element14 Community
element14 Community
    Register Log In
  • Site
  • Search
  • Log In Register
  • About Us
  • Community Hub
    Community Hub
    • What's New on element14
    • Feedback and Support
    • Benefits of Membership
    • Personal Blogs
    • Members Area
    • Achievement Levels
  • Learn
    Learn
    • Ask an Expert
    • eBooks
    • element14 presents
    • Learning Center
    • Tech Spotlight
    • STEM Academy
    • Webinars, Training and Events
    • Learning Groups
  • Technologies
    Technologies
    • 3D Printing
    • FPGA
    • Industrial Automation
    • Internet of Things
    • Power & Energy
    • Sensors
    • Technology Groups
  • Challenges & Projects
    Challenges & Projects
    • Design Challenges
    • element14 presents Projects
    • Project14
    • Arduino Projects
    • Raspberry Pi Projects
    • Project Groups
  • Products
    Products
    • Arduino
    • Avnet Boards Community
    • Dev Tools
    • Manufacturers
    • Multicomp Pro
    • Product Groups
    • Raspberry Pi
    • RoadTests & Reviews
  • Store
    Store
    • Visit Your Store
    • Choose another store...
      • Europe
      •  Austria (German)
      •  Belgium (Dutch, French)
      •  Bulgaria (Bulgarian)
      •  Czech Republic (Czech)
      •  Denmark (Danish)
      •  Estonia (Estonian)
      •  Finland (Finnish)
      •  France (French)
      •  Germany (German)
      •  Hungary (Hungarian)
      •  Ireland
      •  Israel
      •  Italy (Italian)
      •  Latvia (Latvian)
      •  
      •  Lithuania (Lithuanian)
      •  Netherlands (Dutch)
      •  Norway (Norwegian)
      •  Poland (Polish)
      •  Portugal (Portuguese)
      •  Romania (Romanian)
      •  Russia (Russian)
      •  Slovakia (Slovak)
      •  Slovenia (Slovenian)
      •  Spain (Spanish)
      •  Sweden (Swedish)
      •  Switzerland(German, French)
      •  Turkey (Turkish)
      •  United Kingdom
      • Asia Pacific
      •  Australia
      •  China
      •  Hong Kong
      •  India
      •  Korea (Korean)
      •  Malaysia
      •  New Zealand
      •  Philippines
      •  Singapore
      •  Taiwan
      •  Thailand (Thai)
      • Americas
      •  Brazil (Portuguese)
      •  Canada
      •  Mexico (Spanish)
      •  United States
      Can't find the country/region you're looking for? Visit our export site or find a local distributor.
  • Translate
  • Profile
  • Settings
Essentials
  • Learn
  • Learning Center
  • Essentials
  • More
  • Cancel
Essentials
Forum Experimenting with Op Amps: active full-wave rectifier
  • Forum
  • Documents
  • Polls
  • Files
  • Members
  • Mentions
  • Sub-Groups
  • Tags
  • More
  • Cancel
  • New
Join Essentials to participate - click to join for free!
Actions
  • Share
  • More
  • Cancel
Forum Thread Details
  • Replies 21 replies
  • Subscribers 1011 subscribers
  • Views 7955 views
  • Users 0 members are here
  • opamp
  • analogue
  • analog
Related

Experimenting with Op Amps: active full-wave rectifier

Jan Cumps
Jan Cumps over 2 years ago

The Art Of Electronics features a set of practical op-amp circuits. They have several full-wave rectifiers. I'm trying the simplest one. You don't need fancy devices. A pair of 741s will do.
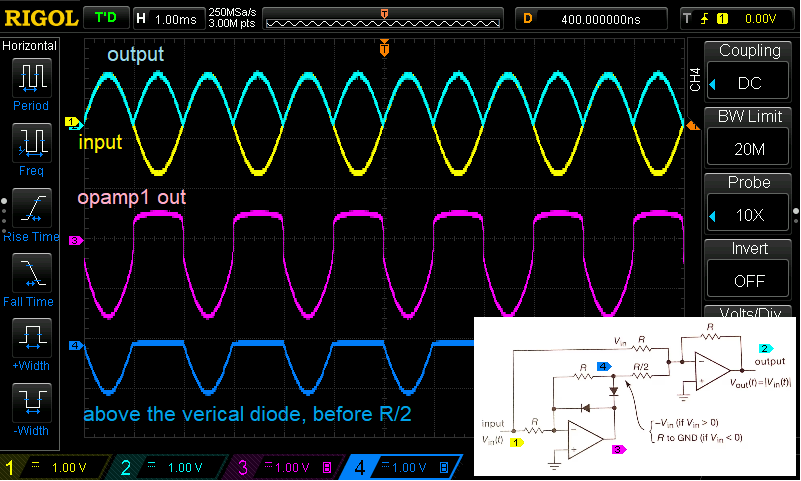
The circuit:

image
image source: my copy of the book. fair use.

Looking at the node where the arrow points to:

  • for positive values, the first op-amp is an inverting buffer.
  • for negative values, the op-amp output has a  0.6V dc bias, the right side of  the feedback resistor will be at 0 V (ground). 
    hint: the 0.6 V output is generated by the op-amp to drive the inverting input to the same value as the + input (ground), effectively clamping the output to 1 diode drop above ground.

image

Looking at the second op-amp:

  • it is an op-amp with a summing node. Two signals at the inverting input are summed and inverted. The amplification factor is defined by the input resistor and the feedback resistor.
  • for the input signal, the amplification = -1 * R/R = -1 (the input resistance equals the feedback resistance, resulting in the -1 amplification factor, doubling and inverting the signal)
  • for the signal coming from op-amp 1, the amplification = -1 * R / (R/2) = -2 (the input resistance is half the feedback resistance, resulting in the -2 amplification factor)
  • it is an inverting amplifier for the input. Both positive and negative signals are amplified by -1.
  • for the signal coming from the first op-amp, it acts as a -2 amplifier.
  • for positive inputs, this results in  Vin * -1 + Vin * -1 * -2 = -Vin + 2Vin = Vin ->  result: Vin, positive Vin comes out as positive Vin (see comment)
  • for negative inputs, this results in Vin * -1 (making Vin positive)  + Vin * 0 * -1 -> result -Vin: negative Vin comes out as positive Vin

image

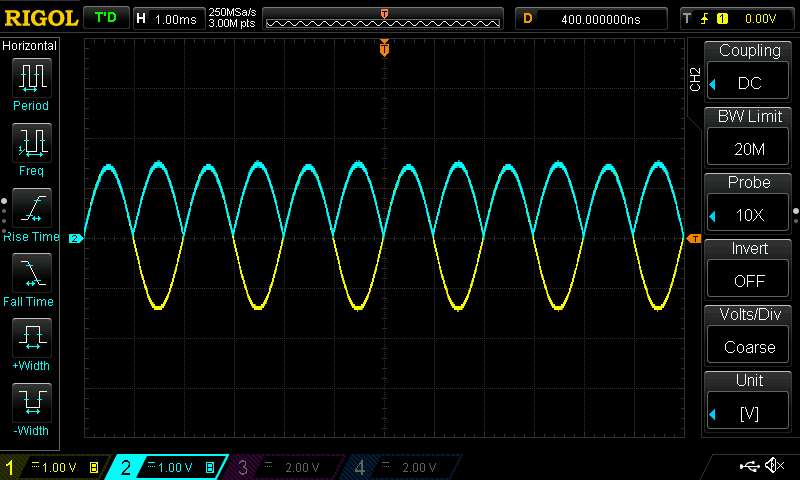
Here is the result: The blue line is the output. Underneath it, you see the input. The output overlaps the input for the positive part. It inverses the negative part. No diode drop.

image

  • Sign in to reply
  • Cancel

Top Replies

  • Jan Cumps
    Jan Cumps over 2 years ago +5
    If you are puzzled by the circuit, there is a way to understand it: Build the first op-amp circuit and feed a sinus into it. Try it with and without the vertical diode. Try to understand why it is…
  • anniel747
    anniel747 over 2 years ago in reply to Jan Cumps +4
    Deleted
  • javagoza
    javagoza over 2 years ago in reply to anniel747 +4
  • genebren
    genebren over 2 years ago

    Very cool!

    • Cancel
    • Vote Up +1 Vote Down
    • Sign in to reply
    • Cancel
  • strb
    strb over 2 years ago

    I love this kind of circuits and experimenting.
    I didn't know this circuit topology, and you explained it very well. Nicely done.

    • Cancel
    • Vote Up +1 Vote Down
    • Sign in to reply
    • Cancel
  • Jan Cumps
    Jan Cumps over 2 years ago

    If you are puzzled by the circuit, there is a way to understand it:

    Build the first op-amp circuit and feed a sinus into it. Try it with and without the vertical diode. 
    Try to understand why it is a perfect inverting amplifier for positive signals
    Try to see why, without the vertical diode (bridge it), it blocks the negative signals (amplification factor of 0), but has a diode drop offset for those negative signals.
    Try to understand why the 2-diodes setup offsets the 0.7 V diode drop

    Build the second op-amp circuit by itself, without connecting the first op-amp's output via the R/2 resistor
    See that it is a perfect inverter for the input signal, because the input resistor equals the feedback resistor.
    That is because this circuit is an inverting amp with input resistance equal to feedback resistance. That results in a -1 amplification

    Now disconnect the input signal from the 2nd op-amp, but put the R/2 resistor in place. See that the 2nd op-amp output signal is the inverse of the 1st op-amps output, doubled, and inverted. That is because this is an inverting amp with input resistance half of feedback resistance. That results in a -2 amplification. 

    Now try to imagine the result. It is pure maths. A + B. It will help if you draw the two distinct signals underneath each other - using the same scale. Then draw a third signal underneath it, that is the sum of both signals.
    You 'll see that the positive signal is always added with 0. That makes it unchanged.
    The negative is added with its inverse doubled signal. That turns it into its positive self.

    In the end, this is a mathematical circuit, that adds 0 to positive signals. And (itself times -2) to negative signals; In both cases, the result is the absolute value of the input. And that is what a rectifier does: turn each input into its absolute value.
    examples:
    +3 + 0 = +3. The absolute value of 3.
    -3 + (-3 * -2) = -3 +6 = 3. The absolute value of -3. 

    Building it with op-amps is the fun exercise. You don't really need a signal generator, because the circuit works for DC signals too.
    LTSpice is a great alternative. This circuit is perfectly suited for simulation.

    • Cancel
    • Vote Up +5 Vote Down
    • Sign in to reply
    • Cancel
  • genebren
    genebren over 2 years ago in reply to Jan Cumps

    Great explanation!  I must admit that I could not quite grasp all of that from the schematic.  Your step-by-step analysis was very helpful.

    • Cancel
    • Vote Up +1 Vote Down
    • Sign in to reply
    • Cancel
  • flyingbean
    flyingbean over 2 years ago

    Great blog. I just finished TI precision lab: OPAMP training. Your blog just reinforced what I learned last week. 

    • Cancel
    • Vote Up 0 Vote Down
    • Sign in to reply
    • Cancel
  • michaelkellett
    michaelkellett over 2 years ago

    It's a useful circuit that I used a lot in the 70s and 80s. I was wondering why I use it  a lot less now - and the answer is that I am much more likely to feed signals straight into a fast ADC in a micro and do the rectification in maths.

    I first saw this circuit in the National Semiconductors Linear Applications book (1972). This was where I learned about Op Amps in my (distant) youth. It's a great collection of Op Amp circuits.

    Just for fun try scoping the output of A1 and high frequencies and with a low amplitude signal - you might not be so happy with the 741 !

    MK

    • Cancel
    • Vote Up +2 Vote Down
    • Sign in to reply
    • Cancel
  • Jan Cumps
    Jan Cumps over 2 years ago in reply to michaelkellett
    michaelkellett said:
    Just for fun try scoping the output of A1 and high frequencies and with a low amplitude signal - you might not be so happy with the 741 !

    I definitely did not select a top op-amp   -  and the breadboard will not make it any better either.

    I'll take some measurements this afternoon. Maybe also take scope captures of the separate circuits, and some dc data points

    • Cancel
    • Vote Up 0 Vote Down
    • Sign in to reply
    • Cancel
  • Jan Cumps
    Jan Cumps over 2 years ago

    A few more test points:

    image

    Input signal for this measurement is a 2 Vpp sine, 500 Hz.

    power supply: +- 11 V dc

    • Cancel
    • Vote Up +1 Vote Down
    • Sign in to reply
    • Cancel
  • Jan Cumps
    Jan Cumps over 2 years ago

    Measurements when the input is  -6 V dc.

    image

    You can see here that for negative inputs, the op-amp generates 0.6 V dc output to try and keep the - input at ground level (same level as + input).
    It generates just enough so that the output - the horizontal diode drop brings the input to ground.
    The vertical diode will not conduct in this scenario. To the circuit it looks as if it isn't there. This brings the node left of the 5K to 0 V (ground) 

    The second op-amp, the inverting summing amp, has different gain for both inputs. The gain = -(Rfeedback / Rin)
    For the original -6 V input, with gain -1 (-10K/10K), we'd get +6 V output.
    For the 0 V signal coming from the first circuit, with gain -2 (-10K/5K), we'd get 0V output
    Summed up, this is +6 V output.

    • Cancel
    • Vote Up +1 Vote Down
    • Sign in to reply
    • Cancel
  • Jan Cumps
    Jan Cumps over 2 years ago in reply to michaelkellett
    michaelkellett said:
    National Semiconductors Linear Applications book (1972)

    https://archive.org/details/bitsavers_nationaldaLinearApplicationsHandbook_19605588/page/n97/mode/2up?view=theater

    page 98

    • Cancel
    • Vote Up +1 Vote Down
    • Sign in to reply
    • Cancel
>
element14 Community

element14 is the first online community specifically for engineers. Connect with your peers and get expert answers to your questions.

  • Members
  • Learn
  • Technologies
  • Challenges & Projects
  • Products
  • Store
  • About Us
  • Feedback & Support
  • FAQs
  • Terms of Use
  • Privacy Policy
  • Legal and Copyright Notices
  • Sitemap
  • Cookies

An Avnet Company © 2025 Premier Farnell Limited. All Rights Reserved.

Premier Farnell Ltd, registered in England and Wales (no 00876412), registered office: Farnell House, Forge Lane, Leeds LS12 2NE.

ICP 备案号 10220084.

Follow element14

  • X
  • Facebook
  • linkedin
  • YouTube