element14 Community
element14 Community
    Register Log In
  • Site
  • Search
  • Log In Register
  • About Us
  • Community Hub
    Community Hub
    • What's New on element14
    • Feedback and Support
    • Benefits of Membership
    • Personal Blogs
    • Members Area
    • Achievement Levels
  • Learn
    Learn
    • Ask an Expert
    • eBooks
    • element14 presents
    • Learning Center
    • Tech Spotlight
    • STEM Academy
    • Webinars, Training and Events
    • Learning Groups
  • Technologies
    Technologies
    • 3D Printing
    • FPGA
    • Industrial Automation
    • Internet of Things
    • Power & Energy
    • Sensors
    • Technology Groups
  • Challenges & Projects
    Challenges & Projects
    • Design Challenges
    • element14 presents Projects
    • Project14
    • Arduino Projects
    • Raspberry Pi Projects
    • Project Groups
  • Products
    Products
    • Arduino
    • Avnet Boards Community
    • Dev Tools
    • Manufacturers
    • Multicomp Pro
    • Product Groups
    • Raspberry Pi
    • RoadTests & Reviews
  • Store
    Store
    • Visit Your Store
    • Choose another store...
      • Europe
      •  Austria (German)
      •  Belgium (Dutch, French)
      •  Bulgaria (Bulgarian)
      •  Czech Republic (Czech)
      •  Denmark (Danish)
      •  Estonia (Estonian)
      •  Finland (Finnish)
      •  France (French)
      •  Germany (German)
      •  Hungary (Hungarian)
      •  Ireland
      •  Israel
      •  Italy (Italian)
      •  Latvia (Latvian)
      •  
      •  Lithuania (Lithuanian)
      •  Netherlands (Dutch)
      •  Norway (Norwegian)
      •  Poland (Polish)
      •  Portugal (Portuguese)
      •  Romania (Romanian)
      •  Russia (Russian)
      •  Slovakia (Slovak)
      •  Slovenia (Slovenian)
      •  Spain (Spanish)
      •  Sweden (Swedish)
      •  Switzerland(German, French)
      •  Turkey (Turkish)
      •  United Kingdom
      • Asia Pacific
      •  Australia
      •  China
      •  Hong Kong
      •  India
      •  Korea (Korean)
      •  Malaysia
      •  New Zealand
      •  Philippines
      •  Singapore
      •  Taiwan
      •  Thailand (Thai)
      • Americas
      •  Brazil (Portuguese)
      •  Canada
      •  Mexico (Spanish)
      •  United States
      Can't find the country/region you're looking for? Visit our export site or find a local distributor.
  • Translate
  • Profile
  • Settings
microbit
  • Learn
  • Learning Center
  • STEM Academy
  • microbit
  • More
  • Cancel
microbit
micro:bit Blog 10 BBC micro:bit Projects in 10 Days: Day Four - Camera Time
  • Blog
  • Forum
  • Documents
  • Events
  • Polls
  • Files
  • Members
  • Mentions
  • Sub-Groups
  • Tags
  • More
  • Cancel
  • New
Join microbit to participate - click to join for free!
  • Share
  • More
  • Cancel
Group Actions
  • Group RSS
  • More
  • Cancel
Engagement
  • Author Author: jlucas
  • Date Created: 3 Jun 2016 11:38 AM Date Created
  • Views 5263 views
  • Likes 20 likes
  • Comments 5 comments
  • micro:bit
  • bbc micro:bit
  • microbit
  • beginner micro:bit projects
  • bbc microbit
  • ten bbc micro:bit projects
  • beginner_microbit_projects
  • bbc_micro:bit
  • 10projects10days
Related
Recommended

10 BBC micro:bit Projects in 10 Days: Day Four - Camera Time

jlucas
jlucas
3 Jun 2016

About this project


This project introduces the BBC micro:bit's camera functionality, allowing users to take a timed photo using the device.


What you'll need


1 x BBC micro:bit

1 x Micro USB

1 x Computer or tablet

2 x AAA Batteries & Battery Holder


Project walkthrough


  • Go to the BBC micro:bit website, click 'create code' and begin a new Microsoft Block Editor project.


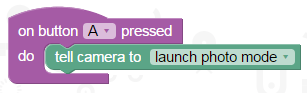
  • Under the left-hand commands menu, click 'Input' and find the 'On button [A] pressed do...' tile.


  • We want to tell the device to take a photograph when the 'A' button is pressed. However, we also want to add in a five second delay to allow us to set up the shot. To enable the camera, select 'Devices' from the left-hand menu, and drag in the tile 'Tell camera to [take photo]. Attach to your 'On button [A] pressed do...' tile, and change [take photo] to [launch photo mode].


image

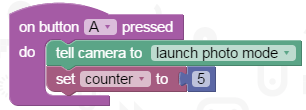
  • To set up a countdown timer, drag in a 'set [item] to tile, and rename [item] to [counter].


  • Attach a number tile from the 'Maths' menu, and set it to [5].


image

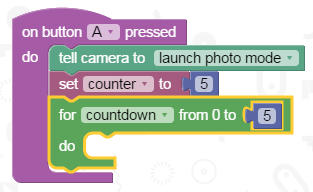
  • Now we need to tell the timer to start counting down when the A button is pressed. This is a slightly different process to the last time we created a countdown timer (see Project Two). First you'll need to bring in a tile entitled 'for [i] from 0 to [4] do...' and attach it to your code. This tile can be found in the loops menu.


  • In this tile, the [i] simply represents the variable being referenced in the code - in this case, the countdown timer. Feel free to change the name to something that makes more sense to you, but don't use 'counter' as we've already used this as a variable in this code. I've used 'Countdown' in this demo. Also, change the [4] to a [5] to bring it in line with your five second countdown timer.


image

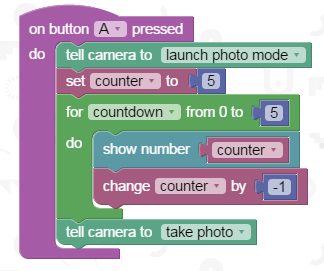
  • Under 'do', drag in a 'show number' tile from the 'Basic' menu, and drag a 'counter' tile from the Variables menu into the input box.


  • Now drag in a 'change [item] by [1]' tile, also from the Variables menu, change [item] to [counter] and change [1] to [-1], to instruct the timer to count backwards from 5.


  • Finally, drag in another 'Tell camera to [take photo]' tile from the devices menu, and attach this at the bottom, as indicated here:


image

  • Now hit 'Run' to test out your script on the emulator. When you push the 'A' button the counter should begin counting down from 5 to 0. At zero, the device should take a photo. Compile your script and transfer it to your BBC micro:bit device to test it out for real. You can access your photos from the BBC micro:bit drive when you attach the device to your computer.


Once students have mastered this project, what else can they do with the BBC micro:bit camera functionality? Encourage them to play around with different commands and techniques, and let us know how they get on in the comments section below...

  • Sign in to reply

Top Comments

  • zenandy
    zenandy over 9 years ago +6
    It would help to specify the requirements for a smartphone here. The Micro:bit doesn't have an onboard camera.
  • shabaz
    shabaz over 9 years ago +3
    It looks like this uses the Bluetooth and BLE capabilities of the micro:bit. I'm no expert, but there are dozens/hundreds? of profiles for doing different things, and one of them is for camera control…
  • volly
    volly over 9 years ago +2
    Like Andy says. Please clarify the fact that the micro:bit does not come with any onboard peripherals like speakers, cameras, etc. It would also be a good thing to add instructions on how exactly to attach…
Parents
  • shabaz
    shabaz over 9 years ago

    It looks like this uses the Bluetooth and BLE capabilities of the micro:bit. I'm no expert, but there are dozens/hundreds? of profiles for doing different things, and one of them is for camera control (requires the camera to also support Bluetooth/BLE).


    Regarding the speaker by the way, for that you can just stick a pair of earphones on the connector (e.g. connector marked '0') on the micro:bit and you'll hear any tones/music notes generated with the micro:bit.

    Ideally you want to connect the shield of the jack plug to the GND connection, but if you're in a hurry (like most schoolkids) then you'll still hear it if you bridge with your fingers and use body conductivity - so no real need for a jack socket or wires.

    • Cancel
    • Vote Up +3 Vote Down
    • Sign in to reply
    • More
    • Cancel
Comment
  • shabaz
    shabaz over 9 years ago

    It looks like this uses the Bluetooth and BLE capabilities of the micro:bit. I'm no expert, but there are dozens/hundreds? of profiles for doing different things, and one of them is for camera control (requires the camera to also support Bluetooth/BLE).


    Regarding the speaker by the way, for that you can just stick a pair of earphones on the connector (e.g. connector marked '0') on the micro:bit and you'll hear any tones/music notes generated with the micro:bit.

    Ideally you want to connect the shield of the jack plug to the GND connection, but if you're in a hurry (like most schoolkids) then you'll still hear it if you bridge with your fingers and use body conductivity - so no real need for a jack socket or wires.

    • Cancel
    • Vote Up +3 Vote Down
    • Sign in to reply
    • More
    • Cancel
Children
No Data
element14 Community

element14 is the first online community specifically for engineers. Connect with your peers and get expert answers to your questions.

  • Members
  • Learn
  • Technologies
  • Challenges & Projects
  • Products
  • Store
  • About Us
  • Feedback & Support
  • FAQs
  • Terms of Use
  • Privacy Policy
  • Legal and Copyright Notices
  • Sitemap
  • Cookies

An Avnet Company © 2025 Premier Farnell Limited. All Rights Reserved.

Premier Farnell Ltd, registered in England and Wales (no 00876412), registered office: Farnell House, Forge Lane, Leeds LS12 2NE.

ICP 备案号 10220084.

Follow element14

  • X
  • Facebook
  • linkedin
  • YouTube