element14 Community
element14 Community
    Register Log In
  • Site
  • Search
  • Log In Register
  • Community Hub
    Community Hub
    • What's New on element14
    • Feedback and Support
    • Benefits of Membership
    • Personal Blogs
    • Members Area
    • Achievement Levels
  • Learn
    Learn
    • Ask an Expert
    • eBooks
    • element14 presents
    • Learning Center
    • Tech Spotlight
    • STEM Academy
    • Webinars, Training and Events
    • Learning Groups
  • Technologies
    Technologies
    • 3D Printing
    • FPGA
    • Industrial Automation
    • Internet of Things
    • Power & Energy
    • Sensors
    • Technology Groups
  • Challenges & Projects
    Challenges & Projects
    • Design Challenges
    • element14 presents Projects
    • Project14
    • Arduino Projects
    • Raspberry Pi Projects
    • Project Groups
  • Products
    Products
    • Arduino
    • Avnet & Tria Boards Community
    • Dev Tools
    • Manufacturers
    • Multicomp Pro
    • Product Groups
    • Raspberry Pi
    • RoadTests & Reviews
  • About Us
  • Store
    Store
    • Visit Your Store
    • Choose another store...
      • Europe
      •  Austria (German)
      •  Belgium (Dutch, French)
      •  Bulgaria (Bulgarian)
      •  Czech Republic (Czech)
      •  Denmark (Danish)
      •  Estonia (Estonian)
      •  Finland (Finnish)
      •  France (French)
      •  Germany (German)
      •  Hungary (Hungarian)
      •  Ireland
      •  Israel
      •  Italy (Italian)
      •  Latvia (Latvian)
      •  
      •  Lithuania (Lithuanian)
      •  Netherlands (Dutch)
      •  Norway (Norwegian)
      •  Poland (Polish)
      •  Portugal (Portuguese)
      •  Romania (Romanian)
      •  Russia (Russian)
      •  Slovakia (Slovak)
      •  Slovenia (Slovenian)
      •  Spain (Spanish)
      •  Sweden (Swedish)
      •  Switzerland(German, French)
      •  Turkey (Turkish)
      •  United Kingdom
      • Asia Pacific
      •  Australia
      •  China
      •  Hong Kong
      •  India
      •  Korea (Korean)
      •  Malaysia
      •  New Zealand
      •  Philippines
      •  Singapore
      •  Taiwan
      •  Thailand (Thai)
      • Americas
      •  Brazil (Portuguese)
      •  Canada
      •  Mexico (Spanish)
      •  United States
      Can't find the country/region you're looking for? Visit our export site or find a local distributor.
  • Translate
  • Profile
  • Settings
Personal Blogs
  • Community Hub
  • More
Personal Blogs
Legacy Personal Blogs Hercules TMS570LC43x LaunchPad: Starting with an ADC Project
  • Blog
  • Documents
  • Mentions
  • Sub-Groups
  • Tags
  • More
  • Cancel
  • New
  • Share
  • More
  • Cancel
Group Actions
  • Group RSS
  • More
  • Cancel
Engagement
  • Author Author: Jan Cumps
  • Date Created: 11 Jun 2015 11:32 AM Date Created
  • Views 5124 views
  • Likes 2 likes
  • Comments 6 comments
  • tms570lc43x
  • texas_instruments
  • hercules
  • launchpad
  • feature_tutorial
Related
Recommended

Hercules TMS570LC43x LaunchPad: Starting with an ADC Project

Jan Cumps
Jan Cumps
11 Jun 2015

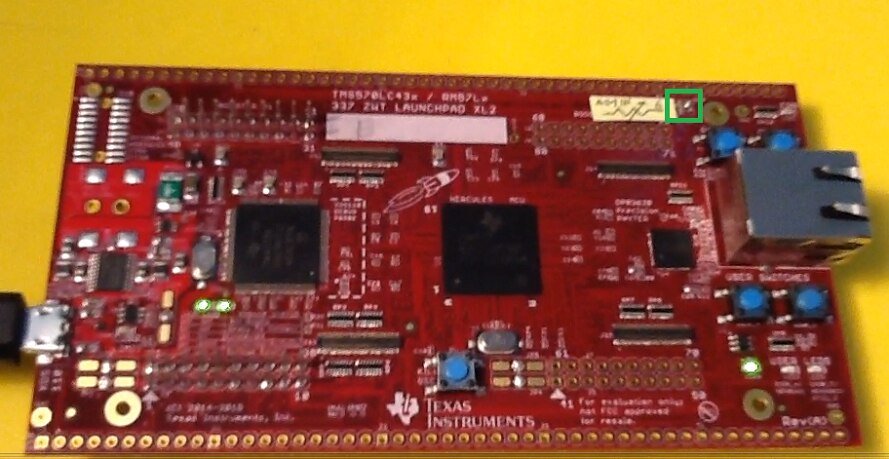
I have the new Texas Instruments Hercules LaunchPad here at home.

It's the LAUNCHXL2-570LC43LAUNCHXL2-570LC43 with a TMS570LC4357 microcontroller.


image


That TMS570LC43, an ARM Cortex R5 that can clock up to a whopping 300MHz (the RM57L843 goes up to 330), is targeted to safety and automotive applications.

All peripherals, the memory and the ARM core are designed with that safety in mind.

The processor is actually a dual ARM R5 core, where core 2 runs in lockstep with core 1.


image


By comparing the state of both cores at each clock cycle, inconsistencies in the controller can be detected in the hardware, without impacting performance.

If you are into design for safety, it's worth checking out all the measures that are taken in this chip to validate safe operations,
how to recover/correct where possible and fail safely when needed.


In this post, I'm creating an ADC project for the LaunchPad. I'm only using on board components. It's a good project when you are taking your first steps with the Hercules series.


ADC  sampling with the TMS507LC43/RM57L


Based on the Project0 for TMS570LS04

http://www.ti.com/ww/en/launchpad/dl/Hercules_LaunchPad_Proj0.pdf


Configure the microcontroller in HALCoGen
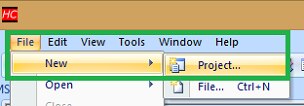
 

Create new project

File -> New -> Project

image


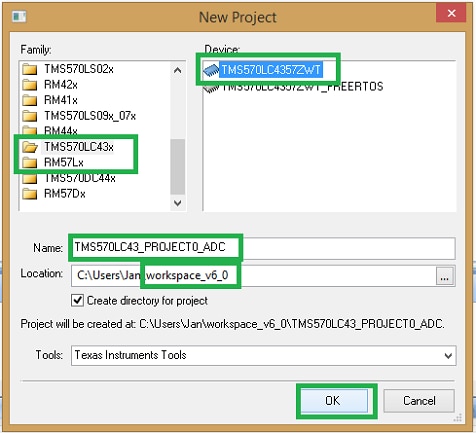
Select Device TMS570LC4357ZWT or RM57L843ZWT

When naming the project, take care to use the same name later in CCS, and check that the location is your CCS working directory.
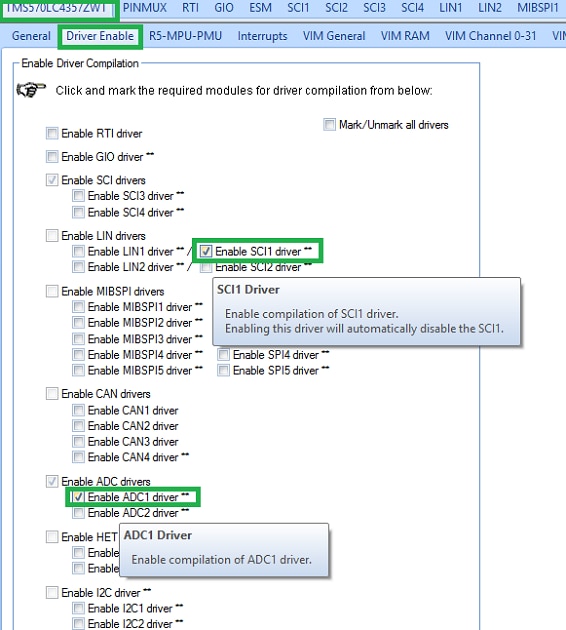
 

image


Enable Drivers

In the Driver Enable tab, select SCI1 and ADC1

SCI1 will be used to do serial communication over the USB COM port.

The potentiometer is connected to ADC1.


image


Configure SCI1

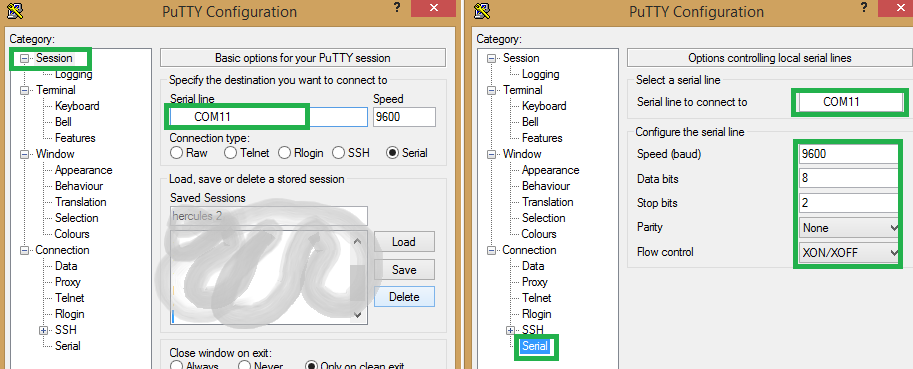
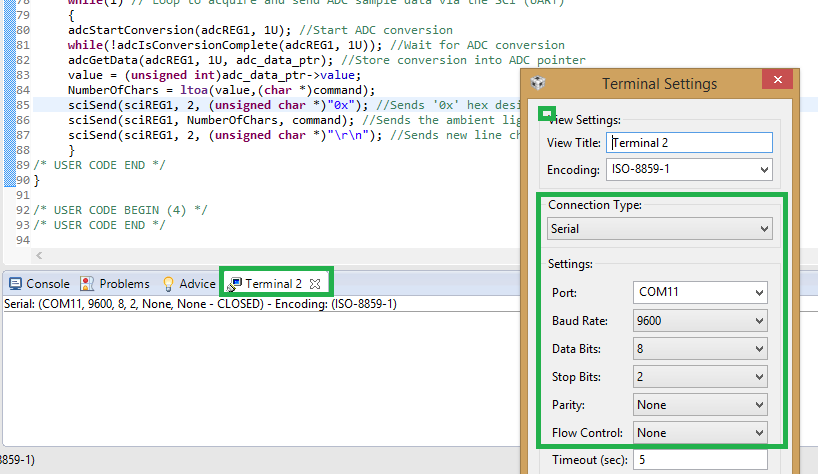
In the SCI1 - SCI Data Format tab, validate that the baud rate  is 9600, with 8 bits length and 2 stop bits


image


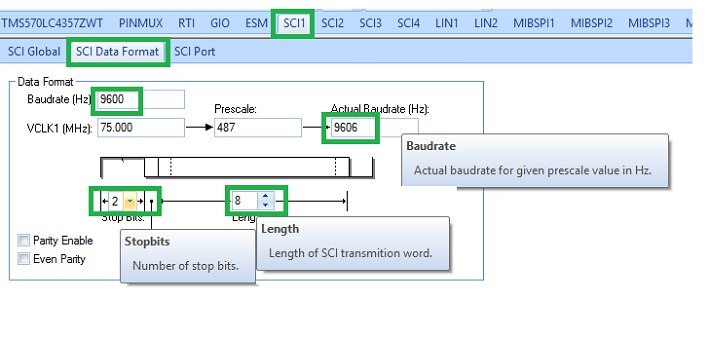
Use the same settings later in your terminal program to monitor the output.
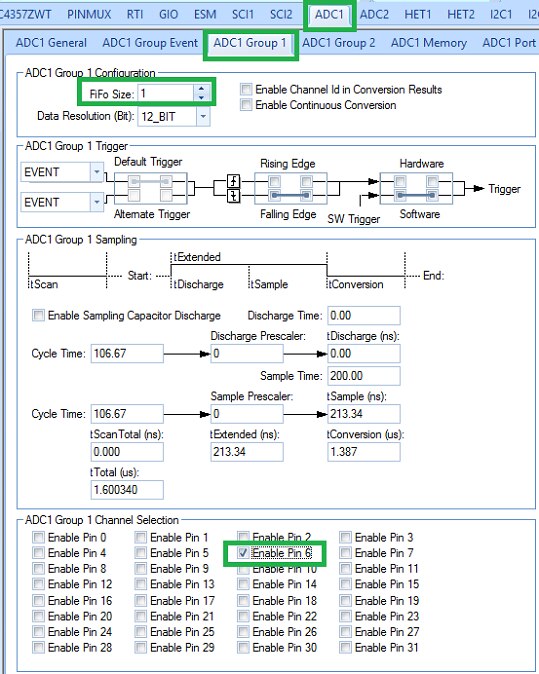
 

Configure ADC1

Set FiFo Size to 1, and enable pin 6 (that's the AD1IN_6 input that we're sampling.


image


Generate the Code

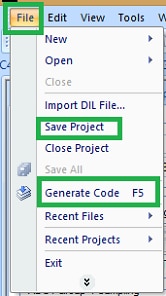
All configuration is coomplete. Save the project  and generate the code.

File -> Save Project

File -> Generate Code


image


Write your Program in Code Composer Studio
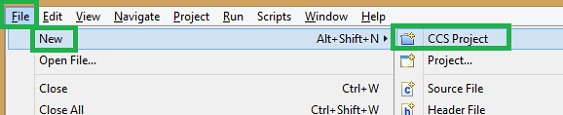
 

Create new project

File -> New -> CCS Project


image


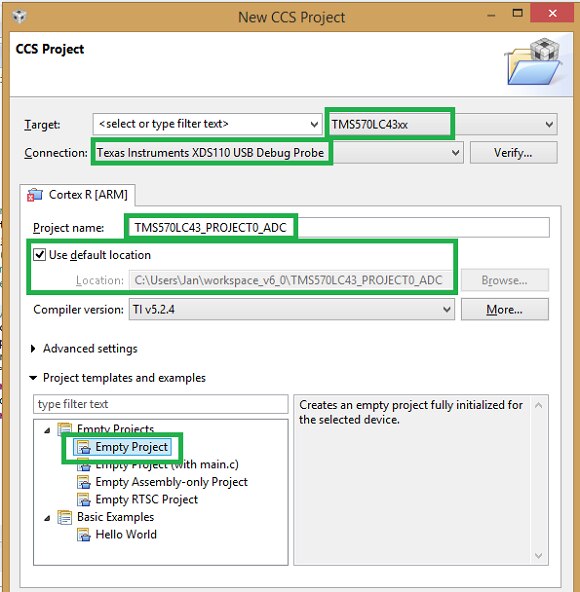
Select TMS570LC43xx or RM57L8xx as target.

Use the XDS110 debugger.

Check that the location is the same directory that was used in HALCoGen above.

Choose Empty Project. HALCoGen has already created all source files we need.


image


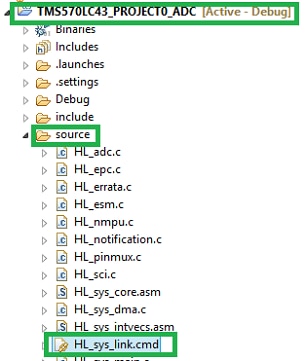
for HALCoGen Versions older than June 2015 only

replace the source/HL_sys_link.cmd file generated by HALCoGen by the one from this url:

http://processors.wiki.ti.com/index.php/LAUNCHXL2-570LC43-RM57L:_LinkerECCRecommendation or check Hercules Microcontroller: Correctly create and load Firmware with Error Checking and Correction (TMS570LC43 and RM57 specific)


image


Set the Project Properties

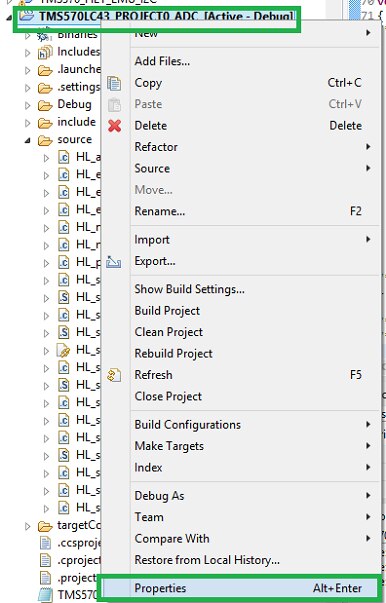
Right click on your project, and select Properies

image


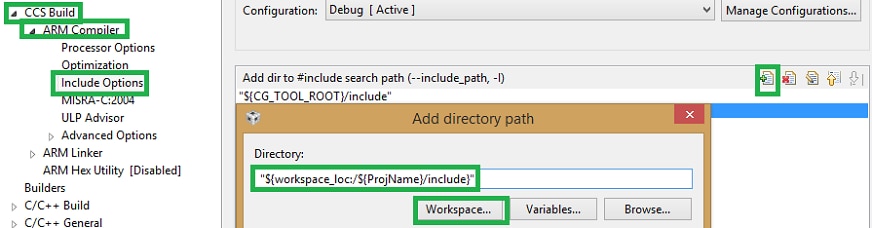
Add the HALCoGen generated include files to the project include path.


image


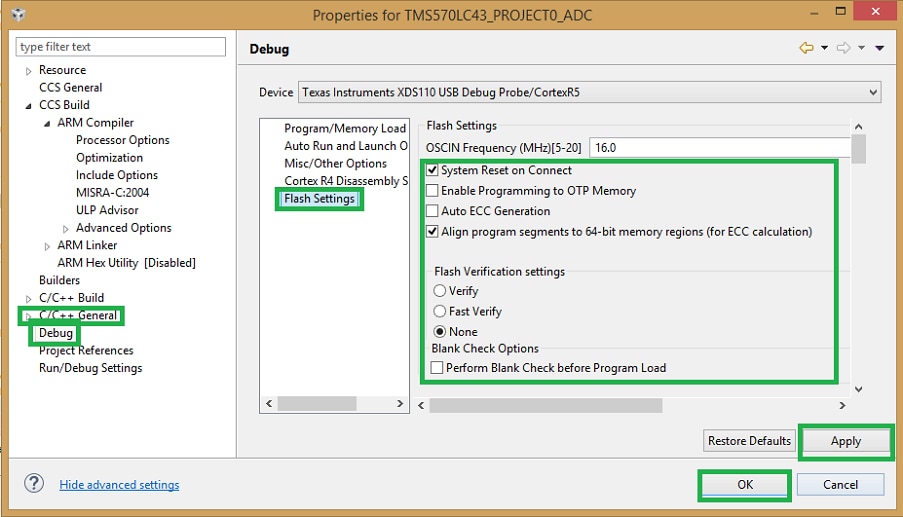
Set the Debug Flash options as documented on the url above.


image


Add the Logic to the Main File

Edit the HL_sys_main.c file.

Add these lines between /* USER CODE BEGIN (0) */ and /* USER CODE END */


/* USER CODE BEGIN (0) */
#include "HL_sci.h"
#include "HL_adc.h"
#include "stdlib.h"
unsigned char command[8];
/* USER CODE END */


Add these lines between /* USER CODE BEGIN (3) */ and /* USER CODE END */


/* USER CODE BEGIN (3) */
    adcData_t adc_data; //ADC Data Structure
    adcData_t *adc_data_ptr = &adc_data; //ADC Data Pointer
    unsigned int NumberOfChars, value; //Declare variables
    sciInit(); //Initializes the SCI (UART) module
    adcInit(); //Initializes the ADC module
    while(1) // Loop to acquire and send ADC sample data via the SCI (UART)
    {
    adcStartConversion(adcREG1, 1U); //Start ADC conversion
    while(!adcIsConversionComplete(adcREG1, 1U)); //Wait for ADC conversion
    adcGetData(adcREG1, 1U, adc_data_ptr); //Store conversion into ADC pointer
    value = (unsigned int)adc_data_ptr->value;
    NumberOfChars = ltoa(value,(char *)command);
    sciSend(sciREG1, 2, (unsigned char *)"0x"); //Sends '0x' hex designation chars
    sciSend(sciREG1, NumberOfChars, command); //Sends the ambient light sensor data
    sciSend(sciREG1, 2, (unsigned char *)"\r\n"); //Sends new line character
    }
/* USER CODE END */


Build and Debug your Project


image


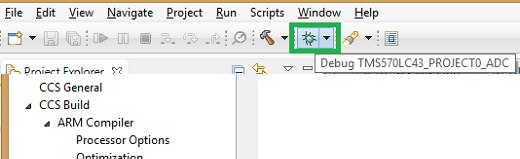
You can do this in a single step by pushing the Debug icon. If you prefer, you can first use the Build icon next to it.

Your LaunchPad has to be connected via USB before you click Debug.

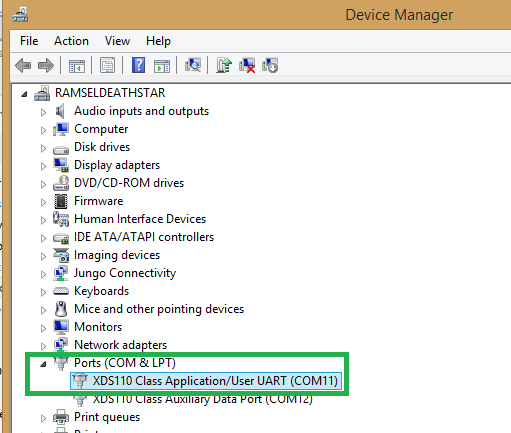
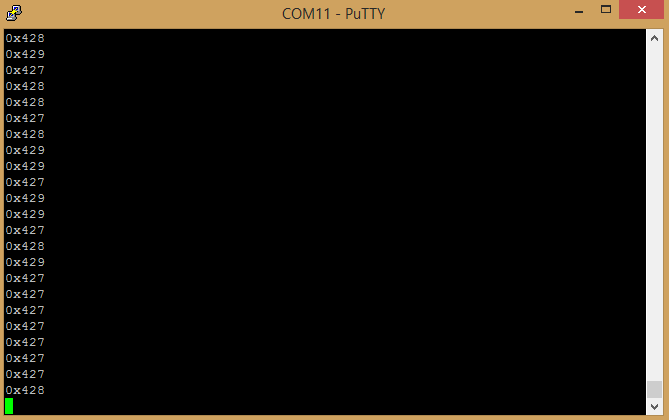
You can now Resume the program and connect a Serial Terminal program to the LaunchPad's COM port.

The terminal will show the measured values. Turn the potentiometer and see how the measurements change.


image


Most Terminal programs with Serial Interface will do.

You'l need to know the COM port of the LaunchPad. On Windows, that's available via the Device Manager.


image


For PuTTY, you can set the following


image

image


If you're using the Eclipse Terminal window, use these settings:


image


image

  • Sign in to reply

Top Comments

  • Jan Cumps
    Jan Cumps over 10 years ago in reply to DAB +2
    Documenting took way longer than programming (the story of my life)
  • DAB
    DAB over 10 years ago +1
    Nice detailed post. DAB
  • martinvalencia
    martinvalencia over 10 years ago in reply to Jan Cumps +1
    Spanish: Muchas gracias amigo, muchos de los latinoamericanos interesados en este nuevo microcontrolador te lo agradecemos, tengo dos amigos de Guatemala que realmente apreciaran el tiempo que te tomo…
  • terabyte21
    terabyte21 over 10 years ago

    Thank you Jan Cumps, great post

    • Cancel
    • Vote Up +1 Vote Down
    • Sign in to reply
    • More
    • Cancel
  • Jan Cumps
    Jan Cumps over 10 years ago in reply to michaelkellett

    Hi MK,

    I'm not going into discussions on using tools or not. The internet is full of that.


    HALCoGen is free for download. You can download it, replicate my project and look at the generated code.


    Regards,

    • Cancel
    • Vote Up 0 Vote Down
    • Sign in to reply
    • More
    • Cancel
  • michaelkellett
    michaelkellett over 10 years ago in reply to Jan Cumps

    I see that you have done this the TI way making use of all the library and code generating thingies.

    I worry a lot about this technique which is being pushed very hard by several processor and tool vendors. I use the Keil/ARM toolset and mainly ST processors and a  similar but completely incompatible workflow is promoted (based on CMSIS which is a free to use standard and sort of supported by several processor vendors.) The problems start when it doesn't quite work, or quite do what you want or, worst, they move on to version N and you can no longer maintain projects built with earlier versions. One HUGE issue is the difficulty of encapsulating ALL the code in your project so that it can be archived - increasingly the only way is to do development in virtual machines and archive the whole thing  - which is a pain  (to put it mildly).

    Can you post a bit of the code generated by the tool, for example what actually happens when you call sciSend(), and comment on where the tool appears to keep code (does it have an archive method ?).


    Thanks for the blog.


    MK

    • Cancel
    • Vote Up +1 Vote Down
    • Sign in to reply
    • More
    • Cancel
  • martinvalencia
    martinvalencia over 10 years ago in reply to Jan Cumps

    Spanish:


    Muchas gracias amigo, muchos de los latinoamericanos interesados en este nuevo microcontrolador te lo agradecemos, tengo dos amigos de Guatemala que realmente apreciaran el tiempo que te tomo armar este foro, saludos amigo!


    Inglish:


    Thank you very much friend, a lot of Latinoamerican is interested in this new microcontroller, so we thank you, I have two friends from Guatemala who really appreciate the time it took you to build this forum, greetings friend!

    • Cancel
    • Vote Up +1 Vote Down
    • Sign in to reply
    • More
    • Cancel
  • Jan Cumps
    Jan Cumps over 10 years ago in reply to DAB

    Documenting took way longer than programming image


    (the story of my life)

    • Cancel
    • Vote Up +2 Vote Down
    • Sign in to reply
    • More
    • Cancel
>
element14 Community

element14 is the first online community specifically for engineers. Connect with your peers and get expert answers to your questions.

  • Members
  • Learn
  • Technologies
  • Challenges & Projects
  • Products
  • Store
  • About Us
  • Feedback & Support
  • FAQs
  • Terms of Use
  • Privacy Policy
  • Legal and Copyright Notices
  • Sitemap
  • Cookies

An Avnet Company © 2025 Premier Farnell Limited. All Rights Reserved.

Premier Farnell Ltd, registered in England and Wales (no 00876412), registered office: Farnell House, Forge Lane, Leeds LS12 2NE.

ICP 备案号 10220084.

Follow element14

  • X
  • Facebook
  • linkedin
  • YouTube