Introduction
This post is continuing the series on creating a control board for an electronic load. Having created a prototype board to test various configurations of features, described in this post, I have spent some time evaluating the Power section with the aim of minimising output ripple and noise on the power lines. One aspect of this is to try and understand more about ripple and noise as I find it a bit of a head-scratcher - a lot of information on this topic is maths and concept heavy which I struggle with so I'm hoping that experimenting will help.
TL;DR;
I have taken a number of pre- and post-change measurements to see the impact of those changes and see how much I can attenuate ripple and noise. Within the scope of my knowledge, I've been reasonably successful. The 12Vout power still has a sizeable amount of ripple and noise but this line is only to drive a fan so I'm not too concerned about it. The post is mostly images.
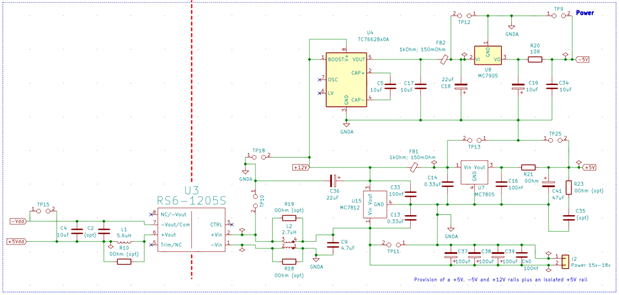
Power Section Circuit
(See this post for the full circuit.)
This is intended to provide the following power rails:
- +15Vin: to drive the power section.
- +5V: to power DACs, ADCs and other ICs
- -5V: to provide a -ve source for Op Amps to enable rail-to-rail operation down to 0V
- +12V: to provide a source to drive a fan. It also provides a source for the +5V regulator and the DC-DC charge pump which inverts it for driving the -5V regulator
- +5Vdd: to provide an isolated +5V source to drive a microcontroller and signal isolation ICs. This is generated from a DC-DC isolating convertor.
The critical power rails are the +5V and -5V which drive the sensitive ICs.
Measurements
I'm taking 'before' and 'after' measurements to compare against changes I make. As I haven't populated the downstream components, I have provided a load as follows:
- A measured 285Ohm resistor soldered across TP9 for the -5Vout
- A measured 317Ohm resistor soldered across TP25 for the +5Vout
- A 4Duino attached to the board driven by the +5Vdd output.
In the notes below, I don't comment on everything I tried, just what I ended up with.
Ripple and noise are load-dependent. That means that what I measure and change in this testing will have to be revisited once I fully populate the other sections of the prototype board.
Before
I wanted to see the impact of adding in the inductor, choke and ferrite beads so the board is populated as follows. All components in place except for:
- L1: NOT populated
- R10: Populated with 0Ohm jumper
- L2: NOT populated
- R18 and R19: Populated with 0Ohm jumper
- FB1 and FB2: Populated with 0Ohm jumper and NOT a ferrite bead
- R22, R23, C34 and C35: Not populated
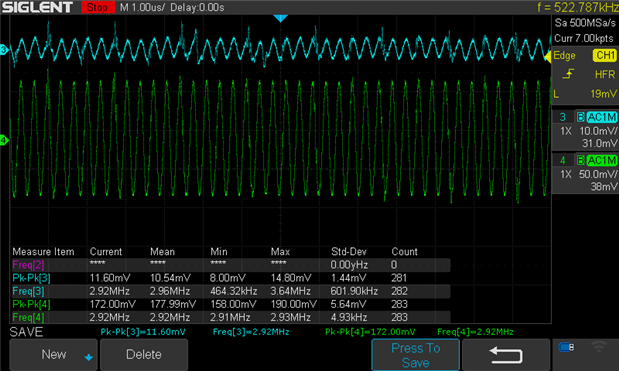
Image 1:
Ch1: +15Vin
Ch2: +12Vout
I'm driving the board with a relatively cheap 15V 1.2A switching supply. Nominally, it has a 150mVpp specification but that's under a very specific condition. Here, it's not too bad at 87mV. I should have expanded the 12V signal to better see it but the measurement is showing quite a range on the ripple.
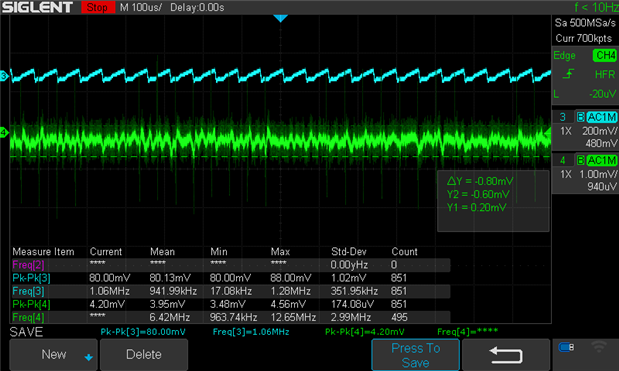
Image 2:
Ch3: +5Vout
Ch4: -5Vout
The +5Vout is picking up what I assume is switching noise propagated through the 12V regulator but has attenuated the ripple considerably. The -5Vout is a disaster and, in actual fact, is worse than shown as I mistakenly measured at x1 but left the probe switched at x10 - peak to peak ripple is actually 1.32V. Clearly, something is wrong.
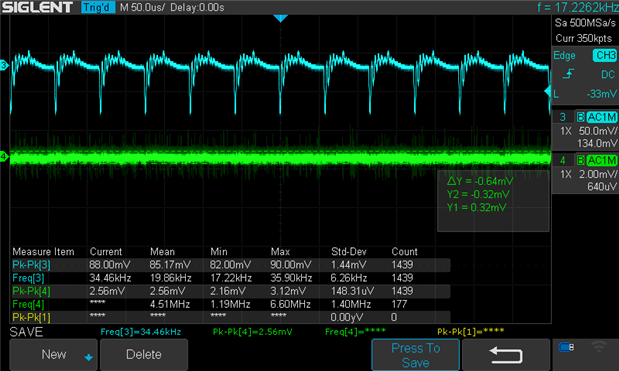
Image 3:
Ch1: +15Vin
Ch4: +5Vdd DC-DC isolator output
Interestingly, the 15Vin measurement is showing noise here which isn't apparent in Image 1. The measurement in this image is taken at TP10, rather than TP11 in image 1 - I wouldn't have thought it made a difference but I suspect here, it's picking up noise from the RS6 DC-DC isolator. As above, I should have expanded the +5Vdd signal but the measurement is showing a consistent 24mV noise range with ringing from the isolator and is in-step with the +15Vin signal.
After
The following measurements are taken once I've made the following changes:
- L1: Populated
- R10: NOT populated
- L2: Populated
- R18 and R19: NOT populated
- FB1 and FB2: Populated with ferrite beads
I also added, off-board, 3x100uF electrolytic capacitors plus a 0.1uF mlcc to the +15Vin line.
Image 4
Ch1: +15Vin
Ch2: Ignore
The additional capacitance doesn't seem to make much of a difference - it's smoothed out the signal rise but the overall peak-peak measurement is worse. Still showing noise.
Image 5
Ch3: +5Vout
Ch4: -5Vout
The board population has had a positive impact on the +5Vout signal although there is still ripple and noise. -5Vout is being measured properly here and shows how bad it actually is compared to image 2. The regulator is oscillating and not at all stable - as discussed in this post.
Image 6
Ch3: Output of the DC-DC inverter
Ch4: -5Vout
The -5Vout signal was oscillating because of an assumption I made regarding the ESR of the output capacitor so I replaced the C19 1uF output mlcc for a 10uF electrolytic capacitor and placed a 22uF electrolytic capacitor in parallel to C18. That has stabilised the output and reduced the ripple down to 800uV with noise peak to peak of 3.95mV (mean.) The 22uF capacitor also had a significant impact on the ripple output from the DC-DC investor which was 320mV peak to peak beforehand (no image in this post.)
Image 7
Ch3: Output of the DC-DC inverter
Ch4: -5Vout
To try and improve this further, I added a 10Ohm/10uF mlcc low pass filter after the -5V regulator (R20 populated with 10Ohm, R22 populated with 10uF and C34 populated with 0Ohm jumper.) I also removed C18 0.33uF capacitor leaving just the 22uF capacitor for input. This has reduced ripple to 680uV and noise peak to peak to 2.83mV (mean). The LPF has reduced the output voltage from -5.011V to -4.85V but given its purpose - the negative input to OpAmps - this is not an issue.
Image 8
Ch3: 12Vout (+5V regulator in)
Ch4: +5Vout
This is a better view of the 12Vout signal which is very noise. The 5V regulator deals with it pretty well giving a ripple of 1.2mV with noise peak to peak of 3.85mV (mean.)
Image 9
Ch3: 12Vout (+5V regulator in)
Ch4: +5Vout
To try and address the 12V regulator output ripple, I added a 22uF electrolytic capacitor in parallel to C33, it's output capacitor. Additionally, I added a 47uF electrolytic capacitor to +5Vout in parallel to C16 (a smaller capacitor made no difference and a larger one made it worse.) This seems to have reduced the ripple to 640uV and noise peak to peak to 2.56mV (mean.)
Image 10
Ch4: +5Vdd DC-DC Isolator output
This is a better view of the output from the RS6 isolator. The overall changes made across the board does seem to have had a positive impact on this signal, presumably because the input signal is cleaner (??) Still noisy though, although the 4Duino doesn't seem to mind. It may be an issue for the I2C and Digital isolators though which I'll discover as I move the prototype forward - initial breadboarding with these components hasn't shown a problem though.
Final Changes
The circuit now looks like this, with the changes highlighted.
Summary
It does feel that I've made a reasonable stab at attenuating ripple and noise on the +5Vout and -5Vout lines, and +5Vdd isn't too bad (certainly, the 4Duino works without issue.) The 7805 and 7905 regulators are not the best (but what I'm used to) and I'm contemplating looking at other regulators such as AD LT1964 and AD ADP3338. I'd need to create another PCB but it may make an interesting comparison!
I've reached the limit of my knowledge but I also wonder if there's more to be gained for the purposes the power lines will be used for - I'm open to opinions and ideas, please comment below!
Further Posts
Creating an Instrument Control Board
Instrument Control Board - Component Selection
Instrument Control Board - Prototyping the Power section (this post)


Top Comments
-

michaelkellett
-
Cancel
-
Vote Up
+5
Vote Down
-
-
Sign in to reply
-
More
-
Cancel
-

Andrew J
in reply to michaelkellett
-
Cancel
-
Vote Up
+3
Vote Down
-
-
Sign in to reply
-
More
-
Cancel
Comment-

Andrew J
in reply to michaelkellett
-
Cancel
-
Vote Up
+3
Vote Down
-
-
Sign in to reply
-
More
-
Cancel
Children