element14 Community
element14 Community
    Register Log In
  • Site
  • Search
  • Log In Register
  • About Us
  • Community Hub
    Community Hub
    • What's New on element14
    • Feedback and Support
    • Benefits of Membership
    • Personal Blogs
    • Members Area
    • Achievement Levels
  • Learn
    Learn
    • Ask an Expert
    • eBooks
    • element14 presents
    • Learning Center
    • Tech Spotlight
    • STEM Academy
    • Webinars, Training and Events
    • Learning Groups
  • Technologies
    Technologies
    • 3D Printing
    • FPGA
    • Industrial Automation
    • Internet of Things
    • Power & Energy
    • Sensors
    • Technology Groups
  • Challenges & Projects
    Challenges & Projects
    • Design Challenges
    • element14 presents Projects
    • Project14
    • Arduino Projects
    • Raspberry Pi Projects
    • Project Groups
  • Products
    Products
    • Arduino
    • Avnet Boards Community
    • Dev Tools
    • Manufacturers
    • Multicomp Pro
    • Product Groups
    • Raspberry Pi
    • RoadTests & Reviews
  • Store
    Store
    • Visit Your Store
    • Choose another store...
      • Europe
      •  Austria (German)
      •  Belgium (Dutch, French)
      •  Bulgaria (Bulgarian)
      •  Czech Republic (Czech)
      •  Denmark (Danish)
      •  Estonia (Estonian)
      •  Finland (Finnish)
      •  France (French)
      •  Germany (German)
      •  Hungary (Hungarian)
      •  Ireland
      •  Israel
      •  Italy (Italian)
      •  Latvia (Latvian)
      •  
      •  Lithuania (Lithuanian)
      •  Netherlands (Dutch)
      •  Norway (Norwegian)
      •  Poland (Polish)
      •  Portugal (Portuguese)
      •  Romania (Romanian)
      •  Russia (Russian)
      •  Slovakia (Slovak)
      •  Slovenia (Slovenian)
      •  Spain (Spanish)
      •  Sweden (Swedish)
      •  Switzerland(German, French)
      •  Turkey (Turkish)
      •  United Kingdom
      • Asia Pacific
      •  Australia
      •  China
      •  Hong Kong
      •  India
      •  Korea (Korean)
      •  Malaysia
      •  New Zealand
      •  Philippines
      •  Singapore
      •  Taiwan
      •  Thailand (Thai)
      • Americas
      •  Brazil (Portuguese)
      •  Canada
      •  Mexico (Spanish)
      •  United States
      Can't find the country/region you're looking for? Visit our export site or find a local distributor.
  • Translate
  • Profile
  • Settings
Arduino Projects
  • Products
  • Arduino
  • Arduino Projects
  • More
  • Cancel
Arduino Projects
Blog Simple thermometer using Arduino Micro and OLED display
  • Blog
  • Documents
  • Events
  • Polls
  • Files
  • Members
  • Mentions
  • Sub-Groups
  • Tags
  • More
  • Cancel
  • New
Join Arduino Projects to participate - click to join for free!
  • Share
  • More
  • Cancel
Group Actions
  • Group RSS
  • More
  • Cancel
Engagement
  • Author Author: fvan
  • Date Created: 4 Jul 2015 11:27 AM Date Created
  • Views 2937 views
  • Likes 9 likes
  • Comments 14 comments
  • oled
  • micro
  • tmp36
  • adafruit
  • arduino
Related
Recommended

Simple thermometer using Arduino Micro and OLED display

fvan
fvan
4 Jul 2015

A colleague recently made an Arduino-based thermometer to measure how hot it gets in the office. I thought I'd recreate and document the project with the components I have at hand image


Circuit


The circuit is based around the TMP36 temperature sensor. It's cheap, easy to use and doesn't require any external calibration. The voltage output is linearly proportional to temperature in degrees Celsius, making the conversion easy to calculate.

Any Arduino or microcontroller having at least one analog input pin can be used to make the reading. Finally, some form of display is required. This could be a 7-segment display, a character LCD or even an OLED display.


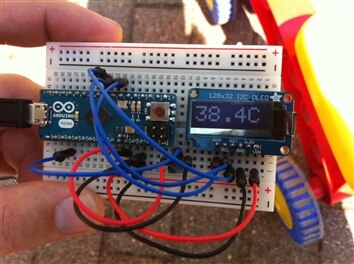
I'll be using an Arduino Micro combined with a small OLED display.


The resulting circuit is the following:

image


Code


The temperature sensor can be used without any additional libraries, the analogRead() function and some math will do the trick.


The OLED display however, requires two libraries:

  • Adafruit GFX: core graphics library
  • Adafruit SSD1306: library for monochrome OLED displays based on SSD1306 drivers


The completed code looks as follows (comments in the code for explanation):


Result


Now I finally know how hot it is in my room ... Outside temperature is not bad either image

imageimage


Extra


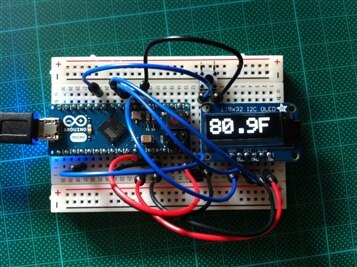
As requested in the comments, I have made an updated version of the above project. It includes a button to toggle between degrees C, F and K.


All temperatures are calculated, and a button connected to an interrupt pin is used to toggle the displayed value.


The updated code:


Some pics:


imageimage

  • Sign in to reply

Top Comments

  • fvan
    fvan over 10 years ago +3
    Added a button linked to an interrupt to toggle the displayed value between degrees C, F and K. Updated the post above
  • Robert Peter Oakes
    Robert Peter Oakes over 10 years ago +2
    Its all in the software so you can have it show in any unuit you prefer, Kelvin anyone
  • Jan Cumps
    Jan Cumps over 10 years ago in reply to clem57 +2
    ... and for doing that in these harsh hot conditions!
  • phil.s
    phil.s over 7 years ago

    Better late than never.

    Very good - for a newcomer to OLEDs, this was just what I was after.

    I am going to fit two of these to a fridge and a freezer. I suspect that the temperature control of the fridge thermostat is  pretty poor with swings between 1-degree C and 10-degrees C.

    This will be the basis of a new fridge thermostat. I was using the TMP36 for the freezer which it's ideal for.

    My setup is 1.3" 128 x 64 OLED from Lamnu (?) on Amazon and has SPI as well as I2C. As reviewers have noted, documentation is next to useless.

    So for I2C, remove the 4K7 SMD resistor marked SPI and short out the I2C pads (not the SPI as well). Subtstitute SD1106 for SSH1306 libraries and change references accordingly.

    On Nano or Uno, use A4 for SDA and A5 for SCL.

    I like the averaging and the fact that I didn't have to code for negative values.

    The only problem I had was with the I2C address - I tried Nick Gammons' address finder sketch, but it couldn't find it. Is this because the SSH1106 chip doesn't support full read/write?

    However, 0x3D worked for the 128 x 64

    Thanks a lot.

    • Cancel
    • Vote Up 0 Vote Down
    • Sign in to reply
    • More
    • Cancel
  • Former Member
    Former Member over 9 years ago in reply to fvan

    Oh right,


    I saw on link you provided me that for Micro board, interrupt 4 is on pin 7.

    Now everything makes sense, because I could not find a link between interrupt pin and button pin.


    Thank you.

    • Cancel
    • Vote Up 0 Vote Down
    • Sign in to reply
    • More
    • Cancel
  • fvan
    fvan over 9 years ago in reply to Former Member

    Trying to remember ...


    I think it just means interrupt 4 is on pin 7. See https://www.arduino.cc/en/Reference/AttachInterrupt  for more info on the interrupt.

    • Cancel
    • Vote Up +1 Vote Down
    • Sign in to reply
    • More
    • Cancel
  • Former Member
    Former Member over 9 years ago

    Hi Frederick,

    first of all thank you for this project, it's perfect for my needs.

    I have one question for 2nd code - with button.

    I'm confused with this line:

    attachInterrupt(4, debounce, FALLING); - instead of 4, do we maybe must use pin 7 for interrupt? If no, can you please explain me then connection between pin7 (button) and pin4.

    Thank you very much.

    P.S. I'm new to this and learning every day...

    • Cancel
    • Vote Up 0 Vote Down
    • Sign in to reply
    • More
    • Cancel
  • Jan Cumps
    Jan Cumps over 10 years ago in reply to clem57

    ... and for doing that in these harsh hot conditions!

    • Cancel
    • Vote Up +2 Vote Down
    • Sign in to reply
    • More
    • Cancel
>
element14 Community

element14 is the first online community specifically for engineers. Connect with your peers and get expert answers to your questions.

  • Members
  • Learn
  • Technologies
  • Challenges & Projects
  • Products
  • Store
  • About Us
  • Feedback & Support
  • FAQs
  • Terms of Use
  • Privacy Policy
  • Legal and Copyright Notices
  • Sitemap
  • Cookies

An Avnet Company © 2025 Premier Farnell Limited. All Rights Reserved.

Premier Farnell Ltd, registered in England and Wales (no 00876412), registered office: Farnell House, Forge Lane, Leeds LS12 2NE.

ICP 备案号 10220084.

Follow element14

  • X
  • Facebook
  • linkedin
  • YouTube