element14 Community
element14 Community
    Register Log In
  • Site
  • Search
  • Log In Register
  • Community Hub
    Community Hub
    • What's New on element14
    • Feedback and Support
    • Benefits of Membership
    • Personal Blogs
    • Members Area
    • Achievement Levels
  • Learn
    Learn
    • Ask an Expert
    • eBooks
    • element14 presents
    • Learning Center
    • Tech Spotlight
    • STEM Academy
    • Webinars, Training and Events
    • Learning Groups
  • Technologies
    Technologies
    • 3D Printing
    • FPGA
    • Industrial Automation
    • Internet of Things
    • Power & Energy
    • Sensors
    • Technology Groups
  • Challenges & Projects
    Challenges & Projects
    • Design Challenges
    • element14 presents Projects
    • Project14
    • Arduino Projects
    • Raspberry Pi Projects
    • Project Groups
  • Products
    Products
    • Arduino
    • Avnet & Tria Boards Community
    • Dev Tools
    • Manufacturers
    • Multicomp Pro
    • Product Groups
    • Raspberry Pi
    • RoadTests & Reviews
  • About Us
    About the element14 Community
  • Store
    Store
    • Visit Your Store
    • Choose another store...
      • Europe
      •  Austria (German)
      •  Belgium (Dutch, French)
      •  Bulgaria (Bulgarian)
      •  Czech Republic (Czech)
      •  Denmark (Danish)
      •  Estonia (Estonian)
      •  Finland (Finnish)
      •  France (French)
      •  Germany (German)
      •  Hungary (Hungarian)
      •  Ireland
      •  Israel
      •  Italy (Italian)
      •  Latvia (Latvian)
      •  
      •  Lithuania (Lithuanian)
      •  Netherlands (Dutch)
      •  Norway (Norwegian)
      •  Poland (Polish)
      •  Portugal (Portuguese)
      •  Romania (Romanian)
      •  Russia (Russian)
      •  Slovakia (Slovak)
      •  Slovenia (Slovenian)
      •  Spain (Spanish)
      •  Sweden (Swedish)
      •  Switzerland(German, French)
      •  Turkey (Turkish)
      •  United Kingdom
      • Asia Pacific
      •  Australia
      •  China
      •  Hong Kong
      •  India
      •  Japan
      •  Korea (Korean)
      •  Malaysia
      •  New Zealand
      •  Philippines
      •  Singapore
      •  Taiwan
      •  Thailand (Thai)
      •  Vietnam
      • Americas
      •  Brazil (Portuguese)
      •  Canada
      •  Mexico (Spanish)
      •  United States
      Can't find the country/region you're looking for? Visit our export site or find a local distributor.
  • Translate
  • Profile
  • Settings
Arduino Projects
  • Products
  • Arduino
  • Arduino Projects
  • More
  • Cancel
Arduino Projects
Blog Simple thermometer using Arduino Micro and OLED display
  • Blog
  • Documents
  • Events
  • Polls
  • Files
  • Members
  • Mentions
  • Sub-Groups
  • More
  • Cancel
  • New
Join Arduino Projects to participate - click to join for free!
  • Share
  • More
  • Cancel
Group Actions
  • Group RSS
  • More
  • Cancel
Engagement
  • Author Author: fvan
  • Date Created: 4 Jul 2015 11:27 AM Date Created
  • Views 3824 views
  • Likes 9 likes
  • Comments 14 comments
  • oled
  • micro
  • tmp36
  • adafruit
  • arduino
Related
Recommended

Simple thermometer using Arduino Micro and OLED display

fvan
fvan
4 Jul 2015

A colleague recently made an Arduino-based thermometer to measure how hot it gets in the office. I thought I'd recreate and document the project with the components I have at hand image


Circuit


The circuit is based around the TMP36 temperature sensor. It's cheap, easy to use and doesn't require any external calibration. The voltage output is linearly proportional to temperature in degrees Celsius, making the conversion easy to calculate.

Any Arduino or microcontroller having at least one analog input pin can be used to make the reading. Finally, some form of display is required. This could be a 7-segment display, a character LCD or even an OLED display.


I'll be using an Arduino Micro combined with a small OLED display.


The resulting circuit is the following:

image


Code


The temperature sensor can be used without any additional libraries, the analogRead() function and some math will do the trick.


The OLED display however, requires two libraries:

  • Adafruit GFX: core graphics library
  • Adafruit SSD1306: library for monochrome OLED displays based on SSD1306 drivers


The completed code looks as follows (comments in the code for explanation):


Result


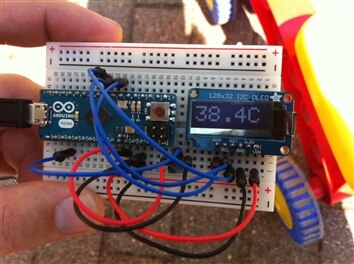
Now I finally know how hot it is in my room ... Outside temperature is not bad either image

imageimage


Extra


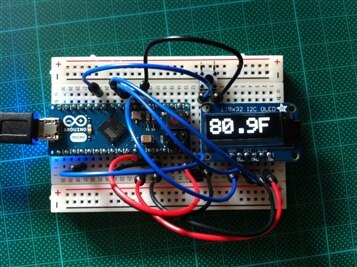
As requested in the comments, I have made an updated version of the above project. It includes a button to toggle between degrees C, F and K.


All temperatures are calculated, and a button connected to an interrupt pin is used to toggle the displayed value.


The updated code:


Some pics:
 

imageimage

  • Sign in to reply

Top Comments

  • fvan
    fvan over 11 years ago +3
    Added a button linked to an interrupt to toggle the displayed value between degrees C, F and K. Updated the post above
  • Robert Peter Oakes
    Robert Peter Oakes over 11 years ago +2
    Its all in the software so you can have it show in any unuit you prefer, Kelvin anyone
  • Jan Cumps
    Jan Cumps over 11 years ago in reply to clem57 +2
    ... and for doing that in these harsh hot conditions!
  • clem57
    clem57 over 11 years ago in reply to fvan

    Thank you for the updated version.

    Clem

    • Cancel
    • Vote Up +1 Vote Down
    • Sign in to reply
    • More
    • Cancel
  • fvan
    fvan over 11 years ago

    Added a button linked to an interrupt to toggle the displayed value between degrees C, F and K. Updated the post above image

    • Cancel
    • Vote Up +3 Vote Down
    • Sign in to reply
    • More
    • Cancel
  • balearicdynamics
    balearicdynamics over 11 years ago

    Hello, the following two sources (sorry but it is impossible to attach) are the temperature class I use on ChipKit PI - that is 100% compatible with Arduino. It makes available the temperature reading in all the known (by me) formats: Fahrenheit, Celsius, Kelving, Rankine. You can use it as a library in the Arduino IDE or include the two files in your own project as well.


    Enrico


    Include file

    /**
    * \file Temperature.h
    * \brief Constants and class prototypes
    */
    
    #ifndef Temperature_h
    #define Temperature_h
    
    #include <inttypes.h>
    
    //! Constant for Kelvin temperature conversion
    #define KELVINC 273
    
    //! Absolute zero value for calculation
    #define ABSOLUTE_ZERO_CELSIUS -273.15
    
    //! Celsius temperature offset. Should be calibrated depending on the
    //! analog reading from the choosen chip. This value is preset for
    //! LM35 temperature sensor.
    #define TEMP_OFFSET 10
    
    //! Analog channel for the temperature sensor
    #define TEMP_SENSOR A1
    
    class Temperature
    {
      public:
        Temperature();
        void CalcTemp(float sensor);
        float Celsius() const;
        float Fahrenheit() const;
        float Kelvin() const;
        float Rankine() const;
      private:
        float _Celsius;
        float _Fahrenheit;
        float _Kelvin;
        float _Rankine;
        float _sensorValue;
    };
    #endif


    Class file

    /**
    * \file Temperature.cpp
    * \brief Class to manage the internal temperature of the devices.
    *
    * The Temperature class acquires data from an LM35 temperature sensor
    *
    */
    #include "Temperature.h"
    
    /**
      * \brief Temperature class constructor. Set the analog pin for data reading
      */
    Temperature::Temperature() {
    }
    
    /**
    * \brief Convert the analog value to the respective value.
    *
    * As the call to the temperature reading is not a high priority task and does
    * not need very high responsivity, when the analog data are read they are immediately
    * converted to the three temperature scales: Celsius, Kelvin and Farehneit.
    */
    void Temperature::CalcTemp(float sensor) {
      _sensorValue = sensor;
      _Celsius = (((_sensorValue / 1024) * 5) * 100) - TEMP_OFFSET; // convert the reading to C
      _Fahrenheit = _Celsius * 1.8 + 32.0; // convert the reading to F
      _Kelvin = _Celsius - ABSOLUTE_ZERO_CELSIUS; // convert the reading to K
      _Rankine = ((_Celsius - ABSOLUTE_ZERO_CELSIUS) * 9) / 5; // convert the reading do R
    }
    
    float Temperature::Celsius() const {
      return(_Celsius);
    }
    
    float Temperature::Fahrenheit() const {
      return(_Fahrenheit);
    }
    
    
    float Temperature::Kelvin() const {
      return(_Kelvin);
    }
    
    
    float Temperature::Rankine() const {
      return(_Rankine);
    }


    Usage

    In the sketch,

    #include "Temperature.h"


    Then create a global library instance

    //! Internal temperature sensor class instance
    Temperature internalTemp;


    When needed (in the setup() or loop() functions) call the temperature reading

    Here I use the TEMP_SENSOR analog pin value, but you can use your own method

      // Read the actual temperature
      internalTemp.CalcTemp(analogRead(TEMP_SENSOR));


    Then everywhere you need you have the converted temperature in all the formats calling the class methods as shown below

    Serial.println(internalTemp.Celsius());
    Serial.println(internalTemp.Fahrenheit());
    Serial.println(internalTemp.Kelvin());
    Serial.println(internalTemp.Rankine());

    • Cancel
    • Vote Up 0 Vote Down
    • Sign in to reply
    • More
    • Cancel
  • fvan
    fvan over 11 years ago in reply to clem57

    Convert the degrees C to F or K, and display, no problem image A push button to switch between the different units sounds fun too!

    • Cancel
    • Vote Up 0 Vote Down
    • Sign in to reply
    • More
    • Cancel
  • clem57
    clem57 over 11 years ago in reply to Robert Peter Oakes

    Robert Peter Oakes that is good for those hotter than (bleep). image

    Clem

    • Cancel
    • Vote Up +1 Vote Down
    • Sign in to reply
    • More
    • Cancel
<>
element14 Community

element14 is the first online community specifically for engineers. Connect with your peers and get expert answers to your questions.

  • Members
  • Learn
  • Technologies
  • Challenges & Projects
  • Products
  • Store
  • About Us
  • Feedback & Support
  • FAQs
  • Terms of Use
  • Privacy Policy
  • Legal and Copyright Notices
  • Sitemap
  • Cookies

An Avnet Company © 2026 Premier Farnell Limited. All Rights Reserved.

Premier Farnell Ltd, registered in England and Wales (no 00876412), registered office: Farnell House, Forge Lane, Leeds LS12 2NE.

Follow element14

  • X
  • Facebook
  • linkedin
  • YouTube