element14 Community
element14 Community
    Register Log In
  • Site
  • Search
  • Log In Register
  • Community Hub
    Community Hub
    • What's New on element14
    • Feedback and Support
    • Benefits of Membership
    • Personal Blogs
    • Members Area
    • Achievement Levels
  • Learn
    Learn
    • Ask an Expert
    • eBooks
    • element14 presents
    • Learning Center
    • Tech Spotlight
    • STEM Academy
    • Webinars, Training and Events
    • Learning Groups
  • Technologies
    Technologies
    • 3D Printing
    • FPGA
    • Industrial Automation
    • Internet of Things
    • Power & Energy
    • Sensors
    • Technology Groups
  • Challenges & Projects
    Challenges & Projects
    • Design Challenges
    • element14 presents Projects
    • Project14
    • Arduino Projects
    • Raspberry Pi Projects
    • Project Groups
  • Products
    Products
    • Arduino
    • Avnet & Tria Boards Community
    • Dev Tools
    • Manufacturers
    • Multicomp Pro
    • Product Groups
    • Raspberry Pi
    • RoadTests & Reviews
  • About Us
    About the element14 Community
  • Store
    Store
    • Visit Your Store
    • Choose another store...
      • Europe
      •  Austria (German)
      •  Belgium (Dutch, French)
      •  Bulgaria (Bulgarian)
      •  Czech Republic (Czech)
      •  Denmark (Danish)
      •  Estonia (Estonian)
      •  Finland (Finnish)
      •  France (French)
      •  Germany (German)
      •  Hungary (Hungarian)
      •  Ireland
      •  Israel
      •  Italy (Italian)
      •  Latvia (Latvian)
      •  
      •  Lithuania (Lithuanian)
      •  Netherlands (Dutch)
      •  Norway (Norwegian)
      •  Poland (Polish)
      •  Portugal (Portuguese)
      •  Romania (Romanian)
      •  Russia (Russian)
      •  Slovakia (Slovak)
      •  Slovenia (Slovenian)
      •  Spain (Spanish)
      •  Sweden (Swedish)
      •  Switzerland(German, French)
      •  Turkey (Turkish)
      •  United Kingdom
      • Asia Pacific
      •  Australia
      •  China
      •  Hong Kong
      •  India
      •  Japan
      •  Korea (Korean)
      •  Malaysia
      •  New Zealand
      •  Philippines
      •  Singapore
      •  Taiwan
      •  Thailand (Thai)
      •  Vietnam
      • Americas
      •  Brazil (Portuguese)
      •  Canada
      •  Mexico (Spanish)
      •  United States
      Can't find the country/region you're looking for? Visit our export site or find a local distributor.
  • Translate
  • Profile
  • Settings
BeagleBoard
  • Products
  • Dev Tools
  • Single-Board Computers
  • BeagleBoard
  • More
  • Cancel
BeagleBoard
Blog BBB - Small OLED Graphic Display
  • Blog
  • Forum
  • Documents
  • Quiz
  • Polls
  • Files
  • Members
  • Mentions
  • Sub-Groups
  • Tags
  • More
  • Cancel
  • New
Join BeagleBoard to participate - click to join for free!
  • Share
  • More
  • Cancel
Group Actions
  • Group RSS
  • More
  • Cancel
Engagement
  • Author Author: shabaz
  • Date Created: 4 Jan 2014 1:31 AM Date Created
  • Views 6552 views
  • Likes 2 likes
  • Comments 37 comments
  • oled
  • lcd
  • beagleboneblack
  • small_oled_displays
  • bbb
  • texas_instruments
  • beagle_bone_black
  • oled_displays
  • ti
Related
Recommended

BBB - Small OLED Graphic Display

shabaz
shabaz
4 Jan 2014

Introduction

There are many compact LCD and OLED displays available, but the documentation tends to be poor. This is just a quick post to record a working configuration (circuit and code) to get a compact OLED display working. A 160x128 OLED display was selected, model DD-160128FC-1A (Farnell code 1498857, also available from Newark). It is a very high quality display.

image

The display is an Organic LED (OLED) type. For interfacing a similar-sized LCD display, see here.

The code that was written is targetted for the BeagleBone Black (BBB) but can be very easily adapted for any platform. For the BBB, it uses an I/O library called iolib (see here for more details) intended for quickly prototyping a solution. The library code is already included in the zip file attached to this post.


The code is prototype level – ideally it would be rewritten to use faster interfaces (e.g. SPI, or PRU processor), but it runs fast enough for many use-cases - with the current code the display update rate is more than sufficient for text information and simple diagrams. Perhaps 30 updates per second are possible with the current code if the entire screen is not being refreshed.


The code has a few graphic commands but not much – it is an easy matter to use one of the many existing third party graphics libraries if anything beyond simple text/graphics is required.

The current code has just these capabilities:

  • Point plotting
  • Line plotting
  • Rectangles (filled, unfilled, bordered)
  • Scalable Text
  • Graphic image read from raw file into RAM
  • Graphic image display from RAM


Display Dimensions and Notes

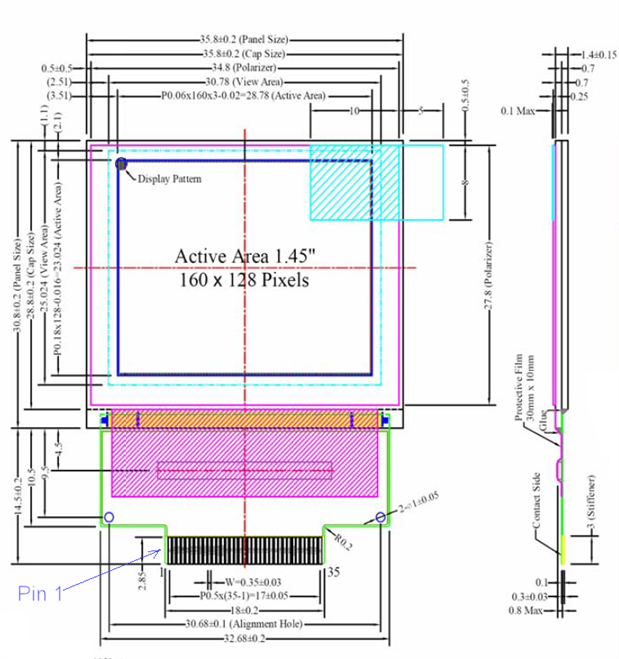
The display has a Densitron code DD-160128FC-1A. The screen has the label “UG-6028GDEAF01” on the rear. A connector by Omron (Omron code XF2M35151A  Farnell code 1112561) should fit.

Shown below is a diagram from the datasheet. The screen is very thin (about 1.5mm). There is an in-built controller (Syncoam SEPS525) located in the hatched purple area. The display is organized such that memory address 0 is top-left (where the round blob is shown) like most displays. Personally I prefer to have the origin at bottom-left, so the code uses that reference point as (0,0) instead of top-left.

image


Example Images

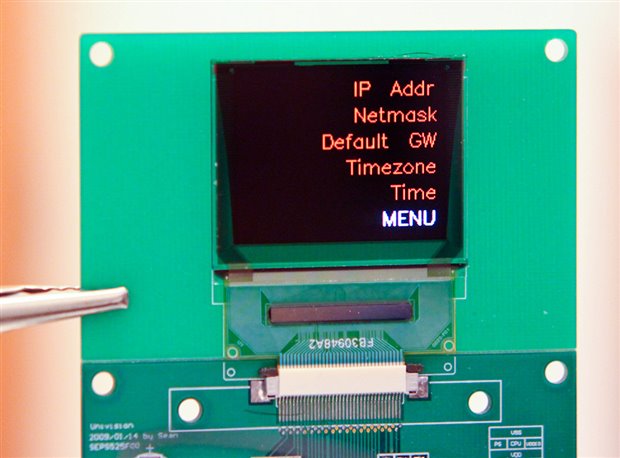
These photos were taken in a brightly lit room. The screen appears bright, sharp and has a more rich/saturated quality than LCD displays:

image


This animated character is drawn at position (0,0), since co-ordinates are taken from bottom-left in the attached code:

image


An example menu. A circuit board could have buttons to the side:

image


Video

Note - The photographs are more representative of what the display looks like in action. The image quality appears extremely bright and sharp when viewed in person – about the same as a mobile phone

The video clip here is only really useful to show the update speeds for the current code. The pulsing/flickering and horizontal banding visible in the video is not apparent in real life.

Click here for the video- having real trouble with it, it is from a camera I don't normally use and the quality is pretty bad - sorry. The final animation is actually quite smooth in real life.


Circuit

There is an optional demo board available, but it is quite basic; it has no active components, it is almost just a breakout board. The demo board was intended to speed development up, but the datasheet slowed things right back down again - the datasheet from Densitron is poor and has many errors (they have taken absolutely no care to review it).

This is the required circuit to get the display working in a serial mode:

image


An appropriate connector shown here (Farnell code 1112561) should be compatible (35 way, 0.5mm pitch) but was not tested.


The display requires a low voltage supply (3.3V max) which matches what the BBB offers. A higher voltage (13V) supply is also required. I didn’t have any appropriate IC over the holiday period, so a Maxim MAX734 was used, with some resistors used to adjust the voltage to 13V. This is not recommended since it is outside the specification of the MAX734, but the circuit is shown below since it worked for the prototype. It is recommended to use a different circuit.

image

Once assembled, the circuit was connected to the BBB as indicated in the schematic. The 0V, +3.3V and +5V supply rails were powered directly from the BeagleBone, using the BBB header P9 pins 1, 3 and 5 respectively.


Software

The code is attached to this post. It is written in C. Refer to the file ‘oled.c’ to see the functions available. The main function currently also resides in that file. It runs five demonstrations when executed.


To use it, create a folder off the home directory (/home/root in my case):

mkdir –p development/oled
cd development/oled

The path will now be /home/root/development/oled

Copy the files into this location, then type the following to compile the code:

make install

The demo can now be run by typing:

./oled


Summary

It would be worthwhile creating a board for this display, and using it for small projects with the BBB where a high quality image is needed. A good amount of information can be represented on this display. It is easy to use with the example C code library, but will require a 13V supply (a small circuit can be used to generate this from the BBB’s 5V supply rail).

For larger displays, the 4.3” and 7” BB-View displays are available.


The revision 1 code is attached below for reference, but is also available here so that changes can be tracked.

Attachments:
oled-SEPS525-rev1.zip
  • Sign in to reply

Top Comments

  • Kilohercas
    Kilohercas over 12 years ago +1
    I have all code for htc desire AMOLED screen. If you want try to connect to LCDC at 800x480 resolution, that would be greait
  • Kilohercas
    Kilohercas over 12 years ago in reply to shabaz +1
    you can get from ebay, cost only 20$. For HTC Desire A8181 G7 LCD Display Screen Samsung AMOLED Repalcement | eBay but you will need pair of connectors from mouser.com, since i was unable to find exact…
  • DAB
    DAB over 12 years ago +1
    Good post, I especially like your sharing the pinouts and interface issues. DAB
  • shabaz
    shabaz over 11 years ago in reply to koolkat204

    Hi,


    That's great that the SCL problem is fixed! Now I look at the code (it has been a year so I've forgotten most of it) I see there are parameters for the OLED, like precharge current, precharge time,  driving current, etc. Looking at the Newhaven datasheet, their values are very different. So it seems that these would need to be adjusted to suit your display. The settings are on lines 38-71 in the source code (and the definitions are in the header file).


    After that, it may work ; (

    • Cancel
    • Vote Up 0 Vote Down
    • Sign in to reply
    • More
    • Cancel
  • koolkat204
    koolkat204 over 11 years ago in reply to shabaz

    Hey shabaz,


    I switched pin 46 (SCL) to pin 43, now I am seeing activity image, unfortunately still no life on the display yet.


    image

    • Cancel
    • Vote Up 0 Vote Down
    • Sign in to reply
    • More
    • Cancel
  • shabaz
    shabaz over 11 years ago in reply to koolkat204

    Also, from your scope trace, it looks like maybe you're looking at multiple bytes, right? Could you zoom in just to see one byte transfer, in case the SCL is toggling but not easily visible at the wide view.

    • Cancel
    • Vote Up 0 Vote Down
    • Sign in to reply
    • More
    • Cancel
  • shabaz
    shabaz over 11 years ago in reply to koolkat204

    I see. Ok, I think we're making progress, the scope trace definitely helps!!

    I'm wondering if it is perhaps pull-up related, although it shouldn't be. I've not got the AM3359 TRM at hand, but as a quick test, a weak pull-up (e.g. 33k resistor between the SCL pin and +3.3V will help identify if the pin is programmed correctly (it should be, because this code worked for me - but perhaps my OLED board has internal pull-ups). I don't have my OLED testbed any more, otherwise I'd reattempt.


    As another thing, in the code (on about line 200) you can see where the pins are configured:


      iolib_init();
      BBBIO_sys_Enable_GPIO(BBBIO_GPIO2);
      iolib_setdir(8, 11, BBBIO_DIR_OUT);
      iolib_setdir(8, 12, BBBIO_DIR_OUT);
      iolib_setdir(8, 15, BBBIO_DIR_OUT);
      iolib_setdir(8, 44, BBBIO_DIR_OUT);
      iolib_setdir(8, 45, BBBIO_DIR_OUT);
      iolib_setdir(8, 46, BBBIO_DIR_OUT);


    It may be worth trying a different pin, more information on the iolib web page (and you may also need to have another  BBIOsys_Enable_GPIO(xxx) line if you are using different GPIO.

    The header file contains the definitions for SCL which will need to change too:

    #define SCL_LOW pin_low(8, 46)
    #define SCL_HIGH pin_high(8, 46)


    I suppose as a first test you could just swap the definitions for SCL and SDA, and rerun the code, and you should then see activity on the SCL but not on SDA. I can't see why the pin for SCL isn't working : (

    • Cancel
    • Vote Up 0 Vote Down
    • Sign in to reply
    • More
    • Cancel
  • koolkat204
    koolkat204 over 11 years ago in reply to shabaz

    Hey shabaz,


    The scope screen shot was directly attached to the BBB (no display). I downloaded the Angstrom image, same results.   : (

    • Cancel
    • Vote Up 0 Vote Down
    • Sign in to reply
    • More
    • Cancel
<>
element14 Community

element14 is the first online community specifically for engineers. Connect with your peers and get expert answers to your questions.

  • Members
  • Learn
  • Technologies
  • Challenges & Projects
  • Products
  • Store
  • About Us
  • Feedback & Support
  • FAQs
  • Terms of Use
  • Privacy Policy
  • Legal and Copyright Notices
  • Sitemap
  • Cookies

An Avnet Company © 2026 Premier Farnell Limited. All Rights Reserved.

Premier Farnell Ltd, registered in England and Wales (no 00876412), registered office: Farnell House, Forge Lane, Leeds LS12 2NE.

ICP 备案号 10220084.

Follow element14

  • X
  • Facebook
  • linkedin
  • YouTube