element14 Community
element14 Community
    Register Log In
  • Site
  • Search
  • Log In Register
  • Community Hub
    Community Hub
    • What's New on element14
    • Feedback and Support
    • Benefits of Membership
    • Personal Blogs
    • Members Area
    • Achievement Levels
  • Learn
    Learn
    • Ask an Expert
    • eBooks
    • element14 presents
    • Learning Center
    • Tech Spotlight
    • STEM Academy
    • Webinars, Training and Events
    • Learning Groups
  • Technologies
    Technologies
    • 3D Printing
    • FPGA
    • Industrial Automation
    • Internet of Things
    • Power & Energy
    • Sensors
    • Technology Groups
  • Challenges & Projects
    Challenges & Projects
    • Design Challenges
    • element14 presents Projects
    • Project14
    • Arduino Projects
    • Raspberry Pi Projects
    • Project Groups
  • Products
    Products
    • Arduino
    • Avnet & Tria Boards Community
    • Dev Tools
    • Manufacturers
    • Multicomp Pro
    • Product Groups
    • Raspberry Pi
    • RoadTests & Reviews
  • About Us
  • Store
    Store
    • Visit Your Store
    • Choose another store...
      • Europe
      •  Austria (German)
      •  Belgium (Dutch, French)
      •  Bulgaria (Bulgarian)
      •  Czech Republic (Czech)
      •  Denmark (Danish)
      •  Estonia (Estonian)
      •  Finland (Finnish)
      •  France (French)
      •  Germany (German)
      •  Hungary (Hungarian)
      •  Ireland
      •  Israel
      •  Italy (Italian)
      •  Latvia (Latvian)
      •  
      •  Lithuania (Lithuanian)
      •  Netherlands (Dutch)
      •  Norway (Norwegian)
      •  Poland (Polish)
      •  Portugal (Portuguese)
      •  Romania (Romanian)
      •  Russia (Russian)
      •  Slovakia (Slovak)
      •  Slovenia (Slovenian)
      •  Spain (Spanish)
      •  Sweden (Swedish)
      •  Switzerland(German, French)
      •  Turkey (Turkish)
      •  United Kingdom
      • Asia Pacific
      •  Australia
      •  China
      •  Hong Kong
      •  India
      •  Korea (Korean)
      •  Malaysia
      •  New Zealand
      •  Philippines
      •  Singapore
      •  Taiwan
      •  Thailand (Thai)
      • Americas
      •  Brazil (Portuguese)
      •  Canada
      •  Mexico (Spanish)
      •  United States
      Can't find the country/region you're looking for? Visit our export site or find a local distributor.
  • Translate
  • Profile
  • Settings
Autodesk EAGLE
  • Products
  • More
Autodesk EAGLE
Forum bench power supply
  • Blog
  • Forum
  • Documents
  • Events
  • Polls
  • Files
  • Members
  • Mentions
  • Sub-Groups
  • Tags
  • More
  • Cancel
  • New
Join Autodesk EAGLE to participate - click to join for free!
Actions
  • Share
  • More
  • Cancel
Forum Thread Details
  • State Verified Answer
  • Replies 42 replies
  • Answers 20 answers
  • Subscribers 179 subscribers
  • Views 7023 views
  • Users 0 members are here
Related

bench power supply

aster94
aster94 over 8 years ago

hello,


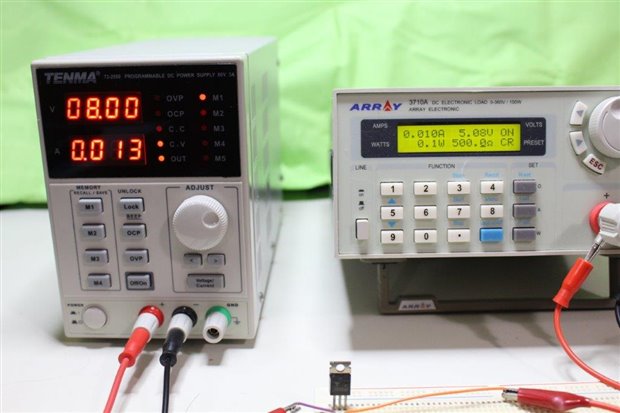
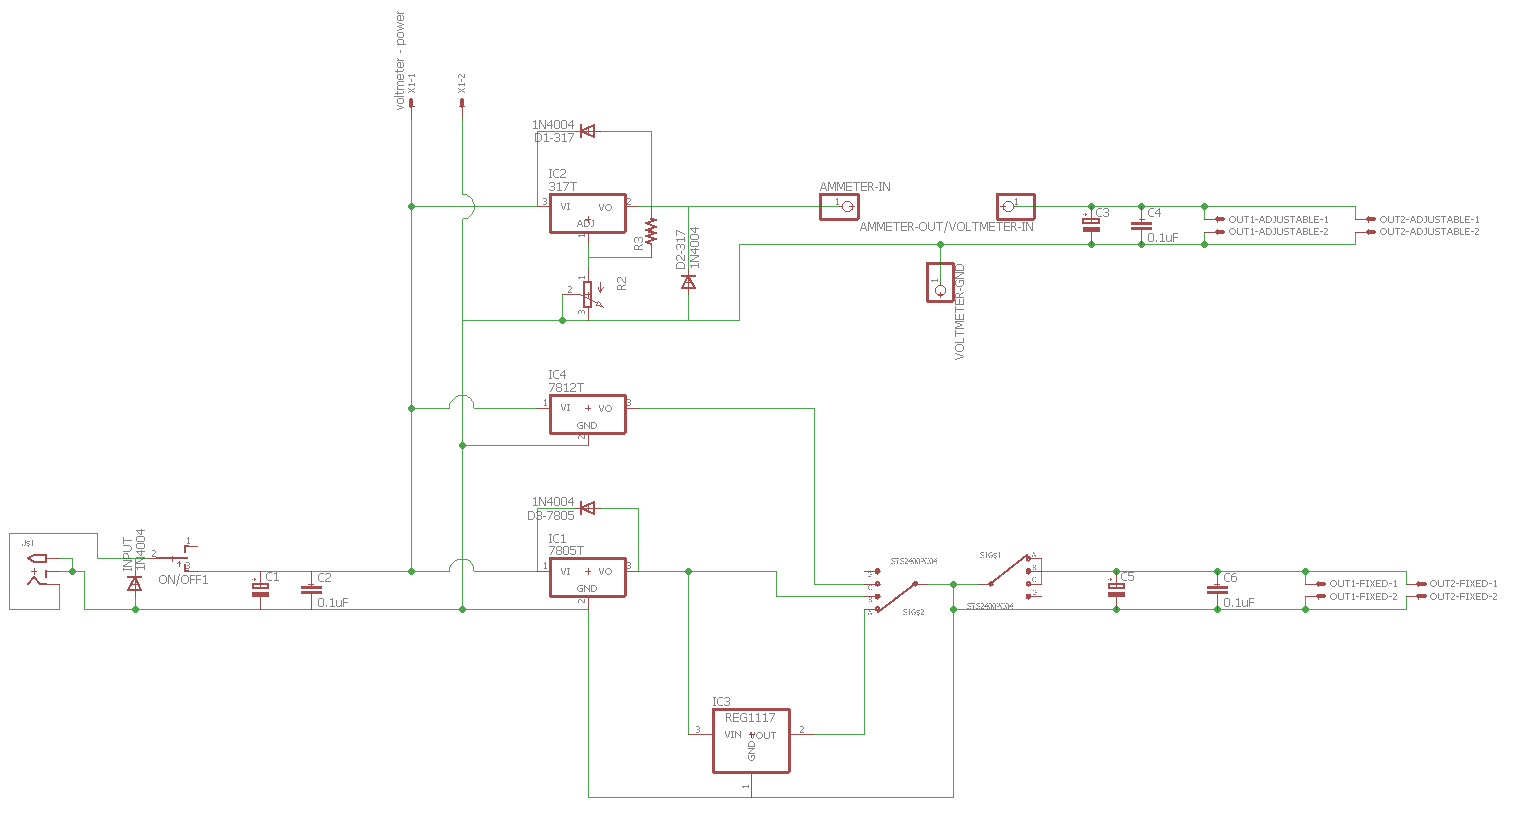
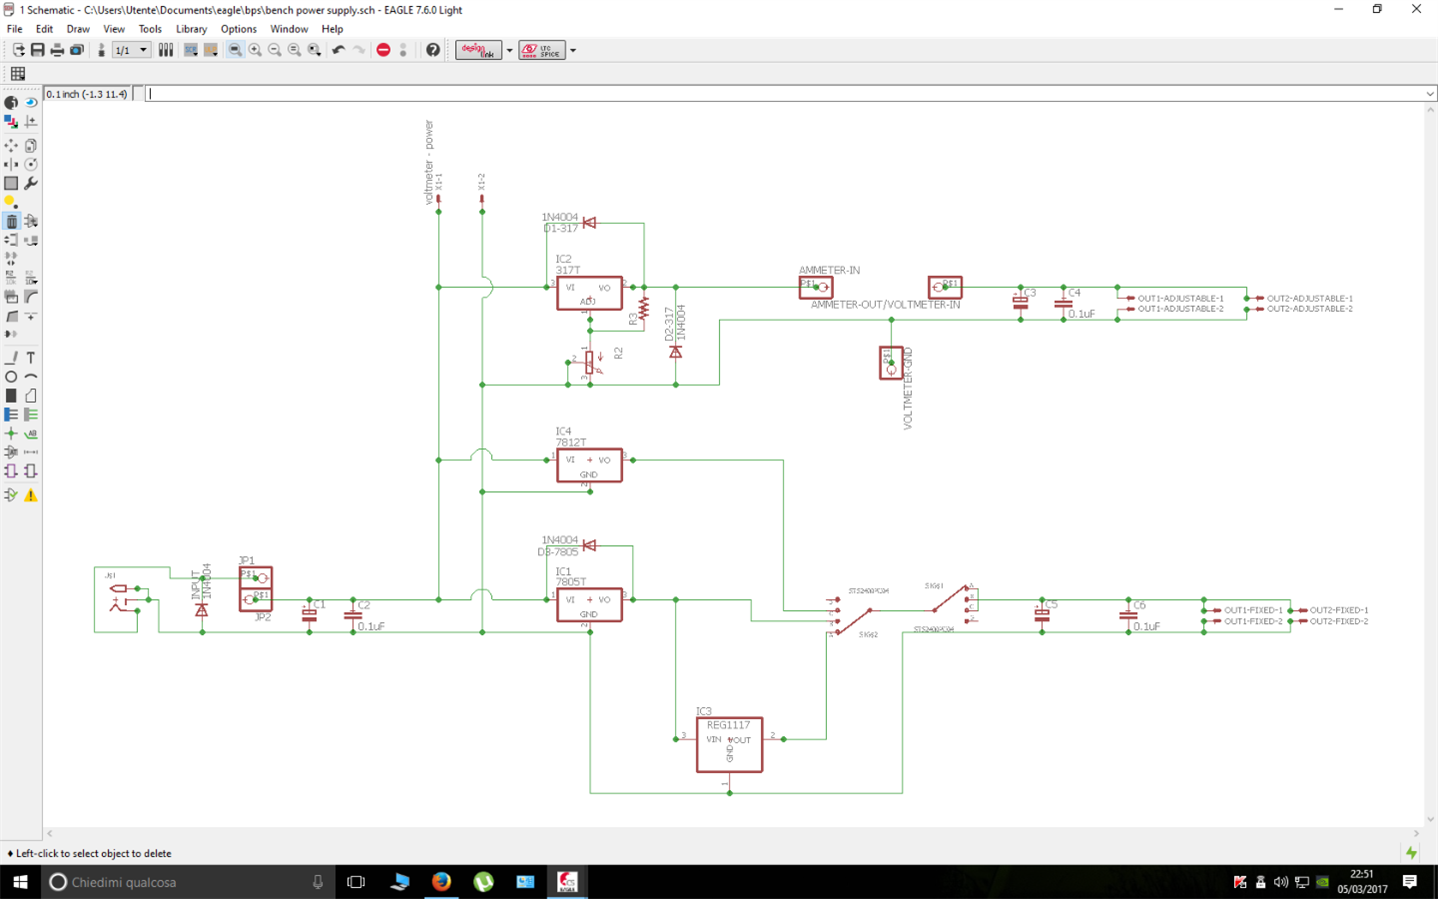
I started drawing in eagle this afternoon to make my first home made pbc board for a bench power supply that with an input of 12V/5A will have two output of 12V, 5V, 3.3V and an adjustable voltage (lm317)

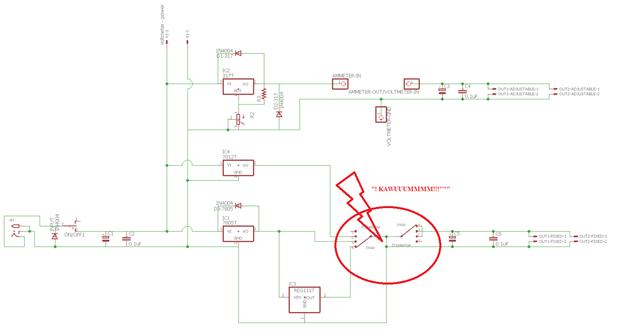
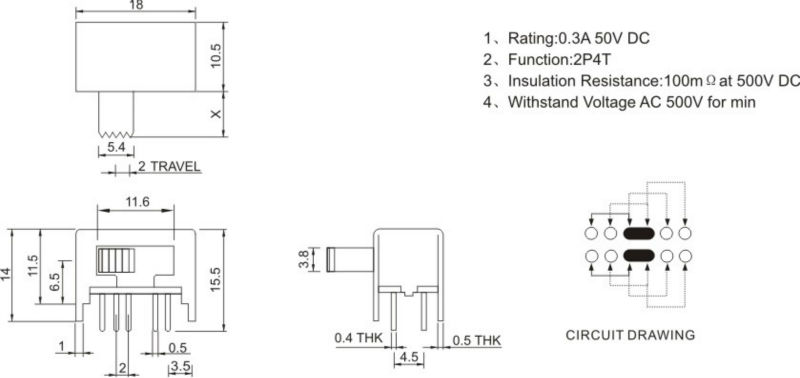
the switches are these with ground in the middle

565935243_150.jpg

I hope that the schematic is clear (it is also in the attachments), maybe you could give me some hint or advice about something that i m doing wrong

about the .brd i didn't route it since maybe you will say me to modify my schematic


thanks in advance


Immagine.png

Attachments:
bps.rar
  • Sign in to reply
  • Cancel

Top Replies

  • COMPACT
    COMPACT over 8 years ago in reply to mcb1 +3 suggested
    Here is an example of what I mean. 8V in from a regulated power supply being output as 5VDC using an LM7805 Linear Regulator. (The current limit has been set to 50mA on the bench power supply as not to…
  • mcb1
    mcb1 over 8 years ago in reply to aster94 +2 suggested
    the rated current it is 0.5 at 50v so I could reach 2A at 12v It doesn't work that way. The current specifies how much the switch will pass without damaging the contacts. The voltage specifies how high…
  • aster94
    aster94 over 8 years ago in reply to mcb1 +2
    As it is clear I am an hobbyist, thanks for the hint about the current In your schematics the middle pin of the potentiometer is not connected, is it correct? Is this schematic also good? http://www.electronics…
  • COMPACT
    0 COMPACT over 8 years ago in reply to mcb1

    image

    Here is an example of what I mean.

    8V in from a regulated power supply being output as 5VDC using an LM7805 Linear Regulator.

    (The current limit has been set to 50mA on the bench power supply as not to risk melting the breadboard or voltage regulator without a heatsink.)

    The most important point here is that the circuit works!


    The test apparatus on the left is a TENMA bench power supply; it is a beauty of a unit and can be remotely controlled by a computer.

    The test apparatus on the right is a DC Electronic Load; it provides a test load for the regulator output whilst acting voltmeter and ammeter.


    If you look at the numbers on the apparatus; you'll notice that the input power used is greater than the power being output; the missing power is expelled as heat!


    "Wherever I lay my cap, that's my home". - Paul Young

    "You can keep your cap on" - Joe Cocker

    • Cancel
    • Vote Up +3 Vote Down
    • Sign in to reply
    • Verify Answer
    • Reject Answer
    • Cancel
  • COMPACT
    0 COMPACT over 8 years ago in reply to COMPACT

    As for PCB layouts of Linear regulators search for "S100 boards" on the Internet.

    There you will find lots of examples.

    • Cancel
    • Vote Up 0 Vote Down
    • Sign in to reply
    • Verify Answer
    • Cancel
  • aster94
    0 aster94 over 8 years ago

    thanks again to mcb1 and COMPACT, I would like to say that, as I wrote before, I don't have any tool (except the voltmeter at 3$), but I know that linear regulator dissipate the excess power as heat and that dc-dc regulator are more efficient. I am making this simple bench power supply just for hobby to improve my abilities, especially about the pcb making (drawing, printing, ectching ecc) and because sometimes I need one


    I looked on google for the S100, do you mean this:  http://www.s100computers.com/My%20System%20Pages/The%20Box/Linear%20Power%20Supply%20in%20Box.jpg  my first purpose is to do something on "my own", not to buy a ready to use one


    deliberately have polarised capacitors attached back to front or use capacitors beyond their rated working voltage


    mmm I will try if this is not a smart way to try to kill me image ahahah obviosly I'm joking


    here there is the -I think- last version, as you adviced I

    1. put the protection diode on the input
    2. changed the simbol for the imput since i will use a dc plug (I'm not sure if it is correctly wired)
    3. moved the ams1117 after the lm7805
    4. reduced the number of caps
    5. moved the voltmeter input
    6. added a lm7812


    image


    the cap that i will use:

    C1- electrolytic 2,200 - 4,700 uF, 25V

    C2,4,6 - ceramic 0.1uF , 25V

    C3,5 - electrolytic 1/10 of C1 (i read it somewhere I don't know if it is correct), 25V


    next week I will start making the board, I attached the schematics and a really really first version of the board (i just put the component where they should be more or less), my goal is to make it single layer (since i am making it home), the sizes on the edges are the maximum that i could use image


    NOTE: in the board the first swith is not present because it will be on the front panel not on the pcb

    Attachments:
    bench power supply.zip
    • Cancel
    • Vote Up 0 Vote Down
    • Sign in to reply
    • Verify Answer
    • Cancel
  • COMPACT
    0 COMPACT over 8 years ago in reply to aster94

    No,  All S100 boards (not system power supplies) have their own regulators on board.  The convert +8V, +16V and -16V into the necessary voltages (usually +5V, +12V and -12V).


    Here's the result of a google search. You'll see tonnes of them.


    https://www.google.com.au/search?q=s100+boards&biw=1602&bih=1275&source=lnms&tbm=isch&sa=X&ved=0ahUKEwjB1eGamcDSAhXCJZQKHdqCCWMQ_AUIBygC

    • Cancel
    • Vote Up 0 Vote Down
    • Sign in to reply
    • Verify Answer
    • Cancel
  • geralds
    0 geralds over 8 years ago in reply to aster94

    Hi,


    please check your circuit!

    image


    Best Regards,

    Gerald

    ---

    • Cancel
    • Vote Up +2 Vote Down
    • Sign in to reply
    • Verify Answer
    • Reject Answer
    • Cancel
  • aster94
    0 aster94 over 8 years ago in reply to geralds

    Gerald, i own you a coffe


    image


    it was wrong since the first time i draw it and i never saw it... ops...

    now i think everythink is ok image tomorrow i will finish the .brd and than i will ask a friend who have all the etching stuff!

    while i am here, on eagle i always see the shortest connection thanks to the rats net, is possible to see the connection in order as i draw in the schematic? i don't know if i explained me in a good way, i mean that i would like to see the dc input going to the diode than to the swith and so on

    • Cancel
    • Vote Up 0 Vote Down
    • Sign in to reply
    • Verify Answer
    • Cancel
  • geralds
    0 geralds over 8 years ago in reply to aster94

    Vincenzo Gibiino wrote:


    ...

    In your schematics the middle pin of the potentiometer is not connected, is it correct?

    Is this schematic also good?


    Hi,


    This is a symbol of a rheostat; An adjustable resistance.

    https://en.wikipedia.org/wiki/Potentiometer#Rheostat


    The difference between the rheostat and the potentiometer is that symbolically only two

    connections are connected, because here no voltage divider is necessary.
    So, a potentiometer is an adjustable voltage divider (% upper half //% lower half), a rheostat is not.

    For setting, one end (usually the "hot" end, maximum stop) and the slider are wired.
    (Usual, cold end = left, hot end = to the right of the stop, looking forward to the axis)

    This also has the disadvantage in the case of the adjustable resistance that when the slider is interrupted,

    e.g. by dust inclusions, or jumping, the entire resistance is interrupted.
    Therefore, the "cold end" of the adjustable resistor is also connected for safety reasons.
    Then, in the case of the interruption, at least the total resistance value has the connection.
    In this way, this circuit can still control, in this case only with the maximum resistance value.
    In the case of the rheostat, the regulation would fail.


    The schematic have fundamental errors (sorry).


    Best Regards,

    Gerald

    ----

    • Cancel
    • Vote Up 0 Vote Down
    • Sign in to reply
    • Verify Answer
    • Cancel
  • geralds
    0 geralds over 8 years ago in reply to aster94

    Hi,


    My pleasure.
    Please wait a bit for etching, because the circuit diagram has some fundamental errors.
    For example:
    ) The plug can not be used for 5A, at least only special types of plug.
    ) There is a better solution for polarity reversal protection, eg with a P-channel MOSFET.
    ) A filter (C-L-C at the input) should be inserted, especially bypass capacitors should be installed in the right places.
    ) The supply for the panel meter (V / A) I would solve differently (what kind of panel meter have you?).
    ) The switch at the output I would make with a rotary switch and relay, because the relay contacts can handle the current.
    ) The sliding switch described above is more suitable for signal currents.
    ) Or, even better, direct all outputs directly to the terminals, so you can use all outputs at the same time.
    ) The part with the LM317 should be modified.


    There was some hints for checking the schematic.


    Best Regards,

    Gerald

    ---

    • Cancel
    • Vote Up 0 Vote Down
    • Sign in to reply
    • Verify Answer
    • Reject Answer
    • Cancel
  • COMPACT
    0 COMPACT over 8 years ago in reply to aster94

    You'll find that having both +5V and +3V3 simultaneously handy to have.

    If you're going to have low impedance regulator input capacitor like C2 you should have one for each regulator.

    Apparently, the shorter the distance from the voltage regulator the better.


    Lose the slide switch and use an appropriately rated toggle switch.

    • Cancel
    • Vote Up +1 Vote Down
    • Sign in to reply
    • Verify Answer
    • Reject Answer
    • Cancel
  • aster94
    0 aster94 over 8 years ago in reply to geralds

    Gerald Schwarz ha scritto:
    ) The plug can not be used for 5A, at least only special types of plug.

    at the end i will just use 1.5A, i think it would be able to handle them (wikipedia says 2A)


    ) There is a better solution for polarity reversal protection, eg with a P-channel MOSFET.
    ) A filter (C-L-C at the input) should be inserted, especially bypass capacitors should be installed in the right places.

    I am an hobbyist making my first power supply, I would like to do something veeeery simple, i found these solution on google and they don't seem to difficult to apply: https://forum.allaboutcircuits.com/threads/pi-filter-clc.2687/ and http://lh4.googleusercontent.com/-uZWaEG-Yhn4/UAXdcxfPDLI/AAAAAAAAET0/SWL6YD6HwYg/s398/input-protect.png  so I would go with your better solutions for my next board but for now i will just use the two capacitor for filter the input


    ) The supply for the panel meter (V / A) I would solve differently (what kind of panel meter have you?).

    this: https://www.element14.com/community/external-link.jspa?url=https%3A%2F%2Fit.aliexpress.com%2Fitem%2F1pcs-DC-100V-10A-Vol…


    ) The switch at the output I would make with a rotary switch and relay, because the relay contacts can handle the current.
    ) The sliding switch described above is more suitable for signal currents.
    ) Or, even better, direct all outputs directly to the terminals, so you can use all outputs at the same time.

    at the end i think that i would do as you and COMPACT said,having all outputs free is better


    ) The part with the LM317 should be modified.
    For setting, one end (usually the "hot" end, maximum stop) and the slider are wired.
    (Usual, cold end = left, hot end = to the right of the stop, looking forward to the axis)

    I am not sure to have understood where the problem is: do i just need to invert the hot and cold end of the pot?


    edit: added new shematics at the end of this topic

    • Cancel
    • Vote Up +2 Vote Down
    • Sign in to reply
    • Verify Answer
    • Cancel
<>
element14 Community

element14 is the first online community specifically for engineers. Connect with your peers and get expert answers to your questions.

  • Members
  • Learn
  • Technologies
  • Challenges & Projects
  • Products
  • Store
  • About Us
  • Feedback & Support
  • FAQs
  • Terms of Use
  • Privacy Policy
  • Legal and Copyright Notices
  • Sitemap
  • Cookies

An Avnet Company © 2025 Premier Farnell Limited. All Rights Reserved.

Premier Farnell Ltd, registered in England and Wales (no 00876412), registered office: Farnell House, Forge Lane, Leeds LS12 2NE.

ICP 备案号 10220084.

Follow element14

  • X
  • Facebook
  • linkedin
  • YouTube