
Welcome to the BitScope page on element14. Here you can find things such as our latest news, training videos, and product details. Additionally, you can engage with us in our forums.
BitScope Mini owner Tom Owad has come up with a brilliant but simple idea to mount his BitScope on his iMac to create a convenient stand-alone test and measurement workstation.
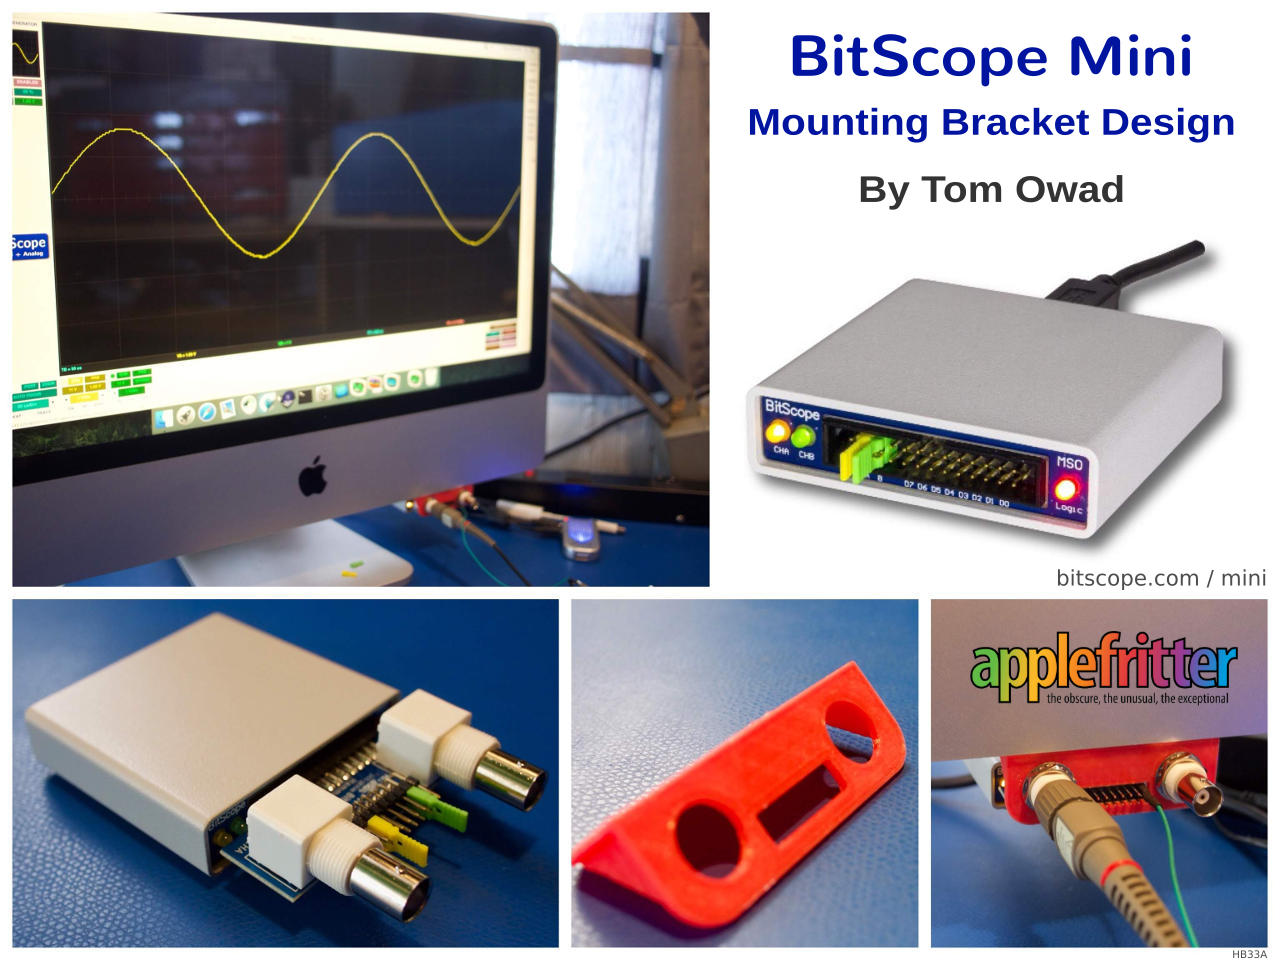
He explains it all at applefritter.com. In a nutshell, he's modelled the Smart Port Adapter and created a 3D-printed bracket for it. Using the bracket he's mounted the BitScope to his iMac. Check out his blog post for full details. He's also included the OpenSCAD and STL files you'll need to do the same.
The beauty of his design is its simplicity and flexibility. The bracket and adapter is fixed to iMac but the BitScope isn't. He can simply unplug his BitScope Mini and take it with him when he needs to "go mobile". BitScope itself is so small that it's effectively just a "plug that activates the iMac Oscilloscope".

As you can see, the BitScope Mini, its port adapter and Tom's bracket are barely visible at the bottom of the iMac display but they're in a very convenient location for a test and measurement workstation. We designed the port adapter to be used this way. That is, plug it in when you need it and remove it when you don't. Tom's innovation is to mount the adapter to his computer and there's nothing to stop him doing this more than once. For example, one mounted on his home computer and another at work. BitScope itself is the only thing that travels and he'd travel light, because most likely he would not need an adapter or scope probes, just the included mixed signal test clips (just in case he needed to do some work on the road).
The same design should also work just as well with bitscope microbitscope micro. Our smallest BitScope also has a port adapterport adapter which has the same physical specifications as far as the bracket is concerned. We've not tried Tom's bracket design but we can see no reason why it would not work. In fact...
We actually been toying with the idea of 3D printed mounting brackets and cases.

We've been printing bespoke mounting solutions for some of our industrial customers for a while but Tom's post has inspired us; perhaps we should publish some designs like Tom's. What do you think? What would you like to see?
HB33A


We had a ball exhibiting BitScope Mini, BitScope Micro, BitScope Blade and full range of accessories at the recent Sydney Mini Maker Faire held at the MAAS Powerhouse Museum in Sydney last weekend.

During the course of the faire we were visited by makers, students, children and their parents, teachers and engineers. We were impressed with how engaged visitors were with many expressing a keen interest in how electronics and computing can be used together to solve problems.
We used Raspberry Pi 3 to demonstrate BitScopes in various configuration as well as part of the Blade exhibits themselves. Every exhibit except one ran on a Blade Workstation, our low cost platform built with Blade Uno, a Raspberry Pi 3 and in many cases a Raspberry Pi HAT. The diminutive and low cost Raspberry Pi proved yet again that it can provide some very impressive performance for just $ 35! Of course, the Blade exhibits we built with Raspberry Pi, in one case with 20 of them connected in a network in a compact 5U rack and performing a variety of number crunching tasks rendering image files with Blender.

We're firm advocates of project and enquiry based learning, especially in science, technology, engineering and mathematical fields. We set up hands-on exhibits with BitScope Micro and Mini connected to electronic circuits built on breadboards and custom educational boards. We showed how one can use BitScope to understand how electronics works in practice and how changes to a circuit can have sometimes unintended consequences. We used Raspberry Pi HATs including Pimoroni's Explorer HAT and Piano HAT to connect control signals from Raspberry Pi with BitScope and allow visitors to "play piano" on a Raspberry Pi while watching the waveforms on a Raspberry Pi Display.

Speaking of sounds, we love music so we created examples to show what music looks like when analyzed with a BitScope. With a guitar for visitors to pick up and play we set up an ancient (41 year old!) BWD 539B oscilloscope next to a BitScope Micro and notebook and had them both display the waveforms on screen. Using the new BitScope Audio Port for BitScope Micro and oscilloscope probes connecting to the BWD the music from visitors phones was connected to both scopes and the guitar played along side them to show how waveform shape determines the timbre, amplitude the loudness and period the pitch of the sounds as they played. Since the music was in stereo we could even demonstrate vectorscope mode and plot the channels against each other to observe the phase. All this in real-time using a tiny BitScope Micro and a not so tiny old school oscilloscope!

Martin, Bruce, Patrick, Andrej and Norman from BitScope Designs all joined the stand. It was a fascinating experience for us all and we learned a lot about where makers and those interested in creative pursuits in electronics and computing are working. We were able to exhibit all our current range of products including BitScope Micro, BitScope Mini and their various probe adapters and accessories as well as BitScope Blade, Blade Packs and Blade Racks with multiple Raspberry Pi. We exhibited new products in development and soon to be released. We'll announce full details soon but they include BitScope Cap, breadboard, audio and other adapters for BitScope Micro as well as prototyping platforms, Blade Workstations and Industrial computing systems all built with Blade and Raspberry Pi. Our thanks to our friends at element14 too for helping with materials and offering three Raspberry Pi Starter Kits to match three BitScope Micro which we're giving away to three lucky visitors to our stand, draw next week!

Bruce introduced BitScope Designs and our history in test, measurement and mixed signal data acquisition solutions. He explained our work with Raspberry Pi which saw the launch of BitScope Micro, our smallest mixed signal oscilloscope tailored for use with Raspberry Pi and available globally via element14. Our use of Raspberry Pi as a low cost but powerful platform for BitScope Software on the desktop demonstrated just how effective this little computer actually is. With a little bit of tweaking we were able to get very impressive performance. However, what really impressed us was the reliability and low power requirements of Raspberry Pi and this lead us to develop our new industrial power and mounting solution for Raspberry Pi we call BitScope Blade.

The first half of this seminar explains what BitScope Blade is, where it came from and how it can be used to build very low cost physical and cluster computing solutions. Starting with Blade Uno, Bruce explained how BitScope Blade scales to two or four nodes with Blade Duo and Blade Quattro and all the way up to a 40 node 160 core compute clusters in compact racks. Combined with the fast 64-bit quad core CPU and flexible I/O options of the new Raspberry Pi 3 BitScope Blade makes it possible to build low cost but powerful compute clusters and private clouds. However, as Bruce explained, there's a lot more to BitScope Blade than just compute clusters. In the evolving world of industrial computing and the "Internet of Things" there is a growing need for small, flexible and reliable computing solutions "at the edge" of the cloud.
Bruce presented a wide range of computing solutions that can be built with Raspberry Pi and BitScope Blade.

He explained that Raspberry Pi itself is a very capable platform and using it for industrial purposes simply comes down to questions about how you power, mount and connect one or more Raspberry Pi with the physical I/O required. He showed small scale examples like this one comprising BitScope Blade Uno with Raspberry Pi, PiFace Digital and a pair of BitScope Mini underneath to build industrial control and analysis systems with multiple analog, digital, logic and control channels. The Bluetooth/BLE integrated in the new Raspberry Pi 3 means the huge range of Bluetooth enable IoT devices that are becoming available can be connected to Blade based solutions as well. The built-in WiFi offers wireless network connectivity between Raspberry Pi and with local wireless networks, all at no extra cost. Bruce explained all these possibilities with physical examples he handed around to members of the audience to review before taking questions. Related topics covered included BitScope test, measurement and data acquisition solutions in the context of physical computing with BitScope Blade and Raspberry Pi and the future of BitScope, Raspberry Pi and low cost computing in this evolving age of internet connected devices.
Our thanks to the Sydney Linux User Group for the invitation to speak and Google Sydney for hosting the event.
![]()
If you're in Sydney (which does not always look like this but it does at the moment due to Vivid  and you're interested in Linux, open source software or systems and solutions like the ones we presented here, we recommend you join this user group. SLUG, as it's otherwise known, is a community of passionate freedom and technology lovers in Sydney, Australia. They are one of the largest and most active Linux users groups in the world, with a diverse membership of users, developers, sysadmins and advocates. We can believe it; we first presented a seminar at SLUG way back 1998 when BitScope was first launched! We have come a long way since then and we're very excited about the possibilities now emerging. Check out the video to learn more and contact us if you have any questions.
Following our initial tests last week, we've been doing more testing today with the Raspberry Pi Touchscreen Display. All our apps work just fine (if you hide the menu bar to make some room on this 800x480 pixel display for some of them).
I've posted this vine showing what BitScope DSO looks running on the new display (let me know in the comments below if you know how to embed a vine in a community post  )
)
It turns out that the display resolution is just right for touchscreen use with BitScope DSO and BitScope Logic. We'll update our packages soon so you don't need to hide the menu bar to use them.
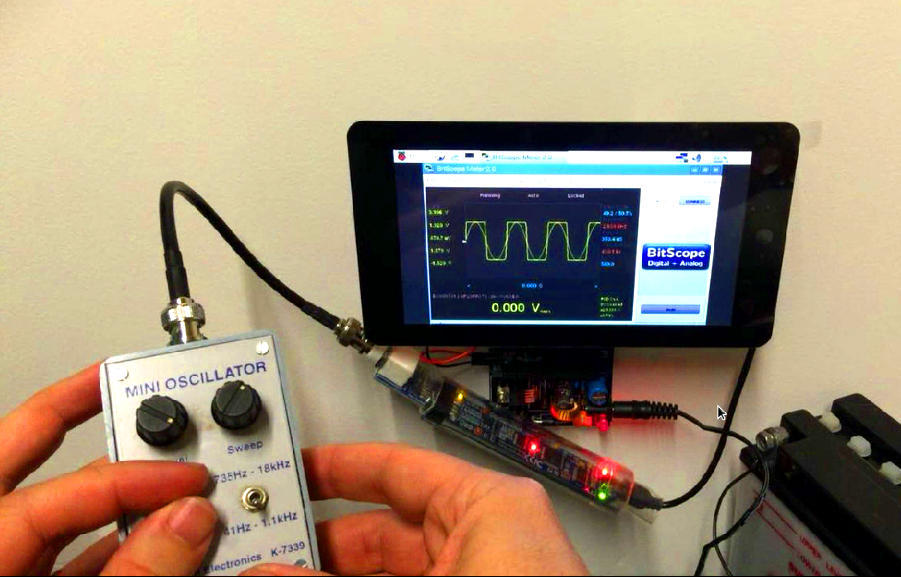
We bootstrapped the new Raspberry Pi LCD like everyone else but with a twist, we wall mounted it and powered it with a 12V battery (using BitScope Blade). We were keen to see what the display looked like and to check that our software and hardware worked with it. We are pleased to report it looks fantastic and everything just works !
BitScope Test & Measurement Workstation.
BitScopes have always offered great USB Oscilloscope solutions for PC, Mac or Linux systems. More recently we updated BitScope to work seamlessly with Raspberry Pi and launched the very low cost BitScope Micro tailored specifically for Raspberry Pi owners (although it remains fully compatible with all supported host platforms).
BitScope Test & Measurement Workstation.
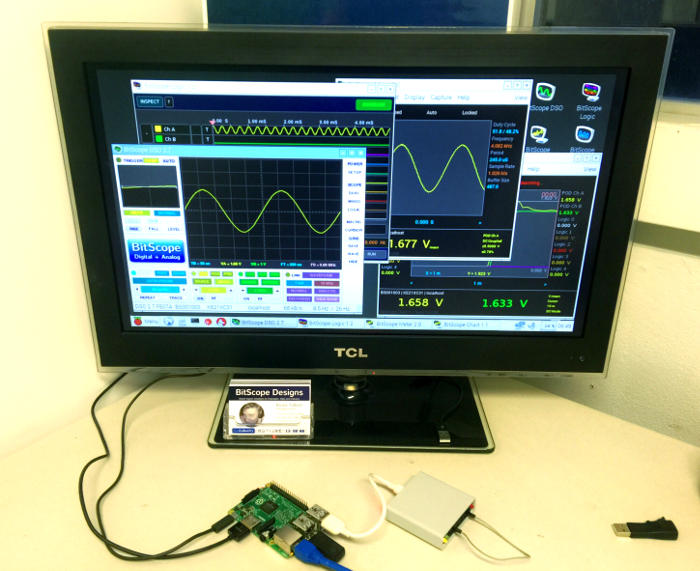
Our core idea was to leverage Raspberry Pi with a keyboard, mouse and monitor to build a BitScope based system for test, measurement & data acquisition. We wanted it to be low cost, convenient to use and readily available. We started with the original Model B and worked with the Raspberry Pi team to fully optimize the platform to handle real-time display. This work resulted in a very capable test & measurement platform using Raspberry Pi with the real-time system performance we needed to run our all our key applications.
It worked well with all BitScope models but following the release of the new BitScope Micro with element14 and then the launch of Raspberry Pi 2 earlier this year it became clear that if we could eliminate the need for a separate monitor, keyboard and mouse that we'd have the ideal embeddable test, measurement and data acquisition solution. We had already optimized our software for use with touchscreens so...
...enter the Raspberry Pi 7" Touchscreen Display !
We were very excited yesterday to receive the long awaited Raspberry Pi 7" Touchscreen Display. With a big thank-you to our friends at element14 we got our hands on one these fantastic little displays the day it was launched and we immediately set about putting it together and testing it. The result is this screencast which I posted yesterday which shows just how easy it is to use.
The Raspberry Pi display home page has all the details and the RasPiTV Videos explain how to set it all up much better than we can. Instead I presented a simplified unboxing and system installation with a twist - I wall mounted the display and powered it all from a 12V battery. Needless to say, we're very impressed with this display.
It's taken a while (read the launch page for all the gory details, EMC compliance can be a devil to get right!) but the end result is just what we wanted - a very low cost, high quality touchscreen display from which to make a self contained test, measurement and data acquisition system!
BitScope Blade DuoPi
Our aim went beyond just eliminating the separate monitor, keyboard and mouse; we wanted the solution to be suitable for industrial use and able to be run from any available power source. Our soon to be released BitScope Blade boards are designed to serve just this purpose; they offer robust power and mounting solutions for Raspberry Pi and BitScope including 19" rack and DIN rail and can accept power sources from 7V to 48V directly and via POE. One of these products (DuoPi) is perfect for the new Raspberry Pi display as it makes it possible to mount and power the Raspberry Pi, the display and up to four connected BitScopes. It is the board that I used in the video to mount the Raspberry Pi display on the wall.
We get asked from time to time whether you can use BitScope with Windows 98, XP and Vista.
The short answer is yes but your mileage may vary. Here is the latest edition (as at the time of writing) of BitScope DSO running on Windows XP:

Unfortunately we can no longer provide official support for these old versions of Windows but we'll do our best to ensure you can still use them. No point to throwing away that ancient but otherwise useful Windows PC or notebook, turn it into a Mixed Signal Oscilloscope with BitScope 
If you run into problems they're likely to be related to the USB when used with some old PC hardware. However, FTDI have drivers compatible with these older Windows editions (download here) that work for most people and we have published detailed troubleshooting information for this. If you do run into trouble you can connect to BitScope via a network (as shown here, connecting to a BS10U we put online at pi.bitscope.com using BitScope Server and Raspberry Pi). This avoids USB on the PC altogether. As far as our software itself is concerned, we've not seen any major issues but feel free to comment below with your own experiences.
This article cross-posted from Raspi.Tv with permission and our thanks!
I was in need of an interesting signal to check out the logic analyser functionality of the BitScope micro. So, another of my current RasPiO Beta boards was used as a convenient way to connect an mcp3008 analog to digital converter (ADC) to the Pi and the scope.

RasPiO Analog board + BitScope probes connected
I don’t claim to be an expert on SPI, but having spent the best part of a day playing with it, the mcp3008 data sheet and the BitScope Micro, I understand it a lot better now. Four pins are used…
…and the way it works, at least my interpretation of it, follows the next large picture.
Connecting 0V (00000000) or 3V3 (11111111) to the ADC gave a flat, boring MISO (ADC output) trace – All LOW (0V)…

MISO output at 0V
…or all HIGH (3V3)…
MISO output at 3V3
So I thought I’d try and get an alternating signal, e.g. 1010101010
To get the 1010101010 reading from the ADC, I had to convert 1010101010 to base 10, which is 682. Then, using a potentiometer, patience and Python, I tweaked the ADC input so the reading was exactly 0682 on the ADC (2.2V). Then I used the BitScope logic analyser with four probes hooked up to the SPI pins to capture the SPI signals. (L0 to MISO, L1 to MOSI, L2 to SCLK & L3 to CE0.)
For convenience, I connected them in the same order as the diagram in the mcp3008 data sheet (white overlay in the screenshot below). This makes it a bit easier to follow. (Although it’s a bit geeky if you’ve never done it before, and might take a little while to understand it clearly.) This is what the SPI signal traces look like when the ADC is reading a value of 0682. You can click the image to enlarge it, which makes the darkish colours of the SCLK & MOSI traces a bit easier to see.
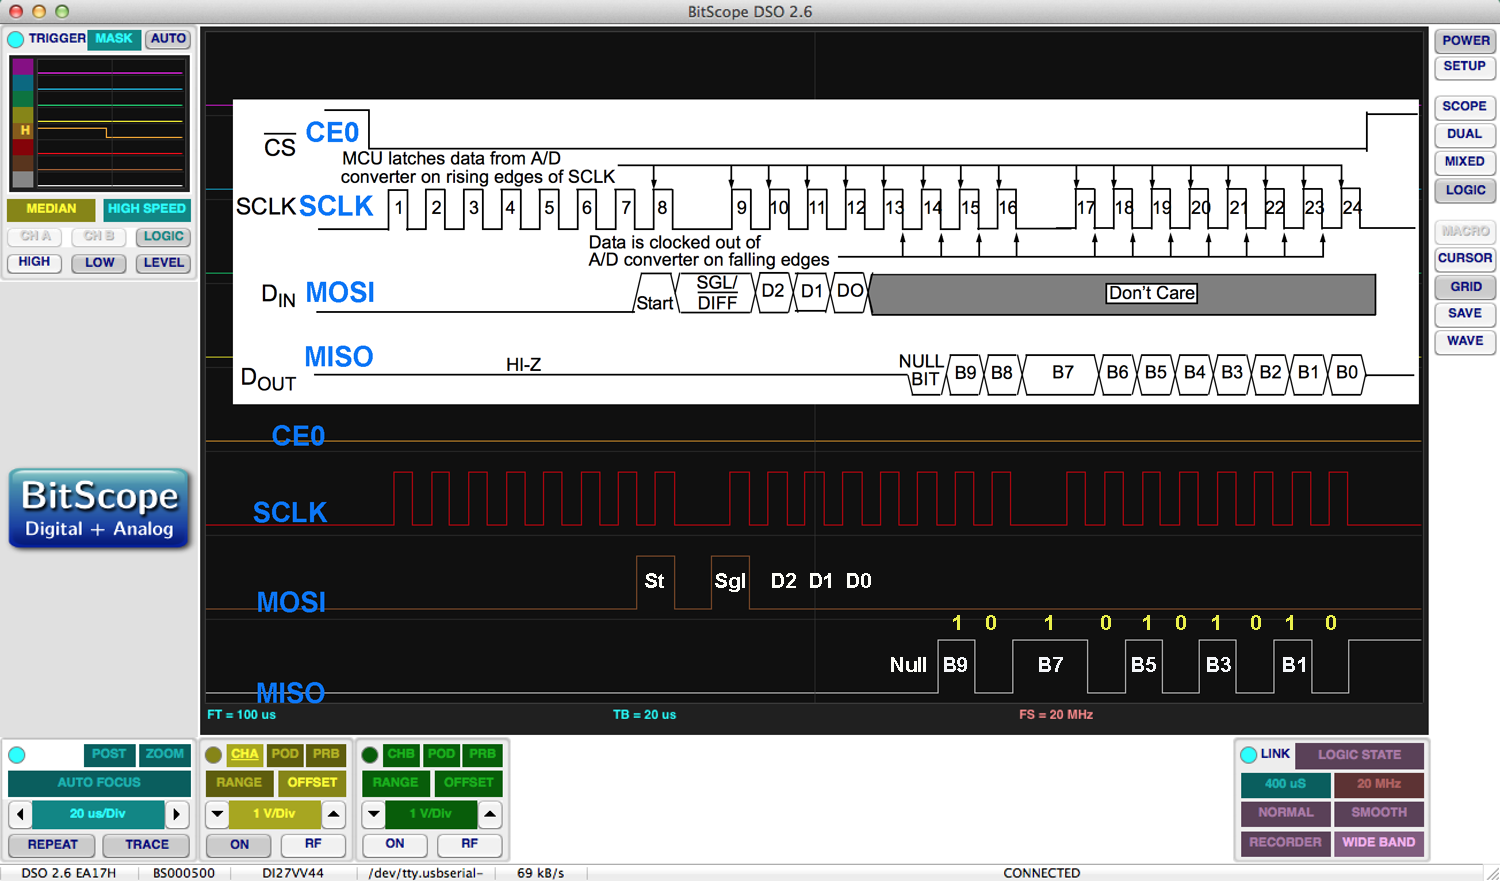
mcp3008 input/output signals for ADC value 0682 (1010101010)
When CE0 is brought LOW, the mcp3008 is activated (it is low for the whole of this screenshot, as that’s what I set as the BitScope trigger).
The Pi’s SPI clock pin, SCLK sends out 3 bytes (8 pulses each, 6 microseconds apart), which control the timing of the signals to and from the chip/pi.
On the 8th pulse of the first byte, MOSI sends a “START” bit, followed by four more bits (SGL, D2, D1, D0) to tell the ADC which mode and channel to use. In this case, single mode (1), channel 0 (0, 0, 0).
Thereafter, MOSI is ignored for the rest of this cycle.
Then the ADC reads the value of the voltage connected to its channel 0 input during the next clock pulse. After that, it uses the MISO port to output a null bit (0), followed by 10 data bits (B9-B0). These 10 bits are the binary value of the ADC reading. In our case, it’s 1010101010. You can see this in the bottom-right part of the logic trace (enlarged below)…

mcp3008 output (MISO) of 10101010
Note that B7 is wider because it spans the ‘gap’ between the second and third ‘bytes’ from the SCLK pin. This is expected, and appears in the data sheet diagram too.
When all the data has been ‘clocked out’ of the mcp3008, the CE0 chip select pin on the Pi is brought HIGH to end the transaction and deactivate the mcp3008.
I’d seen these diagrams in data sheets before and only partially understood them. I’d ‘done’ the software side of it before. But through probing, poking, tweaking and adjusting, I now think I understand how the SPI protocol works in hardware for the mcp3008. To my mind, that’s a day very well spent! Education is priceless.
To those who think it’s all a bit weird, the main draw for many in science, engineering and programming is that “YES” (punch the air) feeling when you understand how or why something works and how you can “fiddle” with it to influence or control what it does.
And it’s all a part of my plan to take over the world. MwoaHaHaHaHaaaaa!
We've released the first beta update in the development branch ahead of BitScope DSO version 3.0.

We've been collecting your feedback as we work towards the release of DSO 3.0. We have added new features and fixed many bugs. The time has come to make the new version available for beta testing. We want you to have the latest software for BitScope as soon as possible. This means releasing the new version it while it's still in development. This software fixes many bugs reported in earlier versions but it may also have some new bugs of its own. We recommend this version if you have encountered problems when using older ones or if you want the latest features and to help us improve this software with your feedback.

We aim to update this very popular software application in a way that does not interfere with how you already use it. For example, shown here is how the channel controls look when first started with BitScope Micro with BitScope DSO 2.9. You might not notice much difference and all of the parameters work with the familiar Act On Touch User Interface introduced in DSO 2.5, but there is a new button (ZERO) and the values reported via some of these parameters are much more informative than before.
So how do you know what all the changes are and how do you download the track development? Since we started using trello to offer more comprehensive technical support online, you've told us that you like it, so we're now using trello to enable you to track development and offer prompt updates for our software in development.

Simply visit and optionally subscribe to the BitScope DSO 2.9 development card to keep track of what's happening with DSO. Updates can be downloaded directly from the card as they are released and you can comment or make feature requests too. If you're new to BitScope DSO we highly recommend you visit the quick start quide to get up and running quickly. Once you're familiar with the basics you can refer to the BitScope User Guide for full details (for the production release).
If you have technical or other questions, see our online technical support and you can email us about software issues to software@bitscope.com. Of course, BitScope DSO is not the only choice. There is a range of software so we'll be doing the same (using trello) for all of these. For example, we've also recently published a card for the BitScope Library. Others are coming soon. Updates are available (via the card) for Windows, Macintosh, Linux and ARM platforms including Raspberry Pi ! Please see the development card for all the details but in summary, our focus for this initial release is to add features for BitScope Micro in support of DC measurement
This quick start guide is to help get you up and running with BitScope quickly. For more information about BitScope, which model is best for you, what software to choose and how to use it in detail, please see our support page.
Regardless of which model you choose, everything you need to get started is included.
Some models come with additional accessories such as BNC probe adapters for use with oscilloscope probes and other accessories but these are not needed to get started.
There is a range of software available for BitScope which is compatible Windows, Mac and Linux including Raspberry Pi and other embedded Linux computers.The software may be downloaded free of charge and is compatible with all BitScope models.
Some BitScopes require a driver to be installed.
USB BitScopes require the installation of a driver when used with Windows but this happens automatically when you first connect BitScope (if your PC is connected to the Internet).We support Windows 7, 8 and later editions. Older versions usually work (if the driver is properly installed) but we don't guarantee or support them. If you have problems installing the driver or getting up and running with Windows, please see our Windows USB Driver Installation Guide.
BitScope works very well with Apple Macintosh too. USB models may require the driver to be installed. Your system may already have the driver installed but if not download the driver and run the installer. There are two versions to choose from, one for Mac OSX 10.9 and later and the others for 10.8 and earlier. Read this for more information.
All models BitScopes work very well with most variants of linux including Debian, Ubuntu, Mint, Fedora and derivatives including Raspbian Linux which is used by Raspberry Pi. There is no driver to install for Linux (drivers are pre-installed).Normally Linux "just works" but if your BitScope is plugged in and powered but not working, read this.
With the driver installed (if necessary), to get started you simply need to:
The software is packaged for each platform; just execute the installer.
Plug the USB cable into a spare USB port on your computer. BitScope should be automatically detected and reported as connected by your operating system.
Click the POWER button on the BitScope DSO software to start. It will find and connect to your BitScope automatically. By default is displays analog Channel A (CH-A). If you touch CH-A input with your finger, the trace should move a litte.
Using the supplied test clips or oscilloscope probes (via a probe adapter), connect to your test circuit. You are now up and running and good to go!
Use the waveform generator! Simply connect a loop-back from the waveform generator to CHA, start the BitScope DSO software and click the WAVE button (on the right).
You don't need a loop-back wire, just use two of the included test probes and connect the grabbers together. A short piece of wire can be used as a simple bus, so you can see both analog channels and a few logic channels all connected to the AWG to try something more advanced like Mixed Mode.
Getting started with BitScope is quick and easy but there's a lot to learn to get the most out of it !

The first thing to know is how to use the Act On Touch touchscreen interface.
Act On Touch simply means you can click, drag or select to adjust almost any parameter to change its value in real-time as the display updates or select built-in functions or related values via a (right-click) pop-up menu.
This screenshot should give you the idea.
Act On Touch makes using a mouse, trackpad or touchscreen easy.
It works the same whether you use a PC, Mac or notebook, touch-screen Windows Surface or other tablet, the Raspberry Pi or even using an iOS or Android device via VNC. Once you learn how On Touch works you will up and running using BitScope effectively. We also recommend you read the BitScope DSO User Guide for full operational details.
We highly recommend you watch the video tutorials to see BitScope in context including live demos of the software running on the Mac, Linux & Raspberry Pi. The tutorials focus on BitScope Micro but it's very similar for other models. We cover unboxing, powering up, software installation, connections, using oscilloscope probes, testing, diagnostics, programming and more. The videos are information packed (about an hour in total) so we've broken it down and indexed it for you if you want to pick out something specific.
If you encounter difficulties you can search or browse our Support Board. Still have problems? Please visit BitScope Support to contact us and find more information about BitScope.
Since launching BitScope Micro with element14 late last year we now have many more customers than we used to !

To ensure we can continue to meet your needs, we looked for a new system we could use to extend our email and online support to help answer all your questions. We surveyed the market for a system we could use. We've chosen Trello and we're now using it to build a number of interactive BitScope Support Boards for you. A Support Board presents lists of support cards. Each card answers one question. We've created our first board for all your sales & support questions. You can leave feedback for us on the board too. We will post new cards on the topics about which we receive the most enquiries.
When you visit the board for the first time you may be invited to sign up (free). You don't have to, but if you do, you will be able to search the board by typing in a few words to find the card you're looking for,comment on any card to leave feedback or ask questions (but please read this), subscribe to any card to receive update notifications when the card changes, and vote on any card to approve of its content or request a feature described by the card. We may not respond to comments via the support board but we will read them. You can always email us to ask us any questions you cannot find answered on the board. If it's a common one we'll post a card answering it for everyone!
We will be publishing more boards (for developer support, bug and feature tracking etc). We'll have more updates soon (published via the board) and we welcome your feedback (email contacts). We hope you find it helpful !
Please see the BitScope Group for more about BitScope and the support options available.
Suffice to say we like Trello but in case you're wondering, we're not on the Trello payroll 


