element14 Community
element14 Community
    Register Log In
  • Site
  • Search
  • Log In Register
  • About Us
  • Community Hub
    Community Hub
    • What's New on element14
    • Feedback and Support
    • Benefits of Membership
    • Personal Blogs
    • Members Area
    • Achievement Levels
  • Learn
    Learn
    • Ask an Expert
    • eBooks
    • element14 presents
    • Learning Center
    • Tech Spotlight
    • STEM Academy
    • Webinars, Training and Events
    • Learning Groups
  • Technologies
    Technologies
    • 3D Printing
    • FPGA
    • Industrial Automation
    • Internet of Things
    • Power & Energy
    • Sensors
    • Technology Groups
  • Challenges & Projects
    Challenges & Projects
    • Design Challenges
    • element14 presents Projects
    • Project14
    • Arduino Projects
    • Raspberry Pi Projects
    • Project Groups
  • Products
    Products
    • Arduino
    • Avnet Boards Community
    • Dev Tools
    • Manufacturers
    • Multicomp Pro
    • Product Groups
    • Raspberry Pi
    • RoadTests & Reviews
  • Store
    Store
    • Visit Your Store
    • Choose another store...
      • Europe
      •  Austria (German)
      •  Belgium (Dutch, French)
      •  Bulgaria (Bulgarian)
      •  Czech Republic (Czech)
      •  Denmark (Danish)
      •  Estonia (Estonian)
      •  Finland (Finnish)
      •  France (French)
      •  Germany (German)
      •  Hungary (Hungarian)
      •  Ireland
      •  Israel
      •  Italy (Italian)
      •  Latvia (Latvian)
      •  
      •  Lithuania (Lithuanian)
      •  Netherlands (Dutch)
      •  Norway (Norwegian)
      •  Poland (Polish)
      •  Portugal (Portuguese)
      •  Romania (Romanian)
      •  Russia (Russian)
      •  Slovakia (Slovak)
      •  Slovenia (Slovenian)
      •  Spain (Spanish)
      •  Sweden (Swedish)
      •  Switzerland(German, French)
      •  Turkey (Turkish)
      •  United Kingdom
      • Asia Pacific
      •  Australia
      •  China
      •  Hong Kong
      •  India
      •  Korea (Korean)
      •  Malaysia
      •  New Zealand
      •  Philippines
      •  Singapore
      •  Taiwan
      •  Thailand (Thai)
      • Americas
      •  Brazil (Portuguese)
      •  Canada
      •  Mexico (Spanish)
      •  United States
      Can't find the country/region you're looking for? Visit our export site or find a local distributor.
  • Translate
  • Profile
  • Settings
Raspberry Pi
  • Products
  • More
Raspberry Pi
Blog Add external SPI Flash Memory to Raspberry Pico - 2: first communication (and c++)
  • Blog
  • Forum
  • Documents
  • Quiz
  • Events
  • Polls
  • Files
  • Members
  • Mentions
  • Sub-Groups
  • Tags
  • More
  • Cancel
  • New
Join Raspberry Pi to participate - click to join for free!
Featured Articles
Announcing Pi
Technical Specifications
Raspberry Pi FAQs
Win a Pi
GPIO Pinout
Raspberry Pi Wishlist
Comparison Chart
Quiz
  • Share
  • More
  • Cancel
Group Actions
  • Group RSS
  • More
  • Cancel
Engagement
  • Author Author: Jan Cumps
  • Date Created: 28 Nov 2022 1:28 PM Date Created
  • Views 3400 views
  • Likes 10 likes
  • Comments 2 comments
Related
Recommended
  • raspberry
  • pico
  • pico_m25
  • pico_eurocard

Add external SPI Flash Memory to Raspberry Pico - 2: first communication (and c++)

Jan Cumps
Jan Cumps
28 Nov 2022
Add external SPI Flash Memory to Raspberry Pico - 2: first communication (and c++)

A projects to learn the SPI API of the RP2040 C SDK, and to use it to control an external Flash IC. In this post, I set up the firmware and execute a first communication. 

image

Hardware Initialisation

I'm setting the SPI pins functional and pull the nHOLD and nWRITEPROTECT high. I'm also pulling the nCS of the SD Card on the Pico Eurocard high, because I use the same SPI peripheral for the SPI flash.

Pre-reads:

  • Add external SPI Flash Memory to Raspberry Pico - 1: hardware
  • Raspberry Pico and CMake - create your own C lib or subdirectory with header files

I've written a helper function for GPIO, and one for SPI. Here's a repeat of the pin assignments of post 1:

pin IC function PICO function GPIO PICO pin
1 S# SPI1 CSn IO9 12 has to be different than the one used by the SD Card, if sharing SPI1
2 DQ1 SPI1 RX IO12 16
3 W# GPIO IO14 19 pulled high at this time, may revisit that
4 VSS ground 38
5 DQ0 SPI1 TX IO11 15
6 C SPI1 SCK IO10 14
7 HOLD# GPIO IO15 20 pulled high at this time, may revisit that
8 VCC 3V3 (OUT) 36

#define M25_SPI          (spi1)
#define M25_SPI_RX_PIN   (12)
#define M25_SPI_SCK_PIN  (10)
#define M25_SPI_TX_PIN   (11)
#define M25_SPI_CSN_PIN  (9)

void setGPIO() {
    // disable Eurocard SDCard CS
    gpio_init(13);
    gpio_put(13, 1);
    gpio_set_dir(13, GPIO_OUT);
    // hold
    gpio_init(15);
    gpio_put(15, 1);
    gpio_set_dir(15, GPIO_OUT);
    // write
    gpio_init(14);
    gpio_put(14, 1);
    gpio_set_dir(14, GPIO_OUT);
}

void setSPI() {
    spi_init(M25_SPI, 1000 * 1000);
    gpio_set_function(M25_SPI_RX_PIN, GPIO_FUNC_SPI);
    gpio_set_function(M25_SPI_SCK_PIN, GPIO_FUNC_SPI);
    gpio_set_function(M25_SPI_TX_PIN, GPIO_FUNC_SPI);

    // Chip select is active-low, so we'll initialise it to a driven-high state
    gpio_init(M25_SPI_CSN_PIN);
    gpio_put(M25_SPI_CSN_PIN, 1);
    gpio_set_dir(M25_SPI_CSN_PIN, GPIO_OUT);
    
}

These are called in main(), before the real business starts.
In the initial design, I'll manually control the nCS.

m25 c++ Class, and the a bit of CMake 

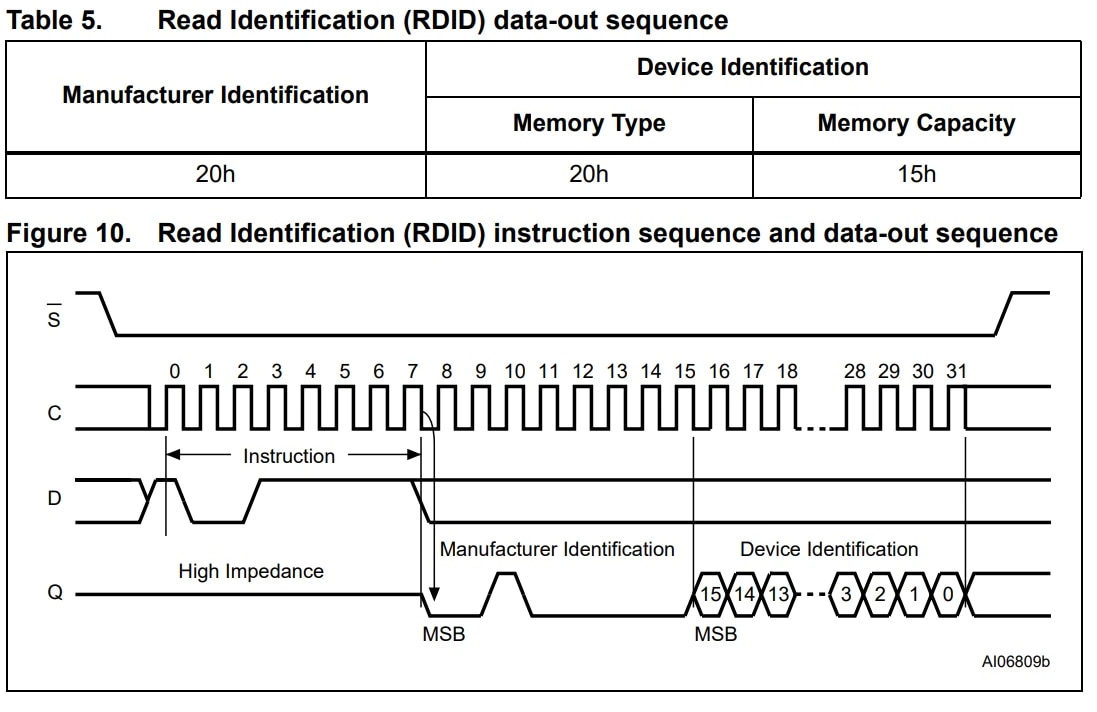
This first firmware can execute one command: read the Flash IC's Read Identification (RDID). I've written the code in c++, to show that the SDK works in that context too.

To get the RDID, you submit the command 9Fh to the IC, with ~CS low. Then, keeping the ~CS low, you clock out 32 bits. See the structure below:

image

Code

m25 class header:

#ifndef _M25_H
#define _M25_H

#include "hardware/gpio.h"
#include "hardware/spi.h"


class m25 {
public:
  m25(spi_inst_t * spi, uint cs) : _spi(spi), _cs(cs) {}
  ~m25() {}
  uint8_t rdid();
private:
  spi_inst_t * _spi;
  uint _cs;

  void setDataBits(uint data_bits);

  void cs_select() {
    asm volatile("nop \n nop \n nop");
    gpio_put(this->_cs, 0);  // Active low
    asm volatile("nop \n nop \n nop");
  }

void cs_deselect() {
    asm volatile("nop \n nop \n nop");
    gpio_put(this->_cs, 1);
    asm volatile("nop \n nop \n nop");
}  
};

#endif // _MM25_H

The source code:

#include "m25.h"

#define FLASH_CMD_RDID         0x9F

void m25::setDataBits(uint data_bits) {
    spi_set_format( this->_spi,   // SPI instance
                    data_bits,    // Number of bits per transfer
                    SPI_CPOL_0,   // Polarity (CPOL)
                    SPI_CPHA_0,   // Phase (CPHA)
                    SPI_MSB_FIRST);    
}

uint8_t m25::rdid() {
    uint8_t retval = 0U;
    uint8_t buf[3];
    // command
    this->setDataBits(8);
    uint8_t cmdbuf[] = {
            FLASH_CMD_RDID,
    };
    this->cs_select();
    spi_write_blocking(this->_spi, cmdbuf, 1);
    spi_read_blocking(this->_spi, 0, buf, 1); // Manufacturer Identification
    spi_read_blocking(this->_spi, 0, buf + sizeof buf[0], 2); // Device Identification (Memory Type || Memory Capacity)
    this->cs_deselect();
    return retval;
}

In the main file, this is how this gets called:

#include "hardware/gpio.h"
#include "hardware/spi.h"

#include "m25.h"


int main() {
    m25 *eeprom = nullptr;

    setGPIO();
    setSPI();

    eeprom = new m25(M25_SPI, M25_SPI_CSN_PIN);
    uint8_t rdid = eeprom->rdid();

    delete eeprom;
    eeprom = nullptr;

    while(1) {
    }
    return 0;;
}

When you set a breakpoint at the last line of the m25::rdid() method, this is the result:

image

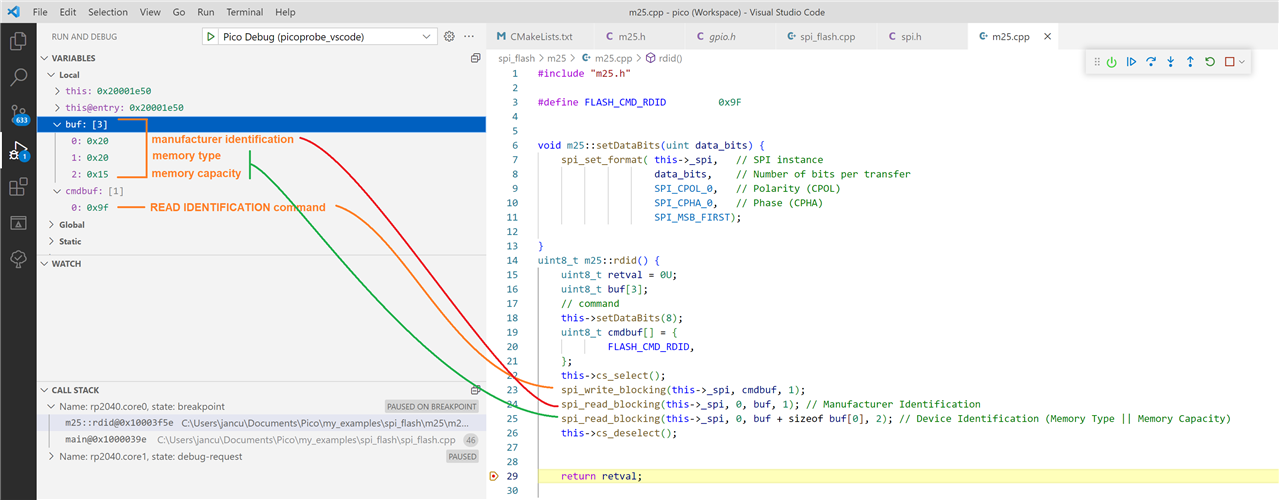
You find the 3 attributes of RDID back, as specified in the datasheet.

CMake setup

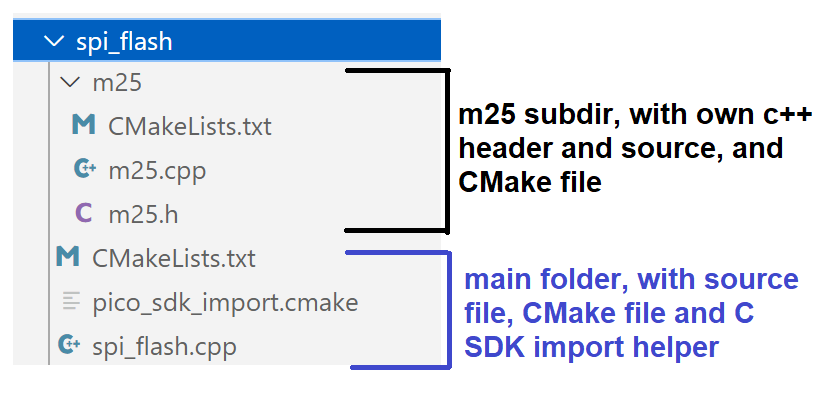
In this post, I'm introducing a feature of CMake: you can divide your projects in directories, while keeping the main CMake file simple. This way you can abstract the intrinsics of your submodules. It's also a starting point if you want to turn them into reusable libraries later.

Directory structure:

image

./CMakeList.txt:

cmake_minimum_required(VERSION 3.13)

# Pull in SDK (must be before project)
include(pico_sdk_import.cmake)

project(spi_flash C CXX ASM)
set(CMAKE_C_STANDARD 11)
set(CMAKE_CXX_STANDARD 17)

set(PICO_DEOPTIMIZED_DEBUG=1)

pico_sdk_init()

add_subdirectory(m25)

add_executable(spi_flash
        spi_flash.cpp
        )


target_link_libraries(spi_flash pico_stdlib hardware_spi m25)


pico_add_extra_outputs(spi_flash)

This CMake file knows that we want to use the ./m25 directory in our project. It does not know how it has to be built. CMake will check the CMake file in that dir, and include those instructions in the make cycle.

./m25/CMakeList.txt:

add_library( m25
    m25.h
    m25.cpp
    )

target_link_libraries(m25
    hardware_clocks
    hardware_resets
    hardware_spi
)

target_include_directories(m25 PUBLIC "${CMAKE_CURRENT_SOURCE_DIR}")

This CMake file just knows how to build the ./m25 directory. Using these two files will also take care that VSCode finds the includes, and get the usual autocomplete and inspect functionality.

VSCode project, with binary UF2 firmware, is attached:

spi_flash_20221128.zip

link to all posts in this series

  • Sign in to reply
  • shabaz
    shabaz over 2 years ago

    Nice!

    It easily compiled with CLion too. Nice how stable CMake is, and the Pico SDK, I didn't even check to see which version of the SDK I had. It's getting easier than Arduino.

    I'm interested in using this with 1.8V Flash, and possibly 2.5V in future too, it will need a simple interfacing circuit. It's cheaper than a Flash programmer! And open source : )

    I extracted the zip file into any folder, and then selected that folder using the Open Project wizard. When the popup appeared, there was just one thing to configure: I typed my path to the Pico C/C++ SDK:

    image

    That was it, it did everything else automatically. I did a clean build using Build->Clean followed by Build->Build Project. 

    image

    The built file was in the appropriate folder:

    image

    • Cancel
    • Vote Up 0 Vote Down
    • Sign in to reply
    • More
    • Cancel
  • Jan Cumps
    Jan Cumps over 2 years ago

    I did not do my best to write proper c++. One of the things I'd change is to define the constants as class constants.

    In the header:

    class m25 {
    public:
      // ...
    
    private:
      enum commands : uint8_t { 
        FLASH_CMD_RDID = 0x9F};
      // ...

    In the cpp file, remove this line:

    #define FLASH_CMD_RDID         0x9F
    There are more ways to do this. Critique is welcome.
    • Cancel
    • Vote Up 0 Vote Down
    • Sign in to reply
    • More
    • Cancel
element14 Community

element14 is the first online community specifically for engineers. Connect with your peers and get expert answers to your questions.

  • Members
  • Learn
  • Technologies
  • Challenges & Projects
  • Products
  • Store
  • About Us
  • Feedback & Support
  • FAQs
  • Terms of Use
  • Privacy Policy
  • Legal and Copyright Notices
  • Sitemap
  • Cookies

An Avnet Company © 2025 Premier Farnell Limited. All Rights Reserved.

Premier Farnell Ltd, registered in England and Wales (no 00876412), registered office: Farnell House, Forge Lane, Leeds LS12 2NE.

ICP 备案号 10220084.

Follow element14

  • X
  • Facebook
  • linkedin
  • YouTube