element14 Community
element14 Community
    Register Log In
  • Site
  • Search
  • Log In Register
  • About Us
  • Community Hub
    Community Hub
    • What's New on element14
    • Feedback and Support
    • Benefits of Membership
    • Personal Blogs
    • Members Area
    • Achievement Levels
  • Learn
    Learn
    • Ask an Expert
    • eBooks
    • element14 presents
    • Learning Center
    • Tech Spotlight
    • STEM Academy
    • Webinars, Training and Events
    • Learning Groups
  • Technologies
    Technologies
    • 3D Printing
    • FPGA
    • Industrial Automation
    • Internet of Things
    • Power & Energy
    • Sensors
    • Technology Groups
  • Challenges & Projects
    Challenges & Projects
    • Design Challenges
    • element14 presents Projects
    • Project14
    • Arduino Projects
    • Raspberry Pi Projects
    • Project Groups
  • Products
    Products
    • Arduino
    • Avnet Boards Community
    • Dev Tools
    • Manufacturers
    • Multicomp Pro
    • Product Groups
    • Raspberry Pi
    • RoadTests & Reviews
  • Store
    Store
    • Visit Your Store
    • Choose another store...
      • Europe
      •  Austria (German)
      •  Belgium (Dutch, French)
      •  Bulgaria (Bulgarian)
      •  Czech Republic (Czech)
      •  Denmark (Danish)
      •  Estonia (Estonian)
      •  Finland (Finnish)
      •  France (French)
      •  Germany (German)
      •  Hungary (Hungarian)
      •  Ireland
      •  Israel
      •  Italy (Italian)
      •  Latvia (Latvian)
      •  
      •  Lithuania (Lithuanian)
      •  Netherlands (Dutch)
      •  Norway (Norwegian)
      •  Poland (Polish)
      •  Portugal (Portuguese)
      •  Romania (Romanian)
      •  Russia (Russian)
      •  Slovakia (Slovak)
      •  Slovenia (Slovenian)
      •  Spain (Spanish)
      •  Sweden (Swedish)
      •  Switzerland(German, French)
      •  Turkey (Turkish)
      •  United Kingdom
      • Asia Pacific
      •  Australia
      •  China
      •  Hong Kong
      •  India
      •  Korea (Korean)
      •  Malaysia
      •  New Zealand
      •  Philippines
      •  Singapore
      •  Taiwan
      •  Thailand (Thai)
      • Americas
      •  Brazil (Portuguese)
      •  Canada
      •  Mexico (Spanish)
      •  United States
      Can't find the country/region you're looking for? Visit our export site or find a local distributor.
  • Translate
  • Profile
  • Settings
Raspberry Pi
  • Products
  • More
Raspberry Pi
Blog Look Ma, no display: Using the Raspberry Pi serial console
  • Blog
  • Forum
  • Documents
  • Quiz
  • Events
  • Polls
  • Files
  • Members
  • Mentions
  • Sub-Groups
  • Tags
  • More
  • Cancel
  • New
Join Raspberry Pi to participate - click to join for free!
Featured Articles
Announcing Pi
Technical Specifications
Raspberry Pi FAQs
Win a Pi
GPIO Pinout
Raspberry Pi Wishlist
Comparison Chart
Quiz
  • Share
  • More
  • Cancel
Group Actions
  • Group RSS
  • More
  • Cancel
Engagement
  • Author Author: fustini
  • Date Created: 17 Jul 2012 11:23 PM Date Created
  • Views 6170 views
  • Likes 3 likes
  • Comments 8 comments
Related
Recommended
  • rpiintermediate
  • raspi
  • raspberry_pi
  • raspberrypi
  • rpi
  • ftdi

Look Ma, no display: Using the Raspberry Pi serial console

fustini
fustini
17 Jul 2012
imageWant to build this project?
View Parts


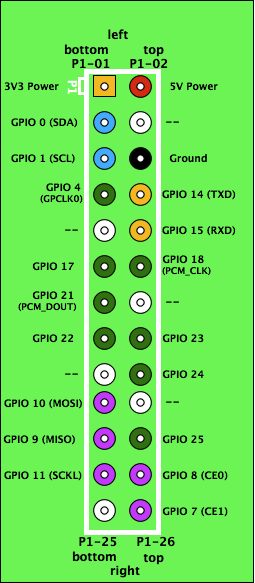
The serial console is a convenient way to interact with the Raspberry Pi when a display isn't handy.  From the pinout on the eLinux wiki, I can see that the serial port (aka UART) on the Pi is on GPIO Pin 14 (TX) and GPIO Pin 15 (RX):

image

This serial port can be connected to your computer via a USB to serial adapter.  However, these pins are designed for 3.3V (e.g. 3V3), so some USB to serial adapters may damage the Pi.  The simplest option is to use a 3.3V adapter such as:


  • FTDI TTL-232R-3V3 cable
  • SparkFun 3.3V Basic FTDI Breakout board


Another option is to use a logic level converter (e.g. level shifter).  This will prevent a higher voltage adapter from damaging the Pi's 3.3V pins.  I already had a 5V FTDI cable (TTL-232R-5V) and a SparkFun converter board, so I went this route:

image

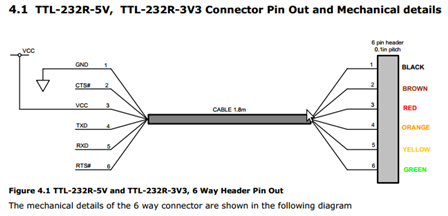
Here is the pinout for my TTL-232R-5V cable (datasheet):

image


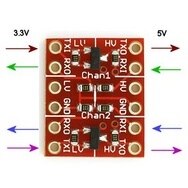
The SparkFun converter board is intended to be used in this configuration:

image

Here's how I wired it all up:


Raspberry Pi Pin
Jumper Wire

Logic Level Converter:

LV side (3.3V)

Logic Level Converter:

HV side (5V)

Jumper Wire

FTDI

cable

3V3 PowerRedLVHVRed

Red

(VCC)

GroundGreenGNDGNDGreen

Black

(GND)

TXD

(GPIO 14)

YellowTX1TX0Yellow

Yellow

(RXD)

RXD

(GPIO 15)

BlueRX0RX1Blue

Orange

(TXD)


Warning: make sure the Pi is turned off and FTDI cable unplugged from the PC before starting to wire up the above connections


Note: TXD (transmit) on the Pi needs to talk to RXD (receive) on FTDI cable, and TXD on the FTDI needs to talk to RXD on the Pi.  Otherwise, it would just be a straight-through connection, and communication wouldn't be possible.


Once wired up, power on the Pi and plug the FTDI cable into the PC.  Finally, a terminal emulator application will be needed to connect to the Pi.  I run Ubuntu Linux and already had gtkterm installed.  The program screen is another option for Linux and Mac (OS X).  On Windows, HyperTerm or TeraTerm should work.  The eLinux wiki has additional information.


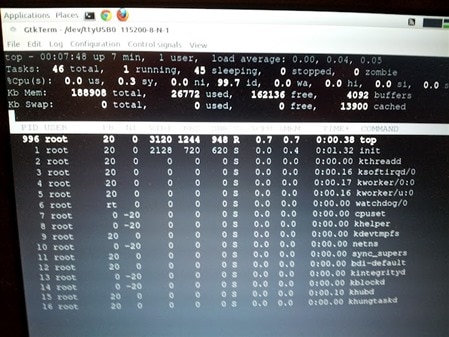
In gtkterm, I selected Configuration->Port and set the Port to /dev/ttyUSB0 and Baud to 115200.  The rest of the defaults are ok (8 bits, stopbits 1, flow control and parity: none).  After clicking OK, I pressed the Enter key a few times and the Pi prompted for username.  I was able to log in and then use the shell as I normally would.  Here is the utility top running:

image

Finally, FTDI has created a cable specifically for the Raspberry Pi: TTL-232R-RPi.  It is available from the UK-based FTDI web shop, but I've not seen it stocked yet by any distributors I'm familiar with.


Cheers,

Drew

http://twitter.com/pdp7


Product Name*DescriptionSupplier
Raspberry Pi Model B Raspberry Pi model BRaspberry Pi
Buy Now
Optical Mouse Basic USB optical mouseIONE / Pro Signal
Buy Now
Raspberry Pi Power Supply 120-240v to 5V power supply with micro USB connectorRaspberry Pi
Buy Now
Keyboard Basic USB keyboardGear Head / A4 Tech
Buy Now
Pre-Programmed 4GB SD Card 4GB Class 4 SD card preloaded with Debian 6 LinuxSamsung
Buy Now
Adafruit Pi Cobbler GPIO breakout kit for Raspberry PiAdafruit Industries
Buy Now
Breadboard Basic breadboard with 830 connection pointsTwin Industries
Buy Now
Jumper wire bundle Jumper wires for use on breadboardBud Industries
Buy Now
FTDI USB-Serial Cable 3.3v USB to serial interface cableFTDI
Buy Now


*Products and resources listed are listed to help members build their own Pi Projects. They are suggestions and listed for educational purposes. For substitutions of any parts, please post a question asking the original author.

  • Sign in to reply

Top Comments

  • gpolder
    gpolder over 12 years ago +1
    A cheaper alternative is, using a cell-phone usb cable: http://www.agri-vision.nl/CMS/index.php?option=com_content&view=article&id=32
Parents
  • PEarle
    PEarle over 12 years ago

    I got the TTL-232R-RPI USB-Serial cable from Farnell in the UK (http://uk.farnell.com/ftdi/ttl-232r-rpi/cable-debug-ttl-232-usb-rpi/dp/2147356).


    I'm running Windows - there is a comprehensive wiring/installation guide for this cable available at http://www.ftdichip.com/Support/Documents/DataSheets/Cables/DS_TTL-232R_RPi.pdf.


    You will prbably need to install a driver - there's another guide at http://www.ftdichip.com/Support/Documents/AppNotes/AN_119_FTDI_Drivers_Installation_Guide_for_Windows7.pdf which takes you through the process of installing these - a link (on page 2 I think) takes you to the driver download URL.


    Once you've got everything downloaded, you will end up with a COM port mapped to the USB port - the guide tells you how to do this. All you need to do then is use some sort of Terminal Emulator - I use Putty (available for free!). Open a terminal connection, boot up the Pi and you have instant terminal access from your PC !

    • Cancel
    • Vote Up 0 Vote Down
    • Sign in to reply
    • More
    • Cancel
Comment
  • PEarle
    PEarle over 12 years ago

    I got the TTL-232R-RPI USB-Serial cable from Farnell in the UK (http://uk.farnell.com/ftdi/ttl-232r-rpi/cable-debug-ttl-232-usb-rpi/dp/2147356).


    I'm running Windows - there is a comprehensive wiring/installation guide for this cable available at http://www.ftdichip.com/Support/Documents/DataSheets/Cables/DS_TTL-232R_RPi.pdf.


    You will prbably need to install a driver - there's another guide at http://www.ftdichip.com/Support/Documents/AppNotes/AN_119_FTDI_Drivers_Installation_Guide_for_Windows7.pdf which takes you through the process of installing these - a link (on page 2 I think) takes you to the driver download URL.


    Once you've got everything downloaded, you will end up with a COM port mapped to the USB port - the guide tells you how to do this. All you need to do then is use some sort of Terminal Emulator - I use Putty (available for free!). Open a terminal connection, boot up the Pi and you have instant terminal access from your PC !

    • Cancel
    • Vote Up 0 Vote Down
    • Sign in to reply
    • More
    • Cancel
Children
No Data
element14 Community

element14 is the first online community specifically for engineers. Connect with your peers and get expert answers to your questions.

  • Members
  • Learn
  • Technologies
  • Challenges & Projects
  • Products
  • Store
  • About Us
  • Feedback & Support
  • FAQs
  • Terms of Use
  • Privacy Policy
  • Legal and Copyright Notices
  • Sitemap
  • Cookies

An Avnet Company © 2025 Premier Farnell Limited. All Rights Reserved.

Premier Farnell Ltd, registered in England and Wales (no 00876412), registered office: Farnell House, Forge Lane, Leeds LS12 2NE.

ICP 备案号 10220084.

Follow element14

  • X
  • Facebook
  • linkedin
  • YouTube