


Introduction
A couple of months ago (November 2019) I'v been asked by e14phil to test and troubleshoot using the Omron HVC on the Raspberry Pi 4 using their python scripts (https://www.element14.com/community/docs/DOC-93443#comment-239308 ). There were already amazing Similar posts from ralphjy (Omron HVC-P2 Roadtest - Getting Started), as a follow up on . Goal was to interact with the product using USB and the SDK in a Windows Operating system environment.
In my case Phil was looking for someone to take it the python route. The plan was to publish a blog before Christmas 2019, but in the mean time I was selected to roadtest the 3 Series MDO Mixed Domain Oscilloscope. I immediately emailed Phil to cancel the HVC trouble shooting project, but the equipment was already sent, and arrived at my home at the same date as the scope. So after working very hard to review the scope before the deadline of 29 January, I now want to fulfill my promise by writing a blog about the Omron HVC on the Raspberry Pi 4 project.
Hardware
Let's first have a look at the hardware. Ralf has a interesting post on all hardware versions for Omron HVC technology: Omron HVC-P2 Roadtest - OKAO Vision Technology.
Mine is the HVC-P2 Camera and processor on separate boards. Communicates over serial UART. Here is a picture. Raspberry Pi on top, HVC-P2 connected to an USB2 port.
As you can see the power consumption (measured with board in action) is not very much for the challenging task the board performs.

When the HVC-P2 is connected to an usb port, a serial device is created. Below you see the list of tty devices before and after the unit is connected.
The units serial port is /dev/ttyACM0.
| Terminal |
pi@raspberrypi:~ $ pi@raspberrypi:~ $ ls /dev/tty* /dev/tty /dev/tty16 /dev/tty24 /dev/tty32 /dev/tty40 /dev/tty49 /dev/tty57 /dev/tty8 /dev/tty0 /dev/tty17 /dev/tty25 /dev/tty33 /dev/tty41 /dev/tty5 /dev/tty58 /dev/tty9 /dev/tty1 /dev/tty18 /dev/tty26 /dev/tty34 /dev/tty42 /dev/tty50 /dev/tty59 /dev/ttyAMA0 /dev/tty10 /dev/tty19 /dev/tty27 /dev/tty35 /dev/tty43 /dev/tty51 /dev/tty6 /dev/ttyprintk /dev/tty11 /dev/tty2 /dev/tty28 /dev/tty36 /dev/tty44 /dev/tty52 /dev/tty60 /dev/tty12 /dev/tty20 /dev/tty29 /dev/tty37 /dev/tty45 /dev/tty53 /dev/tty61 /dev/tty13 /dev/tty21 /dev/tty3 /dev/tty38 /dev/tty46 /dev/tty54 /dev/tty62 /dev/tty14 /dev/tty22 /dev/tty30 /dev/tty39 /dev/tty47 /dev/tty55 /dev/tty63 /dev/tty15 /dev/tty23 /dev/tty31 /dev/tty4 /dev/tty48 /dev/tty56 /dev/tty7 pi@raspberrypi:~ $ pi@raspberrypi:~ $ ls /dev/tty* /dev/tty /dev/tty16 /dev/tty24 /dev/tty32 /dev/tty40 /dev/tty49 /dev/tty57 /dev/tty8 /dev/tty0 /dev/tty17 /dev/tty25 /dev/tty33 /dev/tty41 /dev/tty5 /dev/tty58 /dev/tty9 /dev/tty1 /dev/tty18 /dev/tty26 /dev/tty34 /dev/tty42 /dev/tty50 /dev/tty59 /dev/ttyACM0 /dev/tty10 /dev/tty19 /dev/tty27 /dev/tty35 /dev/tty43 /dev/tty51 /dev/tty6 /dev/ttyAMA0 /dev/tty11 /dev/tty2 /dev/tty28 /dev/tty36 /dev/tty44 /dev/tty52 /dev/tty60 /dev/ttyprintk /dev/tty12 /dev/tty20 /dev/tty29 /dev/tty37 /dev/tty45 /dev/tty53 /dev/tty61 /dev/tty13 /dev/tty21 /dev/tty3 /dev/tty38 /dev/tty46 /dev/tty54 /dev/tty62 /dev/tty14 /dev/tty22 /dev/tty30 /dev/tty39 /dev/tty47 /dev/tty55 /dev/tty63 /dev/tty15 /dev/tty23 /dev/tty31 /dev/tty4 /dev/tty48 /dev/tty56 /dev/tty7 pi@raspberrypi:~ $ |
Software
OMRON has Python sample code available at GitHub (https://github.com/omron-devhub/B5T-007001_HVC-P2_for-Python).
This code provides B5T-007001(HVC-P2) python API class and sample code using that API class.
Instructions on how to use this code are in the readme.txt file. The code is written in Python 2.7, the nowadays more common Python3 is not supported,
Luckily Python 2.7 is standard installed on Raspberry Pi's most recent Raspbian Buster distribution.
For running the code pySerial and Python Imaging Library(PIL) are required.
So I started with the installation of pySerial and Pillow.
| Terminal |
pi@raspberrypi:~ $ python --version Python 2.7.16 pi@raspberrypi:~ $ pip install pyserial Looking in indexes: https://pypi.org/simple, https://www.piwheels.org/simple Requirement already satisfied: pyserial in /usr/lib/python2.7/dist-packages (3.4) pi@raspberrypi:~ $ pip install Pillow Looking in indexes: https://pypi.org/simple, https://www.piwheels.org/simple Requirement already satisfied: Pillow in /usr/lib/python2.7/dist-packages (5.4.1) pi@raspberrypi:~ $ |
Next I cloned the code from GitHub:
| Terminal |
pi@raspberrypi:~ $ pi@raspberrypi:~ $ pi@raspberrypi:~ $ git clone https://github.com/omron-devhub/B5T-007001_HVC-P2_for-Python.git Cloning into 'B5T-007001_HVC-P2_for-Python'... remote: Enumerating objects: 35, done. remote: Counting objects: 100% (35/35), done. remote: Compressing objects: 100% (34/34), done. remote: Total 35 (delta 7), reused 0 (delta 0), pack-reused 0 Unpacking objects: 100% (35/35), done. pi@raspberrypi:~ $ |
And finally I started execution.py on the serial port with a very high speed (921600 bd) and using the STB library.
| Terminal |
pi@raspberrypi:~ $ cd ./B5T-007001_HVC-P2_for-Python pi@raspberrypi:~/B5T-007001_HVC-P2_for-Python $ python execution.py /dev/ttyACM0 921600 ON ........... ............... ==== Elapsed time:219.58[msec] ==== Face Count = 1 [0] TrackingID:11 Detection X:1002 Y:604, Size:384 Conf:548 Direction LR:-15 UD:3 Roll:-2 Conf:233 Age Age:- Conf:- Status:NO_DATA Gender Gender:- Conf:- Status:NO_DATA Expression Exp:Neutral Score:52 (Neutral:52 Happiness:0 Surprise:20 Anger:27 Sadness:1 NegPos:0) Recognition No data is registered in the album. Body Count = 0 Hand Count = 0
Press Ctrl+C Key to end: |
It works! mission accomplished!.
That was easy, less than an hour work. So I decided to play a bit more with the device, and make a simple graphical user interface on top of execution.py using PySimpleGUI.
I made a copy of execution.py to execution_gui.py and added a function to create a guide window:
def creategui():
    sg.ChangeLookAndFeel('BlueMono')

    frame_layout = [
                  [sg.T('Elapsed', size=(60, 1), key='-ELAPSED-')],
                  [sg.Multiline('', size=(60,12), autoscroll=True, key='-ML-')],
               ]

    # define the window layout
    layout = [[sg.Text('OMRON HVC P2 Demo GUI', size=(50, 1), justification='center', font='Helvetica 20')],
              [sg.Image(filename='', key='image'),
               sg.Frame('Result', frame_layout)],
              [sg.ReadButton('Exit', size=(10, 1), pad=((0, 0), 3), font='Helvetica 14'),
               sg.RButton('Pause', key='-RUN-PAUSE-', size=(10,1), font='Any 14')]]

    # create the window and show it without the plot
    window = sg.Window('OMRON HVC P2 Demo Application',
                       location=(400,200))
    #window.Layout(layout).Finalize()
    window.Layout(layout)

    return window
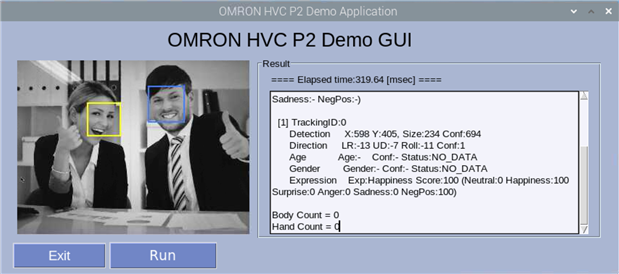
Next the main loop is extended with code to handle the 'exit' and 'run' buttons and to process the tracking results. For now the camera image is displayed and the detected faces are annotated with a box. The rest of the information (gaze, gender, expression etc.) are just shown in a text window.
The boxes are yellow when the gender is not known, blue for men and pink for woman.

pilim = img.getpilim()
                pilim = pilim.convert("RGB")

                window['-ELAPSED-'].Update('==== Elapsed time:{0} [msec] ===='.format(elapsed_time))
                window['-ML-'].Update(hvc_tracking_result)
                #print hvc_tracking_result
                if hvc_tracking_result.faces:
                    for f in (0, len(hvc_tracking_result.faces)-1):
                        pos_x = hvc_tracking_result.faces[f].pos_x/5
                        pos_y = hvc_tracking_result.faces[f].pos_y/5
                        size = hvc_tracking_result.faces[f].size/10
                        box = [pos_x-size,pos_y-size,pos_x+size,pos_y+size]
                        draw = ImageDraw.Draw(pilim)
                        genderstring = hvc_tracking_result.faces[f].gender
                        boxcolor = (255,255,0)
                        if 'Male' in genderstring.__str__():
                            boxcolor = (64,128,255)
                        if 'Female' in genderstring.__str__():
                            boxcolor = (255,64,255)
                        draw.rectangle(box, outline=boxcolor, width=2)

                bio = io.BytesIO()  # a binary memory resident stream
                pilim.save(bio, format= 'PNG')  # save image as png to it
                imgbytes = bio.getvalue()  # this can be used by OpenCV hopefully
                window.FindElement('image').Update(data=imgbytes)
In order to display the image, I needed a pointer to it, so therefore I added a function to greyscale_image.py:
def getpilim(self):
        w = self.width
        h = self.height

        # if no data, no save.
        if w == 0 or h == 0:
            return False

        img = Image.new("L", (w, h), 0)
        x = 0
        y = 0
        for y in range(h):
            for x in range(w):
                img.putpixel((x, y), ord(self.data[w * y + x]))

        return img
And here is the result:
I will add more functionality in the future.
You can find all my adjustments in a fork that I made from the B5T-007001_HVC-P2_for-Python repository.
This fork can be found here: https://github.com/AgriVision/B5T-007001_HVC-P2_for-Python .
Top Comments