


Table of Contents
2026 Update
In 2026, the install process is a little easier. Here are the steps I took.
1. Install Python (I used the standalone installer) and after install check that you can run python from a new PowerShell window by simply typing python --version
2. Install git and check it can run from a new PowerShell window by typing git
3. Create a pico folder (I used the folder C:\DEV\projects\pico) and then using PowerShell, go to the pico folder, and follow these steps which are taken from the Pico SDK user manual:
git clone https://github.com/raspberrypi/pico-sdk.git --branch mastercd pico-sdkgit submodule update --initcd ..git clone https://github.com/raspberrypi/pico-examples.git --branch mastergit clone https://github.com/raspberrypi/pico-extras.git
4. Install the ARM GNU toolchain; I decided to install in C:\DEV\pico\arm_gnu_toolchain so that in that arm_gnu_toolchain folder, I could see folders called arm-none-eabi, bin, include, lib and so on.
5. Create a User variable in Environment variables, called PICO_TOOLCHAIN_PATH, set to C:\DEV\projects\pico\arm_gnu_toolchain
6. Install CLion
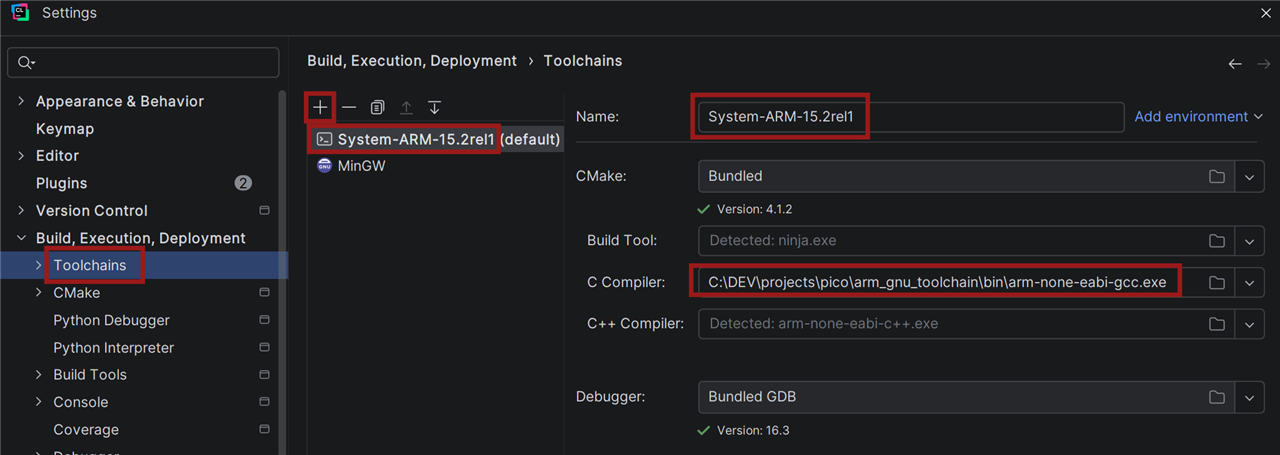
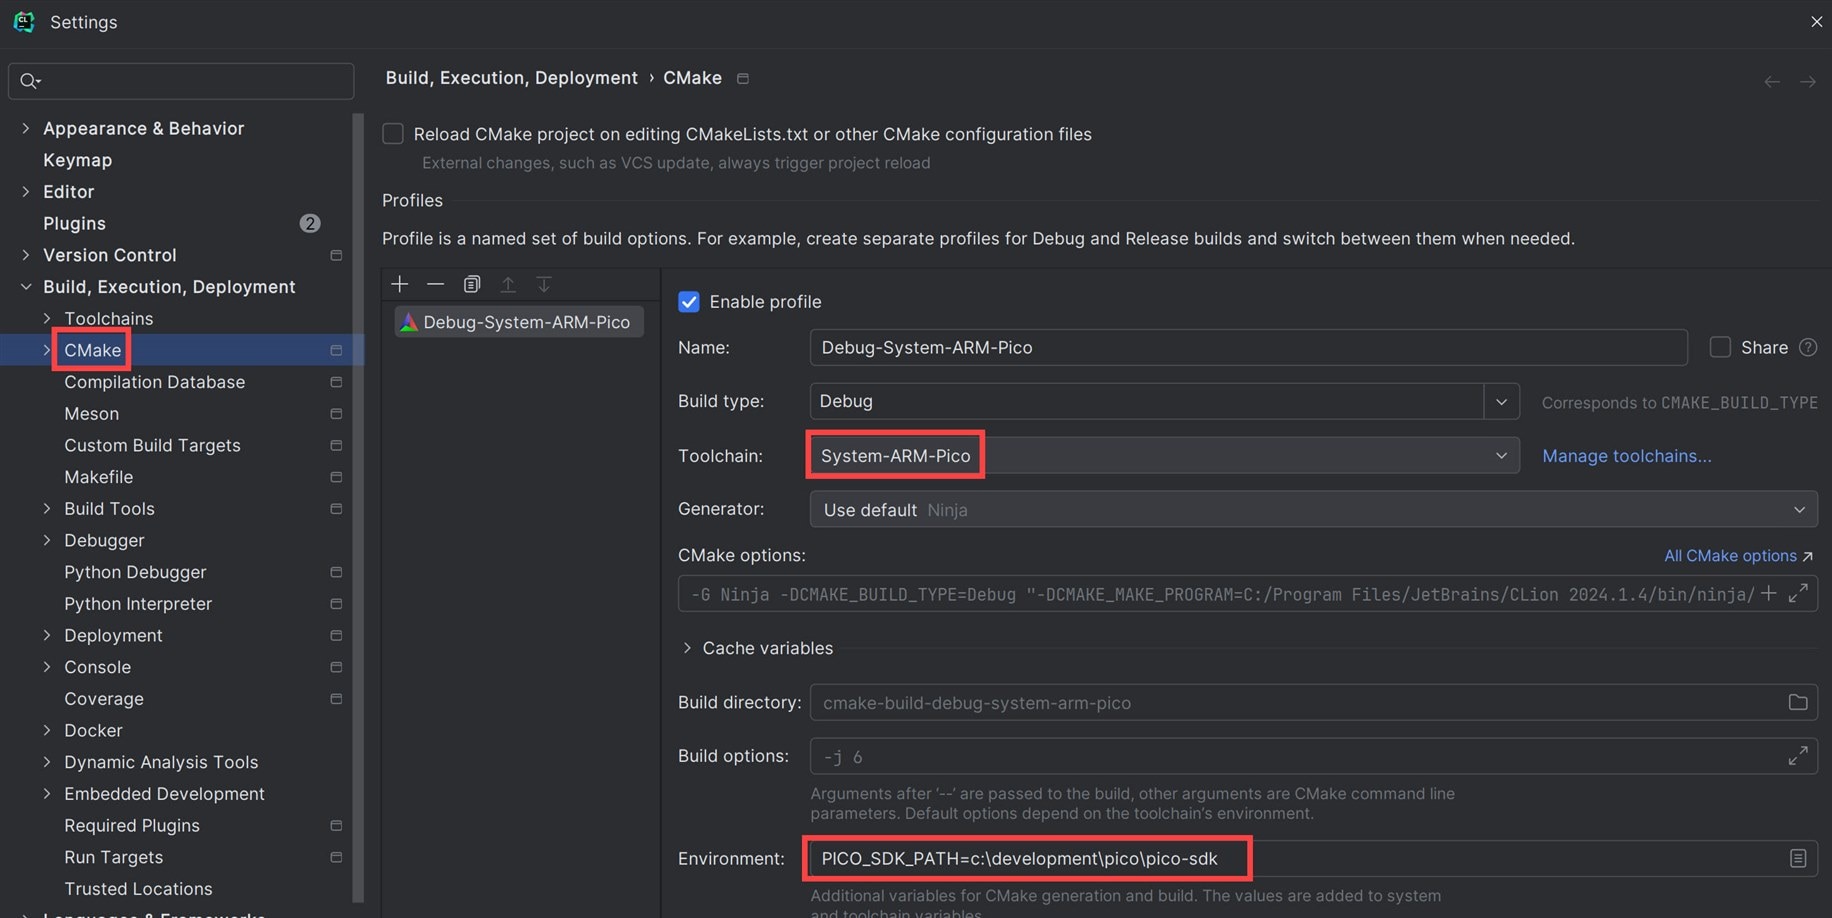
7. Go to the CLion Settings, navigate to Builds,Execution,Deployment->Toolchains and create a new toolchain and configure as shown in the screenshot; you can see I set the C Compiler to C:\DEV\projects\pico\arm_gnu_toolchain\bin\arm-none-eabi-gcc.exe
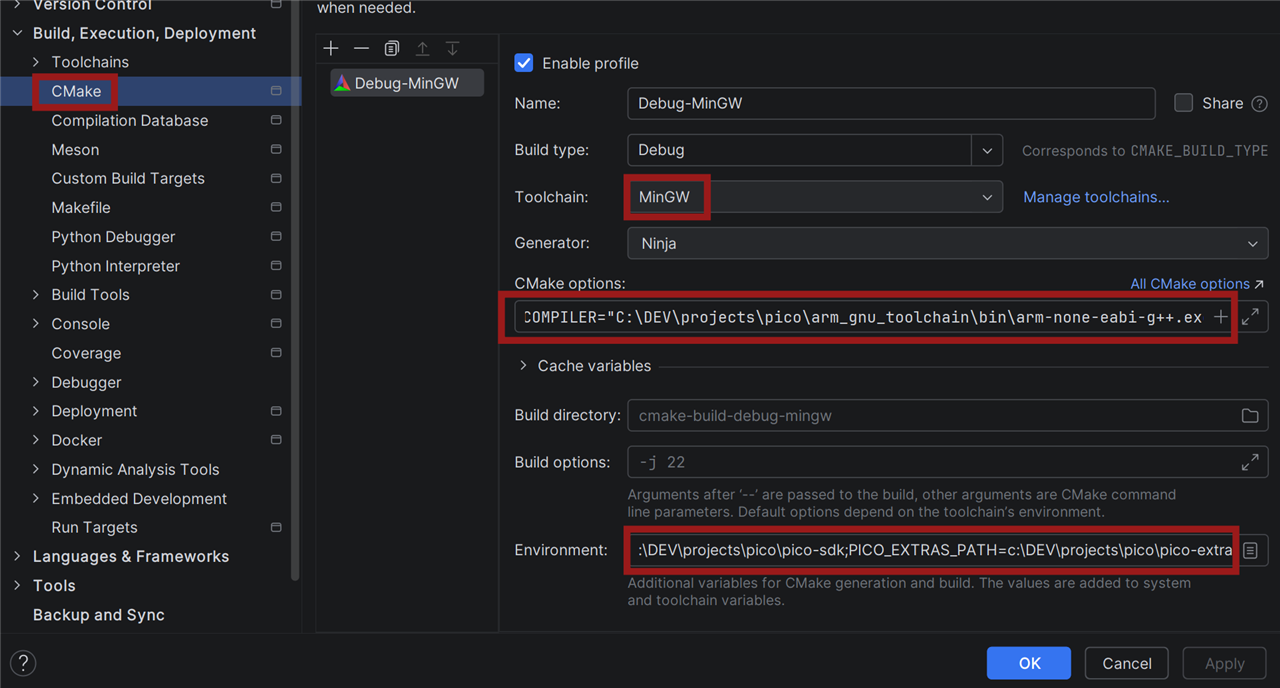
8. Navigate to the CMake settings, and configure as shown in the screenshot below. For the CMake options, I used the following: -G Ninja -DCMAKE_C_COMPILER="C:\DEV\projects\pico\arm_gnu_toolchain\bin\arm-none-eabi-gcc.exe" -DCMAKE_CXX_COMPILER="C:\DEV\projects\pico\arm_gnu_toolchain\bin\arm-none-eabi-g++.exe
For the Environment I used: PICO_SDK_PATH=C:\DEV\projects\pico\pico-sdk;PICO_EXTRAS_PATH=C:\DEV\projects\pico\pico-extras
Note that it is very key that the Toolchain selection is set to MinGW. That’s because a program called picotool gets downloaded during the build process, and it is a Windows application that will get built using MinGW’s gcc compiler that was part of the CLion installation. Granted it seems confusing since we want to build an ARM executable for the actual project code, but it definitely needs to be set to MinGW.
9. That’s it, now code should build. You could try to build any project you have. From the top menu bar in CLion, you may need to go to Tools->CMake->Reset Cache and Reload Project to clear out old settings for a project first. If all goes well, a folder called cmake-build-debug-mingw will appear in your project folder, and it will contain various files, but especially the .uf2 suffixed final built file, ready for uploading to a Pi Pico.
2024 Update
Note that in 2024, there is now a new Pico SDK, version 2.0.0, and a new RP2350 processor (used in the Pico 2), and CLion has seen many releases since the blog post was originally written! If you're following this blog post in 2024, then you'll need to bear the following in mind:
(1) Ensure you have installed Visual Studio, since you need a Windows compiler. There are other options, but you may as well install Visual Studio since it is free. I used Visual Studio 2022.
(2) Install the latest Pico Setup for Windows even if the version is different to the Pico SDK that you wish to use. For instance, I wished to use the latest pico SDK 2.0.0, but the latest Pico Setup for Windows was version 1.5.
(3) Install an ARM GNU toolchain the file you need is called something like arm-gnu-toolchain-13.3.rel1-mingw-w64-i686-arm-none-eabi.zip but use the latest. In my case, it got installed to C:\Program Files (x86)\Arm GNU Toolchain arm-none-eabi\13.3 rel1
(4) Install the pico-sdk somewhere (I chose to do this in a folder called c:\development\pico), by typing (in a Windows PowerShell or Command Prompt):
git clone -b master https://github.com/raspberrypi/pico-sdk.gitcd .\pico-sdk\git submodule update --initcd ..git clone https://github.com/raspberrypi/pico-extras.gitgit clone https://github.com/raspberrypi/pico-playground.gitgit clone https://github.com/raspberrypi/pico-examples.git
(5) Either build picotool, or obtain the zip file containing the executable. Place the executable and associated .dll file into a location of your choice (I chose a folder called c:\development\pico\win_tools, so that when extracted, a folder called picotool was created, and inside there was a picotool.exe file and a libusb-1.0.dll file.
If you're building from scratch, you'll need to git clone https://github.com/raspberrypi/picotool.git and then you'll also need the latest libusb-1.0 binary fromhttps://github.com/libusb/libusb/releases (it will be called something like libusb-1.0.27.7z and you'll need 7-zip to extract it all). I extracted to a folder called c:\development\pico\libusb-win and then create a Windows environment variable called LIBUSB_ROOT with the value C:\development\pico\libusb-win and then, in the cloned picotool folder, type:
mkdir build
cd build
cmake -G "NMake Makefiles" ..
nmake
Once it is built (it will be a file called build/picotool.exe), copy across that executable into a folder of your choice, mine was called c:\development\pico\libusb-win\picotool (make sure the folder is called picotool) and in there was the picotool.exe file. Place the libusb-1.0.dll file from C:\development\pico\libusb-win\VS2022\MS32\dll into that folder too.
(6) In CLion, go to File->Settings->Build,Execution,Deployment->Toolchains and configure as shown. To do this, click on the '+' button highlighted in red, and select "System".
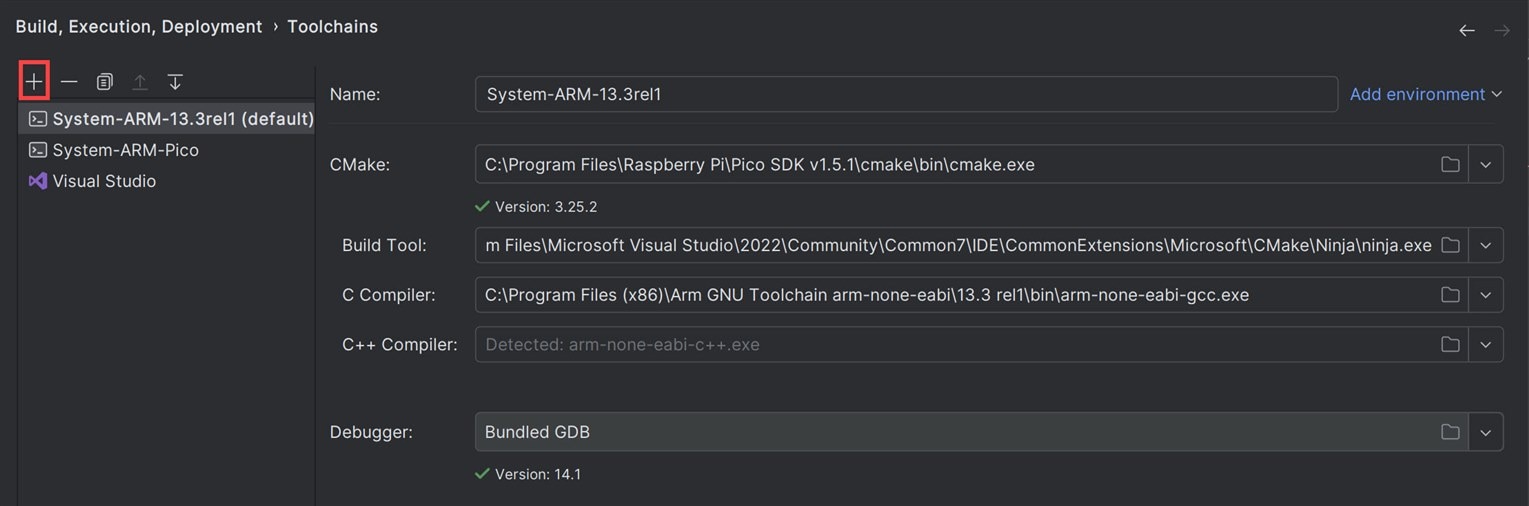
When finished, click Apply.
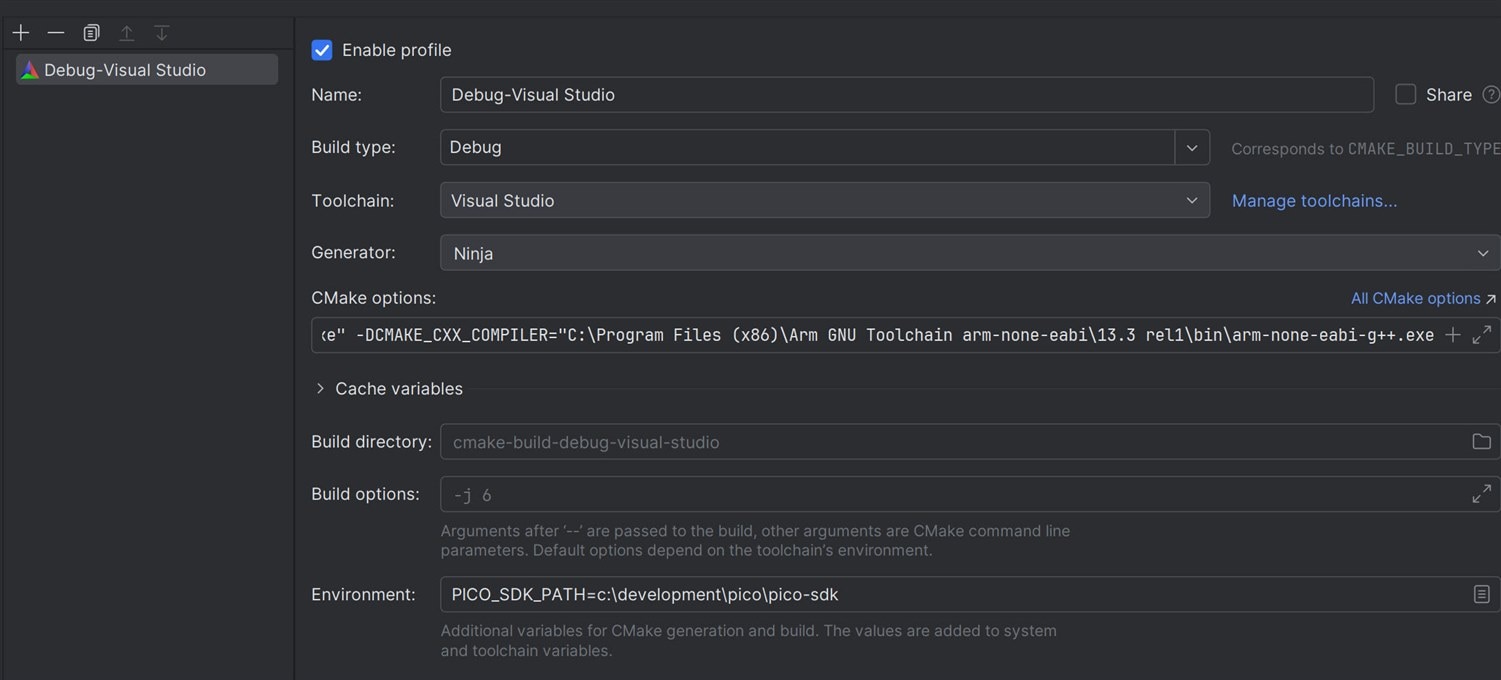
(7) Now repeat step (6) but when you click '+', select "Visual Studio" and configure as shown here, and again click on Apply when finished:

It is important that both the ARM toolchain, and the Visual Studio toolchain, are both configured. This is because the build scripts try to build picotool.exe normally, and that's a Windows executable.
(8) Go to File->Settings->Build,Execution,Deployment->CMake and configure as shown here; notice that the Toolchain called Visual Studio is selected, and not ARM.
In the CMake Options text box, this should be typed:
-G Ninja -DCMAKE_C_COMPILER="C:\ARM_TOOLCHAIN\14.2_rel1\bin\arm-none-eabi-gcc.exe" -DCMAKE_CXX_COMPILER="C:\ARM_TOOLCHAIN\14.2_rel1\bin\arm-none-eabi-g++.exe
In the Environment text box, type:
PICO_SDK_PATH=c:\development\pico\pico-sdk
If you're using PICO-EXTRAS then use this line instead:
Click Apply/OK.
(8) Now you're done! If you have a project open, test it by manually deleting whatever build folder exists (it may be called something like cmake-build-debug-visual-studio and then click on Tools->CMake->Reset Cache and Reload Project, and then hit the hammer icon to perform the build. If you get an error stating that something like "\A" is not found, then you need to do that Reset Cache and Reload Project and the error should disappear.
(9) You may have noticed that picotool was built as part of the project. This is not ideal, it wastes time, and it doesn't make use of the picotool.exe that was installed or created in step (5). I have created an issue here, but in the meantime, to solve this, I had to do the following steps:
(9.1) Edit the pico-sdk\tools\Findpicotool.cmake file, and near the top, immediately after the line stating cmake_minimum_required(VERSION 3.17) type the following:
# if PICOTOOL_OVERRIDE_DIR system environment variable is set,
# then use that as the folder for the picotool executable
if (DEFINED ENV{PICOTOOL_OVERRIDE_DIR})
    message("PICOTOOL_OVERRIDE_DIR env var is set to '$ENV{PICOTOOL_OVERRIDE_DIR}'")
    add_executable(picotool IMPORTED GLOBAL)
    set_property(TARGET picotool PROPERTY IMPORTED_LOCATION $ENV{PICOTOOL_OVERRIDE_DIR}/picotool)
    # check the picotool version:
    execute_process(COMMAND $ENV{PICOTOOL_OVERRIDE_DIR}/picotool version
                    OUTPUT_VARIABLE PICOTOOL_VERSION
                    OUTPUT_STRIP_TRAILING_WHITESPACE)
    string(REGEX MATCH "^picotool v${picotool_VERSION_REQUIRED}" PICOTOOL_VERSION_MATCH ${PICOTOOL_VERSION})
    if (NOT PICOTOOL_VERSION_MATCH)
        message("picotool version response was: ${PICOTOOL_VERSION}")
        message(FATAL_ERROR "PICOTOOL_OVERRIDE_DIR is set to '$ENV{PICOTOOL_OVERRIDE_DIR}', but the version of picotool found is not ${picotool_VERSION_REQUIRED}")
    endif()
endif ()
(9.2) Create a Windows System Environment Variable (not a Windows User Environment Variable) called PICOTOOL_OVERRIDE_DIR set to C:/development/pico/win_tools/picotool
(9.3) Close and restart CLion, so that the system environment variable is detected by CLion
(9.4) Now you could redo step (8) and see that the prebuilt picotool.exe is used. If it is successful, there should be a .uf2 file built in the cmake-build-debug-visual-studio (or similar-ish named) folder.
Introduction
When coding for the Pi Pico, I usually use a hybrid environment: all my code that I’m working on, plus the Pico C/C++ SDK, reside on a small Linux machine in a corner of the home, and then I connect to it remotely from my laptop using a couple of applications called Visual Studio Code and SecureCRT. It’s a great combination; I’ll write it up if there is any interest.
However, I recently tried a different approach, which I believe is equally flexible, but has a few interesting advantages. These are:
- All-in-one, no need for multiple applications
- Reduced effort to set up and use
- Excellent code browsing and editing capabilities
Of the three, perhaps the most powerful feature from my perspective is the ease of code browsing and code editing. CLion is pretty much world-class at that, and it is a significant benefit because if one can navigate code easily, and if the tool helps you write better code as you go, then it can save days and weeks of time coding and troubleshooting.
So, if you want to save time and stress then read on : ) The steps below are specific for Windows, but Mac and Linux are possible too (if you try it on those systems, please write a blog, or comment below with screenshots if possible where things are different to the Windows screenshots, to help everyone).
This blog post will first discuss some CLion highlights, followed by how to use CLion with the Pi Pico.
Some CLion Highlights
CLion was developed by a company called JetBrains. Google’s Android Studio is also based on a JetBrains product, and it has a very similar look and feel to CLion. If you like Android Studio, then you’ll like CLion.
Code Navigation
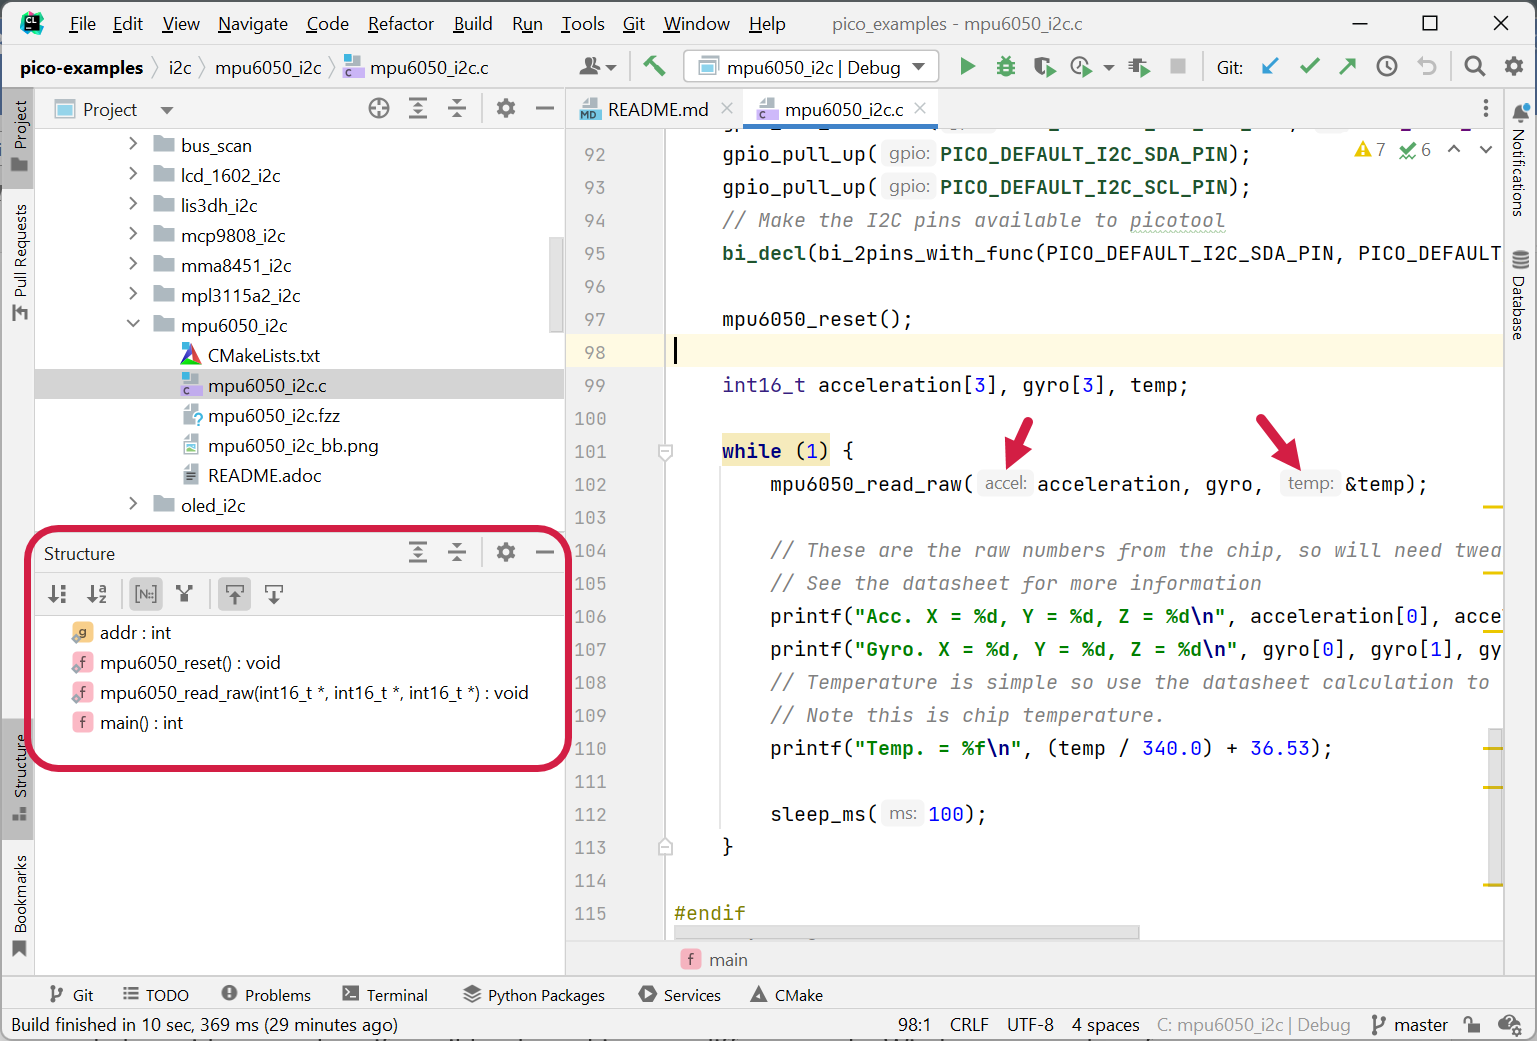
The screenshot below shows what the environment looks like while coding. The top-left pane shows the file names in the project, and double-clicking on a name will display the code in the right pane; that’s pretty standard.
I like that for each function call, CLion will display the description of the parameter as shown with the red arrows.
Another powerful feature is the Structure pane (go to View->Tool Windows->Structure to open it). It shows a kind of summary of what’s in the code file. I frequently look at that while coding, to recall the names of (say) global variables, or functions and their parameter types. It’s a huge time-saver.
A super-powerful keypress is Ctrl-B. If your text cursor is in any function or variable name in the code, pressing Ctrl-B will immediately either highlight where the variable was defined, or it will open up the file containing that function or variable in a separate tab. You can quickly drill down through nested functions in this way.
SSH and Command Line Windows
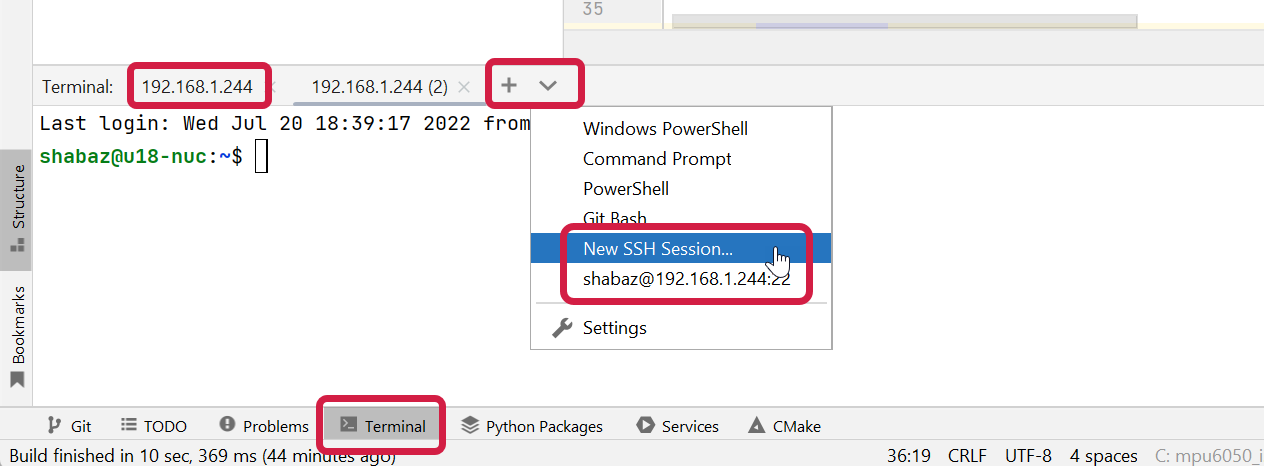
Another neat feature (useful if your code resides on a separate Linux machine for instance) is the built-in SSH terminal capability. It’s possible to have a whole range of tabs opened up, including Windows command prompts, and they all appear in a pane at the bottom of the CLion window. To use SSH, go to Tools->Start SSH Session, or alternatively go to File->Settings->Tools->SSH Configurations first. Terminals can be collapsed out of the way while you’re using the code editor, by clicking on the indicator named Terminal at the bottom of the display.
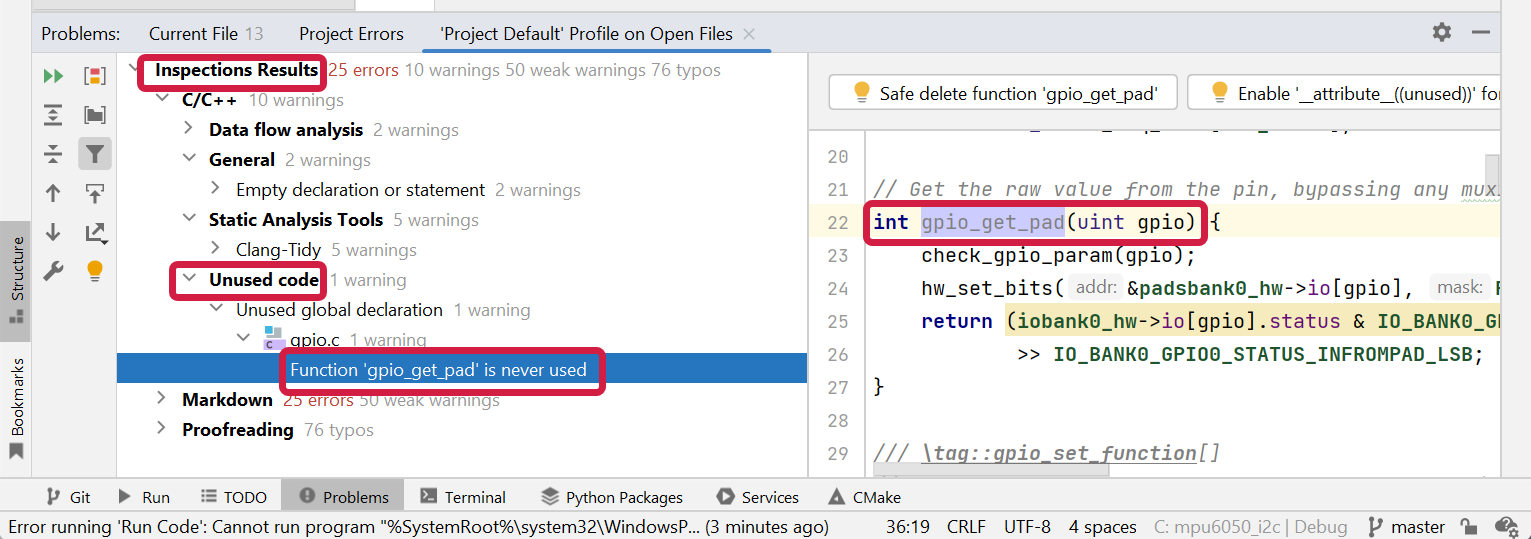
Code Inspection
The code inspection (select Code->Inspect Code) looks interesting; I have not used it much yet:
Git and GitHub
Git and GitHub integration is built-in, and from what I tried, it is well executed. I’ll just comment on some basics, good enough for individual projects. If you’re working on large projects with many contributors, then it’s good to read up on the subject further.
You can set up your GitHub credentials from File->Settings->Version Control.
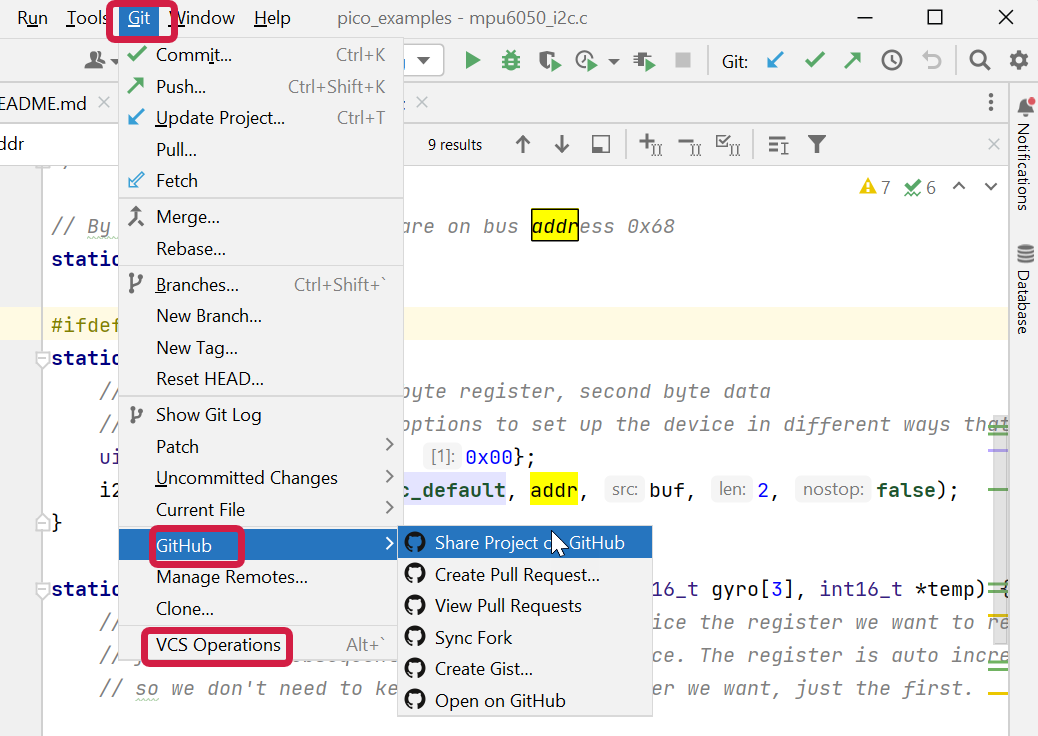
As soon as CLion starts, there are three buttons and the VCS one (it’s short for Version Control System) allows you to select that you want to open an existing project from GitHub.

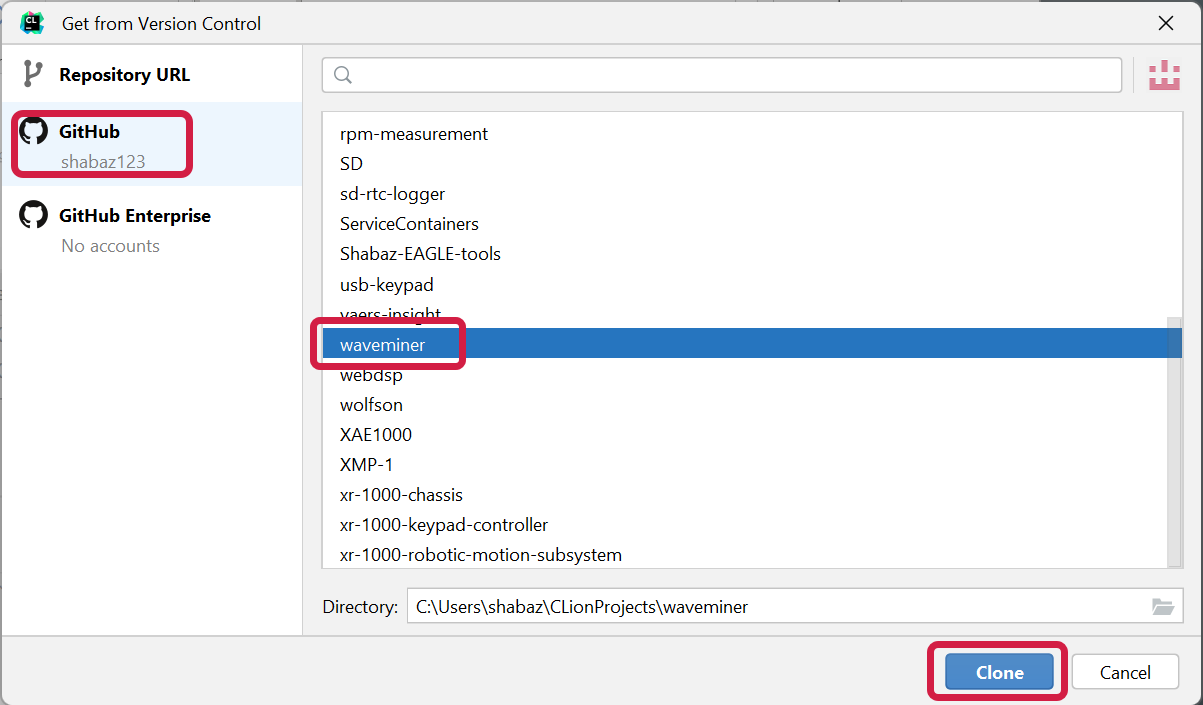
Select your project as shown in the example below and click Clone (which just makes a copy of the content on GitHub, onto your PC, so that you can work with the code locally):
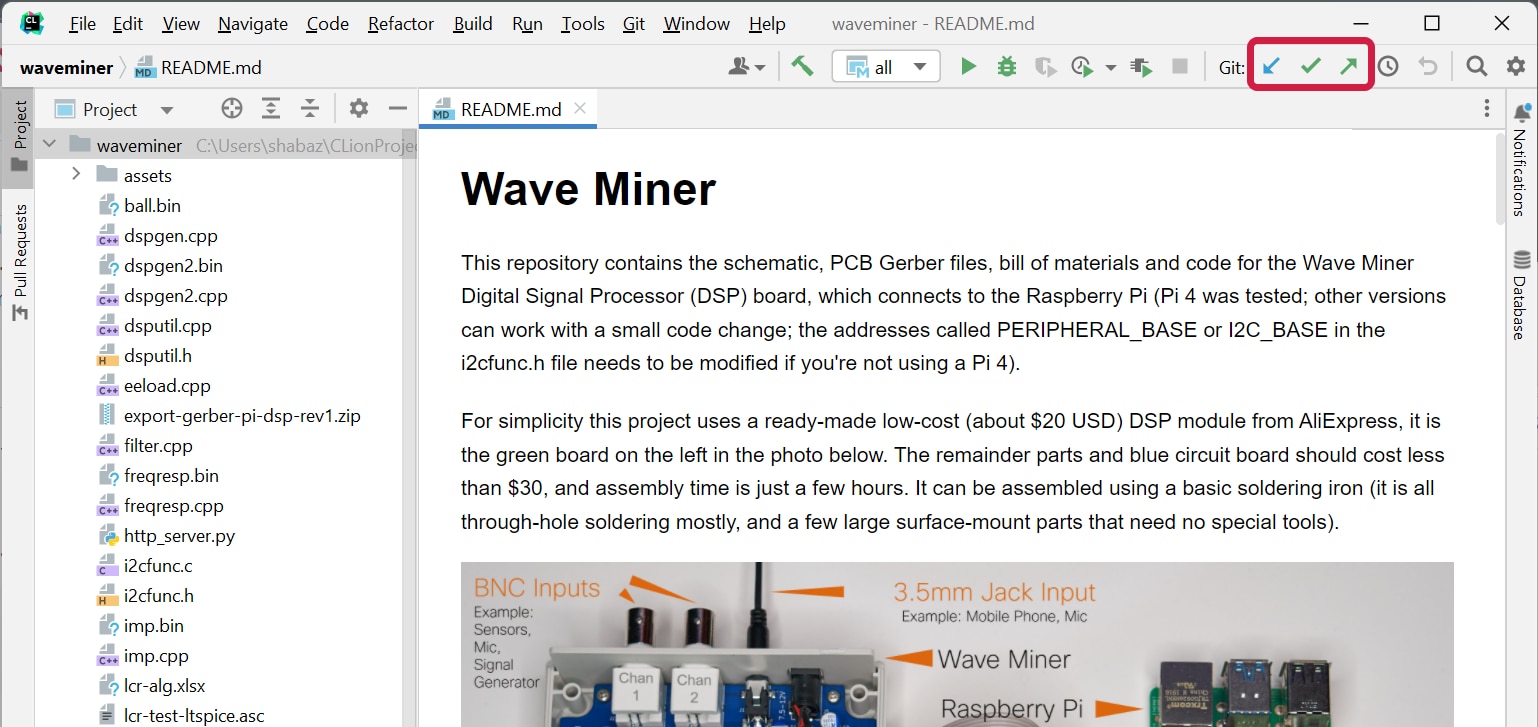
Now you can edit any files in the project, and once you’re happy that the code is functioning and ready for transferring to GitHub, the buttons shown highlighted in the screenshot below can be used; they are from left to right:
- Update Project
- Commit
- Push
Ordinarily, nine times out of ten, you’ll just push these buttons in sequence, left-to-right, and it’s that easy. However, if someone has modified the code on GitHub while you were working on the code, and they happened to work in the precisely same part of the code as you, then a window will appear where you can select whose work was right for that section of code : )
The first button is used to update your project local copy with any changes made in the version on GitHub behind your back by others (technically it's not behind your back if it's your own repository of course, since you'll have received an e-mail requesting your approval!).

The second button is called Commit and you can do that whenever you’re happy with your code; you can do it repeatedly so that you can progressively add your code improvements. For instance, if you need to add a function, you could add it, press Commit, and then later if you edit further and improve its performance, you could press Commit again.
The last button is called Push and it will send all the committed stuff to GitHub, so everyone can view it.
The rest of this blog post covers how to prepare the PC to work with the Pi Pico, and how to use CLion for Pi Pico projects.
Working with Pico: Installing Pre-Requisites (Pico C SDK, Pico Examples, and CLion)
Note: In 2024 onward, you don't need to manually install multiple items as the rest of this section mentions. Instead, do the following:
(a) Install the latest release of Pico setup for Windows. In my case, it was a file called pico-setup-windows-x64-standalone.exe that was run. Install it with all options including installing the examples. It will take a few minutes to install and then automatically compile the examples. The examples will be in a folder called C:\Users\<your_username>\Documents\Pico-v1.5.1
(b) In CLion, go to the File->Settings, and navigate to Build,Execution,Deployment->Toolchains, click on the '+' icon, and select System. Then, populate as follows (you may need to tweak your paths if you have a more recent Pico setup installed and apply it or click OK ):

(c) In the settings, go to CMake and type as shown here, and click apply or OK:
(d) If you have a project already open, then click on Tools->CMake->Reset Cache and Reload Project and then click on the hammer icon to build the project!
Old information pre-2024:
To save repeating stuff unnecessarily, a few things from an existing blog post called Working with the Raspberry Pi Pico with Windows and C/C++ can be followed, specifically the sections with these headings:
- Install CMake
- Install Python 3, Git, and ARM GCC Compiler
- Get Code
After you have followed those steps, you’ll end up with a Pico-ready machine. You’ll have a folder called c:\development\pico, and inside there will be a sub-folder called pico-sdk, and another called pico-examples.
Next, if you have not already done so, download and install CLion (it is available for Windows, Linux and Mac). You can follow the steps on the CLion website.
Now you’re ready to open up projects with CLion, and edit them and build them. The pico-example projects will be discussed next.
Opening Projects with CLion
Start up CLion, and a window appears. Click on Open, navigate to the pico-examples folder, and then click OK.
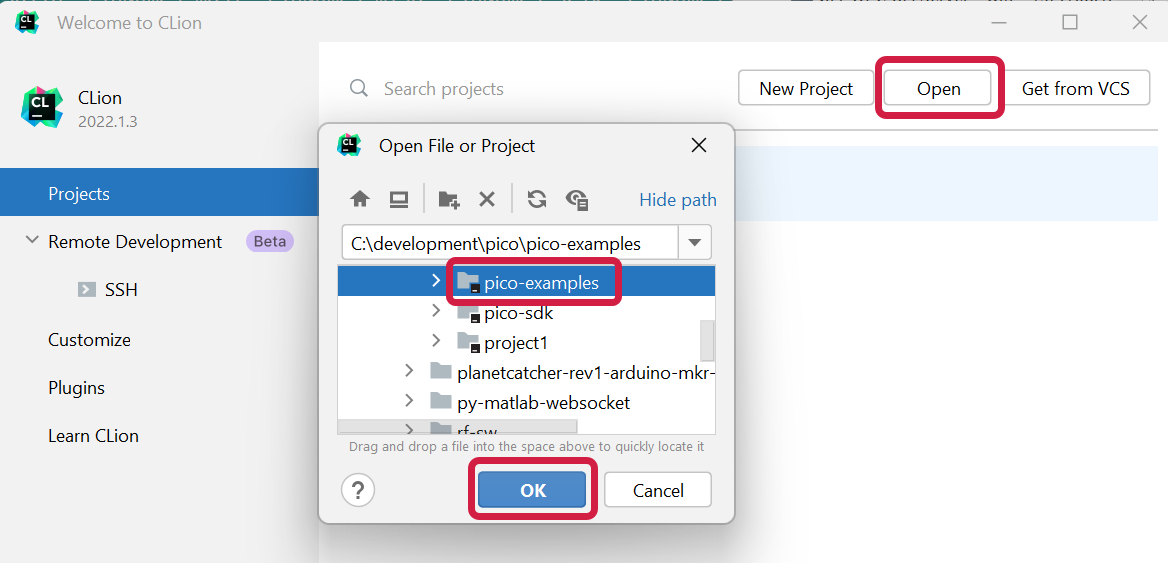
After you click OK, the windows shown below will appear; it is the main CLion window in the background and an Open Project Wizard on top.
The purpose of this popup window is to set up how you want files to be compiled and joined together into a single executable firmware image file that you can later transfer to the Pi Pico. You can set up multiple configurations (for instance, you might create one that has slightly different capabilities for debugging/troubleshooting) but for now, a single configuration is sufficient; you can see that the configuration has a friendly name of Debug, and a folder name called cmake-build-debug in faint grey, which is a folder that CLion will automatically create. It’s a reasonable default so you don’t need to type anything there. A red highlighted area does need to be filled in, however, as discussed next:
There is one tiny bit of configuration that is needed, which is the text entry field called Environment, indicated with a red box in the screenshot above. It needs to be populated with this text:
PICO_SDK_PATH=c:\development\pico\pico-sdk
Once you have done that, click OK.
CLion has an I am busy type of area in the lower right part of the main window. You’ll see a progress bar there:

You’ll need to wait around a minute initially (less if you’ve got a fast PC, or more if it’s slow!), until there are no more progress bars in that area. During this time CLion is building up indices of the code contents for all of the Pico examples, and so on.
You’re now ready to go! Building any project is just seconds away with a couple of mouse clicks.
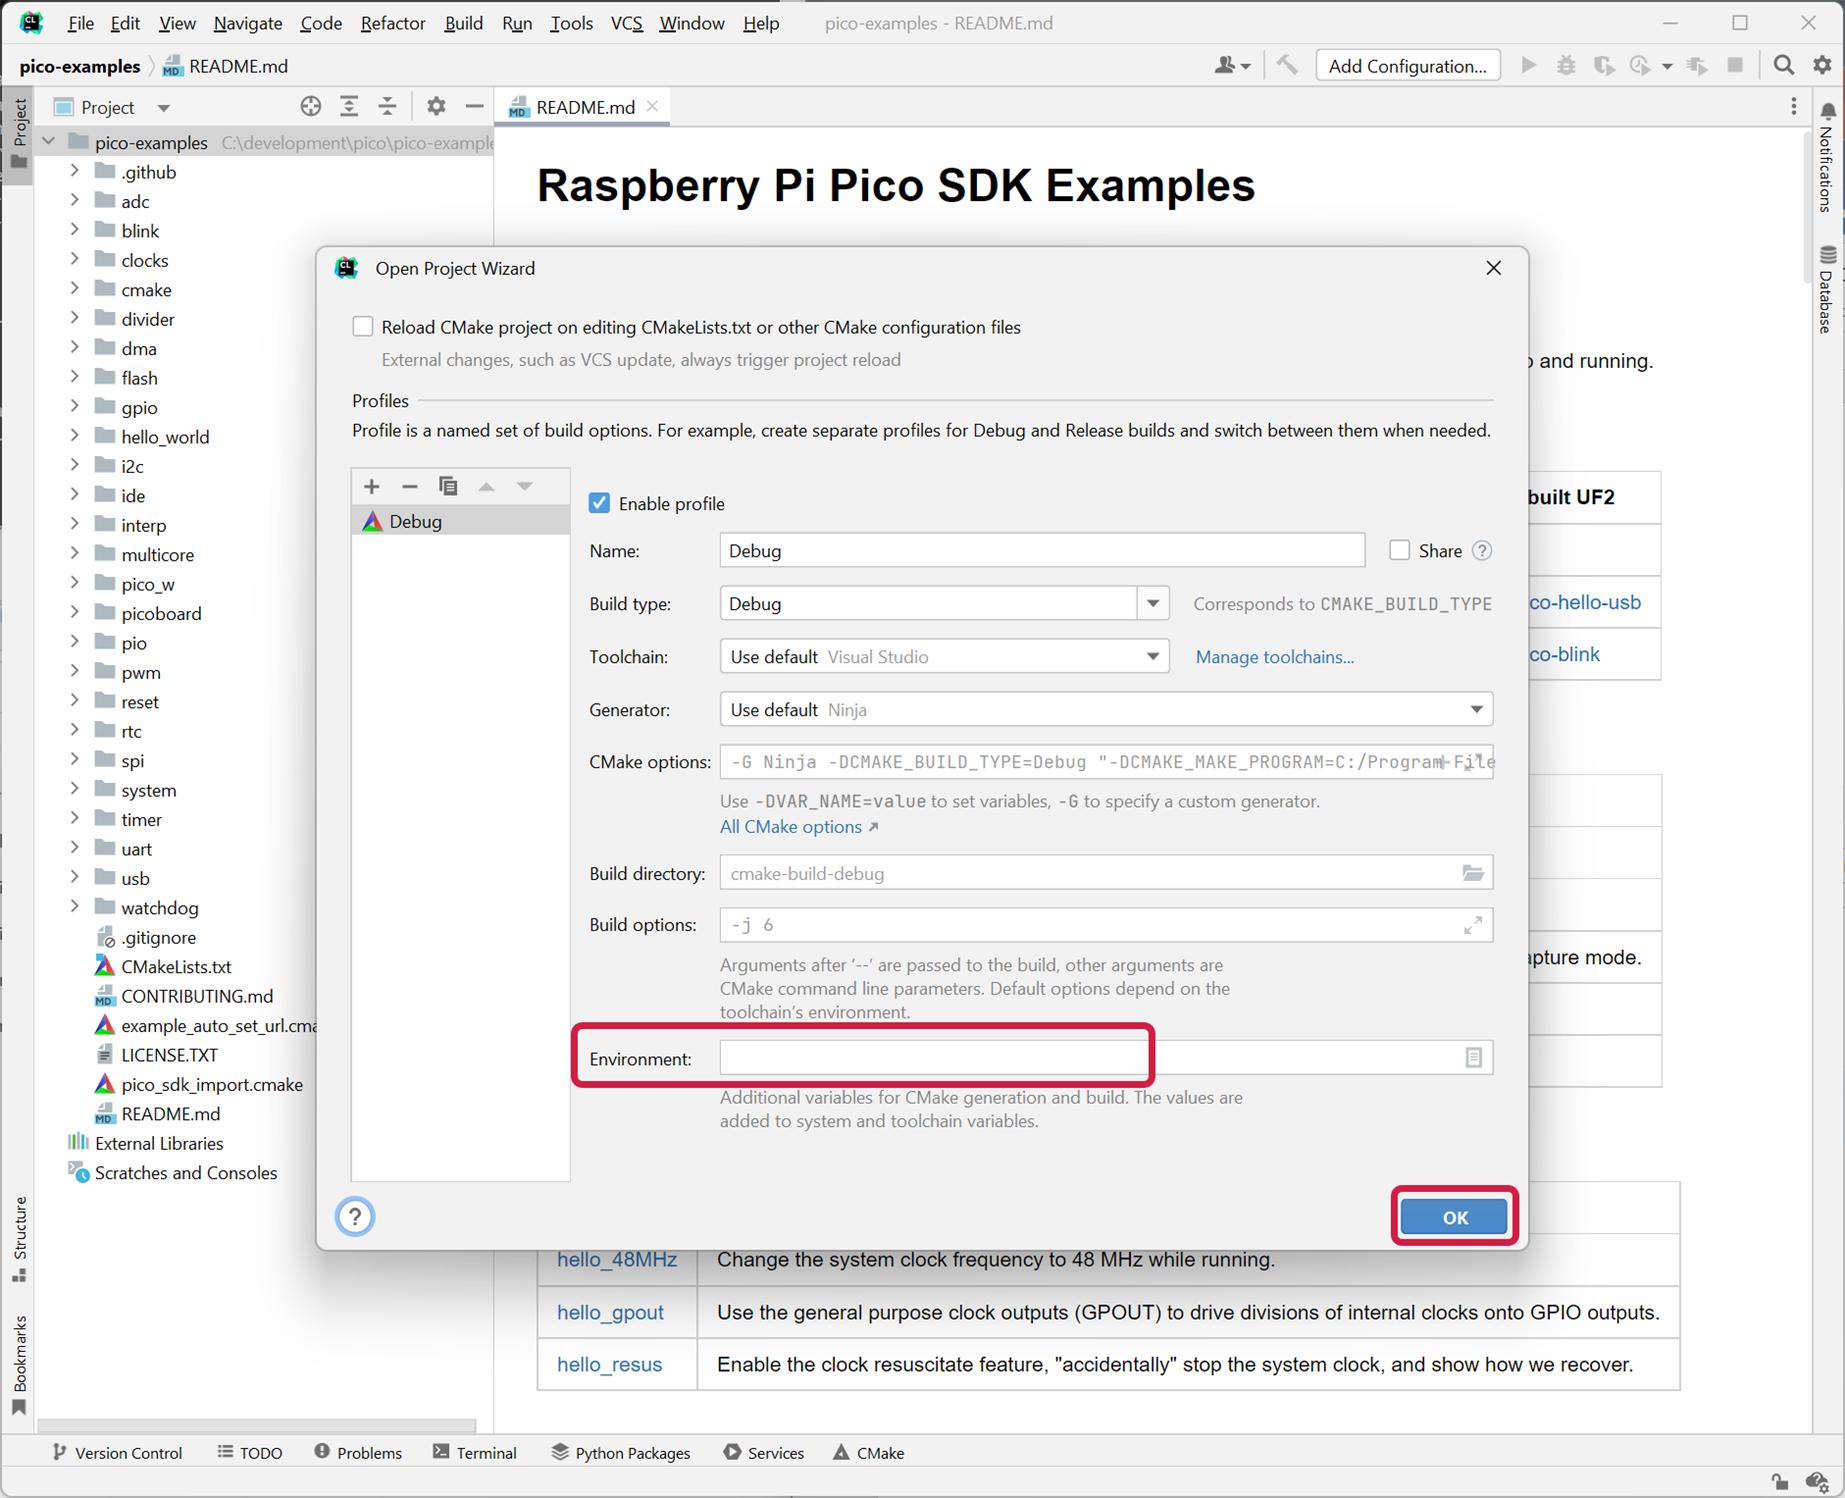
Building a Project
The pico-examples folder contains a lot of projects. You can select a project of interest by clicking on the triangle in a drop-down selection box at the top of the window. The screenshot below shows where to click to select an example called blink.
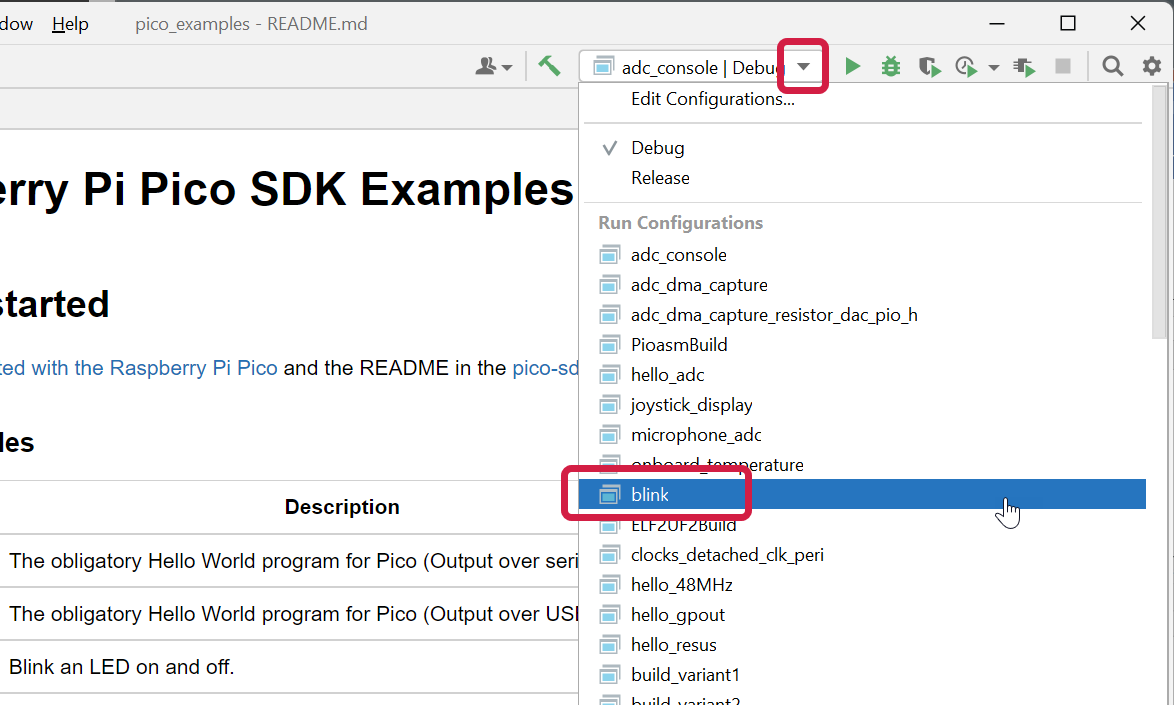
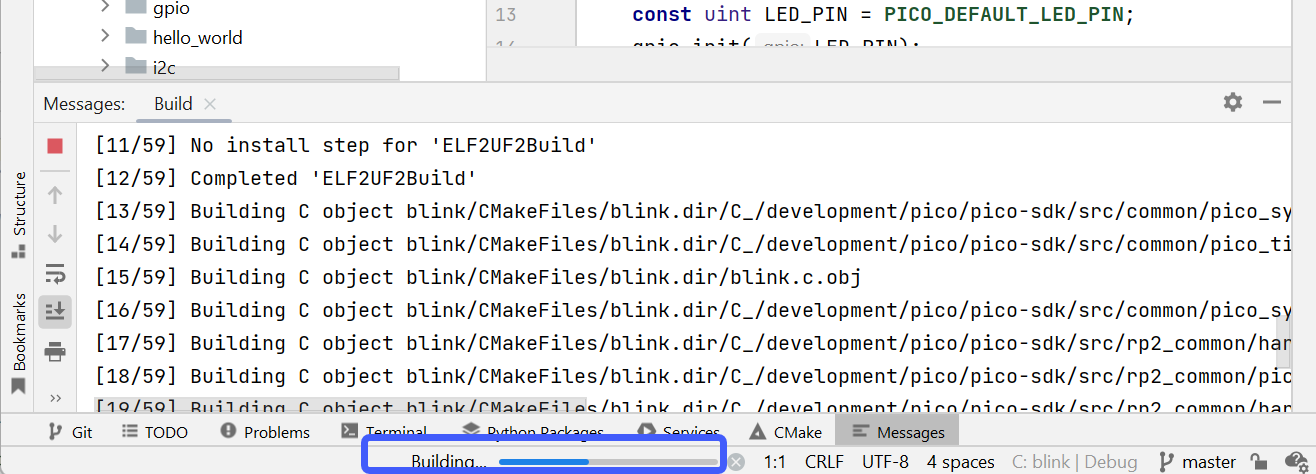
To explore the code, expand the file tree pane that is on the left side. Double-clicking on a file will display its contents in the right pane, as shown in the screenshot below. Click on the highlighted hammer icon at any time, to build the code!
When you click the hammer icon, the lower half of the CLion window will start displaying progress text, and the I am busy section will show progress bars.
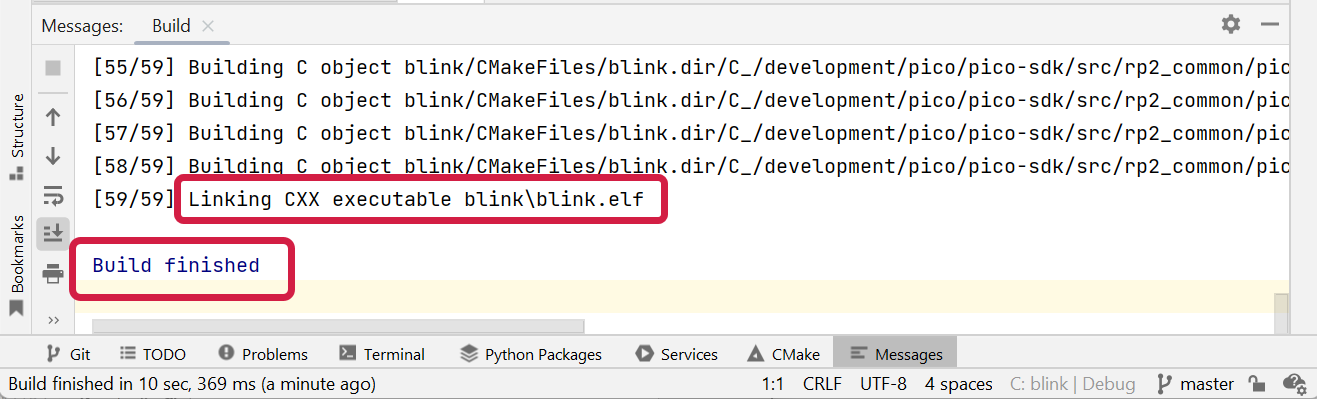
A good indication that everything was successful is shown below.
Running the Project
The built project will be in the pico-examples/cmake-build-debug/blink folder.
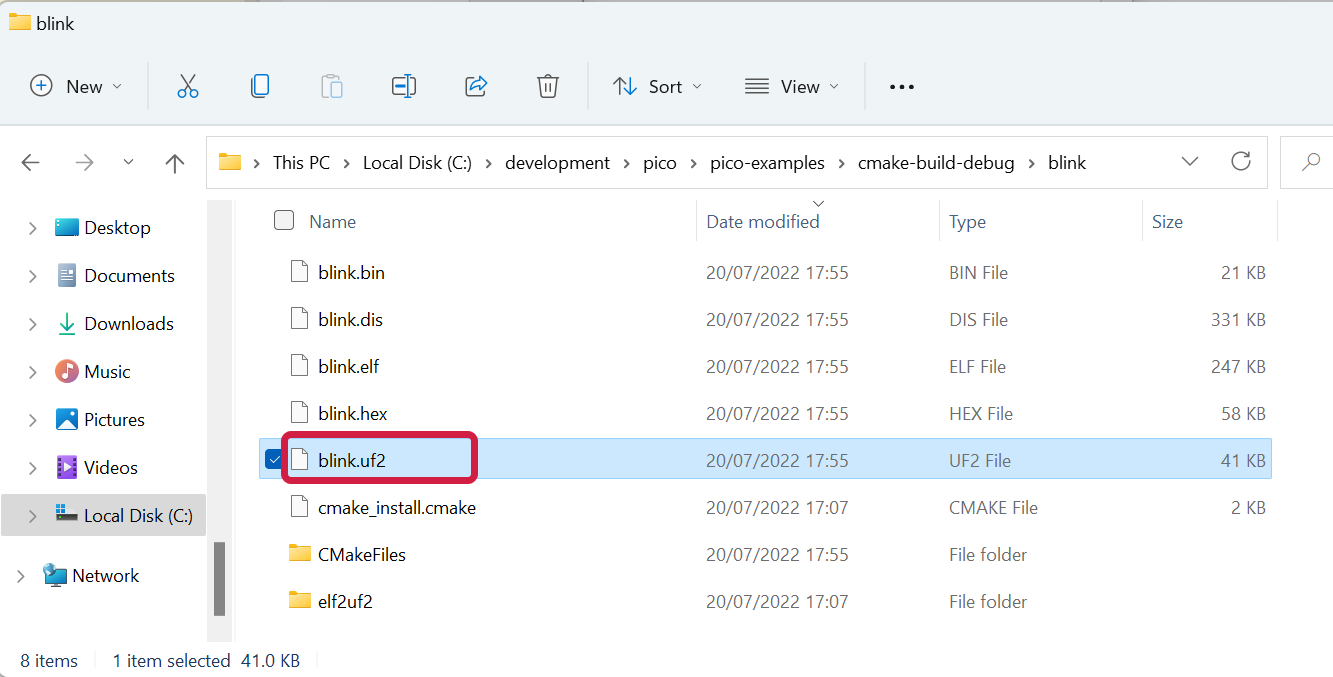
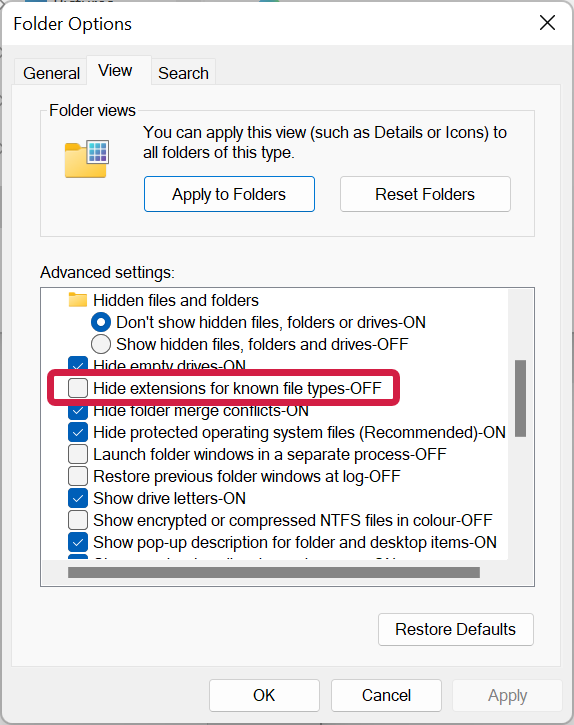
If you can’t see the suffixes like .uf2, then in the Explorer options, remove the check-mark for Hide extensions for known file types so that it looks like as shown below:
To run the code, hold down the button that is present on the Pi Pico, and insert the USB connector into your PC.
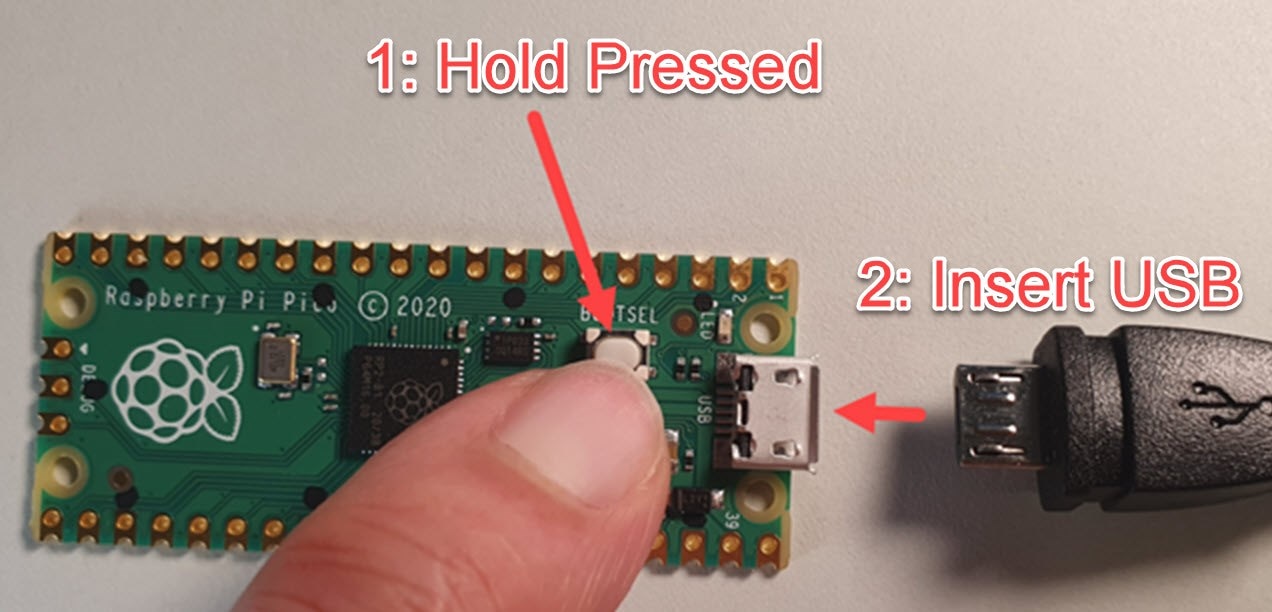
Release the button after a few seconds, and you’ll see a window appear on the PC:
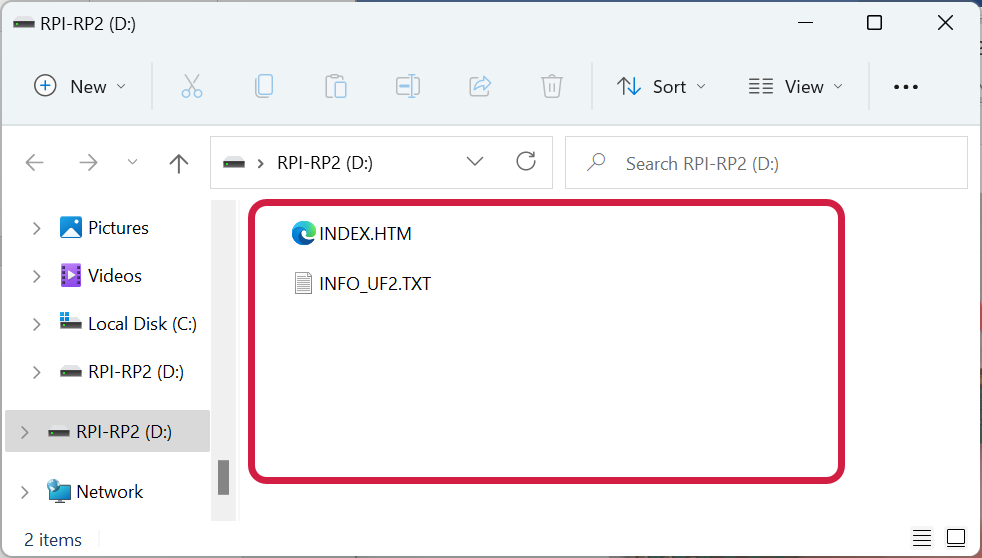
Drag the blink.uf2 file to the file area shown in red above, or to the drive letter.
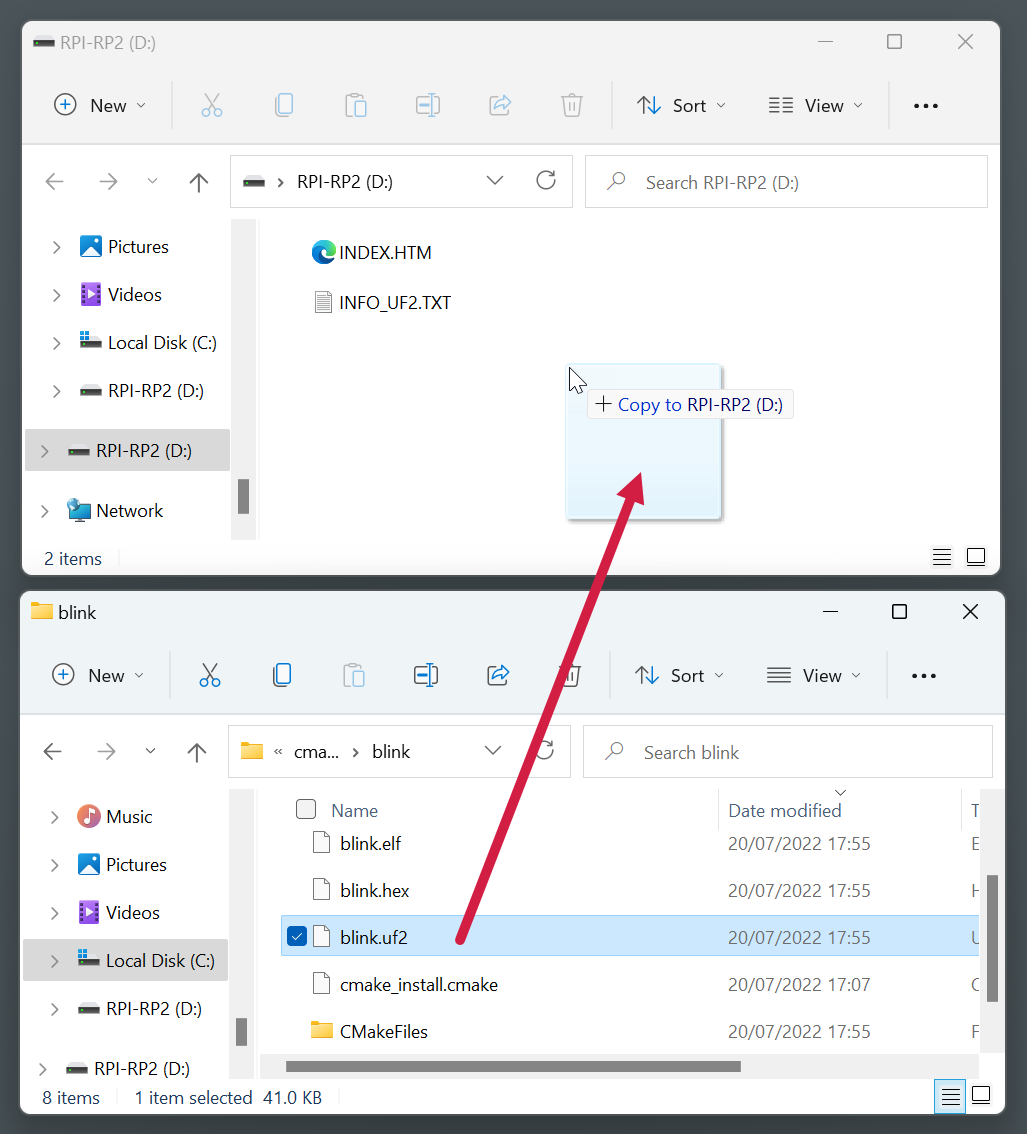
That’s it – the LED on the Pico should be blinking because that’s what the code does.
Working with Picoprobe
The Picoprobe is a Serial Wire Debug (SWD) tool made from a Pi Pico (or any other RP2040 board). It can be used to accelerate development. You can use it to step through the code line-by-line, observe variable values, and you can also use it to upload code to the RP2040 more smoothly; no need to press the BOOTSEL button. The Picoprobe in the background works with GNU software called GDB, which should be installed as part of your GNU ARM GCC compiler installation.
First off, install prerequisite software called OpenOCD, which will talk to GDB. You need a special build of OpenOCD that supports the Picoprobe. If you're using Windows, then there are pre-built versions here: https://github.com/shabaz123/rp2040tools
Place the software in a convenient location, for instance in a folder called c:\development, such that the path to openocd.exe is c:\development\openocd_rp2040\bin\openocd.exe
There are two different USB interface types of Picoprobe, and the next OpenOCD step differs depending on what type of Picoprobe is being used. If you're using the newer "CMSIS-DAP" type, then skip to the sub-section titled CMSIS-DAP Picoprobe.
Earlier non-CMSIS-DAP Picoprobe
Locate a folder called board (its path may be c:\development\openocd_rp2040\tcl\board or C:\development\myopenocdbuild\scripts\board (depending on where you got the OpenOCD software from), and there will be a file there called rp2040.cfg
Make a copy of that file, called (say) rp2040_clion.cfg and prepend the following two lines at the beginning of this new file:
adapter driver picoprobeadapter speed 5000
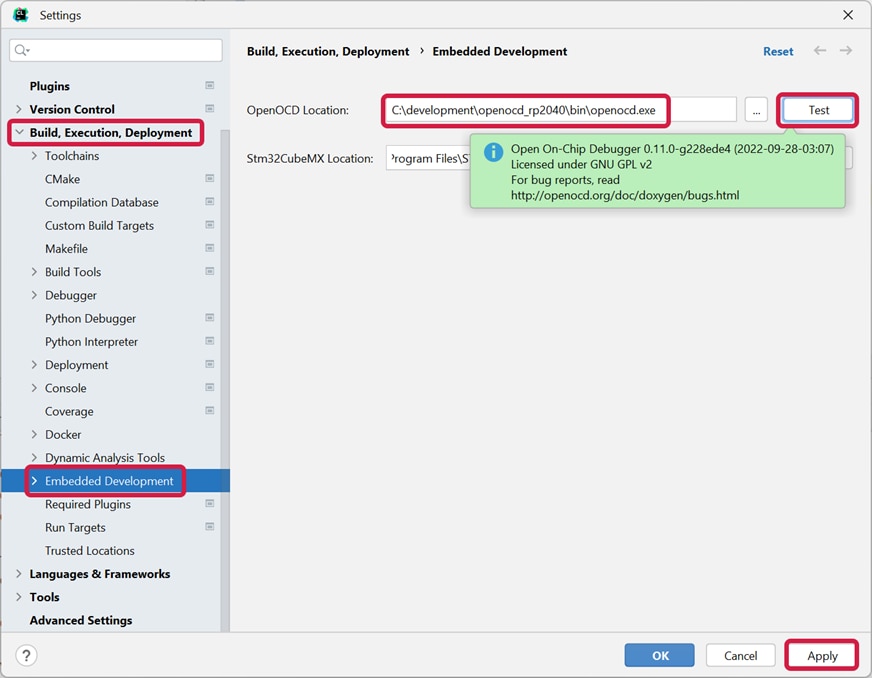
In CLion click File->Settings and select Embedded Development on the left of the pane that appears. Then, configure the full path and filename to OpenOCD (C:\development\openocd_rp2040\bin\openocd.exe if the OpenOCD steps earlier were followed).
Click Test and a green success box should appear. Click Apply and OK.
Once your CLion project is open, click on Run->Edit Configurations, then click the + symbol at the top-left, and select OpenOCD Download & Run.
Create a configuration, and name it to something memorable like myOpenOCD. For the Board config file setting, select the rp2040_clion.cfg file. You can click on the Assist button alongside the configuration box, so that it is populated correctly. Once everything else is configured as shown in the screenshot below, click on OK.
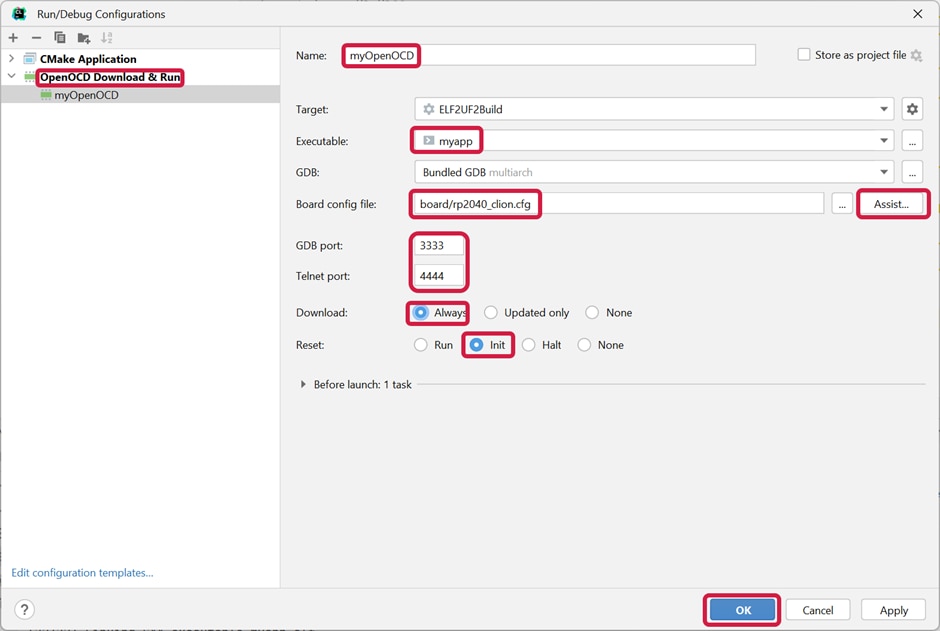
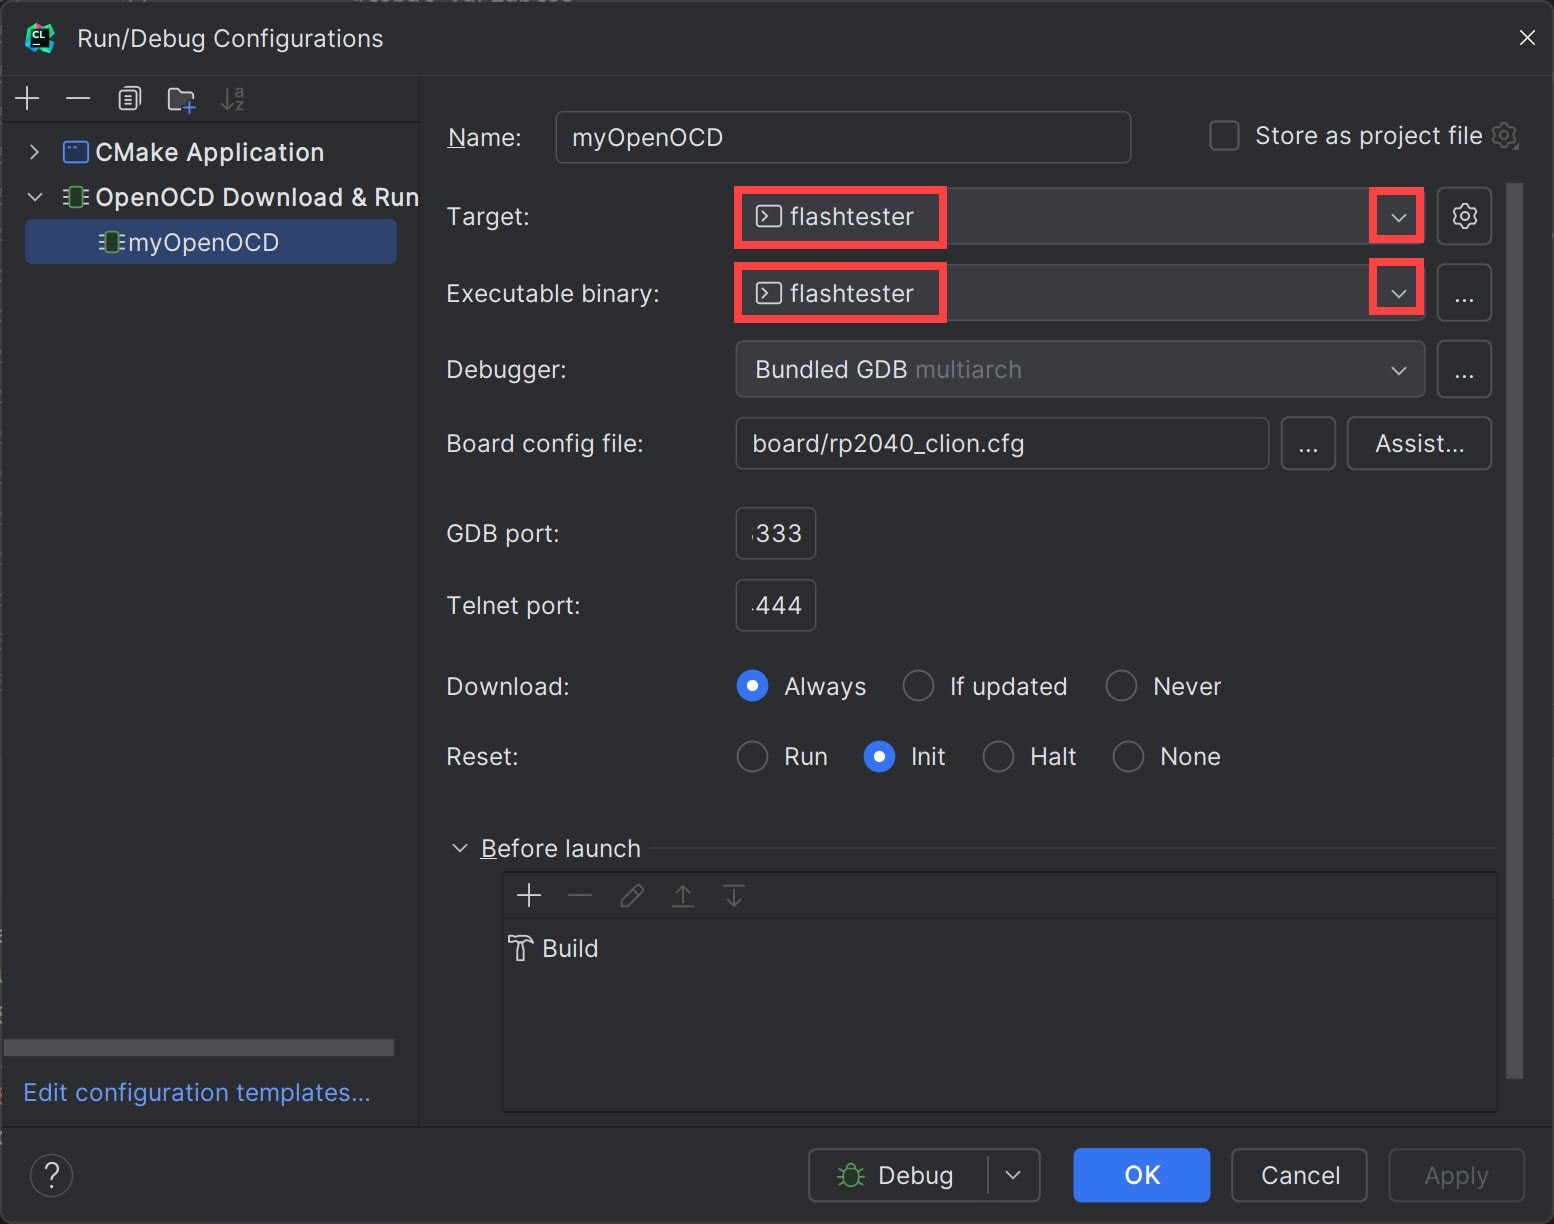
Note: in recent versions of CLion (2024 onward) I had to specifically set the project name as follows:
The CLion configuration is now complete for debugging purposes. As with other IDEs, once you’re ready to debug your application, click on the little bug icon:

Note that if youre using a version of CLion 2024 or onward, set to the 'new UI' mode, then you may see a view as shown here:

Here are some useful things to explore and click on when using the CLion and Picoprobe setup:

CMSIS-DAP Picoprobe
If you're using the newer CMSIS-DAP type of Picoprobe, then do everything in the Earlier non-CMSIS-DAP Picoprobe sub-section above, but instead of selecting the rp2040.cfg file (and renaming and editing that to rp2040_clion.cfg), just directly use the file called rp2040_cmsis_dap_clion.cfg, which is in the OpenOCD zip file available at https://github.com/shabaz123/rp2040tools.
Summary
Creating C/C++ projects with the Pi Pico can actually be a lot of fun if the coding and testing experience is smooth. CLion provides a lot of benefits in that area, and it’s easy to get going with it.
There is no single "best" development environment, and with almost any solution that you use, you can customise things to your own liking through plugins, scripts and settings, and so on. I found CLion useful, so I wrote this blog. If you prefer a different IDE for working with the Pi Pico, it would be great to hear about it.
CLion currently costs £69 + tax for a permanent license, including upgrades for a year, and there is also a 30-day free trial. Personally, I think it’s worth it, but there are free options too. One is Eclipse, which I have not used with the Pico, so I cannot comment on it in detail, however, I have used Eclipse with other microcontrollers, and it’s competent, it is also very feature-rich.
Another is Visual Studio Code, which I often use, and it’s excellent, but probably more so for frequent users of it, because newcomers may initially find it confusing, and it derives its strength from add-on extensions (and there are thousands of them!), whereas CLion, while it also supports plug-ins, offers a lot for C/C++ developers already built-in as shown in this blog. The CLion plugins are available in a Marketplace – there’s even a vim emulation plugin.
Thanks for reading!
Top Comments