element14 Community
element14 Community
    Register Log In
  • Site
  • Search
  • Log In Register
  • Community Hub
    Community Hub
    • What's New on element14
    • Feedback and Support
    • Benefits of Membership
    • Personal Blogs
    • Members Area
    • Achievement Levels
  • Learn
    Learn
    • Ask an Expert
    • eBooks
    • element14 presents
    • Learning Center
    • Tech Spotlight
    • STEM Academy
    • Webinars, Training and Events
    • Learning Groups
  • Technologies
    Technologies
    • 3D Printing
    • FPGA
    • Industrial Automation
    • Internet of Things
    • Power & Energy
    • Sensors
    • Technology Groups
  • Challenges & Projects
    Challenges & Projects
    • Design Challenges
    • element14 presents Projects
    • Project14
    • Arduino Projects
    • Raspberry Pi Projects
    • Project Groups
  • Products
    Products
    • Arduino
    • Avnet & Tria Boards Community
    • Dev Tools
    • Manufacturers
    • Multicomp Pro
    • Product Groups
    • Raspberry Pi
    • RoadTests & Reviews
  • About Us
    About the element14 Community
  • Store
    Store
    • Visit Your Store
    • Choose another store...
      • Europe
      •  Austria (German)
      •  Belgium (Dutch, French)
      •  Bulgaria (Bulgarian)
      •  Czech Republic (Czech)
      •  Denmark (Danish)
      •  Estonia (Estonian)
      •  Finland (Finnish)
      •  France (French)
      •  Germany (German)
      •  Hungary (Hungarian)
      •  Ireland
      •  Israel
      •  Italy (Italian)
      •  Latvia (Latvian)
      •  
      •  Lithuania (Lithuanian)
      •  Netherlands (Dutch)
      •  Norway (Norwegian)
      •  Poland (Polish)
      •  Portugal (Portuguese)
      •  Romania (Romanian)
      •  Russia (Russian)
      •  Slovakia (Slovak)
      •  Slovenia (Slovenian)
      •  Spain (Spanish)
      •  Sweden (Swedish)
      •  Switzerland(German, French)
      •  Turkey (Turkish)
      •  United Kingdom
      • Asia Pacific
      •  Australia
      •  China
      •  Hong Kong
      •  India
      •  Japan
      •  Korea (Korean)
      •  Malaysia
      •  New Zealand
      •  Philippines
      •  Singapore
      •  Taiwan
      •  Thailand (Thai)
      •  Vietnam
      • Americas
      •  Brazil (Portuguese)
      •  Canada
      •  Mexico (Spanish)
      •  United States
      Can't find the country/region you're looking for? Visit our export site or find a local distributor.
  • Translate
  • Profile
  • Settings
Raspberry Pi
  • Products
  • More
Raspberry Pi
Raspberry Pi Forum Wiring a motor to the RPi?
  • Blog
  • Forum
  • Documents
  • Quiz
  • Events
  • Polls
  • Files
  • Members
  • Mentions
  • Sub-Groups
  • Tags
  • More
  • Cancel
  • New
Join Raspberry Pi to participate - click to join for free!
Featured Articles
Announcing Pi
Technical Specifications
Raspberry Pi FAQs
Win a Pi
Raspberry Pi Wishlist
Actions
  • Share
  • More
  • Cancel
Forum Thread Details
  • Replies 63 replies
  • Subscribers 710 subscribers
  • Views 10335 views
  • Users 0 members are here
  • help
  • rc
  • pi
  • control
  • raspberry_pi
  • please
  • motor
  • raspberr
Related

Wiring a motor to the RPi?

wallarug
wallarug over 14 years ago

What do I need?


I am told that I need some transitors.  I have a 12v powerpack and 2 x12v motors.  How do I set this up so that I don't blow-up the RPi and that I can control the motors through the GPIO?


I have a gertboard on the way but I would like to see if I can do it without it first.


I have little knowlegde about transitors and electronics but I do know how to build circuits.

  • Sign in to reply
  • Cancel
  • wallarug
    wallarug over 13 years ago in reply to michaelkellett

    The RPi IO is pretty hopeless - the sodtware PWm is making the best of a bad job but it could well be OK for some things.

    I will give software PWM a miss.  It looks like a messy job and probaby will not work with 12v motors that spin @160rpm.

    • Cancel
    • Vote Up 0 Vote Down
    • Sign in to reply
    • Cancel
  • yvanttt
    yvanttt over 13 years ago

    as an example use pins 5 and 6 (pins 20 and 22 on J25) on the atmega328 and connect them to the motor_a and motor_b input (J5) on the gertboard.

    Then the uart TXD (gpio pin22) of the raspberry to the RXD (pin 2 of the atmega, pin 1 of J64)


    Then it is a simple mater to program the atmega328 to intercept the bytes sent from the raspbery and copy them to the 2 PWM ports.


    http://arduino.cc/en/Reference/AnalogWrite

    http://arduino.cc/en/Reference/Serial

    • Cancel
    • Vote Up 0 Vote Down
    • Sign in to reply
    • Cancel
  • wallarug
    wallarug over 13 years ago in reply to yvanttt

    Don't have a gertboard and won't get it for a while (Farnel issue).  But I am going to get an adruino eleven with ATMEGA328p which will help me do what I want.  I will look at your links though. 


    The only problem I have with coding such a chip.  I have no experience and will require massive amount of help with the coding in python (I know some already) or C (which sounds easy to learn).

    • Cancel
    • Vote Up 0 Vote Down
    • Sign in to reply
    • Cancel
  • yvanttt
    yvanttt over 13 years ago

    These Arduino are the easiest to program.

    They made an IDE package that works on Windows, OS max and Linux 32 or 64 bits. These devices uses C


    They have all the major function already available on their site "www.arduino.cc".

    Plus they have "sheild" that can get you started then use the sheild schematics to build your permanent setup.

    • Cancel
    • Vote Up 0 Vote Down
    • Sign in to reply
    • Cancel
  • wallarug
    wallarug over 13 years ago in reply to yvanttt

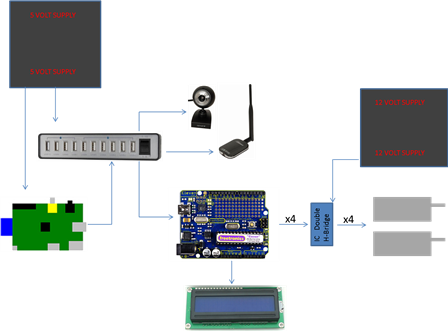
    Ok, here is my idea:

    Using some of the set-up features that @aonsquared used with his Robot/Rover thing.


    image

    Using a 5 volt supply to power the Raspberry Pi and the Powered hub.


    The Raspberry Pi will send commands to the Ardunio Eleven (which I still have to get), which will control the Two Motors through a H-bridge and PWM.


    That camera will be powered through the 10 port hub, along with the Ardunio and the W/LAN dongle.


    The Motors will be powered though a 12 volt supply (8 AA batteries).


    All the commands will be sent through an Ad-Hoc Network to a Laptop running Windows 7 Pro 64 bit.  I think that I will use by Joystick to move the Motors but I don't know how that is going to work as @aonsquared used a PS3 controller instead. (Saitek ST90 is the Joystick).


    The LCD display will have the IP address so that I know exactly what it is whenever.


    The Raspberry Pi will host a live webcam feed though an old Logitec Camera I have lying around.


    One question is: Will PWM work on the motors through the Ardunio if I have the 12 volts going directly into the H-bridge Chip?   


    What do you think?   

    • Cancel
    • Vote Up 0 Vote Down
    • Sign in to reply
    • Cancel
  • yvanttt
    yvanttt over 13 years ago

    Yes it can be done.


    Look at this chip the L298, it can accept input voltage for the motor up to 46 volts. The logic side is at 5 votls so it is safe for your Arduino.

    You can drive up to 2 amps per output.

    This chips can 2 motors or you can connect the outputs in parallel to double the current.

    The datasheet even has some  circuits examples to try.


    http://www.datasheetcatalog.org/datasheet2/2/052daje928cw7pc0uqs1ipyryppy.pdf

    • Cancel
    • Vote Up 0 Vote Down
    • Sign in to reply
    • Cancel
  • yvanttt
    yvanttt over 13 years ago

    For the motor control via the joystick it is easy if you can convert the joystick position into values from 0 to 255.


    for example:


    move the stick forward, both PWM will increase simulatneously. this will increase your speed.

    move the stick to the left or right, then deduct the values on one motor to make it turn.

    • Cancel
    • Vote Up 0 Vote Down
    • Sign in to reply
    • Cancel
  • wallarug
    wallarug over 13 years ago in reply to yvanttt

    Would you be able to help me code this?


    Also, if the neutral position of the stick is (0,0) then that would mean the range would be from -255 to +255 on both the x- and y-axis.  Right?

    • Cancel
    • Vote Up 0 Vote Down
    • Sign in to reply
    • Cancel
  • wallarug
    wallarug over 13 years ago in reply to wallarug

    Every position going up and down the x- / y-axis (+/- 255) will increase the motor speed by an incriment of


    100/255 = 0.392157


    Is this formula able to be included to decide on the speed of the motor?  I will improve it so that it works for all situations.

    • Cancel
    • Vote Up 0 Vote Down
    • Sign in to reply
    • Cancel
  • wallarug
    wallarug over 13 years ago in reply to yvanttt

    Yvan Turcot wrote:


    For the motor control via the joystick it is easy if you can convert the joystick position into values from 0 to 255.


    for example:


    move the stick forward, both PWM will increase simulatneously. this will increase your speed.

    move the stick to the left or right, then deduct the values on one motor to make it turn.

    I just wiped up this python script.

    # Converting Joystick Position to a Percentage that the PWM

    # Channel can simluate on the motors

    # By Wallarug

    # Change the input value "i" to something that relates to the Joystick


    f = float(100)/float(255)

    i = input("Enter a number between -255 and +255: ")


    while i!="":

        x = float(f)*int(i)

        print "PWM, " + str(x) + "%"

        i = input("Enter a number between -255 and +255: ")


    # By Wallarug

    Should work if it is converted to a different language and add in the motor commands and Joystick.

    • Cancel
    • Vote Up 0 Vote Down
    • Sign in to reply
    • Cancel
<>
element14 Community

element14 is the first online community specifically for engineers. Connect with your peers and get expert answers to your questions.

  • Members
  • Learn
  • Technologies
  • Challenges & Projects
  • Products
  • Store
  • About Us
  • Feedback & Support
  • FAQs
  • Terms of Use
  • Privacy Policy
  • Legal and Copyright Notices
  • Sitemap
  • Cookies

An Avnet Company © 2026 Premier Farnell Limited. All Rights Reserved.

Premier Farnell Ltd, registered in England and Wales (no 00876412), registered office: Farnell House, Forge Lane, Leeds LS12 2NE.

Follow element14

  • X
  • Facebook
  • linkedin
  • YouTube