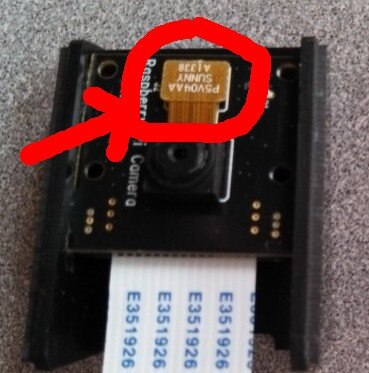
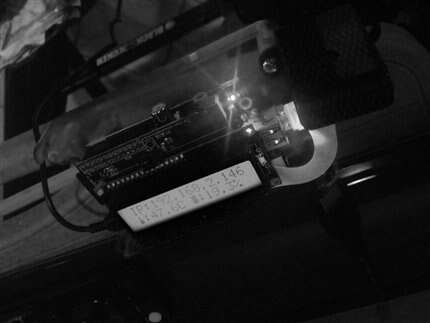
Okay, it has been too quiet around here. Got my Pi NoIR camera today and decided to start playing. Well, plugged it in and started it up and had the same problems others were having that it would not work. Saying the camera was not installed. Double checked everything, enabled, rebooted, seated on both ends of the ribbon cable, etc. No luck. Then I check the small ribbon connector at the top of the lens and found that if I pushed it in, it would pop and I am guess re-seat. Tested it and it worked, then I put it back in the case and it did not work. Seems that camera housing/case pops that little sucker off.
Here is the connector in question that I had a problem with
So now I just put on the case without getting it all the way in, no pushing, and here is my test.
That connector popping off seems to be a common problem going by the number of reports of the same over on the RPF forums. Seem to be just your luck though, I have several cameras and haven't had any problems.
I don't like the case much though. I got the white version a few months back and don't think the quality is at all good. One of the problems is getting the camera board to sit in the slots in the sides fully. It's a bit hard to tell from your photo, but I wonder if the camera board isn't seated fully ? If the camera board sits too high then maybe something catches the connector when you close the case. Or I'd not be surprised if the force needed isn't causing the fairly thin PCB to flex and that's causing the connector to pop out.
It's made somewhat more difficult by needing to have the Pi in the same case. I've built a couple of weatherproof RPi cameras at laest one of which survived outside for 4-5 months. As you can tell, I'm interested to see if others have any better ideas than mine.
Problem with having all this in the same case is that you need some method of making all the connections and maintaining some degree of weatherproofing also you'll need to have a nice place to mount the camera that is transparent....not beyond the means of man but obviously more than the case supplied is really designed for.
one way is to start with a weather proof box then put the pi etc int he box then put a small window(Acrylic for example) in it siliconed in.
Having the camera inside the ~3mm thick clear lid has it's problems, you get distortions and reflections. The last photo in that album shows the latest incarnation which has a sheet of OHP transparency sandwiched between the case and the plate on the front. Plenty of silicone
Shipment came in the mail today, I too have outside project ideas, I wrote 2 people who corresponded about the shipment to let them know my Pi/LCD control case was also not included in the shipment. Hopefully I can get one shipped to me. Otherwise, this afternoon I was able to fire up the Pi, configure it with Rasbian via noobs greeting, configure to boot to desktop, enable WIFI (using WPA2), enable the camera, take a few stills and a quick vid to reflect that it is working as well as display the default LCD output of the IP as well as the CPU temp etc... so far so good! I have temp'd in an enclosure to get things going, also the camera housing DID arrive in the box, so all I'm missing I believe is the Pi/LCD Control Carbon Fiber case!! Excited to get that for the review. In the mean time, I have confirmed that it boots headless, SSH enabled and now I can get to work on it. I am thinking cron jobs, rsync's, somthing, to a remote host on my network, then display the stills or the vid through another means, in an attempt to off load some of the work that the Pi has to deal with. I saw a post that there is a utility that the camera is used with that negates the need for the cron style jobs. Going to go back through the documentation and see what I can do with it. I think I need a line item list of some links to:
1) LCD / Control docs that are specific to button purposing and relevant configuration
2) Camera control, automation, GUI adjustments for brightness, *color, sharpness etc... just for example of tweaking those settings on the fly, to adjust it as a first stab in that environment (thinking command line like alsamixer sliders)
3) Need to review what is available for the sensor capabilities with the I/O pins, maybe adding a few IR emitters to add *light, for snapping some non light photos etc...
4) more?
Happy New Year all !!!!
Eric
Here it is slammed together in true geek/techy style! Also, Cam housing is just temped in on one of the snap together case's posts with a screw hole full of paper and a smaller wood screw, just to hold the cam case from jumping around and orient it so that it is not laying next to the case, (in lieu of not having the coool carbon fiber case that hopefully will be coming).
How did the last image solution work out for distortion, etc.
I'm about to tackle the 'inside a gutted floodlight' for another purpose, and hopefully the thin glass doesn't have distortion issues.
The glare isn't a big problem as its intended to be mounted inside and for low light, but outside you may want to add a hood using a piece of pvc tubing.
How did the last image solution work out for distortion, etc.
It works well, partly because it's a very thin layer, and partly because unlike the clear-lid case it's a small opening and so doesn't suffer from light-pipe side effects.
Camera as close to the glass as you can and as near parallel as possible and as John says you shouldn't have a problem.
I searched around and found the lens depth dimension (5.2mm) so I now need to find a suitable thickness spacer plate to 'glue' to the glass.
The good news is the rural mailman has delivered two UPS packages from Newark.
According to the packing slips the second package contains the camera.
Unfortunately I have a task that will take all day plus some, so they will need to wait. (....maybe tonight)
Laureen/Christian
The standard packing note says 60 days for the review, which clearly is at odds with the challenge
Testers are required to produce a full, comprehensive and well thought out review of the PiNoIR camera, we also expect a minimum of 1 blog posts about the "Santa Catcher" in the Raspberry Pi Projects area of element14 and a video as per the brief above. These elements are due by January 13, 2014.
which was extended
We will extend the deadlines as a result to Friday, January 31st.
Possibly in the future just include the print of the Road Test page.
Mark I was considering doing a mounting kit for this type of purpose where the mount is basically a set of 3mm sheets with the cut outs for the various bumps and notches for the camera it's self components and screw holes then a final sheet over the whole assembly with some screws to hold it all together that is then glued/siliconed to the case
Mark I was considering doing a mounting kit for this type of purpose where the mount is basically a set of 3mm sheets with the cut outs for the various bumps and notches for the camera it's self components and screw holes then a final sheet over the whole assembly with some screws to hold it all together that is then glued/siliconed to the case
A few years back we manufactured an outdoor petrol/diesel pump controller that had an LCD on the front panel.
We used an over-sized piece of acrylic with countersunk screws.
This was then silicon'ed onto the inside of metal front panel with the screw threads sticking out.
It worked very well with zero failures, and the silicon seemed to hold the screws very well.
I think for this a 3mm thick piece with a notch for the camera, and a 2mm that had a little more clearance might work.
You can use a piece of mylar for the last tenths of a millimeter, which could be cut larger and folded to provide protection to the back if the user desired.
If you can't /didn't want to use 2mm screws, you could always make it wider with a third piece on the top that did the holding, and use 3mm screws.
If you made the first piece longer then its easy to add a right angle bracket for a tripod or vertical mount.
I'm essentially using two 3mm bits of ABS to space mine. For the clear lid version, I glued some pieces into the case, mounted the camera to a second, then bolted them together. The current case uses the case itself as one of the 3mm parts with the clear sheet on the outside. I suspect the difference from 5.2mm to 6mm makes no difference and may possibly be taken up by the sticky pad holding the camera to the PCB anyway.