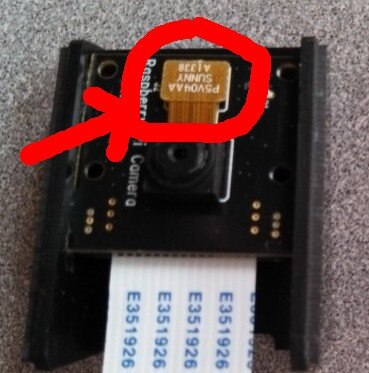
Okay, it has been too quiet around here. Got my Pi NoIR camera today and decided to start playing. Well, plugged it in and started it up and had the same problems others were having that it would not work. Saying the camera was not installed. Double checked everything, enabled, rebooted, seated on both ends of the ribbon cable, etc. No luck. Then I check the small ribbon connector at the top of the lens and found that if I pushed it in, it would pop and I am guess re-seat. Tested it and it worked, then I put it back in the case and it did not work. Seems that camera housing/case pops that little sucker off.
Here is the connector in question that I had a problem with
So now I just put on the case without getting it all the way in, no pushing, and here is my test.
That connector popping off seems to be a common problem going by the number of reports of the same over on the RPF forums. Seem to be just your luck though, I have several cameras and haven't had any problems.
I don't like the case much though. I got the white version a few months back and don't think the quality is at all good. One of the problems is getting the camera board to sit in the slots in the sides fully. It's a bit hard to tell from your photo, but I wonder if the camera board isn't seated fully ? If the camera board sits too high then maybe something catches the connector when you close the case. Or I'd not be surprised if the force needed isn't causing the fairly thin PCB to flex and that's causing the connector to pop out.
How did the last image solution work out for distortion, etc.
It works well, partly because it's a very thin layer, and partly because unlike the clear-lid case it's a small opening and so doesn't suffer from light-pipe side effects.
Camera as close to the glass as you can and as near parallel as possible and as John says you shouldn't have a problem.
I searched around and found the lens depth dimension (5.2mm) so I now need to find a suitable thickness spacer plate to 'glue' to the glass.
The good news is the rural mailman has delivered two UPS packages from Newark.
According to the packing slips the second package contains the camera.
Unfortunately I have a task that will take all day plus some, so they will need to wait. (....maybe tonight)
Laureen/Christian
The standard packing note says 60 days for the review, which clearly is at odds with the challenge
Testers are required to produce a full, comprehensive and well thought out review of the PiNoIR camera, we also expect a minimum of 1 blog posts about the "Santa Catcher" in the Raspberry Pi Projects area of element14 and a video as per the brief above. These elements are due by January 13, 2014.
which was extended
We will extend the deadlines as a result to Friday, January 31st.
Possibly in the future just include the print of the Road Test page.
Mark I was considering doing a mounting kit for this type of purpose where the mount is basically a set of 3mm sheets with the cut outs for the various bumps and notches for the camera it's self components and screw holes then a final sheet over the whole assembly with some screws to hold it all together that is then glued/siliconed to the case
A few years back we manufactured an outdoor petrol/diesel pump controller that had an LCD on the front panel.
We used an over-sized piece of acrylic with countersunk screws.
This was then silicon'ed onto the inside of metal front panel with the screw threads sticking out.
It worked very well with zero failures, and the silicon seemed to hold the screws very well.
I think for this a 3mm thick piece with a notch for the camera, and a 2mm that had a little more clearance might work.
You can use a piece of mylar for the last tenths of a millimeter, which could be cut larger and folded to provide protection to the back if the user desired.
If you can't /didn't want to use 2mm screws, you could always make it wider with a third piece on the top that did the holding, and use 3mm screws.
If you made the first piece longer then its easy to add a right angle bracket for a tripod or vertical mount.
I'm essentially using two 3mm bits of ABS to space mine. For the clear lid version, I glued some pieces into the case, mounted the camera to a second, then bolted them together. The current case uses the case itself as one of the 3mm parts with the clear sheet on the outside. I suspect the difference from 5.2mm to 6mm makes no difference and may possibly be taken up by the sticky pad holding the camera to the PCB anyway.
I too received my final box today, the Carbon Fiber Pi+CAD enclosure, was going to snap some pics of my progress however, now I've run into a small hiccup I think. It possibly is my fault but want to get a few other opinions before I go all hacker on it. Before installing said Pi+CAD in the enclosure, i *thought things were grooving nicely, So a quick a quick catch up, I found some documentation that had me setup the Pi with Apache + some additional python scripts mix in a little php and voila, had on-demand snapshots, with a web browser that would display the newly snapped pic. Configured that last night (late), then messed with that better part of the morning and just afternoon. Then turned my attention to the snap-camera. Found the article and documentation (forums stuff too about experience), got that up and configured and played a little with it this evening. (reboot to enable and set newly installed snap-camera), seemed to be fine, left it alone for a few hours come back now that a cute little brown package arrives, unwrap the new CF-enclosure, ssh -- shutdown the Pi cleanly, put it all back together and power up the new good looking contraption and the Display text is now all garbled when it looks like it should be loading/starting up the snap-camera LCD screen txt. Thought that was strange, ssh - cleanly shutdown again, pull enclosure apart carefully and slowly to make sure nothing was disconnected or wonky, re-assemble, same thing. Garbled txt when it finally is booted up. SO, like any good *nix person, ssh -- restart the snap-camera service, display *rights itself, think it is fixed, only to have the characters start to *corrupt themselves after pushing the once working buttons. I think this is a script/python level thing but this is where I default to everyone else for assistance. I am not a programmer. I can follow along and traceback things, but ..... SO, I'm leaning toward it's not a hardware issue, but python or a conflicting service or script. About to disassemble the Pi, and run it again outside the enclosure jic.
Thoughts anyone/everyone?
Thanks in advance,
Eric
Updated, cover/enclosure removed, still doing it (garbled txt on display, however perhaps I just did not mess around long enough with it earlier to see that it was doing it. A couple pictures I took showing the text *refresh maybe whats' going on, but maybe that the command that displays the sysinfo.py is somehow trying to update the display (as a service), where snap-camera is also interacting and updating the display? So it feels like they are both running at the same time, only the snap-camera has more things being refreshed so it takes the lead, where if I left it on 1 of the modes while messing with the options in that mode, the IP address replaces the entire top line of txt.
That night I fiddled a bit longer and before I read your post (just now) I had the same thought. During initial setup and test of the LCD, I went through the steps to enable the sysinfo.py script. Simply removing it from defaults fixed after I stopped the 'service'. Thanks for the reply, Over the years I've been brain washed to use the ps axf, showing tree/child processes. I knew it was a py script so it was easy to identify.
That night I fiddled a bit longer and before I read your post (just now) I had the same thought. During initial setup and test of the LCD, I went through the steps to enable the sysinfo.py script. Simply removing it from defaults fixed after I stopped the 'service'. Thanks for the reply, Over the years I've been brain washed to use the ps axf, showing tree/child processes. I knew it was a py script so it was easy to identify.