element14 Community
element14 Community
    Register Log In
  • Site
  • Search
  • Log In Register
  • Members
    Members
    • Benefits of Membership
    • Achievement Levels
    • Members Area
    • Personal Blogs
    • Feedback and Support
    • What's New on element14
  • Learn
    Learn
    • Learning Center
    • eBooks
    • STEM Academy
    • Webinars, Training and Events
    • More
  • Technologies
    Technologies
    • 3D Printing
    • FPGA
    • Industrial Automation
    • Internet of Things
    • Power & Energy
    • Sensors
    • More
  • Challenges & Projects
    Challenges & Projects
    • Design Challenges
    • element14 presents
    • Project14
    • Arduino Projects
    • Raspberry Pi Projects
    • More
  • Products
    Products
    • Arduino
    • Dev Tools
    • Manufacturers
    • Raspberry Pi
    • RoadTests & Reviews
    • Avnet Boards Community
    • More
  • Store
    Store
    • Visit Your Store
    • Choose Another Store
      • Europe
      •  Austria (German)
      •  Belgium (Dutch, French)
      •  Bulgaria (Bulgarian)
      •  Czech Republic (Czech)
      •  Denmark (Danish)
      •  Estonia (Estonian)
      •  Finland (Finnish)
      •  France (French)
      •  Germany (German)
      •  Hungary (Hungarian)
      •  Ireland
      •  Israel
      •  Italy (Italian)
      •  Latvia (Latvian)
      •  
      •  Lithuania (Lithuanian)
      •  Netherlands (Dutch)
      •  Norway (Norwegian)
      •  Poland (Polish)
      •  Portugal (Portuguese)
      •  Romania (Romanian)
      •  Russia (Russian)
      •  Slovakia (Slovak)
      •  Slovenia (Slovenian)
      •  Spain (Spanish)
      •  Sweden (Swedish)
      •  Switzerland(German, French)
      •  Turkey (Turkish)
      •  United Kingdom
      • Asia Pacific
      •  Australia
      •  China
      •  Hong Kong
      •  India
      •  Korea (Korean)
      •  Malaysia
      •  New Zealand
      •  Philippines
      •  Singapore
      •  Taiwan
      •  Thailand (Thai)
      • Americas
      •  Brazil (Portuguese)
      •  Canada
      •  Mexico (Spanish)
      •  United States
      Can't find the country/region you're looking for? Visit our export site or find a local distributor.
  • Translate
  • Profile
Raspberry Pi
  • Products
  • More
Raspberry Pi
Forum How to solder fairy light strings
  • Blog
  • Forum
  • Documents
  • Events
  • Members
  • Mentions
  • Sub-Groups
  • Tags
  • More
  • Cancel
  • New
Raspberry Pi requires membership for participation - click to join
Actions
  • Share
  • More
  • Cancel
Forum Thread Details
  • State Not Answered
  • Replies 13 replies
  • Subscribers 141 subscribers
  • Views 522 views
  • Users 0 members are here
Related

How to solder fairy light strings

scottiebabe
scottiebabe 21 days ago

I have been experimenting with tri-state multiplexing with the Rp2040's PIO statemachine and have found good success.

The PIO code is quite interesting in that its quite different from how I might write it in c-code in a repeating ISR. I may write a blog about it in the future, but here is the code:

# Tri-state multiplexing with done with PIO statemachine
# -scottiebabe 2022
import time
from machine import Pin
import rp2

# Ensure pin pull-ups and pull-downs are disabled
# So pin is Hi-Z when set as input
Pin(0,Pin.IN)
Pin(1,Pin.IN)
Pin(2,Pin.IN)

@rp2.asm_pio(out_shiftdir=rp2.PIO.SHIFT_RIGHT,set_init=[rp2.PIO.OUT_LOW]*3,out_init=[rp2.PIO.OUT_LOW]*3)
def charlie():
    pull(noblock)
    mov(x,osr)
    # Set Pin0 & Pin1 as outputs
    in_(null,2)
    in_(osr,1) # output state of LED0 on Pin0
    out(null,1)
    set(pindirs, 0b011)
    mov(pins, isr) [7]
    in_(null,1)
    in_(osr,1) # output state of LED1 on Pin1
    in_(null,1)
    out(null,1)
    mov(pins, isr) [7]
    
    # Set Pin0 & Pin2 as outputs
    in_(null,2)
    in_(osr,1) # output state of LED2 on Pin0
    out(null,1)
    set(pindirs, 0b101)
    mov(pins, isr) [7]
    in_(osr,1) # output state of LED3 on Pin2
    in_(null,2)
    out(null,1)
    mov(pins, isr) [7]

    # Set Pin1 & Pin2 as outputs
    in_(null,1)
    in_(osr,1) # output state of LED4 on Pin1
    in_(null,1)
    out(null,1)
    set(pins,0)
    set(pindirs, 0b110)
    mov(pins, isr) [7]
    in_(osr,1) # output state of LED5 on Pin2
    in_(null,2)
    out(null,1)
    mov(pins, isr) [7]


# Create the StateMachine with the charlie program, outputting on Pins 0-2.
sm = rp2.StateMachine(0, charlie, freq=20000, set_base=Pin(0),out_base=Pin(0))

# Put bitmap into pio statemachine
sm.put(0b101)

# Start the StateMachine.
sm.active(1)

i = 0
while True:
    i += 1
    sm.put(i % 64)
    time.sleep(0.1)

I would like to try and make my own fairly light strings with three wires and 6 LEDs, similar to these

What do you think the best way to solder the LEDs to wires would be?

I'm thinking maybe use a piece of perfboard to hold everything in place while soldering

  • Reply
  • Cancel
  • Cancel

Top Replies

  • scottiebabe
    scottiebabe 21 days ago +5

    In the 2-wire fairy lights they appear to use 0603 LEDs as well.

    I really like the wire they use, I don't know where to source that just yet.

    I think a dap of hot glue would be close enough to what…

  • dougw
    dougw 20 days ago +5

    How about we cheat and just use 2 wires and no microcontroller....This is enameled wire where molten solder burns off the enamel. I stuck the LEDs to a piece of duct tape to solder them to the wire. Still…

  • scottiebabe
    scottiebabe 20 days ago in reply to dougw +5

    Heart eyes That is extra fancy! Although I think your solution might involve 6 state machines Wink

    I need to get some of those LEDs and make a string lol Its hard to compete with Dollar store price point, the only down…

  • fmilburn
    0 fmilburn 21 days ago

    I did something similar several years ago.  And by coincidence I have been thinking about adding LED lighting to Lego projects with the grandkids so I'm interested in how you end up doing it.  I used a scrap wood block and woodcarver's chisels to construct my jig which looked something like this, although not near this neat or precise:

    I used a small V-shaped chisel to cut parallel lines to hold the wire in place.  Then I cut a rectangular slot for the LED to sit in with a small straight chisel.  Wood might seem like a strange choice but it worked fine for the dozen or so connections made and was still good for more use.  The jig was also handy for getting the right spacing.  The main issue was getting the wire to lay flat alongside the LED which is what the V-shaped troughs were supposed to do. I used painter's tape to help hold the wire in place while soldering.  I suspect your approach with the perfboard will work as well or better.

    • Cancel
    • Up +4 Down
    • Reply
    • Verify Answer
    • Cancel
  • scottiebabe
    0 scottiebabe 21 days ago

    This turned out to be quite a bit more challenging than I had thought.

    Marking the wires with a green/black sharpie (colors not important) was helpful.

    Drilling a hole to hold the led didn't end up being helpful. Perhaps its wasn't the perfect size, not sure. The perfboard would hold the wires steady and I could hold the LED with tweezers and solder to one wire. Then move the nudge the other wire over and solder the second joint.

    Watch out for cheap LED lead frames. I started with white leds, but their mounting leads kept breaking off. So I switched to amber leds that had a solid plastic base surrounding the lead frame.

    0603 LEDs are small, 0805 would be much easier to work with.

    The lead frame fiasco threw off my groove, and forgot to pay attention to mounting polarity.

    You don't have permission to edit metadata of this video.
    Edit media
    x
    Upload Preview

    • Cancel
    • Up +1 Down
    • Reply
    • Verify Answer
    • Cancel
  • scottiebabe
    0 scottiebabe 21 days ago in reply to fmilburn

    That's very clever, I like it! I like your LED recess, there is no way for the LED to fall through Slight smile. Drilling a hole didn't end up being helpful for me. I found it easier to hold the led with tweezer and solder one wire.

    I did like that I could mash my soldering iron into the wire to tin the joint before attaching the LED.

    The painters tape tip was extremely helpful, thank you for the great tip!

    Your lego adventure sounds like a lot of fun Slight smile

    • Cancel
    • Up +1 Down
    • Reply
    • Verify Answer
    • Cancel
  • scottiebabe
    0 scottiebabe 21 days ago

    In the 2-wire fairy lights they appear to use 0603 LEDs as well.

    I really like the wire they use, I don't know where to source that just yet.

    I think a dap of hot glue would be close enough to what is done commercially. I am guessing it may be some type of UV curing epoxy? Or maybe I didn't heat it up enough for the glue to melt... 

    • Cancel
    • Up +5 Down
    • Reply
    • Verify Answer
    • Cancel
  • scottiebabe
    0 scottiebabe 21 days ago

    The other neat observation was, that I can run another instance of the charlie pio routine on another state machine.

    # Create the StateMachine with the charlie program, outputting on Pins 0-2.
    sm = rp2.StateMachine(0, charlie, freq=20000, set_base=Pin(0),out_base=Pin(0))
    sm2 = rp2.StateMachine(1, charlie, freq=20000, set_base=Pin(7),out_base=Pin(7))
    
    # Put bitmap into pio statemachine
    sm.put(0b101)
    sm2.put(0b101)
    
    # Start the StateMachines.
    sm.active(1)
    sm2.active(1)

    • Cancel
    • Up +2 Down
    • Reply
    • Verify Answer
    • Cancel
  • dougw
    0 dougw 20 days ago

    How about we cheat and just use 2 wires and no microcontroller....This is enameled wire where molten solder burns off the enamel. I stuck the LEDs to a piece of duct tape to solder them to the wire. Still very fiddly, although you could come up with a "production" method using tape. Basically stick the wires to tape patches on either side of an LED location, then burn off the enamel at the LED locations, then stick this wire ladder onto tape that has LEDs on it, then solder the LEDs to the wires. The wire costs about $1 for 10 m.

    You don't have permission to edit metadata of this video.
    Edit media
    x
    Upload Preview

    A whole string of these LEDs can run off of one coin cell.

    • Cancel
    • Up +5 Down
    • Reply
    • Verify Answer
    • Cancel
  • scottiebabe
    0 scottiebabe 20 days ago in reply to dougw

    Heart eyes That is extra fancy! Although I think your solution might involve 6 state machines Wink

    I need to get some of those LEDs and make a string lol Its hard to compete with Dollar store price point, the only down side is the driver circuit (or complete lack there of)

    They come with just a AA battery holder and a switch. Which is a very poor match to the Vf of white LEDs. Luckily the LEDs they use are reasonably efficient and are quite visible even at 1 mA.

    They has have color phosphor ones too Heart! 

    • Cancel
    • Up +5 Down
    • Reply
    • Verify Answer
    • Cancel
  • shabaz
    0 shabaz 20 days ago in reply to scottiebabe

    That looks like epoxy, for example Araldite has the consistency that would naturally form a blob shape for such a size of blob. I really like Araldite although for many small blobs a jig would be required to apply it before it all sets (at least for the 5-minute epoxy version). 

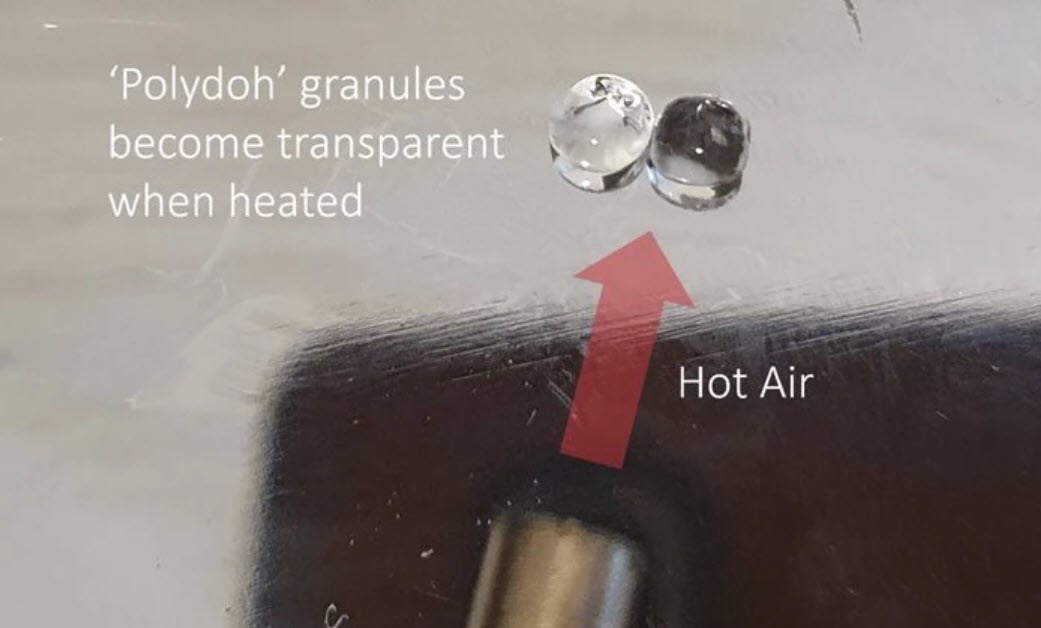
    I also like using the stuff in the photo below a lot, although it is not actually glue, it won't stick hard to other materials. The instructions state to put it into boiling water, but it's easier to heat the granules with a hot air tool. Then it is just pressed into shape with fingers (it is not too hot), and there is a good 20-30 seconds time to do that before it cools. If that is not enough time, it can simply be reheated. Each granule is maybe 3mm sphere (I have not measured them).

    Here two granules were used to surround an 0805 sized component, to make solderable 'scope probes. The color is white and only slightly translucent, but perhaps if only one granule was used per component, then it could just surround all sides except the light emitting side.

    It dries rock-hard, so there won't be any proper flexible strain relief as such, except that it would support the wire away from the join, so that's an amount of effective strain relief.

    The Polydoh material is great for making connector backshells, e.g. it can convert a pin header into a pluggable connector : )  

    Anyway, it could be an option, although I think normal epoxy would work great too.

    • Cancel
    • Up +4 Down
    • Reply
    • Verify Answer
    • Cancel
  • dougw
    0 dougw 20 days ago in reply to scottiebabe

    The 3-color LEDs I used each have a built-in chip that regulates current, and decides which color to illuminate and when. They are available in different flashing rate versions. The LEDs cost about $4 for 100 LEDs. Actually they aren't just LEDs, each device has 3 LEDs plus a driver chip in a 2 pin 0805 package..

    • Cancel
    • Up +2 Down
    • Reply
    • Verify Answer
    • Cancel
  • scottiebabe
    0 scottiebabe 20 days ago in reply to shabaz

    This polydoh looks like a very handy material to have on hand, and a small quantity should go a long ways for electronics uses. It seems to also be advertised a a tooth repair kit or thermal mold, but it appears to be available for under $20.

    Thanks for the recommendation!  

    I tried hot glue on wax paper,

    It is okay in that it provides a good bond to the wires and LEDs and is mostly transparent, but it doesn't look that pretty...

    • Cancel
    • Up +2 Down
    • Reply
    • Verify Answer
    • Cancel
>
Element14

element14 is the first online community specifically for engineers. Connect with your peers and get expert answers to your questions.

  • Members
  • Learn
  • Technologies
  • Challenges & Projects
  • Products
  • Store
  • About Us
  • Feedback & Support
  • FAQs
  • Terms of Use
  • Privacy Policy
  • Legal and Copyright Notices
  • Sitemap
  • Cookies

An Avnet Company © 2022 Premier Farnell Limited. All Rights Reserved.

Premier Farnell Ltd, registered in England and Wales (no 00876412), registered office: Farnell House, Forge Lane, Leeds LS12 2NE.

ICP 备案号 10220084.

Follow element14

  • Facebook
  • Twitter
  • linkedin
  • YouTube