element14 Community
element14 Community
    Register Log In
  • Site
  • Search
  • Log In Register
  • Community Hub
    Community Hub
    • What's New on element14
    • Feedback and Support
    • Benefits of Membership
    • Personal Blogs
    • Members Area
    • Achievement Levels
  • Learn
    Learn
    • Ask an Expert
    • eBooks
    • element14 presents
    • Learning Center
    • Tech Spotlight
    • STEM Academy
    • Webinars, Training and Events
    • Learning Groups
  • Technologies
    Technologies
    • 3D Printing
    • FPGA
    • Industrial Automation
    • Internet of Things
    • Power & Energy
    • Sensors
    • Technology Groups
  • Challenges & Projects
    Challenges & Projects
    • Design Challenges
    • element14 presents Projects
    • Project14
    • Arduino Projects
    • Raspberry Pi Projects
    • Project Groups
  • Products
    Products
    • Arduino
    • Avnet & Tria Boards Community
    • Dev Tools
    • Manufacturers
    • Multicomp Pro
    • Product Groups
    • Raspberry Pi
    • RoadTests & Reviews
  • About Us
  • Store
    Store
    • Visit Your Store
    • Choose another store...
      • Europe
      •  Austria (German)
      •  Belgium (Dutch, French)
      •  Bulgaria (Bulgarian)
      •  Czech Republic (Czech)
      •  Denmark (Danish)
      •  Estonia (Estonian)
      •  Finland (Finnish)
      •  France (French)
      •  Germany (German)
      •  Hungary (Hungarian)
      •  Ireland
      •  Israel
      •  Italy (Italian)
      •  Latvia (Latvian)
      •  
      •  Lithuania (Lithuanian)
      •  Netherlands (Dutch)
      •  Norway (Norwegian)
      •  Poland (Polish)
      •  Portugal (Portuguese)
      •  Romania (Romanian)
      •  Russia (Russian)
      •  Slovakia (Slovak)
      •  Slovenia (Slovenian)
      •  Spain (Spanish)
      •  Sweden (Swedish)
      •  Switzerland(German, French)
      •  Turkey (Turkish)
      •  United Kingdom
      • Asia Pacific
      •  Australia
      •  China
      •  Hong Kong
      •  India
      • Japan
      •  Korea (Korean)
      •  Malaysia
      •  New Zealand
      •  Philippines
      •  Singapore
      •  Taiwan
      •  Thailand (Thai)
      • Vietnam
      • Americas
      •  Brazil (Portuguese)
      •  Canada
      •  Mexico (Spanish)
      •  United States
      Can't find the country/region you're looking for? Visit our export site or find a local distributor.
  • Translate
  • Profile
  • Settings
Raspberry Pi Projects
  • Products
  • Raspberry Pi
  • Raspberry Pi Projects
  • More
  • Cancel
Raspberry Pi Projects
Blog Pi Alarm System - Part 5: Fleeing Burglar
  • Blog
  • Documents
  • Events
  • Polls
  • Members
  • Mentions
  • Sub-Groups
  • Tags
  • More
  • Cancel
  • New
Join Raspberry Pi Projects to participate - click to join for free!
  • Share
  • More
  • Cancel
Group Actions
  • Group RSS
  • More
  • Cancel
Engagement
  • Author Author: fvan
  • Date Created: 23 Apr 2014 8:22 PM Date Created
  • Views 1387 views
  • Likes 7 likes
  • Comments 1 comment
  • rpiintermediate
  • security
  • gsm
  • raspberrypi
  • camera
  • wireless
  • raspberry_pi_projects
  • arduino
  • pi_noir
Related
Recommended

Pi Alarm System - Part 5: Fleeing Burglar

fvan
fvan
23 Apr 2014

Previous entries in this blog series:

  • Pi Alarm System - Part 1: Project and components description
  • Pi Alarm System - Part 2: Wireless sensors
  • Pi Alarm System - Part 3: Control unit
  • Pi Alarm System - Part 4: Almost there


Enclosure


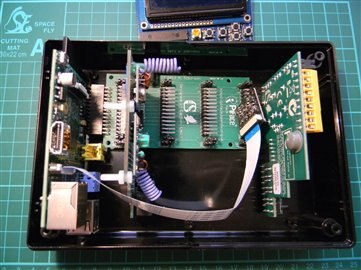
The dimensions of the enclosure were based on some rough estimations, now I had to make everything fit inside.

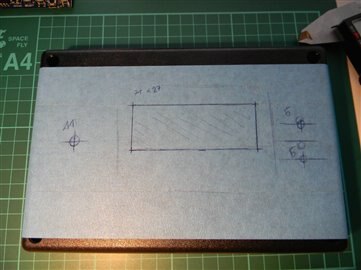
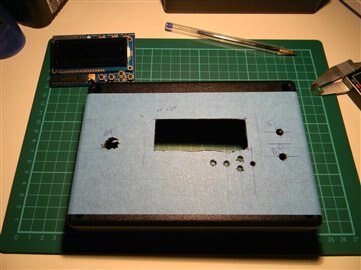
I puzzled a bit, figuring out how I would expose the controls, camera and LCD.

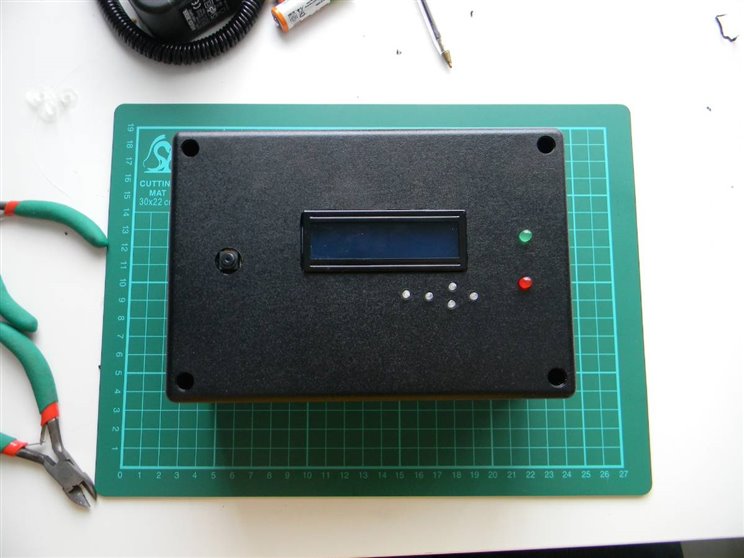
The solution I came up with can be seen in the pictures below. It's a bit big, but fully functional.

I even printed some buttons, as the keypad pushbuttons were no longer accessible because of the enclosure.


imageimageimage

image

image


RF433 I2C Board


As mentioned in previous blog post, I made a prototype of an I2C RF433 transmitter using an ATtiny85.

With the prototype working, I designed a small PCB using Fritzing and had it made.


A short video of the board being controlled by the Pi via I2C to turn a light on and off:


You don't have permission to edit metadata of this video.
Edit media
x
image
Upload Preview
image


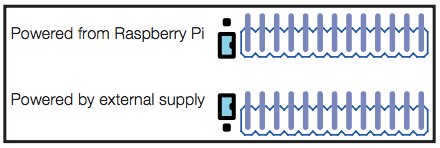
Power and other pins


I wanted to power every component involved in the most simple way possible, using a single power supply.

For that purpose I made use of the power provided to the Pi Rack and distributed it to the different components by means of jumper wires in case they weren't directly connected to the Pi Rack.

The Pi is also powered by the Pi Rack by providing the power via the GPIO pins. Not ideal, but it works and was simple to achieve: on one of the jumper selections for power, I shorted all three pins in order to have the external power supply reach the Pi 5V GPIO pin and have the module attached still powered also.


image


Because the Arduino and the Adafruit LCD/Keypad cannot be connected directly to the Pi Rack, I used jumper wires to connect the necessary pins:

  • Adafruit LCD/Keypad: Power and Ground + I2C pins
  • Arduino with GSM Shield: Power and Ground + Serial pins


I'll have to find a better way to fasten the jumper wires though, as they tended to come loose easily.


Testing


With all components enclosed, some tests were required to verify all connections were still functioning properly.


Using the "sudo i2cdetect -y 1" command, I verified both I2C modules (Adafruit LCD/Keypad and custom pcb) were detected properly.


The camera was tested using the "raspistill -o test.jpg" command. The picture and its orientation were correct.

Motion also provides a live stream of the camera feed, which worked properly.


A quick test of the LCD/Keypad:


You don't have permission to edit metadata of this video.
Edit media
x
image
Upload Preview
image


With the enclosure done and the components working, it was time for a "field" test ...


Demos


Because the wireless sensors could detect our little burglar even before she reached the living room (and because there was not much for you to see), we allowed her to start from within the living room.


The system would still detect her, but at least we'd have her reaction on film image


You don't have permission to edit metadata of this video.
Edit media
x
image
Upload Preview
image


You don't have permission to edit metadata of this video.
Edit media
x
image
Upload Preview
image


Thanks to the pictures and videos, the burglar was identified and apprehended image


Improvements


There are still quite some improvements to be done before this project becomes more than a game to play with my daughter:

  • As Mark suggested in a previous post: the wireless sensors should include a mechanism to check in periodically in order to know the batteries are not dead
  • The control unit with camera and controls should have some backup power: if the burglars turns off the electricity, the system should keep working for a (little) while
  • The solution is very bulky, mainly because all components used were used as is. A custom PCB with the different elements required could be more compact (and cheaper).
  • ...


Still, this was a great learning experience on different types of communication between the modules, and on the modules themselves.


Code


I'll be posting the full code on GitHub and provide the link when available.


The code consists of following parts:

  • Arduino sketch for RF433 sensor reception and GSM shield using UNO
  • Arduino sketch for the RF433 I2C transmitter using ATtiny85
  • Raspberry Pi python scripts to drive the LCD with keypad, the Piface digital, the lights and the sending of SMS
  • Sign in to reply
  • mcb1
    mcb1 over 11 years ago

    Nice work.

    A 5v power bank my work, but I'd be aiming for a 12v Gell Cell and suitable regulator.


    Mark

    • Cancel
    • Vote Up 0 Vote Down
    • Sign in to reply
    • More
    • Cancel
element14 Community

element14 is the first online community specifically for engineers. Connect with your peers and get expert answers to your questions.

  • Members
  • Learn
  • Technologies
  • Challenges & Projects
  • Products
  • Store
  • About Us
  • Feedback & Support
  • FAQs
  • Terms of Use
  • Privacy Policy
  • Legal and Copyright Notices
  • Sitemap
  • Cookies

An Avnet Company © 2025 Premier Farnell Limited. All Rights Reserved.

Premier Farnell Ltd, registered in England and Wales (no 00876412), registered office: Farnell House, Forge Lane, Leeds LS12 2NE.

ICP 备案号 10220084.

Follow element14

  • X
  • Facebook
  • linkedin
  • YouTube