element14 Community
element14 Community
    Register Log In
  • Site
  • Search
  • Log In Register
  • Community Hub
    Community Hub
    • What's New on element14
    • Feedback and Support
    • Benefits of Membership
    • Personal Blogs
    • Members Area
    • Achievement Levels
  • Learn
    Learn
    • Ask an Expert
    • eBooks
    • element14 presents
    • Learning Center
    • Tech Spotlight
    • STEM Academy
    • Webinars, Training and Events
    • Learning Groups
  • Technologies
    Technologies
    • 3D Printing
    • FPGA
    • Industrial Automation
    • Internet of Things
    • Power & Energy
    • Sensors
    • Technology Groups
  • Challenges & Projects
    Challenges & Projects
    • Design Challenges
    • element14 presents Projects
    • Project14
    • Arduino Projects
    • Raspberry Pi Projects
    • Project Groups
  • Products
    Products
    • Arduino
    • Avnet & Tria Boards Community
    • Dev Tools
    • Manufacturers
    • Multicomp Pro
    • Product Groups
    • Raspberry Pi
    • RoadTests & Reviews
  • About Us
  • Store
    Store
    • Visit Your Store
    • Choose another store...
      • Europe
      •  Austria (German)
      •  Belgium (Dutch, French)
      •  Bulgaria (Bulgarian)
      •  Czech Republic (Czech)
      •  Denmark (Danish)
      •  Estonia (Estonian)
      •  Finland (Finnish)
      •  France (French)
      •  Germany (German)
      •  Hungary (Hungarian)
      •  Ireland
      •  Israel
      •  Italy (Italian)
      •  Latvia (Latvian)
      •  
      •  Lithuania (Lithuanian)
      •  Netherlands (Dutch)
      •  Norway (Norwegian)
      •  Poland (Polish)
      •  Portugal (Portuguese)
      •  Romania (Romanian)
      •  Russia (Russian)
      •  Slovakia (Slovak)
      •  Slovenia (Slovenian)
      •  Spain (Spanish)
      •  Sweden (Swedish)
      •  Switzerland(German, French)
      •  Turkey (Turkish)
      •  United Kingdom
      • Asia Pacific
      •  Australia
      •  China
      •  Hong Kong
      •  India
      •  Korea (Korean)
      •  Malaysia
      •  New Zealand
      •  Philippines
      •  Singapore
      •  Taiwan
      •  Thailand (Thai)
      • Americas
      •  Brazil (Portuguese)
      •  Canada
      •  Mexico (Spanish)
      •  United States
      Can't find the country/region you're looking for? Visit our export site or find a local distributor.
  • Translate
  • Profile
  • Settings
Raspberry Pi Projects
  • Products
  • Raspberry Pi
  • Raspberry Pi Projects
  • More
  • Cancel
Raspberry Pi Projects
Blog Raspberry Pi 3 Cooling / Heat Sink Ideas
  • Blog
  • Documents
  • Events
  • Polls
  • Members
  • Mentions
  • Sub-Groups
  • Tags
  • More
  • Cancel
  • New
Join Raspberry Pi Projects to participate - click to join for free!
  • Share
  • More
  • Cancel
Group Actions
  • Group RSS
  • More
  • Cancel
Engagement
  • Author Author: shabaz
  • Date Created: 3 Mar 2016 5:03 AM Date Created
  • Views 19462 views
  • Likes 20 likes
  • Comments 142 comments
  • pi 3
  • heatsink
  • rpibeginner
  • heat_sink
  • rpi3
  • raspberry_pi
  • heat sink
  • rpi
  • raspberry_pi_projects
Related
Recommended

Raspberry Pi 3 Cooling / Heat Sink Ideas

shabaz
shabaz
3 Mar 2016

Note: This is part 1 of a 2-part post. For part 2, click here: Raspberry Pi 3 Dynamic Current Consumption, Power and Temperature Tests

To see an implementation using a heat pipe, see the Outdoor Pi 3 Image Recognition Security Camera project (aka HAL-CAM 9001)

image

Inspired by Christopher's cstanton  Raspberry Pi Operating Temperature report (with thermal photos from Gareth Halfacree) regarding the heat dissipated by the Broadcom chip on the Raspberry Pi 3, and the discussion with bwelsby we started searching around for ways to keep the Pi cool.

Ceramic heat sinks have an innovative structure (vias or micro-pores) which allow a heightened thermal conductivity compared to traditional aluminium heat sinks. They also can have the advantage that they won't affect radio frequency (RF) communications as much, when positioned close to the wireless antenna that is present on the Pi 3.

Furthermore, ceramic heat sinks are not electrically conductive and therefore there is no risk of accidentally shorting something on the Pi.

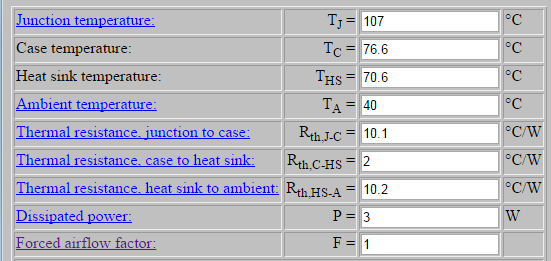
Back-of-the-envelope calculations (we don't have all parameters since we don't have a copy of the Broadcom datasheet to examine the device operating conditions in detail, nor a copy of the schematic to examine if we can measure device power consumption isolated from the remainder circuitry) suggests that a heat sink with thermal resistance of around 10 degrees C/W might be effective to keep the Broadcom chip's internal temperature below 120 degrees C when the ambient temperature is below around 40 degrees C. These are guesstimates until practical measurements have been taken.

image

Armed with this information, I searched for a suitable sized heat sink and I found a cheap aluminium one. However bwelsby and cstanton suggested that there may be issues with the heatsink getting in the way of connected HAT boards on top of the Pi, and Brian suggested examining ceramic heatsinks.

In summary, I think these parts may be suitable although measurements still need to be done:

22x22x2.5mm MPC222225T22x22x2.5mm MPC222225T

15x15x2.5mm MPC151525T15x15x2.5mm MPC151525T

(Optional) 20x20x10mm 5V DC fan MC33873(Optional) 20x20x10mm 5V DC fan MC33873

(EDIT: after some discussions below, it looks like this Sunon 'DR-MagLev' design fanSunon 'DR-MagLev' design fan is a far better choice, it is 25x25x10mm, quieter, higher throughput, and more efficient with overall lower power consumption. There is also a 25x25mm finger guard25x25mm finger guard).


The Broadcom chip is about 14x14mm in size, and ceramic heat sinks do exist in approximately that size. However it is possible to attach a larger heat sink if desired.

The photo below shows the parts that were examined. All of these ceramic heat sinks come with adhesive tape on the underside; the protective tape is removed and the heat sink will stick to the top of the integrated circuit.

The photo at the top of the blog post shows the largest 22x22mm ceramic heatsink.

image

The photo below shows a heat sink closer to the size of the Broadcom chip, 15x15mm. It also shows a 10x10mm heat sink on top of the USB hub/Ethernet controller chip, however this is really not needed. It doesn't get very hot according to the thermal photos in the previous blog post.

image

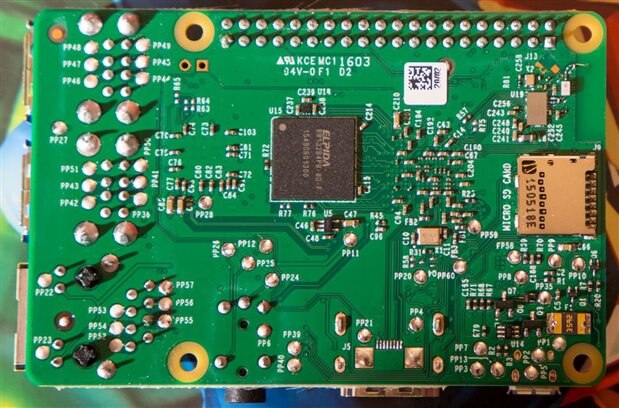
The memory chip on the underside gets hot too. If desired, the 15x15mm heat sink could  be attached there too. The 22x22mm one is too large for that location due to nearby components (the memory chip has a lower height than the Broadcom chip on the top side).

image

So, I plan to attach a 22x22mm part to the Broadcom chip on the top of the board, and possibly a 15x15mm heat sink to the memory chip on the underside. I don't think a fan will be needed unless a very small enclosure with no natural ventilation was used, or if the Pi was in a very warm environment.

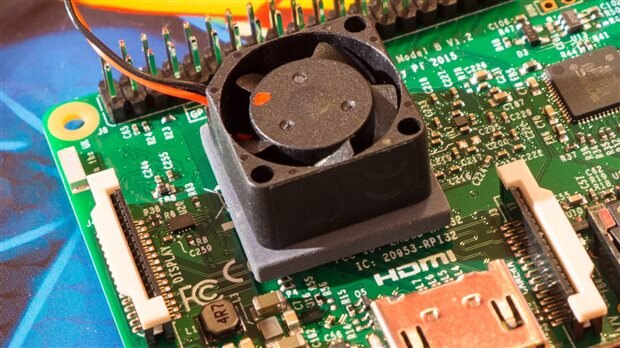
In that case, a fan may be an option. I tried the MC33873 fanMC33873 fan and it generates a usable level of air that can be felt from a distance of 10cm or more. However it does generate a small amount of noise too (possibly inaudible if the Pi will be behind other items such as a TV, but I think there is still a risk it could be audible. The voltage could be reduced from 5V to lessen the noise). It could be mounted on the heat sink as shown here although I think a small gap would be good to allow forced air to hit the entire top face of the heat sink. (The red dot on the fan was placed by me so that I could see it spinning). The fan could be secured with epoxy adhesive. The overall height is less than the height of the USB connectors on the Pi 3. The problem with this is that a HAT board cannot be plugged on top if there is a fan in the way.

image

A very nice solution would have been to put the fan on the side (to the left side of the photo above) so that the fan could blast air across the entire top face, and the underside of the board. However the display connector (the long white thing on the edge of the board in the photo above) is in the way and would block the flow of air which is extremely unfortunate. The Pi 3 wasn't designed with air flow in mind : ( However it might be possible with some 3D-printed duct design to achieve something that could work.


To summarize, some heat sinking ideas have been suggested however it is for further examination to see how well they perform. It will be good to see what solutions people come up with over time.


  • Sign in to reply

Top Comments

  • bwelsby
    bwelsby over 9 years ago in reply to shabaz +6
    I received the ceramic heatsinks today but not the fans they didn't get shipped till today. I have quickly designed a small case to 3D print as a test, and I shall make a dummy HAT too. I can then play…
  • shabaz
    shabaz over 9 years ago +5
    There is a 1-page article on the heat topic in magpi: So it looks like the fix they have implemented is more aggressive throttling through software changes. The wording is interesting in places.. it is…
  • shabaz
    shabaz over 9 years ago in reply to clem57 +4
    Hi! They are the real thing, they actually look like that. They look like school erasers don't they ; ) I remembered I had these heat sinks around from another project. Might try getting some measurements…
Parents
  • shabaz
    shabaz over 9 years ago

    Just to follow up on the duct thing, maybe something like this could work, and would be HAT-compatible:

    image

    Maybe it could be 3D-printed, I don't have such a printer though. Or alternatively a cardboard or thin plastic sheet prototype (could be used for real, I suppose combustible hazard is low!).

    Something like that on the underside would be interesting too.

    • Cancel
    • Vote Up +4 Vote Down
    • Sign in to reply
    • More
    • Cancel
  • bwelsby
    bwelsby over 9 years ago in reply to shabaz

    shabaz wrote:


    Just to follow up on the duct thing, maybe something like this could work, and would be HAT-compatible:


    Maybe it could be 3D-printed, I don't have such a printer though. Or alternatively a cardboard or thin plastic sheet prototype (could be used for real, I suppose combustible hazard is low!).

    Something like that on the underside would be interesting too.

    I don't have any HATs (apart from a thermal woolly one from when we went up into the Arctic Circle image )

    I don't have any 20mm 5v  fans or the ceramic heatsinks either so will have to do some ordering image

    I do have a 3D printer, so will see what I can do image  maybe split airflow so a small amount is channeled under the RPi too.


    Brian

    • Cancel
    • Vote Up +2 Vote Down
    • Sign in to reply
    • More
    • Cancel
  • shabaz
    shabaz over 9 years ago in reply to bwelsby

    Hi Brian,


    Just thinking, depending on your design, this alternative fan could be better, it is slightly larger (25x25x10mm) so quieter, and more airflow:

    http://uk.farnell.com/sunon/mc25100v2-0000-a99/fan-25x25x10mm-5vdc/dp/1924847

    If your enclosure is around 25mm or more taller anyway, then this fan shouldn't take up more usable space than the 20mm one.

    The high whine of a smaller fan could get annoying, although the volume isn't very high.

    The 25mm one spins slower but higher throughput overall and lower power consumption.

    Will be interesting to see your design ; )

    • Cancel
    • Vote Up +2 Vote Down
    • Sign in to reply
    • More
    • Cancel
  • bwelsby
    bwelsby over 9 years ago in reply to shabaz

    Yes 25mm is probably the better fan.  One thought I had was to use the RPi control it's speed in response to cpu temp.. like most PC cpu fans but thats another development image

    • Cancel
    • Vote Up 0 Vote Down
    • Sign in to reply
    • More
    • Cancel
  • cstanton
    cstanton over 9 years ago in reply to bwelsby

    That brings me to think that typically on fans now, there's also a PWM output sensor that can tell you what speed the fan is going at, to sense check if it's even working. I wonder if that's likely on smaller fans?

    • Cancel
    • Vote Up +2 Vote Down
    • Sign in to reply
    • More
    • Cancel
  • bwelsby
    bwelsby over 9 years ago in reply to cstanton

    I don't know of any small 5v fans with speed sensor, usually they are 12v and start at 40x40mm size.

    • Cancel
    • Vote Up +1 Vote Down
    • Sign in to reply
    • More
    • Cancel
  • shabaz
    shabaz over 9 years ago in reply to cstanton

    Just updated the post with the latest discussion concerning fans and the 25x25x10mm Sunon fan under consideration.. It is a good point, how can we know for sure that the fan is operating (we have some information from the RPI CPU temperature sensor, but it is quite indirect). Maybe the back EMF could be examined, a bit like brushless motor electronic commutation does.

    It looks like Sunon have some small fans orderable with feedback, but I don't know what the cost for that is. Another option (if only the display flat flex connector was not in the way!!) would have been to put a second fan there, and run them both, but at a lower speed and speed up as the temperature rises, i.e. share the load but a single one could support it if one fails. Maybe it is a bit OTT, but perhaps for some use-cases that people might subject the Pi to, the fan reliability may be a critical factor.

    The datasheet is quite interesting, it explains the MagLev thing the fan features. According to the datasheet, the noise level should be 4dB quieter than the 20x20mm fan.

    image

    • Cancel
    • Vote Up +2 Vote Down
    • Sign in to reply
    • More
    • Cancel
Comment
  • shabaz
    shabaz over 9 years ago in reply to cstanton

    Just updated the post with the latest discussion concerning fans and the 25x25x10mm Sunon fan under consideration.. It is a good point, how can we know for sure that the fan is operating (we have some information from the RPI CPU temperature sensor, but it is quite indirect). Maybe the back EMF could be examined, a bit like brushless motor electronic commutation does.

    It looks like Sunon have some small fans orderable with feedback, but I don't know what the cost for that is. Another option (if only the display flat flex connector was not in the way!!) would have been to put a second fan there, and run them both, but at a lower speed and speed up as the temperature rises, i.e. share the load but a single one could support it if one fails. Maybe it is a bit OTT, but perhaps for some use-cases that people might subject the Pi to, the fan reliability may be a critical factor.

    The datasheet is quite interesting, it explains the MagLev thing the fan features. According to the datasheet, the noise level should be 4dB quieter than the 20x20mm fan.

    image

    • Cancel
    • Vote Up +2 Vote Down
    • Sign in to reply
    • More
    • Cancel
Children
  • bwelsby
    bwelsby over 9 years ago in reply to shabaz

    Great, I have ordered a few pieces to play around with so will see what sort of results I can get.  Any thoughts on what HAT to wear?

    • Cancel
    • Vote Up +1 Vote Down
    • Sign in to reply
    • More
    • Cancel
  • clem57
    clem57 over 9 years ago in reply to bwelsby

    A bolo could be nice:


    lc-obj-03.jpg


    Oh did you mean for the Pi? image

    Clem

    • Cancel
    • Vote Up +4 Vote Down
    • Sign in to reply
    • More
    • Cancel
  • shabaz
    shabaz over 9 years ago in reply to bwelsby

    I thought we all dressed like characters from Mary Poppins/The Avengers/Sherlock Holmes? : )

    • Cancel
    • Vote Up +4 Vote Down
    • Sign in to reply
    • More
    • Cancel
  • bwelsby
    bwelsby over 9 years ago in reply to shabaz

    I received the ceramic heatsinks today but not the fans image  they didn't get shipped till today.


    I have quickly designed a small case to 3D print as a test,  and I shall make a dummy HAT too. I can then play around with ducting as required.

    The design of the case is using a 25mm fan to force airflow over and under the whole length of the Pi and exit at the Ethernet/USB connector end


    imageimageimage

    • Cancel
    • Vote Up +6 Vote Down
    • Sign in to reply
    • More
    • Cancel
  • shabaz
    shabaz over 9 years ago in reply to bwelsby

    It's amazing that you can design these up so quickly, and the attention to detail first time round, like where the screws will hold the two pieces together ; )

    It looks really nice!

    • Cancel
    • Vote Up +1 Vote Down
    • Sign in to reply
    • More
    • Cancel
element14 Community

element14 is the first online community specifically for engineers. Connect with your peers and get expert answers to your questions.

  • Members
  • Learn
  • Technologies
  • Challenges & Projects
  • Products
  • Store
  • About Us
  • Feedback & Support
  • FAQs
  • Terms of Use
  • Privacy Policy
  • Legal and Copyright Notices
  • Sitemap
  • Cookies

An Avnet Company © 2025 Premier Farnell Limited. All Rights Reserved.

Premier Farnell Ltd, registered in England and Wales (no 00876412), registered office: Farnell House, Forge Lane, Leeds LS12 2NE.

ICP 备案号 10220084.

Follow element14

  • X
  • Facebook
  • linkedin
  • YouTube