


Introduction
Installing MicroPython on your microcontroller board allows you to write and immediately run Python code, without needing to build or compile the code. It’s a really fast way of creating applications.
Usually I use print statements to see what’s going on in the code, but I might not always have a PC connected, nor an LCD screen. It was time to find an alternative solution!
This very short blog post discusses how to edit and run Python code (well, MicroPython code, but it’s almost the same thing) on a Pi Pico W using an editor tool called Thonny, and how to view log content remotely using an application called a syslog server. It is very lightweight, it uses UDP messages over the network.
General Overview
The Python code will first import some general network functions:
from net_utils import NET_UTILS
Next, in the main function, a net_utils object is created:
net_utils = NET_UTILS()
You can connect to the WiFi by the following command:
net_utils.wifi_connect()
The WiFi SSID and password from a file called secrets.py will be used.
To send messages to a syslog server running on a PC, the following commands are used:
net_utils.syslog_init()net_utils.syslog("hello this is a message!”)
That’s it, it’s very simple.
Getting Started
I purchased a Pi Pico-W, and then downloaded the MicroPython UF2 file from the raspberrypi MicroPython page.
The UF2 file is effectively the binary for the MicroPython operating system. I held down the Boot button on the Pi Pico-W, and then plugged in the USB cable, and then drag-and-dropped that UF2 file onto the drive letter that appeared.
Here is a video showing how to do that:
Obtain Example Code
I created some example code downloadable from GitHub. It can be downloaded as a zip file, by clicking on the green button and selecting Download ZIP. When extracted, there will be three files: main.py, net_utils.py, and secrets_example.py.
The secrets_example.py file needs to be renamed to secrets.py, and then edited to insert your WiFi SSID and password. (Note: the SSID and password are stored in plain text and very easy to extract, so you wouldn't do this generally; it's best to have a dedicated SSID and network for your experiments, so that there's no harm if the credentials are leaked).
The example code connects the Pico W to the network using WiFi, repeatedly retrieves the current temperature, and sends it in a message to the syslog server every minute.
Quick Thonny Guide
Thonny is a simple text editor and tool for uploading Python files. I downloaded and installed Thonny from the Thonny website:
The screenshot below shows how to use Thonny. Click the red circle to connect to the Pi Pico-W.
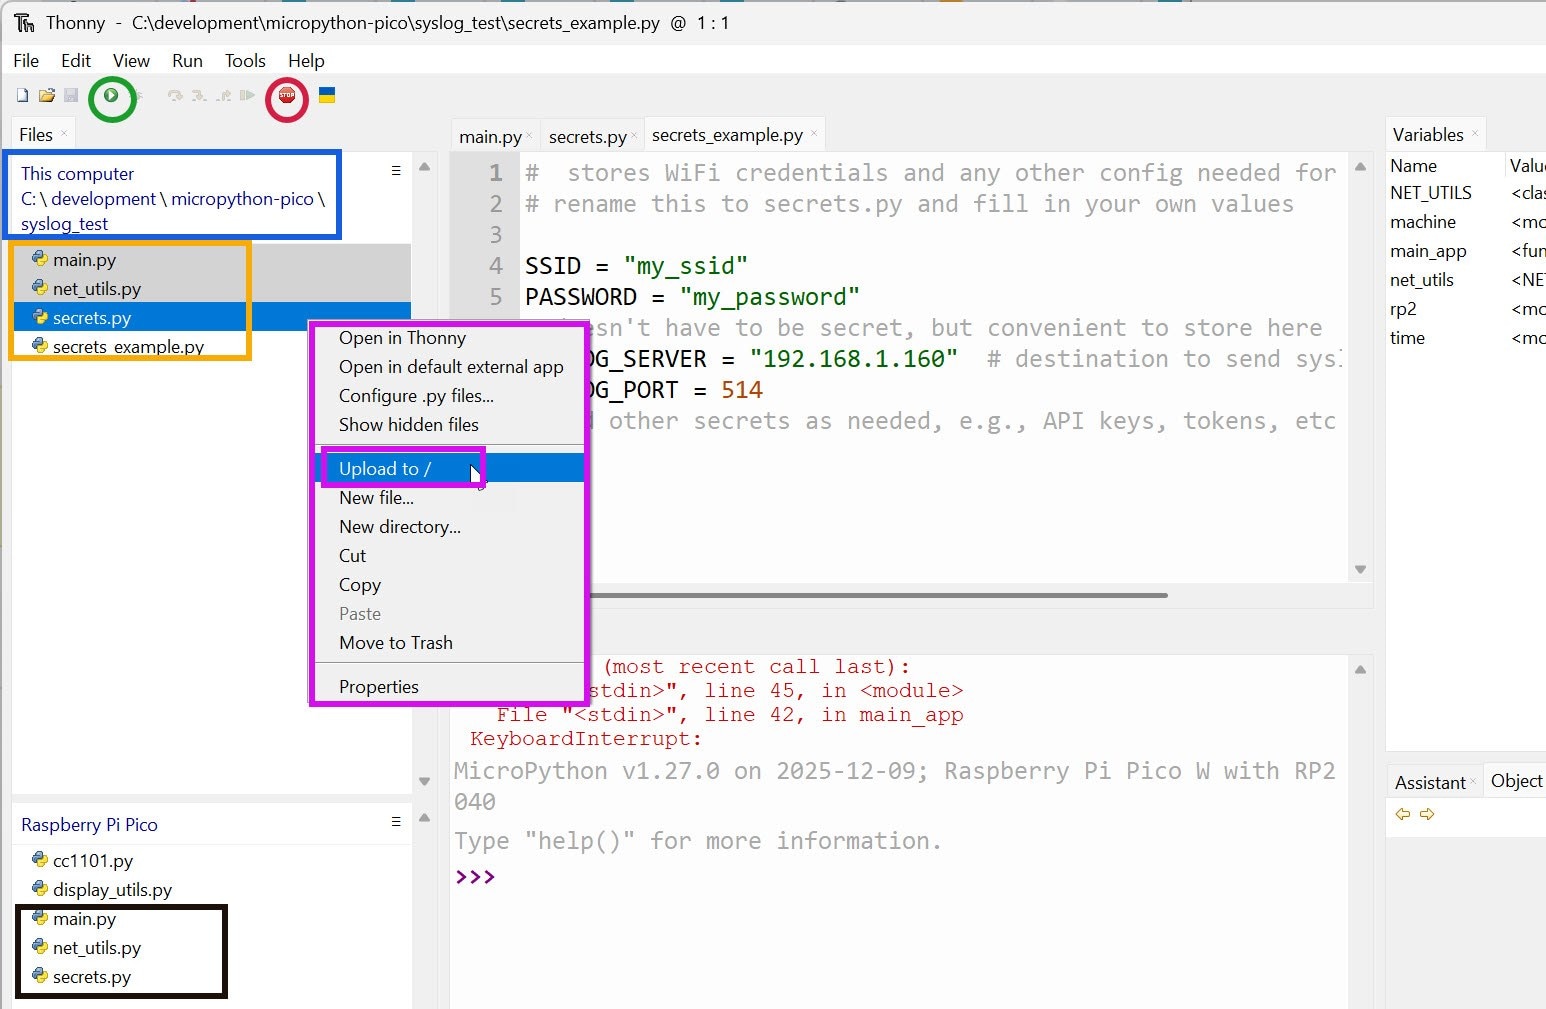
The blue area is used to select the current folder (select the folder where the example code extracted zip file contents were placed).
Once that’s done, the files in that folder will be listed below (orange box). Now you can select one or more files, and then right-click, and see the purple menu appear. From there, if you select Upload to / then the selected files will be transferred via USB to the Pi Pico-W. You’ll know when that is done, because they will be listed at the bottom-left (black box).
The main.py code will automatically run if the Pico-W is power-cycled, but you don’t need to do that. Instead, just double-click on the main.py file in the orange box, so that the contents appear in the main editor pane. Next, click the green circled icon, and the code will immediately run. You’ll see any print statements appear in the pane just below the editor pane (the pane is labelled Shell).
To stop the code, click in the pane below the editor pane, and press Ctrl-C. You;ll see a Python prompt.
If you wish to make code changes, do that in the editor pane, then save the file, then redo the steps to Upload to / and then to rerun the code, press the green circled icon again.
Running the Example Code
When you run the code as explained in the Quick Thonny Guide, you should see the following in Thonny's Shell pane; it will display the IP address that your Pi Pico-W has acquired, and the temperature at the latitude and longitude for Alcatraz (it’s just a demo location).

Installing and Configure a Syslog Server
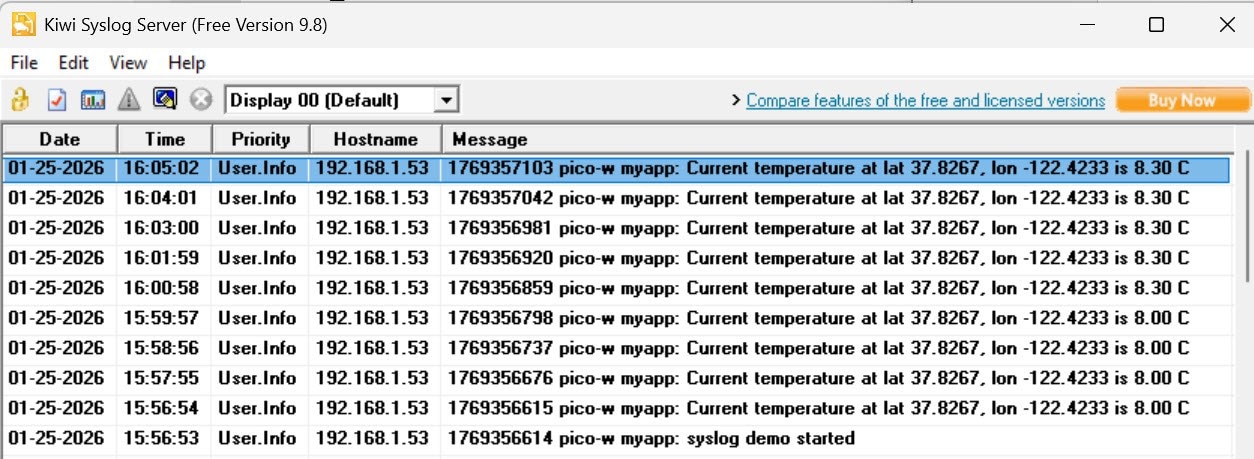
The Syslog Server is the software application that will collect and display the logs. I used an application called Kiwi Syslog Server Free Edition.
During installation, I chose to run it as an application rather than a service. Run the application, and select File->Setup, and then in the window that appears, select Inputs on the left, and then enter the IP address of the Pico-W in the red highlighted area, and click Add, then Apply, then OK. Now the Syslog server is ready to accept log messages from the Pico-W.

Configure the Pico-W to send Syslog Messages
Find out the IP address of your PC, and then go to the secrets.py file using Thonny, and edit the SYSLOG_SERVER IP address to be the PC’s IP address.
Re-run the code (i.e. stop the code first by Ctrl-C in the shell pane, then select main.py and then press the green circled icon as indicated earlier.
You should see logs appear!
Obtaining the Temperature
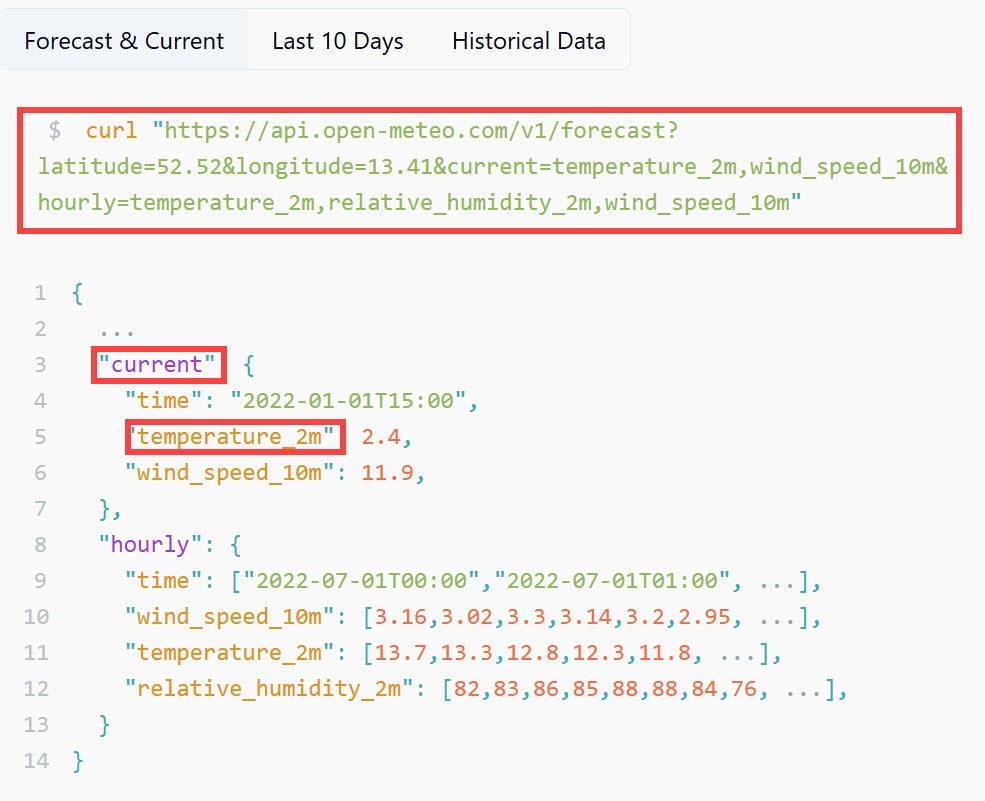
If you're curious, the main.py code shows how the temperature was obtained from a web API accessible from open-meteo. If you look at that site, you can see it describes a URL of https://api.open-meteo.com/v1/forecast with longitude and latitude parameters, and you can see the returned message format, it's known as JSON:
I used that URL and used this command to send the request:
data = net_utils.get_json_with_retries(url)cur = data.get("current")temp = cur.get("temperature_2m")Summary
MicroPython makes it very easy to quickly prototype things on a microcontroller.
A very lightweight remote logging method can be easily implemented in MicroPython. Syslog is a very well-known protocol. Simple code was presented that will send messages to a free syslog server. An API demo was presented using open-meteo.
Thanks for reading!


