RoadTest: Microchip AVR-IoT Cellular Mini Dev Board for LTE-M and NB-IOT Prepaid SIM
Author: redcharly
Creation date:
Evaluation Type: Development Boards & Tools
Did you receive all parts the manufacturer stated would be included in the package?: True
What other parts do you consider comparable to this product?: Any IoT cellular board
What were the biggest problems encountered?: No problems yet, but still working on it.
Detailed Review:
I'm Carlo Russo and I want to study and use this interesting board. I proposed for this roadtest as I was curious to roadtest a board that used cellular connectivity.
WiFi and Bluetooth are very useful and very efficient when we are in a small environment. If we want the communication with a board to exceed a hundred meters, we could use LoRa but with a rather low bandwidth and the need to have a LoRa gateway at a not too great distance.
Cellular communication, on the other hand, allows us to high-bandwidth communications in places where cellular coverage is present, in Italy, almost everywhere!
Starting from the guides proposed by Microchip, https://www.farnell.com/datasheets/3723183.pdf, we will test the board and use it to create a simple remote control system that will be tested in the field.
Unpacking a box from Element14 is always exciting, the AVR-IoT Cellular Mini is a compact and very versatile board thanks to the possibility of external power supply via batteries and the battery charger included.
| {gallery}Unboxing |
|---|
 |

|

|

|

|
 |
 |
 |
 |
 |
AVR-IoT Cellular Mini Development Board is a very versatile board, small in size and compatible with the Feather edge connector, so it is easy to find numerous expansion cards on the market.
It consists of 3 basic blocks, the brain represented by an AVR128DB48 microcontroller, a block, GM02S, for cellular connectivity and a block, ATECC608B, for security and encryption of communications.

A very valid feature, in my opinion, is Arduino support using a library based on the open source DxCore. The board is fully programmable using Arduino IDE, and this is of fundamental importance for those who, like me, are a teacher and can easily use the software already installed on the laboratory PCs to work with a new board. Students will have the advantage of using the same software tool they already use to program many other boards.
This board also has:

Since one of the objectives of this roadtest is to check the documentation of the AVR-IoT Cellular Mini Development Board, I have taken into consideration the "Quick start" manual, seen before, and I have performed the necessary steps for first board configuration.
The board manual is very clear and, to get started, just follow some simple steps:

The site is essential and well usable. You can see the list of modules compatible with Truphone technology, obviously the Monarch 2 GM02S is present!
The registration phase on the site is simple and the security requirements are high enough with a strong password to access the services.
Once registered I can activate my SIM. Truphone offers two choices, activation via activation code which simultaneously activates multiple SIMs of the same user and is so very useful for users who need to activate several cellular IoT systems, without forcing them to tedious device-by-device configurations.

In our case we have only one SIM so we will activate it by inserting the ICCID code printed on it.

Once the SIM is activated, the plan can be selected. For our tests we will have 150 MB and the SIM will expire 90 days after activation. Obviously, the user can at any time switch to a paid plan to use the service after the deadline.

| {gallery}point2 |
|---|

|
 |
|
|

|

Follow the steps on the web page to get started developing your IoT application.
Once the card has been selected, I will begin the actual procedure which consists of 5 steps:
Hardware preparation (SIM insertion and antenna connection, done on the board NOT powered) has already been carried out previously, so I go to the second step;
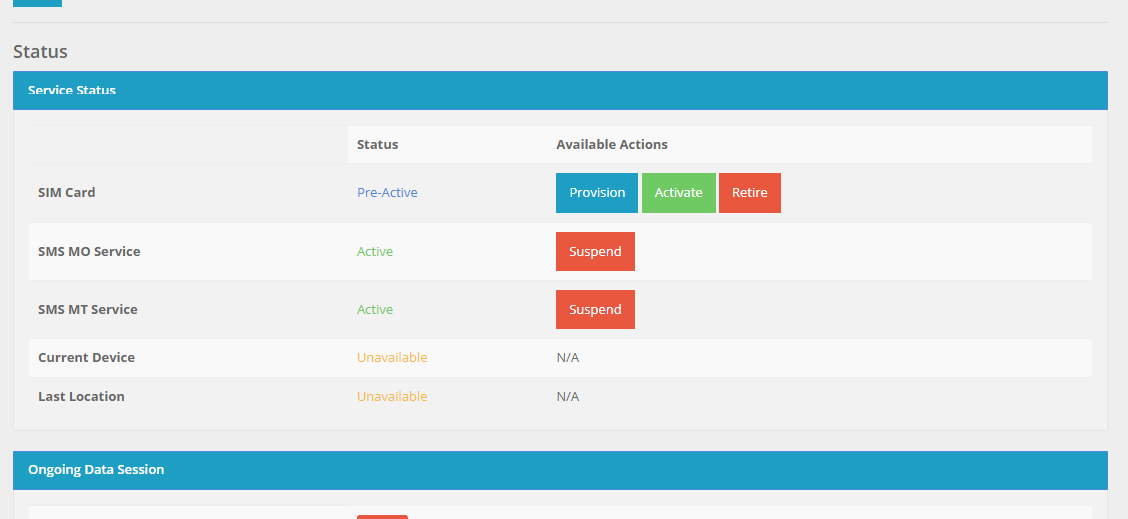
Register and Activate your SIM Card: this operation has also been almost entirely performed in the preliminary phase of configuring the SIM seen above. However, the SIM is not yet active. To activate it, go to the "SIM Cards" menu, choose the "List" submenu and select the ICCID of the SIM card. A new screen will open with information relating to our SIM. Below, in the "Status tab", in green, we will find the button for activating the SIM. By clicking on the button and confirming the choice, the SIM will finally be active.

Upgrade the Board Firmware: now we update the board by downloading the latest firmware version available and then copying the hex file to the Curiosity disk drive;
Connect to the Network: the phase of connecting to the network can be long. The manual says to wait even more than 5 minutes to get the connection. In our case more than 10 minutes have passed and nothing has happened, only the red LED (Error LED) remains on, the other LEDs do not light up. We need to investigate ...
Debugging: Here is a useful checklist if the device fails to connect.
By carrying out all the steps in the correct order and paying attention to each step, the result was a nice red LED on.
The red LED of the board stays on indicates the presence of an error. Since I was unable to solve the problem with the other points in the debug board list, I proceeded to provision the board.
In fact, I am very curious to test the operation of the board with Amazon's AWS, using the Microchip "sandbox" account to do the first tests.
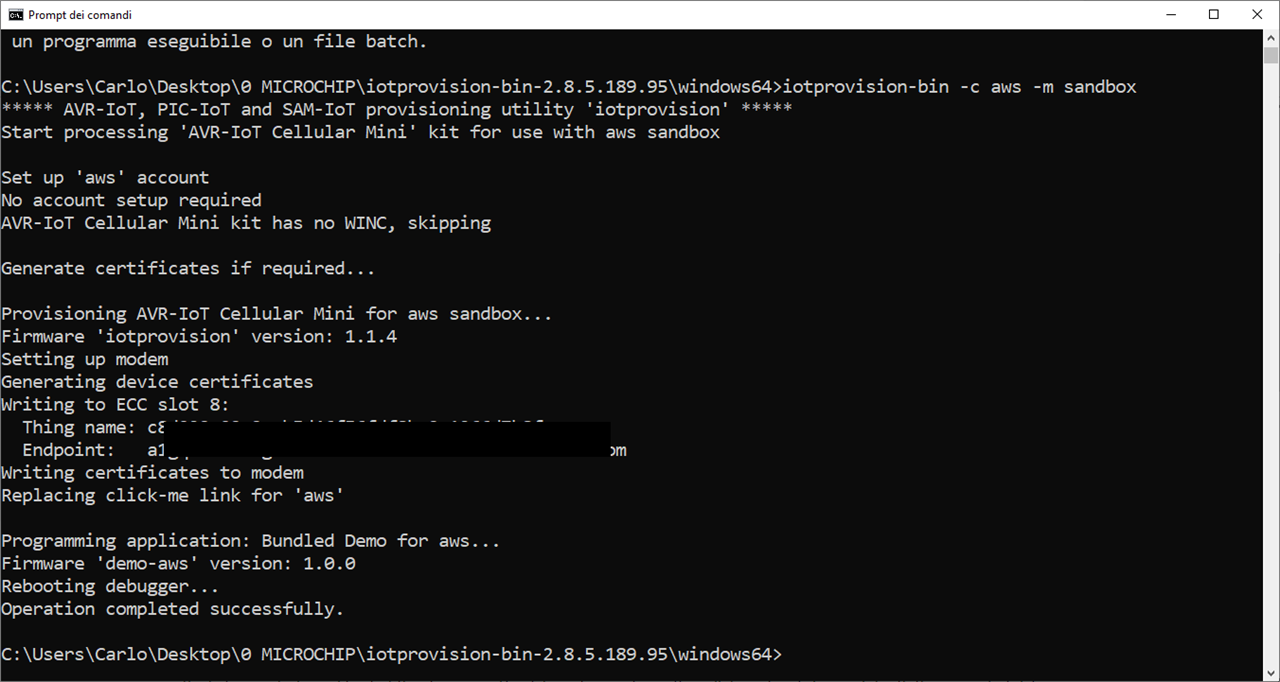
The provisioning operation on AWS is very simple. The procedure requires downloading the iotprovision-bin-2.8.5.189.95.zip file from the site iotprovision-bin. Just unzip the file and, after reading the help file, everything is very simple.
Just connect the board to your PC using USB, open a command prompt, go to the windows64 subdirectory of the folder you just created and type the command:
iotprovision-bin-2.8.5.189.95 \ windows64> iotprovision-bin -c aws -m sandbox

After a few moments, the board will be configured on the AWS with the Microchip sandbox account, very useful for becoming familiar with the board and with AWS.
With the same ease, by changing just a few parameters in the command line just seen, you could configure the board with a personal AWS account and therefore be able to take advantage of a greater number of services, paying for what you consume.
Now that provisioning is done, by launching CLICK-ME.HTM from the virtual drive Curiosity, the AVR-IoT Cellular Mini Development Board, this time, immediately connected to the dashboard and temperature and luminosity data start to fill two graphs. The web page let also command the User LED and the Error LED using simple buttons. Everything works well.
Soon Truphone's trace of the first data exchange appeared.

I have seen only a strange fact: while the brightness values are correctly sent, the sending of the temperature data did not give a correct result since the temperature always remains fixed on the value 131 and does not change even when the board is moved to environments with very different temperatures (outside under the sun of a hot Sicilian summer or inside a refrigerator). I plan to investigate this problem later, also because I had in mind to use the board temperature sensor for my project with the AVR-IoT Cellular Mini Development Board.


Now it's time to work on a project using the AVR-IoT Cellular Mini Development Board to monitor a place far from my house. I will add a link here when the work will be complete.
To conclude this first part of my work, I can say that the AVR-IoT Cellular Mini Development Board maintains the high quality standard of Microchip products and the documentation is very rich and complete.
You can find an application here: https://community.element14.com/products/roadtest/b/blog/posts/roadtesting-microchip-avr-iot-cellular-mini-dev-board-for-lte-m-and-nb-iot-with-prepaid-sim---remote-control-application
and see a video about it.