


This project uses the timers of a TI Hercules microcontroller to generate complex digital signals and to measure digital signals.
The TI Hercules microcontroller has interesting timers. They call them high-end timers, HET. They are autonomous programmable subcontrollers. HET modules are specialised to run logic in a deterministic time. Whatever happens in the outside world. a HET block will grind through the steps, clock steady. It's a tough module to program for, though. All the abstractions and flex we are used to these days is not available. We need to be careful. They have low level instructions only. Clock ticks need to be counted (do they fit in a cycle?)... I'm working with Hercules controllers for 6 years now. This module is he one that I struggle with most. The goal of this post is to advance my own knowledge, and to share what examples are available to my fellow Hercules buffs.
|

This project is based on TI's application note spna178: Monitoring PWM Using N2HET. That note explains the functionality and has a link to a Code Composer Studio project . I'm using these as the source for the blog series.
HET has a confusing naming convention. Depending on the controller version, the timers are called HET, NHET or N2HET. |
I'm planning to break this blog into 3 parts:
- general functionality of the example and adapt the application from a TMS570LS1227 HDK to a TMS570LC43 LaunchPad.
- review the code that generates the triangle waveform.
- review the code that samples the signal generated in part 2 and raises sinals when it's outside given boundaries.
The HET Timer Examples
The project has 2 HET programs, each running on a different HET block, independently.
Program running on HET #1: triangle wave generator
The first program uses the timer to generate a pulse train sequence that, by changing the duty cycle continuously, mimic a triangle wave form.
It will linearly increase the duty cycle and, when reaching 100% decrease the duty cycle until 0%. Rinse and repeat.

source: TI's application note spna178: Monitoring PWM Using N2HET, showing the triangle waveform logic
If you run that waveform through a low-pass filter, you get a triangular wave.
In the scope capture below, light blue signal 2 is the output of HET program 1, after passing through the low-pass filter.
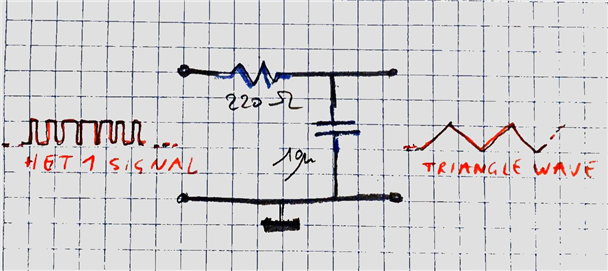
image: a simple RC low pass filter
One of the attributes of this pulse train is that it has a wide range of duty cycles. Ideal for the second HET program below, a design that validates if a duty cycle is within certain bounds.
Some highlights:
- the analog signal is just for your enertainment. The second HET program samples the duty train of the original pulse train generated by HET #1.
- HET #1 generates this sequence without any input from the microcontroller. The only time the CPU is involved is at the startup, when it loads the HET code into memory and gives the GO! signal.
- It shows how to exchange firmware data with the HET logic (for an example where HET and CPU exchange data extensively, check my Stepper Motor posts).
Program running on HET #2: duty cycle monitor
The first program samples the pulse train generated by HET #1. It measures the duty cycle continuously.
When the duty cycle is outside a given % range, it puts an output pin high, until the cycle is within range again.
Additionally (and the reason why I wanted to review this example), it raises a interrupt in the CPU.
That Interrupt updates two counters. An underrun counter in case the duty cycle was below the set range. An overrun counter in the case the duty cycle was larger than the uppder range we define.

Some highlights:
- everything except the (optional) handling of the CPU interrupt run independent of the CPU clock
- there aren't many examples around that show how to generate then react on a HET interrupt
Below scope capture, from TI's application note, shows bot timers in action.
In this case, it considers every pulse cycle that has a duty cycle below 20% or above 80% as an error, and puts an output pin high.
I you break the main clock, this cycle will continue executing.

source: TI's application note spna178: Monitoring PWM Using N2HET, showing the triangle wave of HET#1 and the error output of HET #2
Adapt TI's application note to a Hercules TMS570LC43 LaunchPad
I use the same signals and pins as TI does for their HDK.
Triangle comes out of pin N2HET1_9.
That same signal is sampled (internally! the HET pin we use to sample is routed to the same pin, see later, and see the orange dot below) by N2HET2_16.
That means that in reality, you don't need to wire up any pins to see this example work. You'll see the interrupt wiring and the counters increasing without any witing.
But for your own interest, it's worth putting that output filter on the N2HET1_9 pin and probe both the filter output and the error output N2HET2_0.

On configuration, there's not that much to change.
Start off by creating a brand new project and apply all HalCogen settings from TI's application note.
If you are stuck or want to try immediately, I've attached the Code Composer Studio project to this post.
TMS570LC43 needs a PINMUX setting
By default, the TMS570LC43 routes N2HET2_16 to solder ball L4. It would not detect anything happening on the HET 1 output.
Set the pinmux for that signal to V7. The same BGA ball that has the NHET1_9 signal on it.

Let the Build process generate the HET code at each build cycle.
TI's project has the HET code pre-assembled. But it's more fun to let the build process do that. It allows you to change the HET code and see what happens.
First, create a HET_code subfolder in your project, and place both *.het files you find in TI's example project there.
Right-click on the HET_code folder and exclude it from build.
Create a build variable to the HET assembler (installed when you install HET IDE).

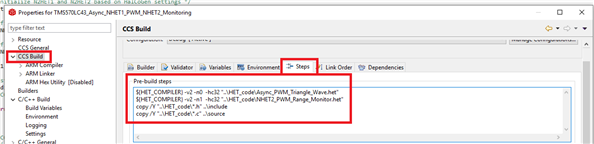
Then put the commands to assemble the *het files in the prebuild steps, and the code to copy the resulting .h and .c files to our source and include folders.
${HET_COMPILER} -v2 -n0  -hc32 "..\HET_code\Async_PWM_Triangle_Wave.het"
${HET_COMPILER} -v2 -n1  -hc32 "..\HET_code\NHET2_PWM_Range_Monitor.het"
copy /Y "..\HET_code\*.h" ..\include
copy /Y "..\HET_code\*.c" ..\source
There's an inconsistency in the code generated by HALCoGen.
It has some conditional code that's dependent on the header file generated by the HET assembler. But it generates an include file sequence that only includes thet header file after trying to check the settings.
HALCoGen definition in std_nhet.h:
:
#ifndef HET_v2
#   define HET_v2 0
#endif
HET assembler definition, defined in a header file that HALCoGen includes after the above file (hence it doesn't know the definition when it tries to resolve the conditional code parts)::
#define HET_v2 1
TI knows (there are several posts on the E2E forum) but since both applications don't have a next release date, I'm not expecting a solution soon.
Here's a workaround: predefine the variable in the project settings. Set it for both debug and release.

Build the project, to check if the prebuild steps work. It will generate the asembled .h and .c files the first time. Don't run the project yet.
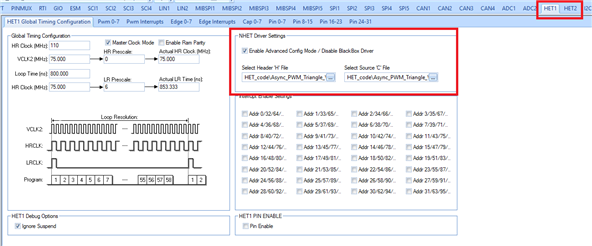
Then, in HALCoGen, select the header and c files generated by this step to the HET1 and HET2 configuration page.
This step is just to make all tools work as you expect, without surprises. It does the same as the pre-build steps above, without first assembling the het source.

Next, provide the code for the main and interrupt handle source.
Copy the content of the TI app note's main file over the main file generated by HALCoGen.
Where needed, add HL_ in front of includes, e.g., from:
#include "sys_core.h"
to:
#include "HL_sys_core.h"
This is because HALCoGen for certain controllers adds HL_ to header files. The easiest way to find out is to build the code and place HL_ in front of all the code lines that error out for an unknown include file.
Add this line anywhere to void configNHET2():
  /* Change the LRPFC according to user input */
  hetREG2->PFR = (LRPFC << 8) ;
In the copied main file, copy the content of the hetNotification() function, and some additionals, to HL_notification.c. It belongs there, not in the main file:
/* USER CODE BEGIN (41) */
#include "NHET2_PWM_Range_Monitor.h"
uint32 greater_than_max_duty = 0;
uint32 less_than_min_duty = 0;
/* USER CODE END */
#pragma WEAK(hetNotification)
void hetNotification(hetBASE_t *het, uint32 offset)
{
/*  enter user code between the USER CODE BEGIN and USER CODE END. */
/* USER CODE BEGIN (42) */
  if (offset == (pHET_L08_1+1) ){
    /* bad_duty keeps track the number of times
       the N2HET2 ISR is entered due to pulse mismatch */
    greater_than_max_duty++;
  } else if (offset == (pHET_L10_1+1) ){
    less_than_min_duty++;
    /* Should never come here */
  } else {
    while (1);
  }
/* USER CODE END */
}
This is the exception handler that will be called by NHET2 when the duty cycle is out of desired range. This one updates the counters.
That's it. Build, run, enjoy. Put oscilloscope probes on HET1_9 and HET2_0.
In the next post, I'll try to explain the HET code that creates the pulse train for the triangle wave.
| Related Blog |
|---|
| 1: adapt TI example to a LaunchPad |
| 2: Generate Dynamic Duty Cycle |
| 3: Measure a PWM Signal and HET Interrupts |
| 4: Getting Started |
| 5: Getting Started with the Wave Form Simulator |
Top Comments