


In this blog series, I plan to build a Texas Instruments MSPM0 example with VS Code as IDE, and CMake as build infrastructure.
I'm trying to use the guidelines from TI's Using CMake with TI Clang Compilers and SysConfig. But then with GCC (version 15 for embedded arm) instead of TI Clang. And using the VS Code CMake extensions. In the first part: the infrastructure to make it work
|
The default IDE for TI controllers is Code Composer Studio. That works right away, and has good integration with the configurator and debugger. |
Dependencies
You 'll need:
- VS Code
- VS Code CMake Tools extension (released by Microsoft - install via VS Code extension button)
- CMake installed, preferably version 4 or higher
- Ninja
- GCC cross compile toolchain arm-none-eabi
These can all be downloaded and installed separately. If you use VS Code with the Raspberry Pico extension, you will find CMake, Ninja and an Arm GCC compiler in its pico_sdk folder (on my computer: C:\Users\jancu\.pico-sdk)
The next posts will also use TI's MSPM0 SDK and SysConfig tools. More on that when we need them.
Create a fresh workspace, create your first project
A fresh workspace is a good idea when you're experimenting with a new controller and toolset. You won't risk contaminating your existing VS Code projects
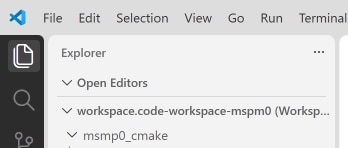
Open VS Code. If you have used it before, close all windows. Then close the current workspace: File -> Close Workspace
Then we make a new workspace:
File-> Save Workspace As...
In the dialog box, navigate to a good location, and create a folder (I used C:\Users\jancu\workspace_vscode_mspm0).
Then navigate to that folder, enter a file name for the workspace (mine:workspace.code-workspace-mspm0.code-workspace)
Then Save
Let's add a folder for our first project to the workspace: File -> Add folder to workspace.
In the dialog box, navigate to that workspace you just created, and create a new folder there (I used: msmp0_cmake).
Select it, then Add
|
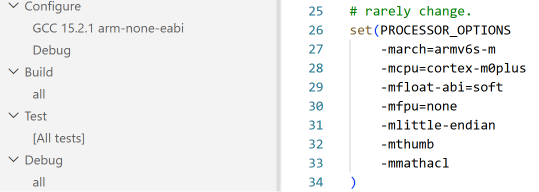
use of AI: I used Google AI to look up compiler settings for the MSPM0 architecture (see image at the top of the post). It also helped to resolve several build errors |
Install and configure VS Code CMake extension
Click on the VS Code Extensions icon, and search for CMake Tools. Install it.
If your CMake and Ninja executables are not on your path, you can define them in the settings. If tcmake.exe and ninja.exe are on your path, you can skip the steps.
Select the Manage cogwheel, and select Settings. Select the Workspace tab.
Extensions -> Cmake Tools
Set the path to your cmake.exe in Cmake Path:
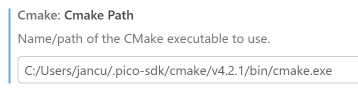
And add Ninja's executable as CMake Environment variable CMAKE_PROGRAM_PATH.
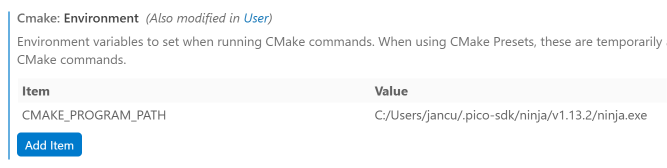
Minimal CMake File and Test Code
I lean heavily on TI's notes here. The C source is the same. The CMake file is adapted to GCC. And I left out the parts that will be covered in a follow up post.
The goal is to have a successful build. Create a binary without errors or warnings.
stub.c:
int main()
{
    return 0;
}
CMakeLists.txt:
cmake_minimum_required(VERSION 3.29)

set(CMAKE_C_STANDARD 11)
set(CMAKE_CXX_STANDARD 26)
set(CMAKE_EXPORT_COMPILE_COMMANDS ON)
set(CMAKE_CXX_FLAGS "${CMAKE_CXX_FLAGS} -fmodules-ts -fcommon -fno-rtti -fno-exceptions --specs=nano.specs -Wl,--gc-sections")
set(CMAKE_CXX_STANDARD_REQUIRED ON)


# Cross compiling for a target system that is an embedded device
set(CMAKE_SYSTEM_NAME Generic)
set(CMAKE_TRY_COMPILE_TARGET_TYPE STATIC_LIBRARY)
set(CMAKE_EXE_LINKER_FLAGS "${CMAKE_EXE_LINKER_FLAGS} --specs=nosys.specs  -Wl,--gc-sections")

# Create the project
project(
    stub                 # Project is named stub
    LANGUAGES C  CXX     # Uses the programming language C
)

#---------------------------------------------------------------------
# Configuration related to compiling
#---------------------------------------------------------------------
# Compiler options which specify the variant of the Arm processor in the
# system.
set(PROCESSOR_OPTIONS
    -march=armv6s-m
    -mcpu=cortex-m0plus
    -mfloat-abi=soft
    -mlittle-endian
    -mthumb
)

# Build the executable from source files in the project
add_executable(
    stub                 # Executable is named stub
    stub.c               # Has one source file
    nofilesystem.c       # temporary function definitions until we add sdk libs
)
I also created a C file to define a few of dummy filesystem operations. Else, the linker throws warnings for a set of missing functions. Once the MSPM0 library is linked in (next post), we can remove this file.
nofilesystem.c:
#include <sys/stat.h>

int _close(int file) {
    (void)file;
    return -1;
}

int _fstat(int file, struct stat *st) {
    (void)file;
    st->st_mode = S_IFCHR;
    return 0;
}

int _isatty(int file) {
    (void)file;
    return 1;
}

int _lseek(int file, int ptr, int dir) {
    (void)file; (void)ptr; (void)dir;
    return 0;
}

int _read(int file, char *ptr, int len) {
    (void)file; (void)ptr; (void)len;
    return 0;
}

int _write(int file, char *ptr, int len) {
    (void)file; (void)ptr; (void)len;
    return len;
}
Use CMake Tools to configure the project and run a build
Open CMake Tools. Select your project folder.
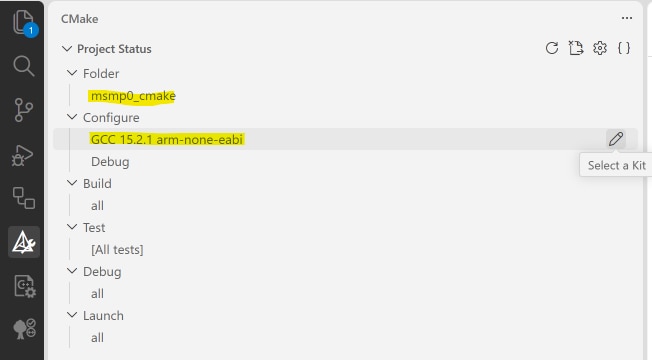
If your arm cross is on the path, you can directly select it as a kit in the Configure node. If not, press the Select a Kit pencil, and scan recursively for toolchains.
In the dialog that pops up, navigate to the root directory of your GCC arm-none-eabi kit. If you use the Raspberry Pico extension for VS Code, you will find at least one GCC version in its toolchain subfolder.
Complete configuration by pressing the Configure button:
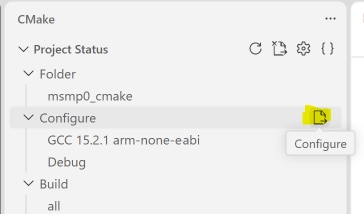
You should see output similar to this:
[main] Configuring project: msmp0_cmake [proc] Executing command: C:/Users/jancu/.pico-sdk/cmake/v4.2.1/bin/cmake.exe -DCMAKE_BUILD_TYPE:STRING=Debug -DCMAKE_EXPORT_COMPILE_COMMANDS:BOOL=TRUE -DCMAKE_C_COMPILER:FILEPATH=c:\Users\jancu\Documents\toolchains\arm-gnu-toolchain-15.2.rel1-mingw-w64-i686-arm-none-eabi\bin\arm-none-eabi-gcc.exe -DCMAKE_CXX_COMPILER:FILEPATH=c:\Users\jancu\Documents\toolchains\arm-gnu-toolchain-15.2.rel1-mingw-w64-i686-arm-none-eabi\bin\arm-none-eabi-g++.exe --no-warn-unused-cli -S C:/Users/jancu/workspace_vscode_mspm0/msmp0_cmake -B c:/Users/jancu/workspace_vscode_mspm0/msmp0_cmake/build -G Ninja[cmake] Not searching for unused variables given on the command line.[cmake] -- Configuring done (0.0s)[cmake] -- Generating done (0.0s)[cmake] -- Build files have been written to: C:/Users/jancu/workspace_vscode_mspm0/msmp0_cmake/buildThen build the project:
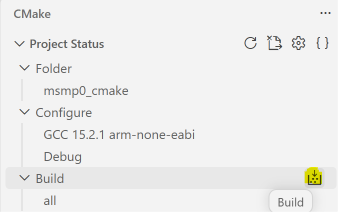
The output should have no errors and warnings
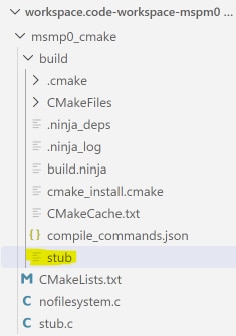
[main] Building folder: c:/Users/jancu/workspace_vscode_mspm0/msmp0_cmake/build [build] Starting build[proc] Executing command: C:/Users/jancu/.pico-sdk/cmake/v4.2.1/bin/cmake.exe --build c:/Users/jancu/workspace_vscode_mspm0/msmp0_cmake/build --config Debug --target all --[build] [2/3 33% :: 0.127] Building C object CMakeFiles/stub.dir/stub.c.obj[build] [2/3 66% :: 0.144] Building C object CMakeFiles/stub.dir/nofilesystem.c.obj[build] [3/3 100% :: 0.262] Linking C executable stub[driver] Build completed: 00:00:00.319[build] Build finished with exit code 0Let's check if the executable is built: yes 
In the next post, I try to set up linking with the SDK libraries. And then a first real project...
post 2: MSPM0 project with VS Code, CMake and GCC - part 2: build a real project
-

Jan Cumps
-
Cancel
-
Vote Up
0
Vote Down
-
-
Sign in to reply
-
More
-
Cancel
Comment-

Jan Cumps
-
Cancel
-
Vote Up
0
Vote Down
-
-
Sign in to reply
-
More
-
Cancel
Children