element14 Community
element14 Community
    Register Log In
  • Site
  • Search
  • Log In Register
  • Community Hub
    Community Hub
    • What's New on element14
    • Feedback and Support
    • Benefits of Membership
    • Personal Blogs
    • Members Area
    • Achievement Levels
  • Learn
    Learn
    • Ask an Expert
    • eBooks
    • element14 presents
    • Learning Center
    • Tech Spotlight
    • STEM Academy
    • Webinars, Training and Events
    • Learning Groups
  • Technologies
    Technologies
    • 3D Printing
    • FPGA
    • Industrial Automation
    • Internet of Things
    • Power & Energy
    • Sensors
    • Technology Groups
  • Challenges & Projects
    Challenges & Projects
    • Design Challenges
    • element14 presents Projects
    • Project14
    • Arduino Projects
    • Raspberry Pi Projects
    • Project Groups
  • Products
    Products
    • Arduino
    • Avnet Boards Community
    • Dev Tools
    • Manufacturers
    • Multicomp Pro
    • Product Groups
    • Raspberry Pi
    • RoadTests & Reviews
  • Store
    Store
    • Visit Your Store
    • Choose another store...
      • Europe
      •  Austria (German)
      •  Belgium (Dutch, French)
      •  Bulgaria (Bulgarian)
      •  Czech Republic (Czech)
      •  Denmark (Danish)
      •  Estonia (Estonian)
      •  Finland (Finnish)
      •  France (French)
      •  Germany (German)
      •  Hungary (Hungarian)
      •  Ireland
      •  Israel
      •  Italy (Italian)
      •  Latvia (Latvian)
      •  
      •  Lithuania (Lithuanian)
      •  Netherlands (Dutch)
      •  Norway (Norwegian)
      •  Poland (Polish)
      •  Portugal (Portuguese)
      •  Romania (Romanian)
      •  Russia (Russian)
      •  Slovakia (Slovak)
      •  Slovenia (Slovenian)
      •  Spain (Spanish)
      •  Sweden (Swedish)
      •  Switzerland(German, French)
      •  Turkey (Turkish)
      •  United Kingdom
      • Asia Pacific
      •  Australia
      •  China
      •  Hong Kong
      •  India
      •  Korea (Korean)
      •  Malaysia
      •  New Zealand
      •  Philippines
      •  Singapore
      •  Taiwan
      •  Thailand (Thai)
      • Americas
      •  Brazil (Portuguese)
      •  Canada
      •  Mexico (Spanish)
      •  United States
      Can't find the country/region you're looking for? Visit our export site or find a local distributor.
  • Translate
  • Profile
  • Settings
Internet of Things
  • Technologies
  • More
Internet of Things
Blog Arduino MKR WAN 1310 integration with Node-RED via The Things Network
  • Blog
  • Forum
  • Documents
  • Quiz
  • Events
  • Polls
  • Members
  • Mentions
  • Sub-Groups
  • Tags
  • More
  • Cancel
  • New
Join Internet of Things to participate - click to join for free!
  • Share
  • More
  • Cancel
Group Actions
  • Group RSS
  • More
  • Cancel
Engagement
  • Author Author: Jan Cumps
  • Date Created: 14 Jan 2024 6:26 PM Date Created
  • Views 1722 views
  • Likes 10 likes
  • Comments 7 comments
  • node-red
  • ttn
  • the_things_network
  • mkr wan 1310
  • arduino
Related
Recommended

Arduino MKR WAN 1310 integration with Node-RED via The Things Network

Jan Cumps
Jan Cumps
14 Jan 2024
Arduino MKR WAN 1310 integration with Node-RED via The Things Network

I connected an Arduino MKR WAN 1310 to The Things Network (TTN). Then tested if the Arduino integrates with TTN MQTT service. Now I'm working with the Arduino's payload in Node-RED. This post is my log of the activity.

image
image source: me

Read this post first:  Arduino MKR WAN 1310 integration with The Things Network MQTT . This posts starts at the point where the Arduino is working with TTN MQTT. 

The Example setup

An Arduino MKR WAN 1310 is integrated with the TTN MQTT server ( Arduino MKR WAN 1310 integration with The Things Network MQTT ). 
Data that the Arduino uplinks via LoRaWan, arrives on in your Node-RED flow.
Data that's published in your Node-RED flow, arrives on the Arduino as a downlink.
To have something tangible, I created a dashboard to show the Arduino's LED status.

image

image: the architecture. Exactly the same as in the earlier TTN + MQTT post

Assumptions:

  • you have your Arduino MKR WAN 1310 integrated with TTN MQTT service.
  • you have Node-RED installed and know how to work with it.

Steps:

  • configure and enable access to the TTN MQTT service from Node-RED
  • test uplink to Node-RED flow and
  • test downlink from Node-RED flow.

We don't have to change the Arduino code or modify existing TTN setup.

image

Create and Test the integration with Node-RED

TTN has written a good manual for that too: TTN Node-RED. I followed the exact steps and it worked. 

uplink from Arduino

This is the first flow, so we'll set up the connection while building it. Create a brand new Node-RED flow and drop an MQTT in node on it. In its configuration pane, add a new MQTT broker.

image

Take over the settings from your console. The password (on the security tab) is the one you saved in the previous post when generating the new API key. Set the MQTT compatibility to 3.1. Else the connection will fail.

I'm not too happy yet, because I couldn't get TLS working. I'm still searching for the right certificates. I wrote a follow-up, to enable secure MQTTS with TLS connection:  Secure MQTT integration between Node-RED and The Things Network . Use that procedure for real deployments always. It's way safer than the plain MQTT connect that I suggest in this post.

On the MQTT node, set the topic, and quality of service.

image

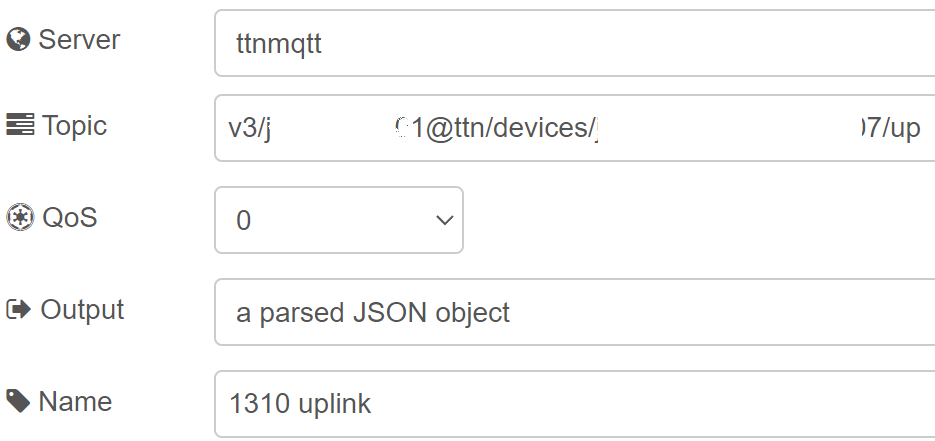
The topic is again v3/*****-01@ttn/devices/****7/up. (pattern: v3/{application id}/devices/{device id}/up).

Connect a debug node to the MQTT in output. Deploy the flow. As soon as your Arduino sends a message over LoRaWan, the payload will appear in the Node-RED debug pane . Here's a capture of an incoming payload:

image

downlink to Arduino

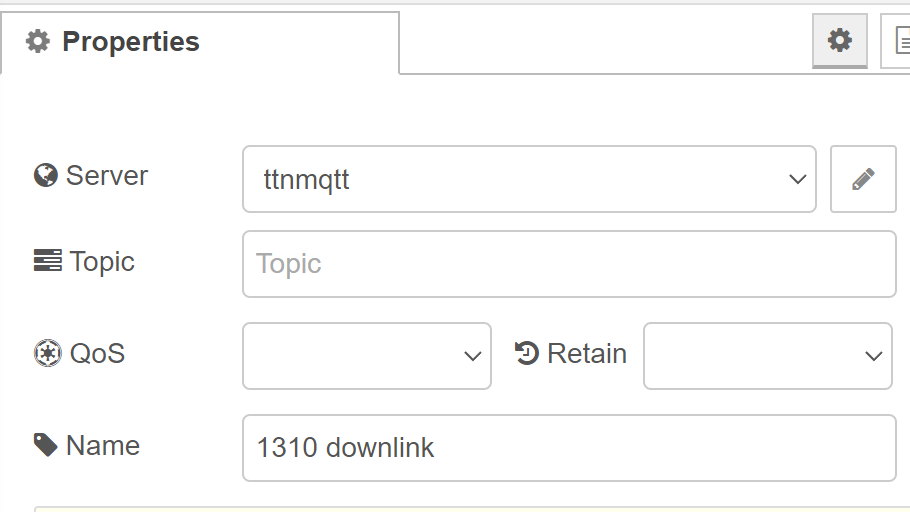
We can test that with Node-RED too. Publish a message to the v3/********-01@ttn/devices/*************7/down/push topic. (pattern: v3/{application id}/devices/{device id}/down/push). I used two inject nodes to create a LED on or off payload. It's again the same as in the previous blog:

Payload:

{
  "downlinks": [{
    "f_port": 1,
    "decoded_payload": {
      "ledState": "on"
    },
    "priority": "NORMAL"
  }]
}

Drop a MQTT out node on the canvas, and connect the two inject nodes to its input.

image

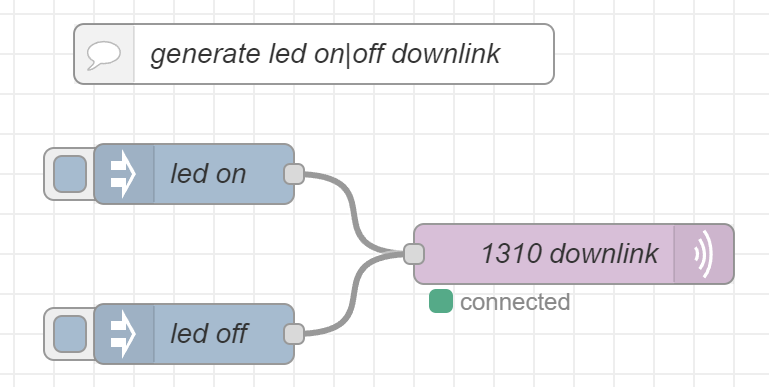
Setting up that node is very easy. Just select the server definition you created for the uplink flow. That 'll be it.

image

Deploy. Push one of the inject nodes to start the process (keep TTN fair use limits in mind). The message will immediately appear in the live data log in the TTN console

image

But will not yet arrive on the Arduino. That's because we'll only get downlink data when we start a communication (design choice in my sketch). Once we receive an uplink from the Arduino, the downlink is sent back:

image

And the LED will light up Slight smile

image

Working with the data in Node-RED

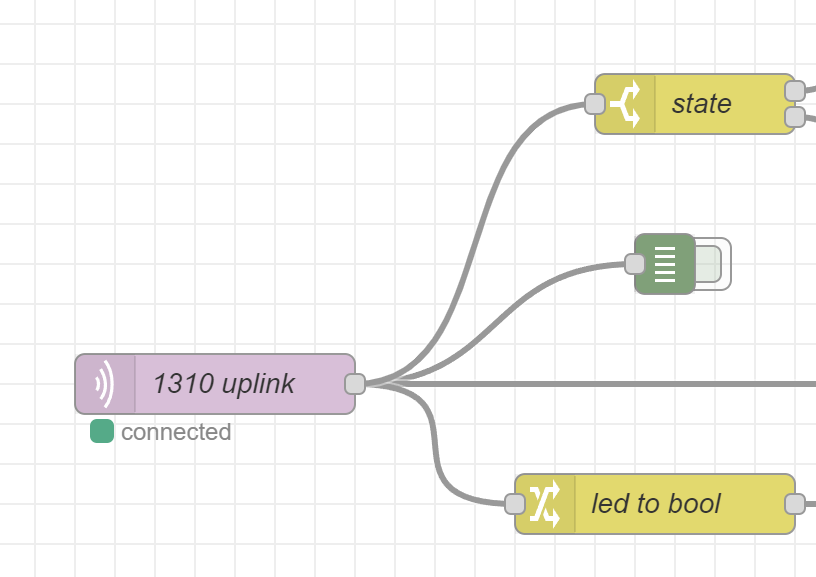
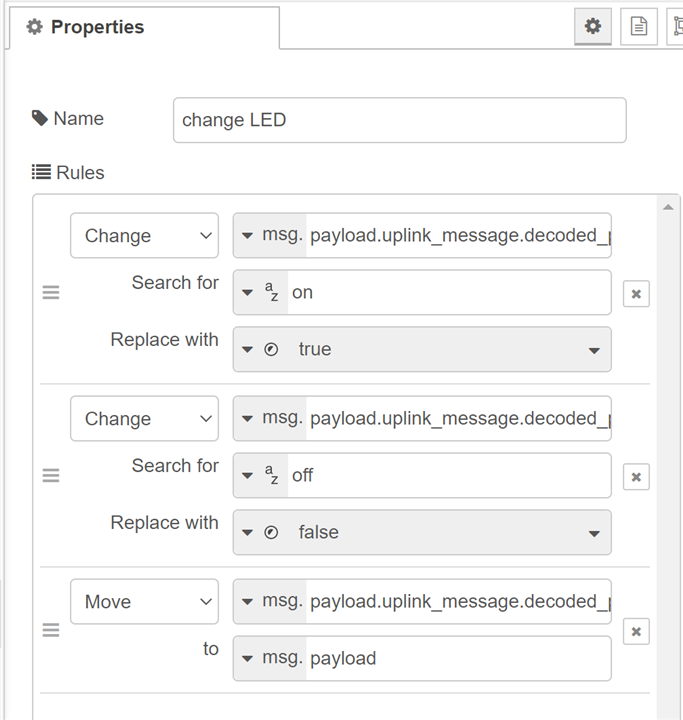
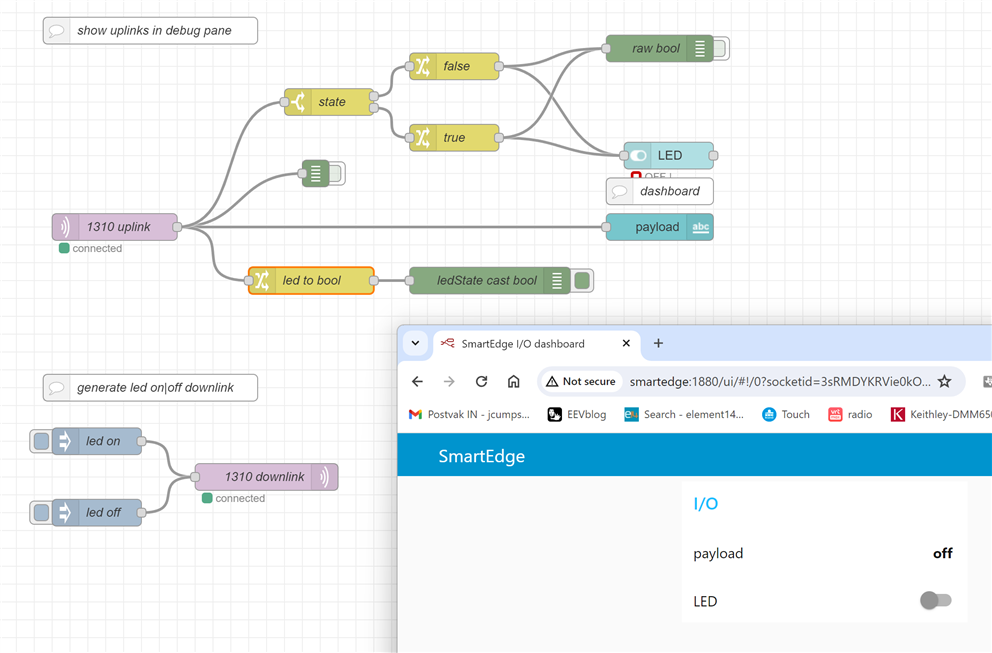
Now that we have Arduino metrics in our application layer, let's play around a bit. I create 3 different processes. They kick of when we receive an upload from the Arduino.

image

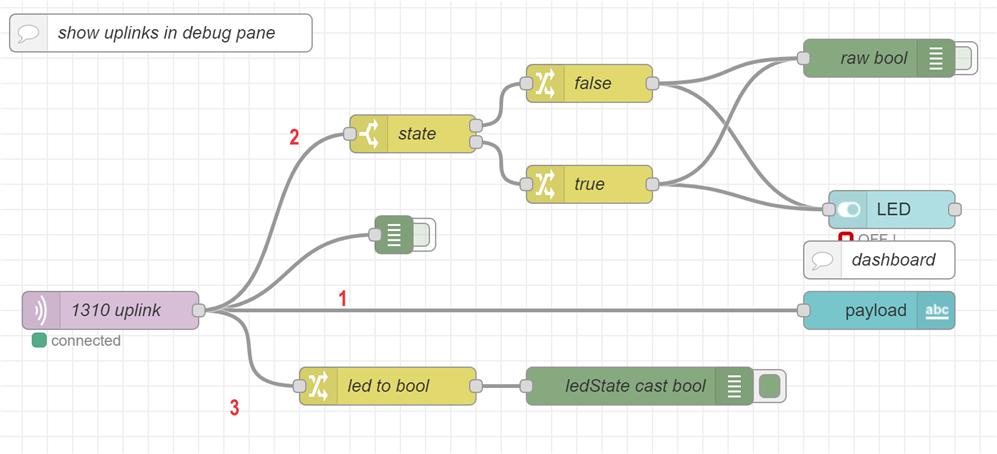
image: a more elaborate upstream handling flow

image
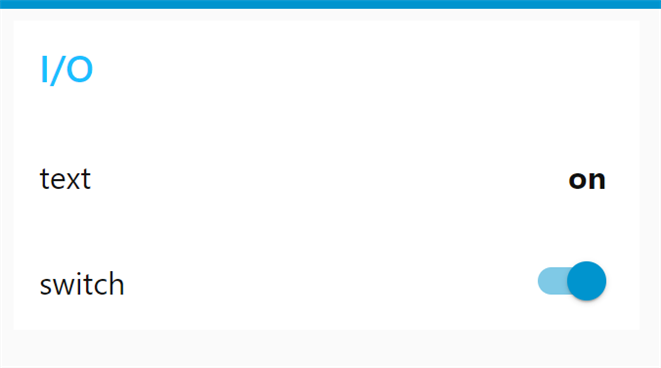
image: Node-RED dashboard showing the Arduino LED state in two ways

1: create a dashboard that shows the LED status as a text

The MQTT in node streams the payload as a JASON object. I showed its structure in the uplink section. We can directly attach a dashboard text node to it. On that node, we can define what part of the JSON object to show. I filtered it down to the ledState attribute:

image

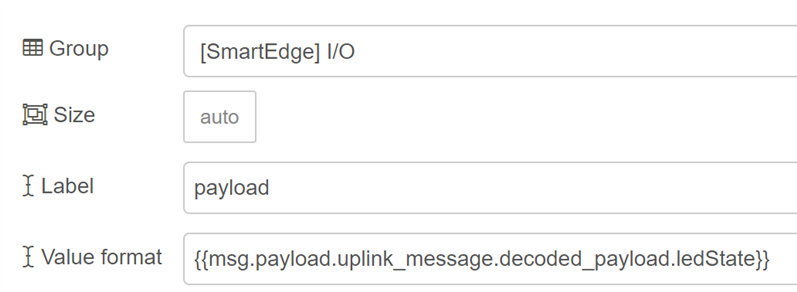
image: configuration of the dashboard text control

2: add a dashboard on-off indicator that shows the LED status

I used a dashboard switch for that. Set it up as an output indicator:

image

image: the switch configuration

There is a little bit of configuration work needed to go from payload to switch status. The switch doesn't have an option to retrieve its value from a JS payload. It needs a raw Boolean as input. I created this flow to do that:

image

I created a switch element, that splits the flow based on the payload's ledState value. Then in each branch, I created a change node that replaces the JSON payload with a single boolean.

image

Their output is the source to control the indicator's status.

In Node-RED, there's many ways to skin a cat. I'm sure you can come up a with neater method. Here is two other ways to retrieve the LED status from the payload, and send it on as a boolean payload:

1: using a js function:

image

js code:

var led = false;

if (msg.payload.uplink_message.decoded_payload.ledState === "on") {
  led = true;
}

msg.payload = led;

return msg;

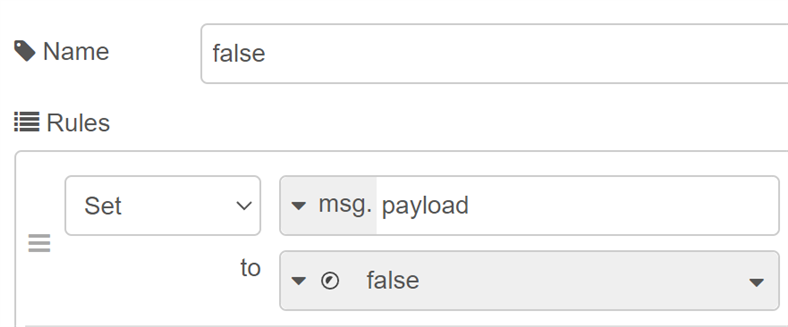
It's simpler and smaller - but code instead of a set of nodes... 

2: using only  a "change" node:

image

image

First 2 rules change the property from "on | "off" to true | false. The 3rd rule moves the result to the root of the payload, ready to send to the indicator.

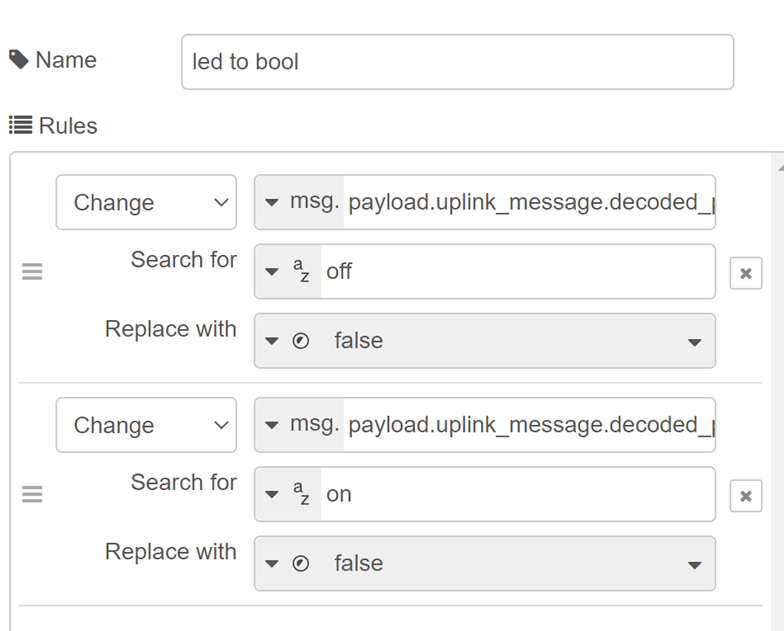
3: change the type of the ledState attribute

Just to see if it can be done. TTN sends the value of ledState as a string. on or off. This little flow uses a change node to turn that to true or false.

image

The flows in this "working with the data" section are no longer related to LoRaWan or TTN. Just a showcase that it's possible to do something with LoRaWan metrics.

image

The End. Enjoy.

  • Sign in to reply
  • Jan Cumps
    Jan Cumps over 1 year ago

    I wrote a follow-up, to enable secure MQTTS with TLS connection:  Secure MQTT integration between Node-RED and The Things Network .

    • Cancel
    • Vote Up 0 Vote Down
    • Sign in to reply
    • More
    • Cancel
  • Jan Cumps
    Jan Cumps over 1 year ago in reply to Jan Cumps

    Other option is to do all in a Change node:

    image

    • Cancel
    • Vote Up 0 Vote Down
    • Sign in to reply
    • More
    • Cancel
  • Jan Cumps
    Jan Cumps over 1 year ago

    In the blog, I used a split, and two change nodes, to turn payload object into a simple boolean. Sticking to the principle of using graphic nodes in a workflow design.

    image

    Another way to retrieve the LED status from the payload, and send it on as a boolean payload: using a js function. A bit of programming (not a lot)

    image

    function's javascript code:

    var led = false;
    
    if (msg.payload.uplink_message.decoded_payload.ledState === "on") {
      led = true;
    }
    
    msg.payload = led;
    
    return msg;

    Opinions on what a flow developer should prefer, are welcome...

    • Cancel
    • Vote Up 0 Vote Down
    • Sign in to reply
    • More
    • Cancel
  • Jan Cumps
    Jan Cumps over 1 year ago

    A bit of playing around with subflows and dashboard elements.

    Custom Font Awesome icons for the on-off indicator:

    image

    Top is the the standard switch UI. Bottom is a custom one. 

    Settings:

    image

    Group related nodes in a subflow.

    In this case, I grouped all dashboard elements. They were starting to clutter up the main flow.

    Original (simulated - I didn't capture a screen before I made the changes):

    image

    Subflow refactor: 

    main:

    image

    sub:

    image

    This is a full overview of the main flow:

    image

    Opinions may vary.
    I personally prefer the standard switch indicator to the custom one.

    Subflows make sense, I think.
    My example may be a border case. The full flow wasn't cluttered (yet).
    Grouping all dashboard elements into a dashboard subflow has some merits. The subflow has the full payload. I can add additional indicators without having to reorganise the main flow.

    Your milage may vary ...

    • Cancel
    • Vote Up 0 Vote Down
    • Sign in to reply
    • More
    • Cancel
  • Jan Cumps
    Jan Cumps over 1 year ago

    I haven't solved the MQTT TLS connectivity yet, but implemented another security measure:

    Node-RED over https only:

    image

    last line in the log is the (still plain mqtt) connection to The Things Network's MQTT service.

    Plain http requests to Node-RED's editor or dashboard will fail:

    image

    • Cancel
    • Vote Up 0 Vote Down
    • Sign in to reply
    • More
    • Cancel
>
element14 Community

element14 is the first online community specifically for engineers. Connect with your peers and get expert answers to your questions.

  • Members
  • Learn
  • Technologies
  • Challenges & Projects
  • Products
  • Store
  • About Us
  • Feedback & Support
  • FAQs
  • Terms of Use
  • Privacy Policy
  • Legal and Copyright Notices
  • Sitemap
  • Cookies

An Avnet Company © 2025 Premier Farnell Limited. All Rights Reserved.

Premier Farnell Ltd, registered in England and Wales (no 00876412), registered office: Farnell House, Forge Lane, Leeds LS12 2NE.

ICP 备案号 10220084.

Follow element14

  • X
  • Facebook
  • linkedin
  • YouTube