


HW Recap
As previously mentioned, the program runs on:
- Avnet LTE IoT Starter KitAvnet LTE IoT Starter Kit
- LTE IoT Breakout CarrierLTE IoT Breakout Carrier
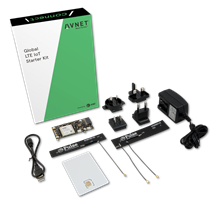
This LTE IoT Starter Kit comes in two varieties, a North American (NA) Version (M18FG-1) and a Global Version (M18QWG). The difference between the two are that the NA version uses the North American Cellular Bands and is SIM locked to AT&T while the M18QWG uses the International Cellular Bands and is not SIM locked. Additionally, the NA SOM is PTCRB but the Global SOM is not. Both SOMs contain Host Mode Firmware which was used for the PTCRB certification. Details of the SOM Hardware can be found in the User Manual and the Breakout Carrier schematic (located here). The Breakout Carrier facilitates the Barometer Click and the Temp&Humidity Click modules that I use in the application. If you don't have these modules or the Breakout Carrier, it is not a problem, as this configuration is checked during startup and if not present, it simply means the Barometer and Humidity measurements will not be sent to Azure. Assembling the kit simply requires you to connect the Antennas, insert the SIM card, and connect power, then connect the board to your development machine for interaction/programming (see the User Manual if you need details).
Required Software Tools
The development tools are all targeted to a Linux environment but it is possible to run in a virtual machine if necessary. This is because the eLinux distribution contained in the SOM (and tools utilized) are based on Yocto Linux. To obtain the software, compile the program, and interact with the hardware you will need the following tools:
GIT Distributed Version Control System
This is available at: https://gist.github.com/derhuerst/1b15ff4652a867391f03
The WNC SDK 
This can be obtained by issuing the command:
git clone http://github.com/Avnet/AvnetWNCSDK
Once cloned, proceed to the AvnetWNCSDK directory and install the tools by executing the command:
sudo ./oecorex-86_64-cortexa7-neon-vfpv4-toolchain-nodistro.0.sh'
After the toolchain has been installed, you will need to add the environment variables (you will need to do this each time you open a new terminal window for development) by executing:
. /usr/local/oecore-x86_64/environment-setup-cortexa7-neon-vfpv4-oe-linux-gnueabi (there is a spaces after the '.')
Install ADB
- Open up a terminal windows.
- Install ADB by issuing the command 'sudo apt-get install adb'
- Copy the file file adbpub.key from the AvnetWNCSDK directory to the ADB directory (cp ./AvnetWNCSDK/adbpub.key ~/.android/). This installs the security key so ADB can access the SK2.
- Connect your M18Qx to the development PC
- Verify the ADB connection by listing the attached devices, sudo adb devices When you do this the SK2 should be reported as:
$sudo adb devices
List of devices attached
WNC_ADB     device
Once all the tools are installed on your development machine, you are ready to download the example program, build it, then load/execute it.
Get Program Source Code
The source code is available from https://github.com/Avnet/M18QxAzureIoT. You get this code by issuing the command:
git clone --recurse-submodules https://github.com/Avnet/M18QxAzureIoT
Once cloned, the development directory will resemble:

Azure SDK
The directory msft_azure_iot_sdk (that you obtained when you cloned the application code) contains elements of the Microsoft Azure IoT SDK. I broke it out into its own sub directory because only a sub-set of the SDK is needed for this application. Microsoft organized the SDK was to support all aspects that the SDK including test-harnesses, multiple development environments, jenkins tools, optional helper tools, etc. I wanted the SDK to only contain what was needed for this program--the necessary transports, and IoT client software.
The platform directory within msft_azure_iot_sdk is the only directory that contains software that would be modified for this application. By isolating all changes to the platform directory, the transports, client, and c-utility directories can be easily updated when Microsoft releases new versions.
MbedTLS
When Building the SDK, there are several options you can use for the SSL layer. Microsoft has used OpenSSL and WolfSSL in their samples, but I wanted to use ARM's MbedTLS so that is the library I imported. This library is pulled in when you clone the directory by virtue of the '--recurse-submodules' flag when cloning the M18QxAzureIoT repository. There are no modifications made to the MbedTLS library itself, it is only compiled and used.
Architecture Overview
Files and Descriptions
Source Code Files | Description |
|---|---|
| adc.hpp | This is an ADC class. It is a class only because to allow for overloading the assignment operator to make it easy to read the ADC. |
| azClientFuncs.cpp | This file contains the functions that interact with Azure (e.g., sending requested reports, handling incomming messages, and setting up Azure connection). |
| azIoTClient.h, azIoTClient.cpp | This file contains the main that drivers the overall program. It defines the objects used and the message that is sent to Azure. |
| azure_certs.h, azure_certs.c | These files contain the certs used by the program to communicate with Azure. |
| barometer.hpp | This file implements the class that handles the Barometer Click module. |
| button.hpp, button.cpp | These files contain the Class that supports button detection and handling. A user defines the binary I/O that is being used for the button (it expects to generate on transition) and a function to call when pressed. The class creates a thread that waits for the button event to be generated (by the interrupt routine) and calls the users registered routine. When the button is released, the thread calculates how long the button was pressed for and calls the users registered 'release' routine--passing the duration of the button press as an argument. This class is used in azIoTClient.cpp |
| devinfo.hpp | This file contains a Class that contains the device information such as IMEI and ICCID. It uses the MAL (singleton) class that is defined in mal.cpp/mal.hpp. |
| foa.h, foa.cpp | This is a helper function that is used when an ISR is actually a class member. When an interrupt occurs, it has no concept of a Class so you need to setup the class address for member function/variable access. These functions create a linked-list of the class address and ISR address so the Class location can be found and the users ISR can access the class variables/member functions. When an interrupt occurs, the fist thing that happens is the ISR looks up the class address and calls the ISR member function. The overall operation is similar to how threads access class member functions/variables. |
| gps.hpp, gps.cpp | This is the class that creates a thread and monitors the WNC device for GPS data every second. |
| hts221.hpp, hts221.cpp | This implements the Temp & Humidity Click module. |
| i2c_interface.hpp, i2c_interface.cpp | These files implement a singleton class for the I2C interface. Because there is only 1 I2C bus but multiple I2C devices, all I2C access need to go through this singleton class so it can control access to the resource. |
| i2c.hpp | This file defines the I2C class an I2C device uses to access the I2C buss. It is used by the hts221.*, lis2dw12.*, barometer.* devices. |
| jsmn.h, jsmn.c | This is a simple JSON parser that is used primarily for the JSON strings that are exchanged with the MAL interface. |
| led.hpp | This file implement a class that monitors and drives the tricolor LED on the SOM. |
| lis2dw12.hpp, lis2dw12.cpp | The LIS2DW12 is an ST sensor that detects/reports positional information and temperature data. This Class is created and a separate ISR thread is created to service interrupts when they occur. |
| mal.hpp, mal.cpp | These files implement a singleton class for the WNC MAL interface. Like the I2C, there is only a single MAL interface but multiple functions that use it (devinfo.*, gps.*, wwan.*). This class starts the MAL interface and exchanges JSON strings with the MAL. |
| NTPClient.hpp | This file implement a class that obtains the time from NTP.ORG |
| prettyjson.cpp | This is a simple function that pretty-prints JSON strings to the user console when needed. |
| wwan.hpp | This Class handles the Wide Area Network LED of the WNC Module. It creates a thread that runs every 500 msec to monitor the network status and light the WWAN LED as necessary. |
These are the repositories that are used in the program. The msft_azure_iot_sdk is simply a subset of the Microsoft Azure IoT C SDK.
| Sub-directory | Description |
|---|---|
| mbedtls | Contains the contents of the ARM MbedTLS git repository (from https://github.com/ARMmbed/mbedtls ) |
| msft_azure_iot_sdk | Contains Portions of the Microsoft Azure IoT C SDKs and Libraries (https://github.com/Azure/azure-iot-sdk-c ). Included are c-utility, iothub_client, uampq, umqtt and platform (created from the adapters sub-directory in c-utility) |
The program uses GNU auto tools as its build system (the Microsoft SDK is setup to use CMAKE). With GNU auto tools, the "meat" of the build is contained in the Makefile.am file and the configure.ac. The Makefile is created from these two inputs.
| Build Tool | Description |
|---|---|
| autogen.sh | This is a script file that runs the 'auto' tools. |
| configure.ac | This file provides the input to the auto tools so that it can create the configure file. |
| Makefile.am | This file provides the input to the auto tools so that the Makefile can be created |
These two script files are an aid for remembering the format of the Azure CLI calls for monitoring and sending message.
| Message Help Scripts | Description |
|---|---|
| mon.sh | This script simply implements the command necessary to monitor messages going to the IoT Hub. The Connection String/Login used is that of the IoT Hub. Script contents are: az iot hub monitor-events --login "HostName=XXX;SharedAccessKeyName=XXX;SharedAccessKey=XXX" |
| send.sh | This script simply implements the command necessary to send a message to the IoT Hub. The device within the IoT Hub the message is destine for is specified as a flag to the command. Script contents are: az iot device c2d-message send --login "HostName=XXX;SharedAccessKeyName=XXX;SharedAccessKey=XXX" --device-id XXX --data "data to be sent..." |
Top Comments