


Build The Program

In Blog #2 you obtained the software for this program by issuing the command:
git clone --recurse-submodules https://github.com/Avnet/M18QxAzureIoT
so you should now have a directory named M18QxAzureIoT that contains all the software and tools needed. Actually building the program is pretty straight forward:
- Go to the M18QxAzureIoT directory
- Set your environment by executing the command '. /usr/local/oecore-x86_64/environment-setup-cortexa7-neon-vfpv4-oe-linux-gnueabi' (I am assuming that you installed the SDK in the default location of /usr/local/oecore... if you used a different location, you will have to update the path).
- Run the autogen.sh script. This scrip will install the tools, sub-directories, and other artifacts needed to configure the build system. During this step, the automake tools will read the configure.ac file and create a 'configure' script.
- Execute the './configure ${CONFIGURE_FLAGS}' command. This script was created in step #3 and the environment variable CONFIGURE_FLAGS is created when you run the environment script in step #1. This command will read the Makefile.am file and using CONFIGURE_FLAGS will create a Makefile that is used when running the make command.
- You must update the file azClientFunctions.cpp (line 26) so that it contains the correct connectionString for your device. This connection string was obtained when you created your Azure IoT Hub (Blog #1).
- You are now ready to build the program by issuing the 'make' command. When you do this, you will observe all the source files be compiled and linked. The end result is a file named 'azIotClient' which is what we will push to the LTE IoT Starter Kit.
After the 'make' command has completed, you will have an 'azIoTClient' file that is the executable code that will be installed on the M18Qx.
Installing
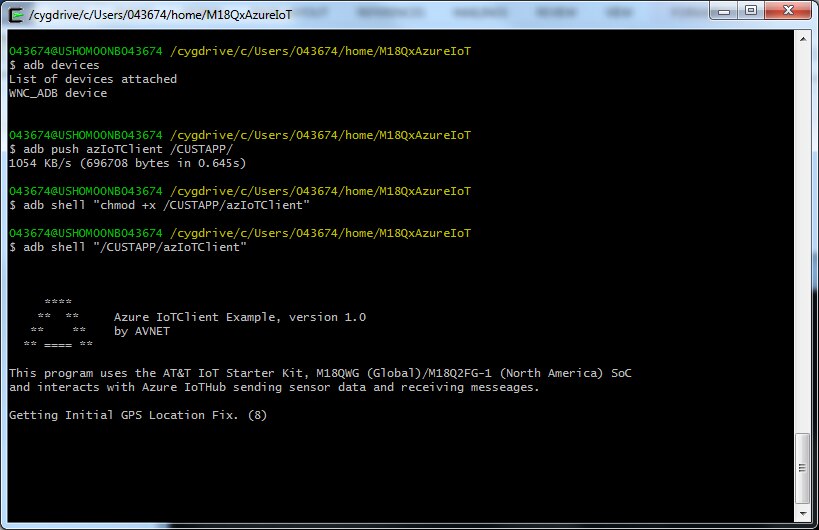
To install the executable code, we will use ADB. First ensure the M18Qx is connected to the development machine and that ADB is connected. You can an verify this by issuing the 'adb devices' command:
$sudo adb devices
List of devices attached
WNC_ADB     device
With ADB running and connected to the M18Qx, issue the command to push the executable to the '/CUSTAPP' directory on the M18Qx. The CUSTAPP directory is the only directory on the M18Qx that is writable, all other directories are read-only. After you have pushed the executable to the M18Qx, you may need to set the execute attribute so that it can be executed.
$adb push azIoTClient /CUSTAPP/
$adb shell "chmod +x /CUSTAPP/azIoTClient"
Manually Running
To run the application directory, issue the command:
$adb shell "/CUSTAPP/azIoTClient"
The following shows the sequence for running Manually.
SOM Operation and User Interaction
When the application first starts up, it displays the welcome screen as shown below, it then attempts to get the initial GPS location data for the board. At this time, you can press the USR key to have the GPS fix skipped (I do this in the example below because it can sometimes take a few minuets for the GPS fix to complete).

After the GPS acquisition, the application gets the current time from NTP.ORG then begins sending telemetry messages to Azure. There are a couple of flags that can be used when starting the application:
-v will Display Messages as sent.
-r X will set the reporting period to occur every 'X' seconds
When the program is started with the -v flag, the console output looks like:
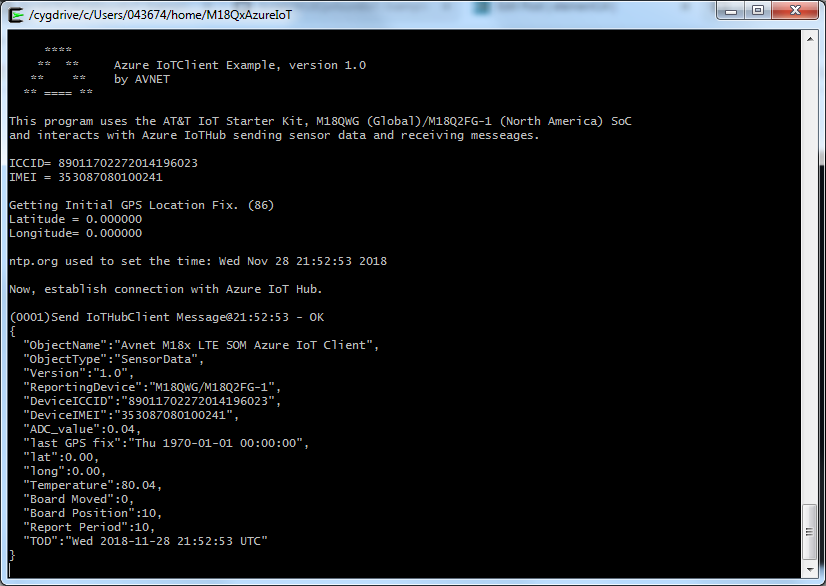
Also , with the -v flag, the ICCID & IMEI is displayed as is the contents of the messages sent to Azure.
Also, during application startup, status information is provided on the boards LED's as follows:
- During Power UP:
- LED it will blink slowly when obtaining the M18Qx device information such as ICCID, IMEI, Time, and Click Module information.
- LED it will then blinking quickly GREEN whil obtaining the initial GPS Fix (you can press the USR button to bypass the initial GPS fix)
- LED blinks GREEN slowly when establishing a connection to Azure
- During normal operation:
- Color is solid GREEN while waiting to send information to Azure
- Color is BLUE when sending/receiving message with Azure
- Color is WHITE when pressing the USR key
- Color is MAGENTA if Azure has instructed the M18Qx to illuminate the LED
The WWAN led provides status information on the network connection as:
- Flashes slowly when a signal is detected by we are not connected
- Flashes quickly when connected but no IP address has been obtained
- Is on continuously when connected and an IP address is assigned/obtained
And lastly, the USR push button is used to terminate the application. If the user presses the USR button for >3 seconds, the azIoTClient application terminates.
Provided the application is not terminated, it will simply continue to send messages to Azure every 'X' seconds (the default for X is 6 seconds).
Monitoring Output
Ok, the program is up and running, telemetry data is being sent and everything looks like it is working correctly, but how do you know that it is actually getting to Azure? You probably want to monitor the Azure input (output from the application). Part of the Azure CLI provides that capability to you. In blog #1 you installed the Azure CLI with IoT Hub extensions and you can use that tool to monitor the Hub for data coming in. You do this by:
- Get the connection string from your IoT Hub:
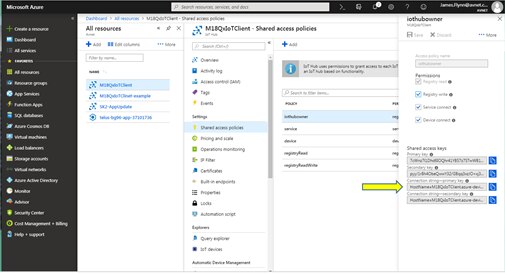
- Issue the command:
az iot hub monitor-events --login "HostName=XXX;SharedAccessKeyName=XXX;SharedAccessKey=XXX"
This will begin monitoring the events that IoT Hub is receiving, i.e
Starting event monitor, use ctrl-c to stop...
event: origin: XXX payload: '{"ObjectName":"Avnet M18x LTE SOM Azure IoT Client","ObjectType":"SensorData","Version":"1.0","ReportingDevice":"M18QWG/M18Q2FG-1","DeviceICCID":"89011703278100836678","DeviceIMEI":"353087080010952","ADC_value":0.39,"last GPS fix":"Fri 2018-11-30 18:17:03","lat":36.04,"long":-78.63,"Temperature":78.69,"Board Moved":1,"Board Position":10,"Report Period":10,"TOD":"Fri 2018-11-30 18:17:02 UTC","Barometer":1008.42,"Humidity":54.3}'
event: origin: XXX payload: '{"ObjectName":"Avnet M18x LTE SOM Azure IoT Client","ObjectType":"SensorData","Version":"1.0","ReportingDevice":"M18QWG/M18Q2FG-1","DeviceICCID":"89011703278100836678","DeviceIMEI":"353087080010952","ADC_value":0.51,"last GPS fix":"Fri 2018-11-30 18:17:14","lat":36.04,"long":-78.63,"Temperature":79.14,"Board Moved":0,"Board Position":10,"Report Period":10,"TOD":"Fri 2018-11-30 18:17:15 UTC","Barometer":1008.40,"Humidity":51.5}'
event:
origin: XXX payload: '{"ObjectName":"Avnet M18x LTE SOM Azure IoT Client","ObjectType":"SensorData","Version":"1.0","ReportingDevice":"M18QWG/M18Q2FG-1","DeviceICCID":"89011703278100836678","DeviceIMEI":"353087080010952","ADC_value":0.41,"last GPS fix":"Fri 2018-11-30 18:17:25","lat":36.04,"long":-78.63,"Temperature":79.59,"Board Moved":0,"Board Position":10,"Report Period":10,"TOD":"Fri 2018-11-30 18:17:26 UTC","Barometer":1008.43,"Humidity":51.4}'
event: origin: XXX payload: '{"ObjectName":"Avnet M18x LTE SOM Azure IoT Client","ObjectType":"SensorData","Version":"1.0","ReportingDevice":"M18QWG/M18Q2FG-1","DeviceICCID":"89011703278100836678","DeviceIMEI":"353087080010952","ADC_value":0.48,"last GPS fix":"Fri 2018-11-30 18:17:37","lat":36.04,"long":-78.63,"Temperature":79.70,"Board Moved":0,"Board Position":10,"Report Period":10,"TOD":"Fri 2018-11-30 18:17:38 UTC","Barometer":1008.48,"Humidity":51.4}'
When issued in this manner, it will display messages that are sent to any IoT device in the IoT Hub. I happen to only have a single device in my IoT Hub so it isn't a problem to monitor everything. If you had a particular device you wanted to monitor, you would modify the command to include the --device-id flag to isolate the specific device.
Sending Commands
Along with the monitor command is how you can send commands/messages from Azure to the device. As previously stated in the intro blog, you can send the following messages to the device from Azure:
Message/Command | Description |
REPORT-SENSORS | Reply with a list of available sensor |
SET-PERIOD x | sets the reporting period for standard telemetry messages to x |
GET-DEV-INFO | lists the information about this M18Qx device |
GET-LOCATION | sends the current latitude/longitude location |
GET-TEMP | sends the current temperature at the boards location |
GET-POS | sends the positional information about the board |
GET-ENV | sends environmental information about the boards location |
LED-ON-MAGENTA | turns the boards LED to Magenta, always on |
LED-BLINK-MAGENTA | turns the boards LED to Magenta, blinking |
LED-OFF | turns off the boards LED |
To send a command, issue the command:
az iot device c2d-message send --login "HostName=XXX;SharedAccessKeyName=XXX;SharedAccessKey=XXX" --device-id XXX --data "<command>"
In this case, you must specify the --device-id along with the login and command because you want this message delivered to a particular device. When you do this with the GET-LOCATION command, it looks like:
az iot device c2d-message send --login "HostName=XXX;SharedAccessKeyName=XXX;SharedAccessKey=XXX" --device-id XXX --data "GET-LOCATION"
az iot hub monitor-events --login "HostName=XXX;SharedAccessKeyName=XXX;SharedAccessKey=XXX"
Starting event monitor, use ctrl-c to stop...
event:
origin: XXX
payload: '{"ObjectName":"location-report","last GPS fix":"Fri 2018-11-30 18:34:17","lat":36.04,"long":-78.63}'
The report that comes back provides the time of the last GPS fix as well as the Lat/Long at that time.
The next Blog, provides a high-level review of the major architectural components in the application.