element14 Community
element14 Community
    Register Log In
  • Site
  • Search
  • Log In Register
  • Community Hub
    Community Hub
    • What's New on element14
    • Feedback and Support
    • Benefits of Membership
    • Personal Blogs
    • Members Area
    • Achievement Levels
  • Learn
    Learn
    • Ask an Expert
    • eBooks
    • element14 presents
    • Learning Center
    • Tech Spotlight
    • STEM Academy
    • Webinars, Training and Events
    • Learning Groups
  • Technologies
    Technologies
    • 3D Printing
    • FPGA
    • Industrial Automation
    • Internet of Things
    • Power & Energy
    • Sensors
    • Technology Groups
  • Challenges & Projects
    Challenges & Projects
    • Design Challenges
    • element14 presents Projects
    • Project14
    • Arduino Projects
    • Raspberry Pi Projects
    • Project Groups
  • Products
    Products
    • Arduino
    • Avnet Boards Community
    • Dev Tools
    • Manufacturers
    • Multicomp Pro
    • Product Groups
    • Raspberry Pi
    • RoadTests & Reviews
  • Store
    Store
    • Visit Your Store
    • Choose another store...
      • Europe
      •  Austria (German)
      •  Belgium (Dutch, French)
      •  Bulgaria (Bulgarian)
      •  Czech Republic (Czech)
      •  Denmark (Danish)
      •  Estonia (Estonian)
      •  Finland (Finnish)
      •  France (French)
      •  Germany (German)
      •  Hungary (Hungarian)
      •  Ireland
      •  Israel
      •  Italy (Italian)
      •  Latvia (Latvian)
      •  
      •  Lithuania (Lithuanian)
      •  Netherlands (Dutch)
      •  Norway (Norwegian)
      •  Poland (Polish)
      •  Portugal (Portuguese)
      •  Romania (Romanian)
      •  Russia (Russian)
      •  Slovakia (Slovak)
      •  Slovenia (Slovenian)
      •  Spain (Spanish)
      •  Sweden (Swedish)
      •  Switzerland(German, French)
      •  Turkey (Turkish)
      •  United Kingdom
      • Asia Pacific
      •  Australia
      •  China
      •  Hong Kong
      •  India
      •  Korea (Korean)
      •  Malaysia
      •  New Zealand
      •  Philippines
      •  Singapore
      •  Taiwan
      •  Thailand (Thai)
      • Americas
      •  Brazil (Portuguese)
      •  Canada
      •  Mexico (Spanish)
      •  United States
      Can't find the country/region you're looking for? Visit our export site or find a local distributor.
  • Translate
  • Profile
  • Settings
Internet of Things
  • Technologies
  • More
Internet of Things
Blog IoT Alarm Clock - Part 3
  • Blog
  • Forum
  • Documents
  • Quiz
  • Events
  • Polls
  • Members
  • Mentions
  • Sub-Groups
  • Tags
  • More
  • Cancel
  • New
Internet of Things requires membership for participation - click to join
  • Share
  • More
  • Cancel
Group Actions
  • Group RSS
  • More
  • Cancel
Engagement
  • Author Author: fvan
  • Date Created: 8 Jun 2014 10:02 PM Date Created
  • Views 2490 views
  • Likes 5 likes
  • Comments 19 comments
  • wolfson
  • clock
  • audio
  • internet_of_things
  • micro
  • raspberrypi
  • iot
  • alarm
  • arduino
Related
Recommended

IoT Alarm Clock - Part 3

fvan
fvan
8 Jun 2014

Previous blog posts for this project:

  • IoT Alarm Clock - Part 1
  • IoT Alarm Clock - Part 2


  • Setting up the webserver
  • Web app development
  • Enclosure progress
  • Next post


This post focuses mainly on the build of the enclosure (lots of pictures!), but starts off with installation of some software components to get the web application running.


Setting up the webserver


Install the "lighttpd" webserver on the pi:


pi@raspberrypi ~ $ sudo apt-get install lighttpd


Edit the configuration to enable CGI support with Perl:


pi@raspberrypi ~ $ sudo nano /etc/lighttpd/lighttpd.conf


server.modules = (
        "mod_access",
        "mod_alias",
        "mod_compress",
        "mod_redirect",
        "mod_cgi",
        "mod_rewrite",
)


$HTTP["url"] =~ "^/cgi-bin/" {
        cgi.assign = (
                ".pl" => "/usr/bin/perl" ,
                ".cgi" => "/usr/bin/perl" ,
        )
}


Create a test CGI script to verify the correct functioning of the webserver:


pi@raspberrypi ~ $ cd /var/www/
pi@raspberrypi /var/www $ mkdir cgi-bin
pi@raspberrypi /var/www $ cd cgi-bin/
pi@raspberrypi /var/www/cgi-bin $ sudo nano test.cgi


#!/usr/bin/perl

print "<html>";
print "<head>";
print "<title>A Simple Perl CGI</title>";
print "</head>";
print "<body>";
print "<h1>A Simple Perl CGI</h1>";
print "<p>Hello World</p>";
print "</body>";
print "</html>”;


pi@raspberrypi /var/www/cgi-bin $ sudo chmod +x test.cgi


Success! The test script works.

image


Web app development


I started development on the web application in charge of the configuration of the alarm clock.

To have something modern looking and compatible with mobile devices, I used Bootstrap and JQuery.


imageimageimage


Using Perl and the iRail API, I am able to populate the web application with the required information.


Here's a test where a dropdown is populated with data retrieved via the API:

image


Enclosure progress


I made a lot of progress on the enclosure for my alarm clock.


In the last post, I had started cutting the parts of the enclosure. I cut grooves in the four sides in order to be able to add a back panel.

imageimage

Everything fitted properly, and the result was very clean looking.

imageimage

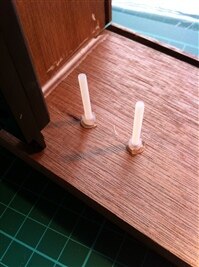
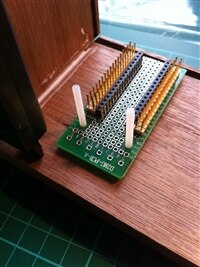
It was time to add the electronics to the enclosure. By using some PVC screws which were glued to the bottom panel, I was able to mount the Arduino and Raspberry Pi.

imageimage

imageimage

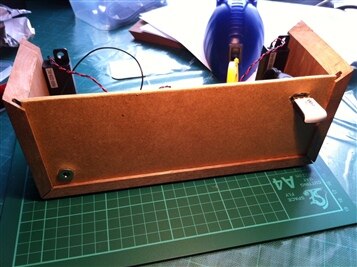
Adding the rest of the components, power connector and wifi USB dongle.

imageimage

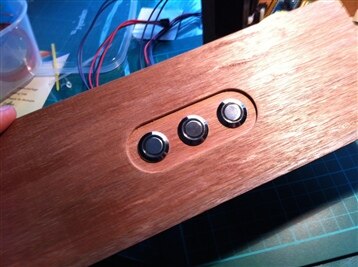
There was still some work to be done on the top panel. I had foreseen to use three buttons and wanted to integrate them in a clean way.

I recently purchased a CNC milling machine which makes use of a Dremel. This was an ideal case to test the CNC.

imageimage


After milling the top panel, I sanded it a bit and inserted the buttons. I was very satisfied with the result!

imageimage

In the dark, the unfinished alarm clock lights up like a Christmas tree:

  • blue light from the Arduino
  • red light from the Raspberry Pi
  • green light from the Wolfson audio card
  • white light from the illuminated pushbuttons

image


Next post


As the enclosure is nearly finished (frontpanel remains) and most of the electronics are sorted, the next update will focus on the software.

  • Sign in to reply

Top Comments

  • shabaz
    shabaz over 10 years ago +1
    Hi Frederick, Wow, this looks good! From what little wood work I've done. it's extremely hard cutting at those "just right" angles, any particular bench/miter box you used? Or just plain care and skill…
  • fvan
    fvan over 10 years ago in reply to fvan +1
  • dragonstyne
    dragonstyne over 10 years ago in reply to fvan +1
    Frederick, I know I'm echoing everyone else but, you have done an outstanding job with this project. Your attention to detail, especially the inset of the top buttons is brilliant. -Steve
  • dougw
    dougw over 9 years ago in reply to Robert Peter Oakes

    Even if they aren't selling wood-working and metal-bashing tools, they make great incentive prizes for electronics geeks.

    Electronics must be harmonized with the rest of the world.

    • Cancel
    • Vote Up 0 Vote Down
    • Sign in to reply
    • More
    • Cancel
  • fvan
    fvan over 10 years ago in reply to Robert Peter Oakes

    More info here: http://www.shapeoko.com/wiki/index.php/About

    • Cancel
    • Vote Up 0 Vote Down
    • Sign in to reply
    • More
    • Cancel
  • Robert Peter Oakes
    Robert Peter Oakes over 10 years ago in reply to fvan

    I can not find accuracy specs on the CNC, do you happen to know them ??

    • Cancel
    • Vote Up 0 Vote Down
    • Sign in to reply
    • More
    • Cancel
  • fvan
    fvan over 10 years ago in reply to dragonstyne

    Thanks Steve, very much appreciated !

    • Cancel
    • Vote Up +1 Vote Down
    • Sign in to reply
    • More
    • Cancel
  • dragonstyne
    dragonstyne over 10 years ago in reply to fvan

    Frederick, 

    I know I'm echoing everyone else but, you have done an outstanding job with this project.  Your attention to detail, especially the inset of the top buttons is brilliant.


    -Steve

    • Cancel
    • Vote Up +1 Vote Down
    • Sign in to reply
    • More
    • Cancel
>
element14 Community

element14 is the first online community specifically for engineers. Connect with your peers and get expert answers to your questions.

  • Members
  • Learn
  • Technologies
  • Challenges & Projects
  • Products
  • Store
  • About Us
  • Feedback & Support
  • FAQs
  • Terms of Use
  • Privacy Policy
  • Legal and Copyright Notices
  • Sitemap
  • Cookies

An Avnet Company © 2025 Premier Farnell Limited. All Rights Reserved.

Premier Farnell Ltd, registered in England and Wales (no 00876412), registered office: Farnell House, Forge Lane, Leeds LS12 2NE.

ICP 备案号 10220084.

Follow element14

  • X
  • Facebook
  • linkedin
  • YouTube