


This blog post is a joint effort by Jan Cumps and shabaz
Table of Contents
- Introduction
- IDE Capabilities
- A Suggested Strategy
- Fork the Project Repository
- Cloning your Repository to your Local PC
- Switching to the Development Branch
- Creating a Feature Branch
- Publish the Branch (Push)
- Write your Feature Code
- Notify the Project Owner that the Feature Code is Complete
- Destroy the Feature Branch
- Update your Development Branch
- I Can’t See the Development Branch in my Fork!
- Summary
Introduction
This blog post discusses how to create features for projects that are in GitHub, although other Git repositories will also have some similar processes. By the end of the blog post, you’ll be somewhere in-between a Padawan and a Jedi, with a more-than-layman’s knowledge of Development Branches and Feature Branches, and how to work with your code with these branches, and successfully get your code into where it should be!
You can read this blog in a standalone manner, but there are a couple of earlier blog posts that might be handy as a backup in case you need a bit more detail here and there:
GitHub for Beginners: Incrementally Adding Features to your Code
GitHub for Beginners: Working with PyCharm and other JetBrains IDEs
The same concepts are used regardless of the integrated development environment (IDE), but the icons and menu items are a bit different of course.
This blog post goes further than the previous two, in that it shows how to work with other people’s projects. The project could be someone’s open-source baby, or it could be the baby belonging to the enterprise you work for, it makes little difference to the workflow. The workflow will involve making a copy of the project, and then implementing your new feature, and then finally ending with the feature being merged into the original project.
This information in this blog post is distilled from work with a real project owned by Jan Cumps , and with a feature that we worked on. Together, we worked through the process, gathering notes and screenshots along the way, so that it could all be documented in a hopefully easy-to-follow manner.
There will be a follow-up blog that will walk through all the steps here with screenshots from a real scenario, so that will be one more opportunity to understand the steps involved.
It is recommended to bookmark this blog post if you plan on ever working on projects in repositories, because while the steps are simple, it is easy to occasionally miss something, and hopefully this blog post will get you back on track. If working with Git repositories or GitHub is a new topic for you, then it is probably worthwhile testing things out with a dry run before you make extensive code changes or additions, so that there are no surprises when doing the steps for real.
If your organization works in a different manner, it would be great to hear how things are done, so that everyone can learn from it. This blog post relies on the graphical user interface within IDEs for performing Git related tasks, and instead many orgs may provide command-line syntax but most of the principles are the same.
IDE Capabilities
JetBrains Products
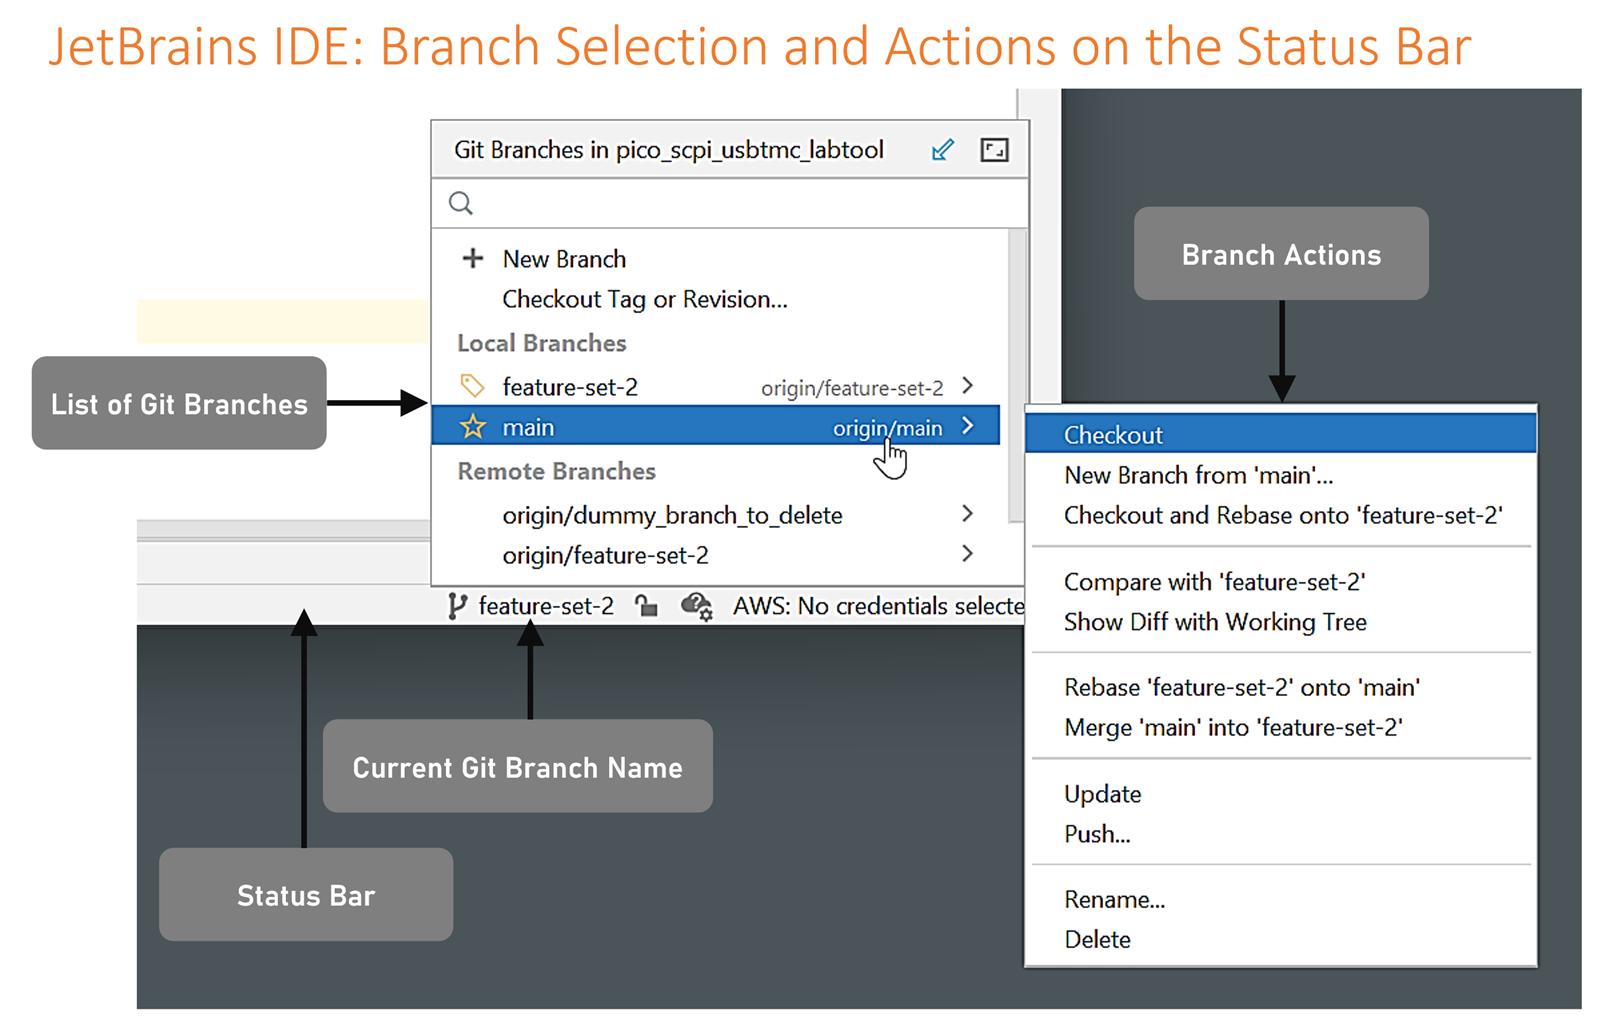
To recap, or if you’ve not read the other blog posts, the IDEs have Git capability. With Jetbrains IDEs such as CLion and PyCharm, the Git Toolbar will often be used:
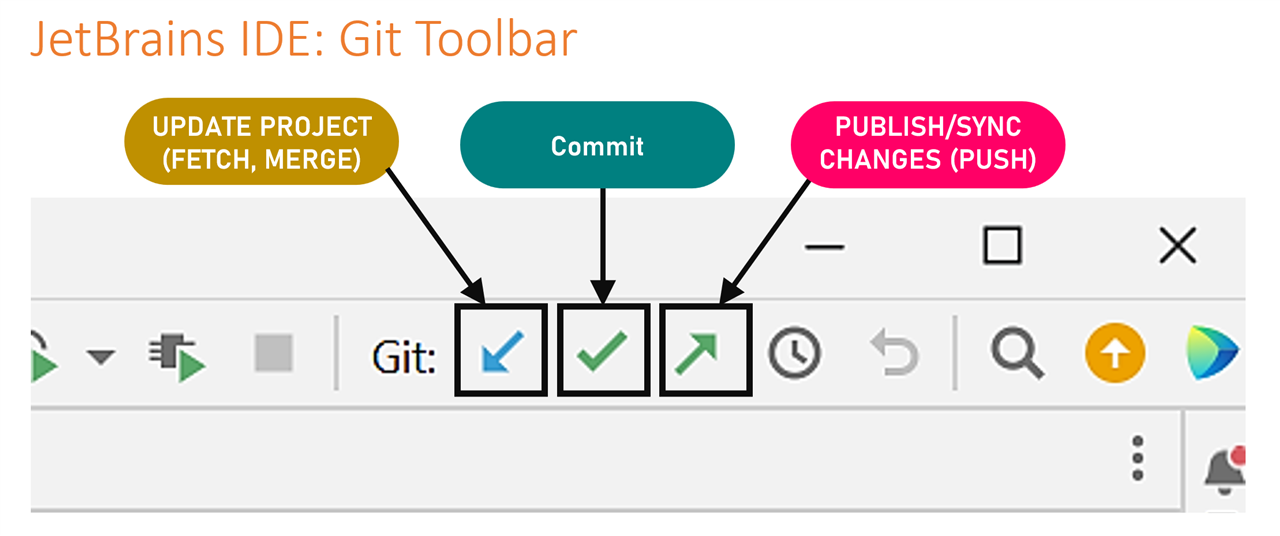
The current branch name, and branch actions, are all available from the status bar at the bottom of the window:
Visual Studio Code
Visual Studio Code also has in-built Git integration, however, I found the optional GitHub Pull Requests and Issues extension to be useful, and it can be installed by clicking on the Extensions icon. The vertical bar (known as the Activity Bar) will have two icons of use for working with GitHub. The Source Control icon is used for many tasks. The GitHub icon is useful for performing some of the final steps during the development process.

As with JetBrains IDEs, the currently selected branch is indicated on the status bar at the bottom of the window, although it will be on the left side of the window rather than the right side.
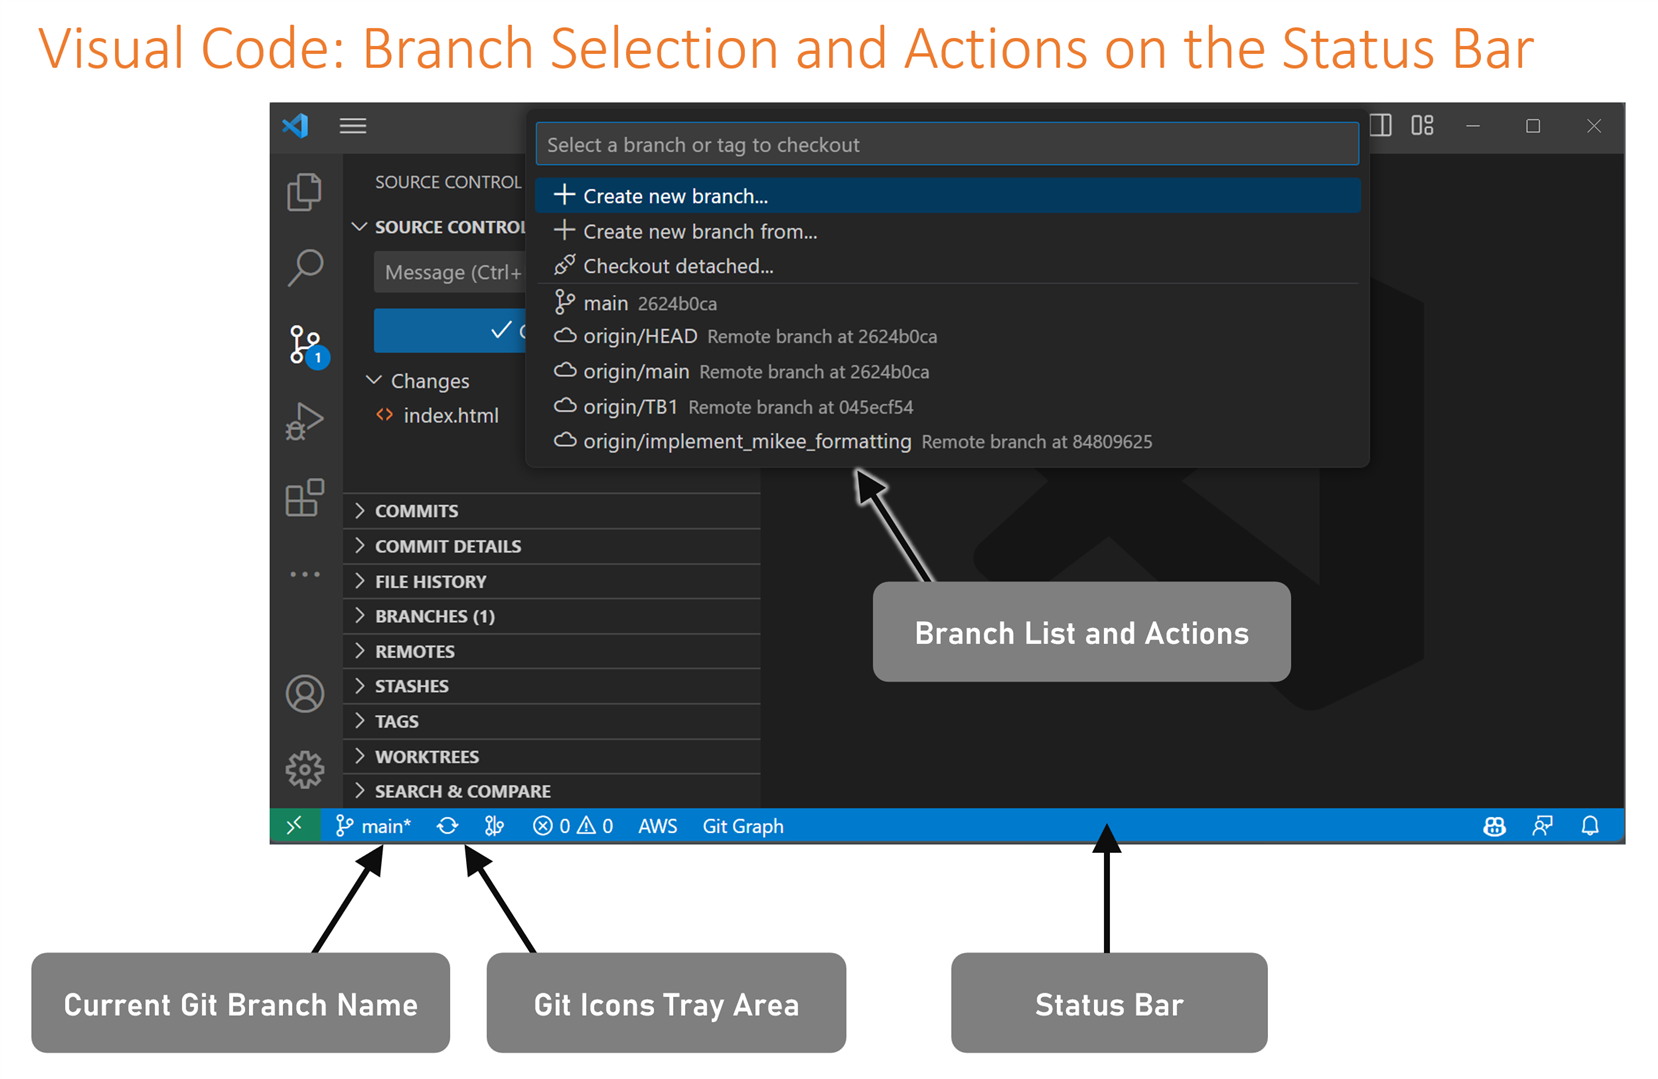
Clicking on the branch name will display a list of all branches at the top of the window. Some Git related icons will also appear in the status bar, dynamically as they are required.
Using Visual Studio Code for Git related tasks can seem initially a bit more complicated than with JetBrains IDEs unfortunately.
A Suggested Strategy
The diagram below shows how things might work out in a good scenario. The horizontal long bars are branches of code, and time runs from left to right in the diagram.
At the top of the diagram, is the project code of interest, sitting in a repository, usually in a cloud of some sort. Often there will be a main branch, with mature, reliable code. In addition there may be one or more development branches, also known as release trains. These are the branches where new functionality resides, as it is developed by engineers, and accepted by the release train engineer (who will be the project repository owner for many open source projects). A development branch may opened up by the project owner, all ready for incorporating some desired features (if you wish to see where you can help out, there may be a list of issues, such as enhancement requests, on the GitHub website for the project).
The diagram shows the main branch, and a single development branch. That development branch is where you’ll want your feature to eventually get into, because then (eventually) the owner (in real life it will be a devops engineer) will merge that into the main branch.
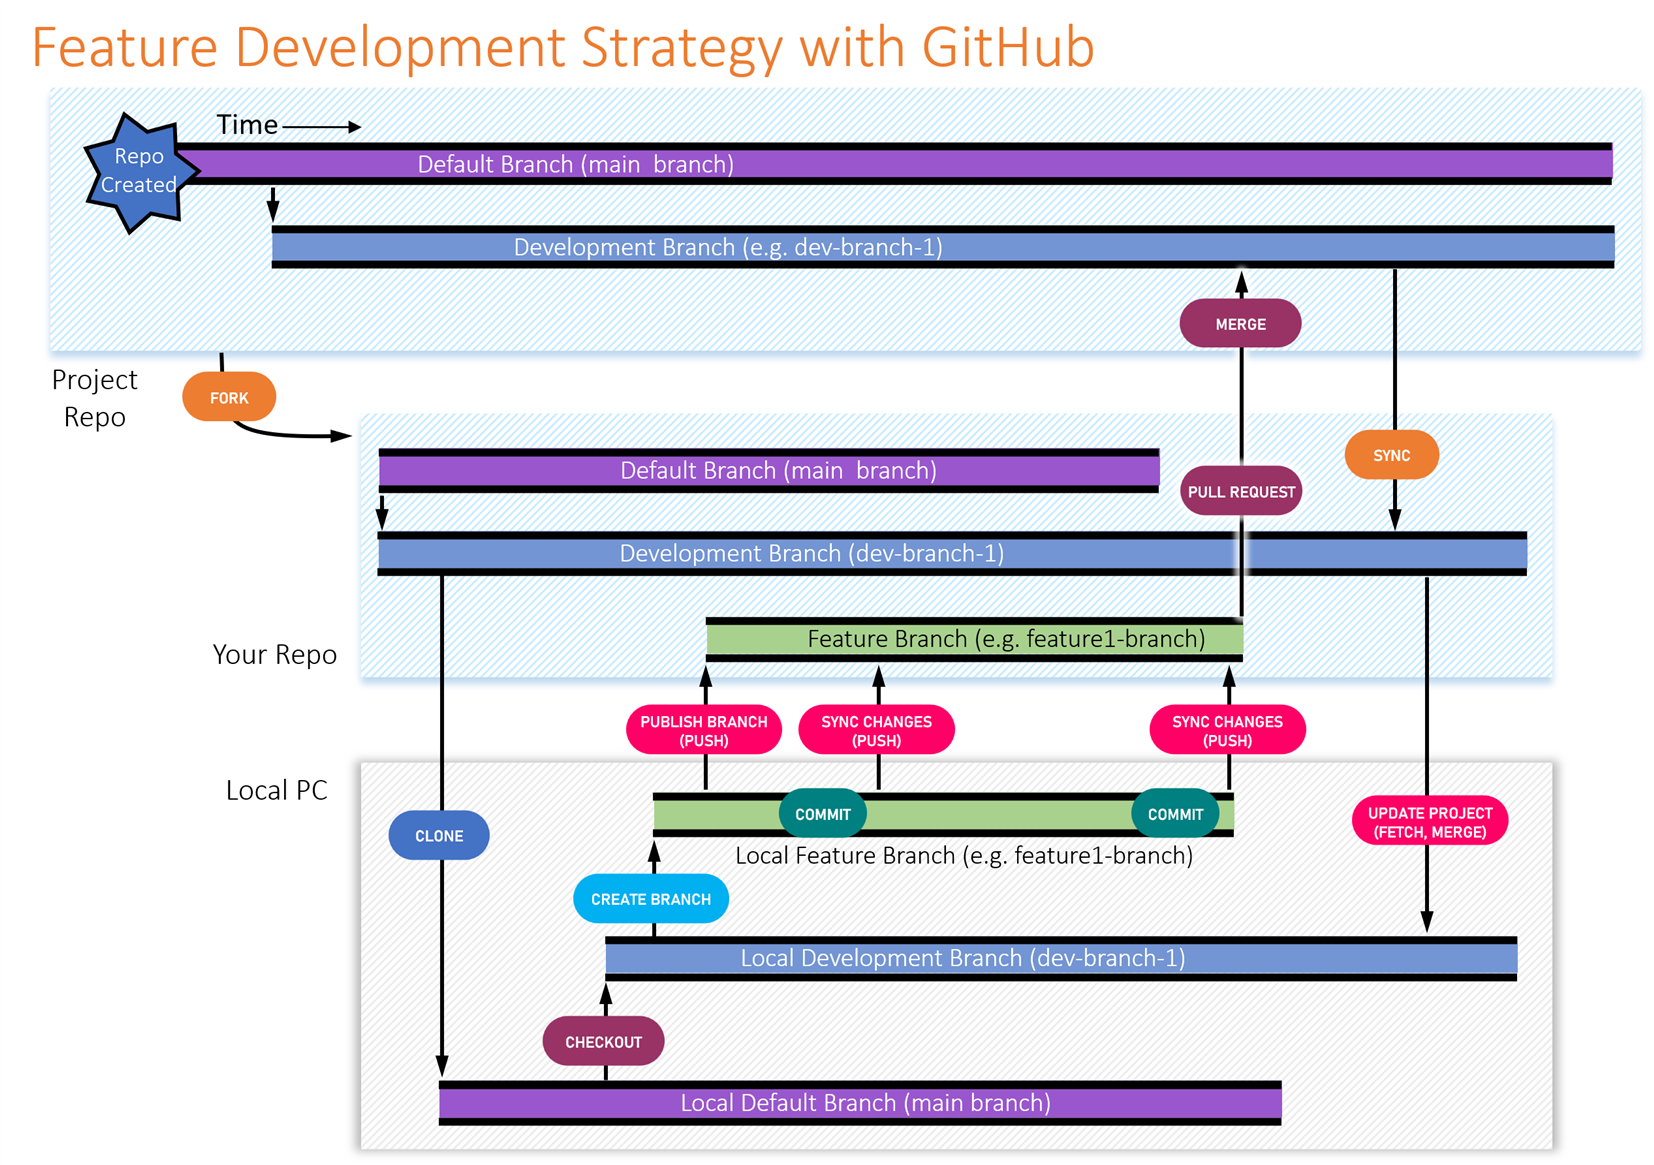
All the steps in this suggested strategy are described below, in the sequence that you’ll be using them, following the path laid out using arrows in the diagram above. You may wish to open up the diagram above in a separate window, so you can follow it alongside the remainder sections in this blog post.
Fork the Project Repository
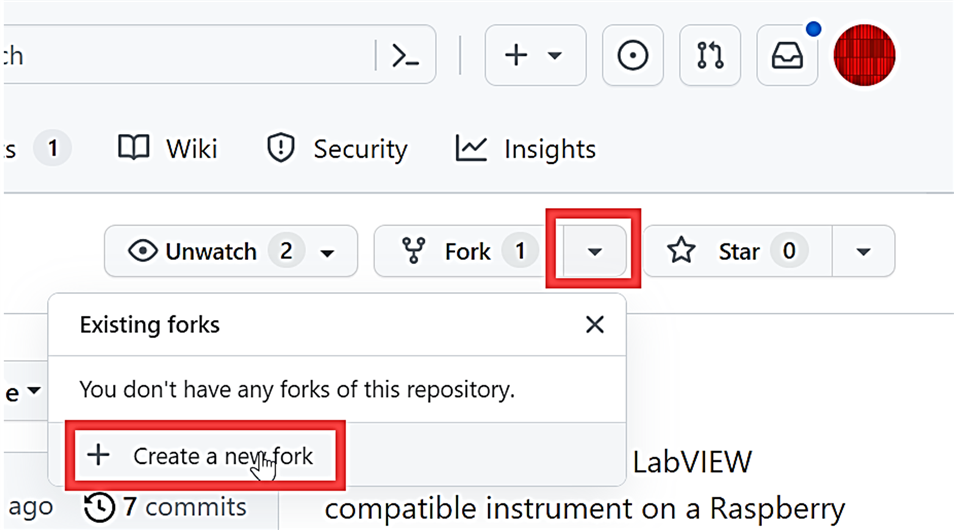
Once you’ve decided to contribute to a project, you’ll want to create your own repository, again in the cloud, and it will be a copy of the original project repository. In an enterprise, you might not need to do this step. The operation is known as a fork of a repository, and it’s easy to do; simply go to the project repo online, and click on the Fork button!
Cloning your Repository to your Local PC
Once you’re ready to start development, a local copy of the code is needed, so that it can be edited. That local copy of the repository is created using a Clone operation. The operation can be performed using the IDE, and it will involve entering in the URL of, or selecting from a list, your repository from your account (or the main project repository if you’re doing feature development at work).
The clone operation will result in a folder of code on your local PC, and by default it will contain the main branch code, i.e. the (hopefully) stable and mature code. See the earlier screenshot to see how to clone a repository using Visual Studio Code’s Source Control icon from the Activity Bar. If you’re using a JetBrains Product, then the cloning operation can be done by selecting Get From VCS (Version Control System) from the startup window, and then selecting GitHub. If you need more detail, including screenshots, check out the earlier blog posts!
Switching to the Development Branch
You can, on your local PC, switch to the development branch by using a Checkout operation. To do that, with many IDEs (for instance Visual Studio Code, and JetBrains tools) you’ll click on the current branch name at the bottom of the IDE, and then a list will appear with other branches listed, and then the development branch can be selected to be checked-out. The folder on your PC which contained the main code will now magically contain the development branch code.
Creating a Feature Branch
The Feature Branch is where your code is entered. To create the branch on your local PC, you can click on the current branch name at the bottom status bar, and then select (if you’re using Visual Studio Code) Create new Branch, or (with JetBrains IDEs) New Branch.
Give the new branch a descriptive name such as blinking-led-feature if that’s what the new feature does.
Publish the Branch (Push)
When the local feature branch is created, it is entirely local, i.e. there’s no visibility to anyone browsing your repository that you’re working on anything. In Visual Studio Code, at the bottom status bar, there is a little cloud icon with an arrow pointing inside it. In JetBrains tools, there is an upward arrow (more like North-East!) on the Git toolbar. Clicking on these items will result in the repository in the cloud being updated with the fact that there is a new feature branch. For more details including screenshots, please see the earlier blog posts.
Write your Feature Code
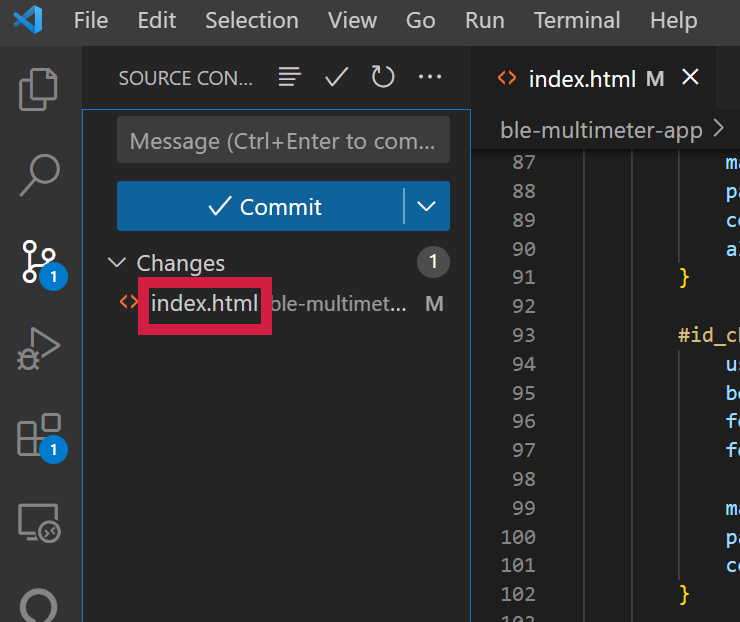
As you create the feature, you’ll want to regularly check-point where you’ve got to. To do that, click on Commit in your IDE. With Jetbrains IDEs, that’s the icon that looks like a check-mark, on the Git toolbar. With Visual Studio Code, you’ll use the Source Control icon and select the files containing the changes, and a text box and a Commit button will appear; as part of the commit operation, you definitely ought to type some brief notes to help recall what the code does so far.
You can also then publish your changes to the cloud, by clicking on Push (the same way as described above in the section Publish the Branch (Push). Do it regularly, immediately after the commit.
Eventually, you’ll get to a stage where the code is hopefully functioning, and tested, and committed and pushed, so that your repo in the cloud contains that functioning code.
Notify the Project Owner that the Feature Code is Complete
It’s time to let the project owner (actually, the release train engineer, but it is the same person for many open source projects) become aware that you have a feature branch of code all ready for merging into the project owner’s development branch. To do that, go to your repository in the cloud, select the Pull requests tab, click New pull request, and then select the destination branch (the project owner’s development branch) and the source branch (your feature branch), and click on Create pull request. 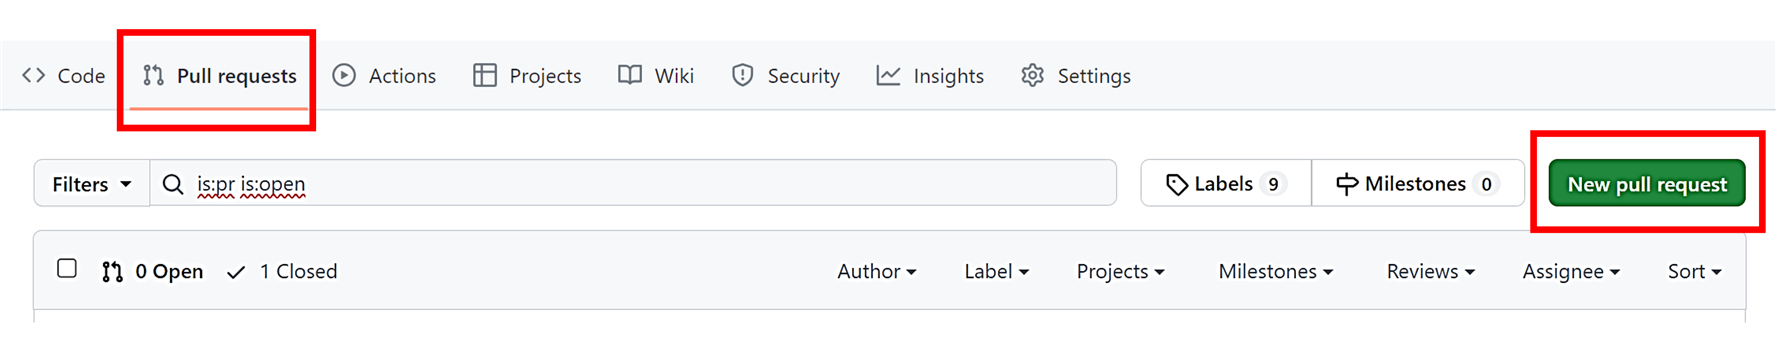
By clicking on a drop-down you’ll be able to choose Create draft pull request, so that the project owner can examine the request for any problems. Click on the Ready for Review button, and then grab the URL of the browser page, and send it to the project’s repo owner. The owner will see a screen with all the changes you’ve made summarised. The owner can write a comment and send it back if they are not happy with the feature, otherwise, they can approve the changes and merge in your feature!

Now the project repository’s development branch contains the content of your feature branch.
Destroy the Feature Branch
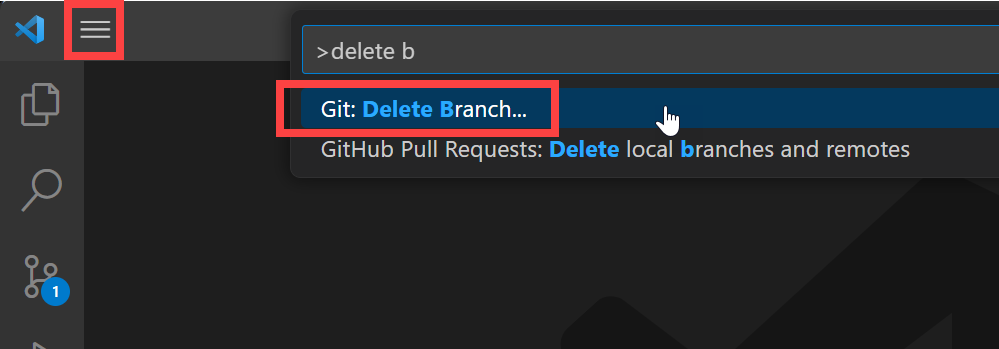
Your feature branch is no longer required after its contents have been merged into the development branch. You can delete your branch, otherwise it just gets confusing unnecessarily retaining it. The local feature branch can be deleted using the IDE. With Jetbrains tools, you can click on any branch name at the bottom of the window, and then from the list of branches that will appear, select the feature branch and then select Delete. With Visual Studio Code, from the top menu bar, click on View->Command Palette, and then type text to locate the Git:Delete Branch command and click on it.
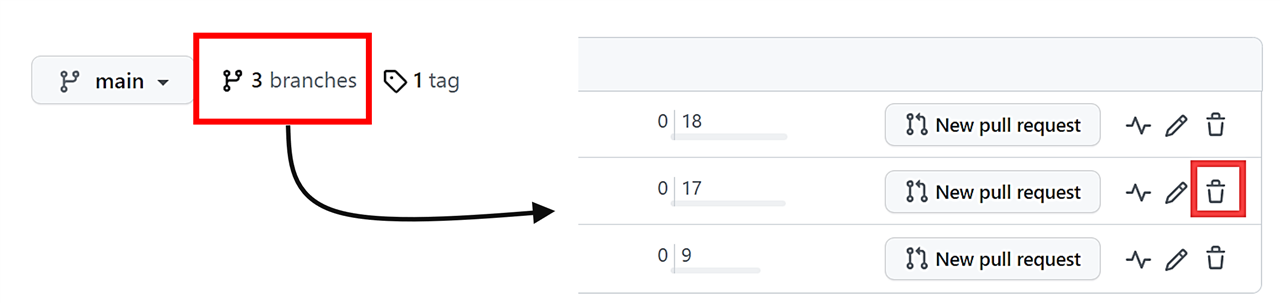
The feature branch in your repo in the cloud can be deleted by clicking on the branches icon in GitHub, locating the branch and selecting the trashcan icon.
Update your Development Branch
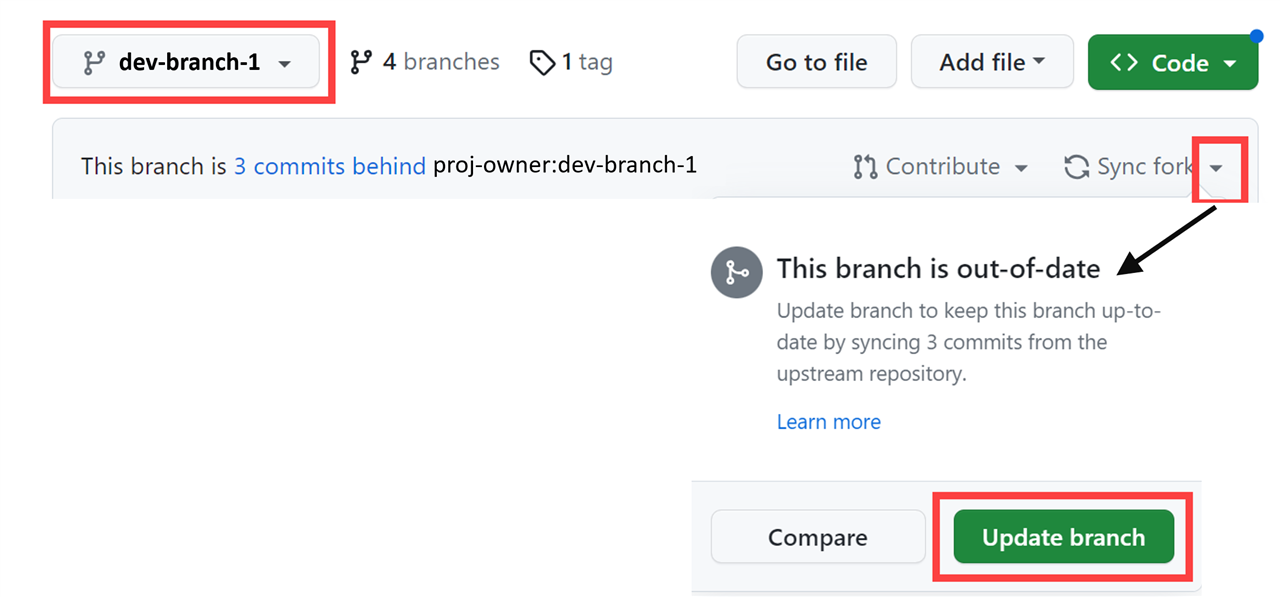
After the feature branch has been merged into the project owner’s development branch, your fork of that branch in your repo will be outdated, as will be the local development branch on the PC. The development branch in your repo can be updated by clicking on the Sync Fork drop-down and then click on Update Branch.
The local development branch can be updated by performing a Fetch and Merge action, which is a single Update Project button in Jetbrains IDEs, available on the Git toolbar. With Visual Studio Code, it will be a Sync circle arrow that will be visible in the status bar at the bottom.
I Can’t See the Development Branch in my Fork!
If subsequently, the project owner creates a new feature branch, you’ll see it in their repo, but you won’t see it in your fork.
The steps to getting that resolved need to be at least partially done at a command line.
Using PowerShell, type the following; first, change to the folder where the code is:
cd C:\development\pico\pico_scpi_usbtmc_labtool\
Next, checkout the main code:
git checkout main
On the following line, include the name of the development branch which you are missing:
git checkout -b develop-set-3
Now type:
git push --set-upstream origin develop-set-3
You should see the following occur:

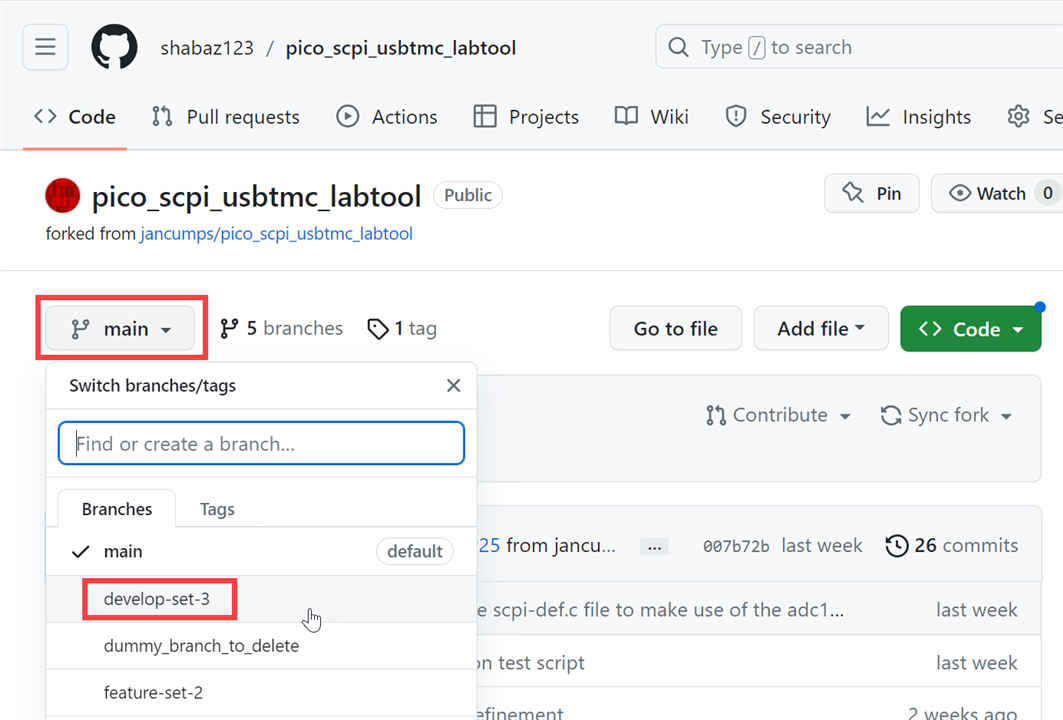
Now you can go to your repo, click on the drop-down containing the branch name, and select the branch:
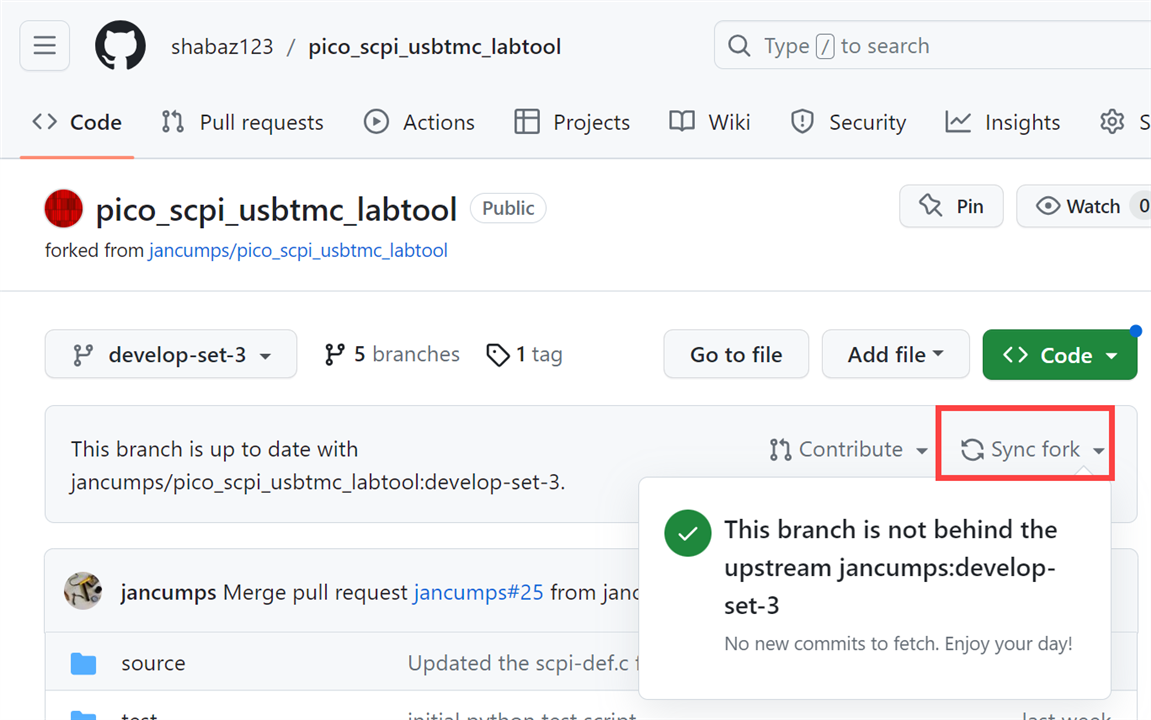
Now click on Sync fork:
Now go to the IDE, and select the branch (it may already be selected) at the bottom on the status bar:
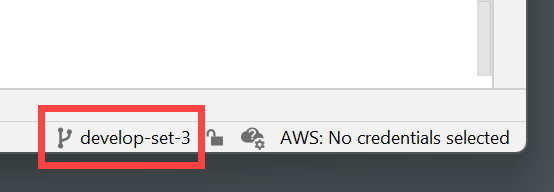
Finally, click on the Update icon in the Git Toolbar if you’re using CLion, or with Visual Studio Code it will be a Sync circle arrow that will be visible in the status bar at the bottom.
Summary
By now you should be broadly familiar with the procedure for adding software features into Git repositories.
Briefly speaking, the main steps are to create your own repository (fork operation) if required, and then clone a project so that you have a local copy. Look for a development branch that will be the candidate for your feature, and then create your own feature branch off it.
As you develop your code, periodically commit and push the code into your repository, i.e. into the cloud. Finally, when you’re ready, you’ll create a Pull Request which will send the project owner your source and destination branch names, and the list of changes. The owner will reply back with comments, or accept the request, and merge into their destination branch (the development branch).
Your feature branch can now be deleted since its job is done, and you can update your copy of the development branch so that it contains your feature!
Thanks for reading.


