


Introduction
One really useful use-case for a VNA is to characterise antennas. When radio transmitters operate, the signal travels with virtually no loss over a cable (often a coax cable) and then is radiated by an antenna. But some of the energy may be reflected back towards the transmitter, if there is an imperfect match. The VNA operates in a manner where it can simulate a transmitter, and observe how much of the signal is reflected back. This provides an indication of how well the antenna is performing (the assumption is that anything that isn’t getting reflected back is being mostly transmitted; this isn’t always the case, for instance a 50 ohm resistor will absorb it all, but we assume that a reasonable antenna is attached).
The VNA goes further into the characterisation by also monitoring the phase difference in the reflection versus the input signal. This provides insight into how to modify the antenna side circuitry to better match the transmitter.
I’d recently purchased a low-cost antenna from ebay, and I was curious to see if it really did meet the specifications. This short blog post documents my findings for that antenna, but the steps described here are relevant to any antennas.

Connecting it up
The antenna came with an SMA connector. As you can see in the photo above, I used an adaptor to deliberately go from there to an N connector plug, and then attached that to an N socket adaption back down to SMA. There is reason to the madness! For more information, see FPC1500 Spectrum Analyzer - Review but in brief, I wanted the cables that connected the antenna to the VNA to be calibrated out of the measurement. To do that, I needed to make the VNA aware of what constituted the cables, and what constituted the antenna. To define this, I need to pick a reference plane and calibrate the VNA up to that plane. The calibration uses three reference impedances and the tool has three connectors for this. The tool looks like a T-shaped piece with a connector on each end and it is known as an OSL mechanical calibrator – OSL refers to Open, Short and Load. It can also be called an OSL T-piece. The FPC1500FPC1500 supports an electronic calibrator that eliminates a lot of effort and risk of inaccuracy, but I only have the OSL mechanical calibrator, so that is what I used.

It just happens that my OSL tool has N connectors (this is very common) so the cable needs to have an N connector too. The photo above shows the approximate location of the calibration plane.
Once the calibration is done, the OSL calibrator tool is removed, and the calibration plane can be attached to the antenna. Since the antenna has an SMA connector, an N-to-SMA adaptor is used. The one in the photo above cannot be removed for the test because it would mess with the calibration plane and the calibration that was just done.
Incidentally, a good quality cable is needed. I used a home-assembled cable that consisted of RG-402 semi-rigid coax (so that things don’t move during the measurements) with SMA connectors soldered to each end and ferrite cores strung on the outside in an attempt to isolate the coax shield from RF, so that it doesn’t influence the antenna much. The antenna ought to be mounted as it would be mounted for a real scenario (i.e. if it would be fitted to an enclosure, then it should be fitted to an enclosure for the measurement too).
Working with VNA Calibration Tools
As mentioned, the easiest way is to use an electronic calibration toolelectronic calibration tool.
Image source: R&S website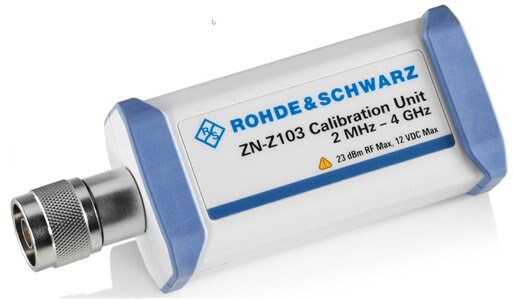
It has a single N plug on one end, and a USB socket on the other. When the USB connector is plugged into the FPC1500, the calibration procedure can be used to electronically switch different reference impedances onto the N connector. Tables of calibration information are also built-in to the tool, so that the FPC1500 is aware of the precise characteristics of the tool’s impedances.
Without the electronic calibrator, an OSL tool can be used. I had to send off mine to be measured, and the returned file specified the parameters that I needed to load into the FPC1500.
The excellent software from Rohde and Schwarz, called InstrumentView, is used for that purpose. It allows me to enter in the information in a user-friendly manner, and it will convert it to a binary file for uploading (e.g. via USB) to the FPC1500.
Here you can see the parameters I entered for my OSL tool:
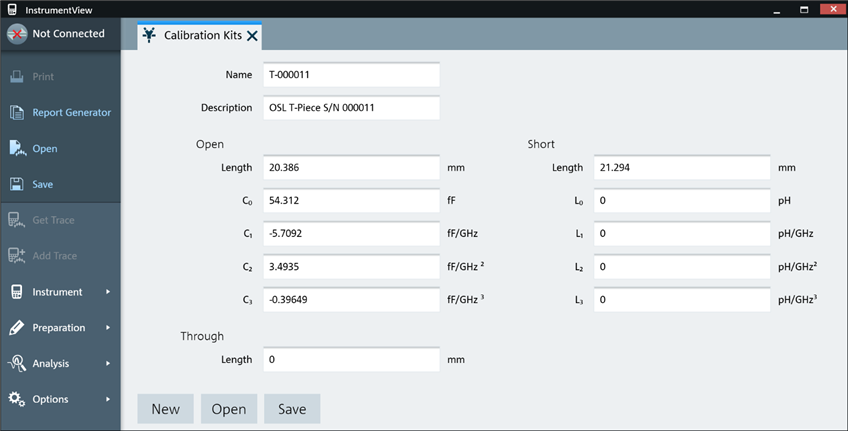
After that I clicked on Save to locally generate and save the binary file, and then went into the Instrument->File Transfer menu to transfer the file to the FPC1500.
Loading the parameters is just the preparatory part of the calibration procedure. Next, the calibration procedure is executed from the FPC1500 menu. It will prompt on the display to attach the OSL tool at the desired reference plane location in three steps, corresponding to the three impedances that the OSL tool offers.
Lots of care is needed during this time, not to disturb any cables, and to double-check that no cables work themselves loose during the procedure.
Once the procedure is done, the OSL tool is disconnected and the antenna can be attached to the VNA!
Results
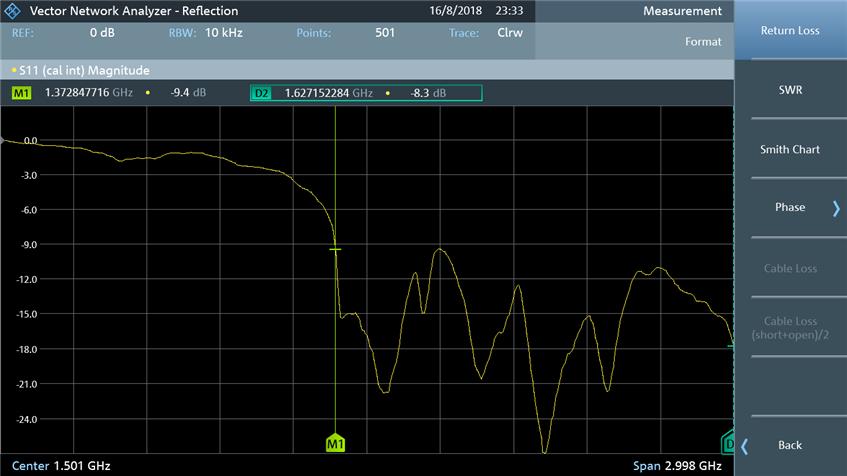
The screenshot below shows the voltage standing wave ratio (SWR or VSWR) of the antenna, across the 0-3GHz range. As can be seen, the SWR falls below 2.0:1 at the marker M1 position which is 1.37GHz. This antenna would therefore function from 1.37GHz to 3GHz and beyond. This is consistent with the ebay advert, which states it works from 1.35GHz to 9.5GHz. I could only test to 3GHz of course. A SWR of 2.0:1 represents a loss of about 10% of power, i.e. 10% was reflected back.
For a lot of the spectrum the ratio was below 1.5:1. At 1.5:1 SWR, the loss is 4%.

Another way of seeing the same information is to look at ‘return loss’. It shows the same information, just as a different conversion that shows more detail due to the y-axis being logarithmic. The SWR chart has everything cramped in the useful portion. In the return loss chart below, the marker is set to -9.5dB which is a return loss value of 9.5dB, that is equivalent to 2.0:1 SWR.
So far the charts have shown scalar information. Now we can go into the vector domain! The swirly diagram here is a Smith Chart. It is discussed in a lot more detail in the FPC1500 review linked to earlier. To cut a long story short, imagine the 0 to 3GHz line in the previous charts, laid out in a different way, which in the case of the screenshot below, happens to begin near the right side of the circular chart, spirals downward and inward, and finally ends up at somewhere else (near the center of the chart in this example).
Anything near the center of the chart corresponds to the antenna looking like a 50 ohm resistance at that frequency, and the loss would therefore be very low. Anthing far away from the center corresponds to an impedance that is not close to 50 ohms resistance. The green marker M1 corresponds to the 1.37GHz position on the swirly yellow line, and it is close to the center. The D2 marker is at a delta of 1.63GHz to M1, i.e. it is at 3GHz absolute frequency, and it too is close to the center.
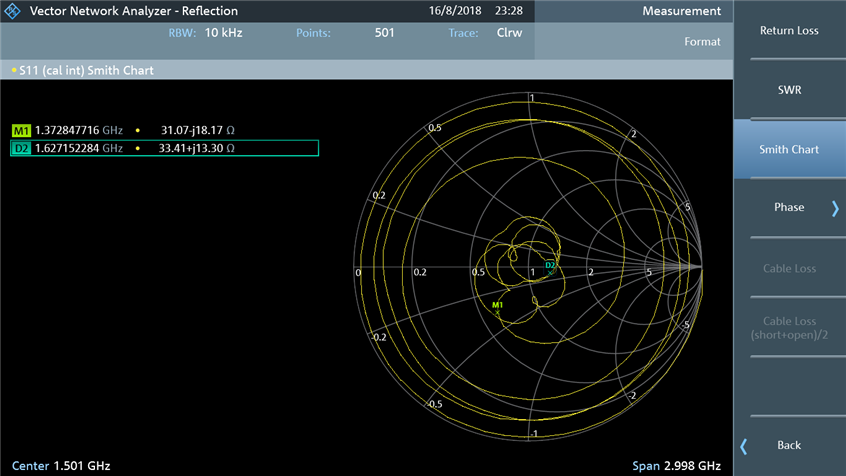
The Smith Chart view is helpful because it graphically describes what needs to be done to the circuit in order to make the match closer to the center, for any desired portion of the spectrum. This too is discussed in more detail in the FPC1500 review.
Summary
It was easy to use the FPC1500 to verify an antenna. The procedure is just a few button-clicks once the calibration procedure is done. The electronic calibration tool would reduce the calibration steps and make that part of the procedure more reliable, but it is perfectly feasible to do it using manual tools too.
The VNA provides valuable information on how to tune an antenna using components. The scalar charts provide a good summary of the overall match across the desired frequency range.
Top Comments
-

colporteur
-
Cancel
-
Vote Up
+2
Vote Down
-
-
Sign in to reply
-
More
-
Cancel
-

shabaz
in reply to colporteur
-
Cancel
-
Vote Up
+1
Vote Down
-
-
Sign in to reply
-
More
-
Cancel
-

mcb1
in reply to shabaz
-
Cancel
-
Vote Up
+3
Vote Down
-
-
Sign in to reply
-
More
-
Cancel
-

shabaz
in reply to mcb1
-
Cancel
-
Vote Up
+2
Vote Down
-
-
Sign in to reply
-
More
-
Cancel
Comment-

shabaz
in reply to mcb1
-
Cancel
-
Vote Up
+2
Vote Down
-
-
Sign in to reply
-
More
-
Cancel
Children