


|
A Schmitt-trigger is a circuit that turns a non-perfect digital signal into a clean one. It has 2 main functions:
There was a recent design of shabaz that uses Schmitt-triggers: Brush and Large-Area Multi-Meter Probes for PCB Reverse-Engineering: A DIY Approach! . The Art of Electronics (AOE) happens to explain that very circuit. A good excuse to check it out.
|

Schmitt-triggers have a set level where they consider a signal high or low. The main difference with a comparator circuit, is that they also introduce hysteresis. Output will switch when the input reaches a particular level, but it will not switch again until the input has dropped below a different, lower, input level. An engineer will define the two levels so, that the noise on the input will never cause a state flip.

image source: TI Application Brief Understanding Schmitt Triggers - fair use
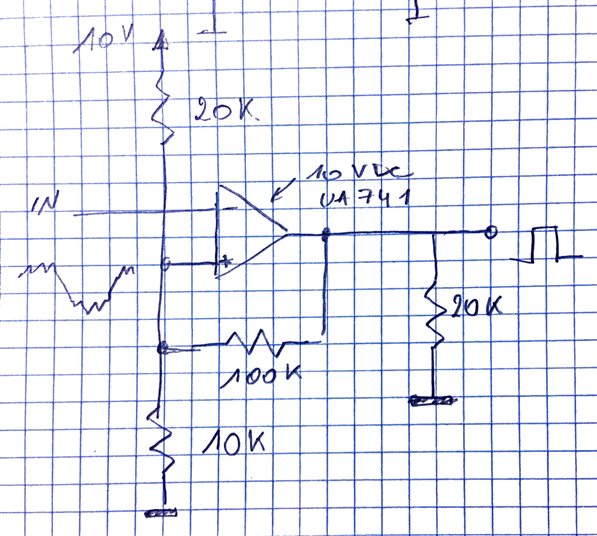
For this post, I'm recreating the AOE design based on an OpAmp (identical to Shabaz', just with different levels and operating voltage), The only change I made is the desired voltage level. I brought that down from 5 V to approx. 3.3 V, because that's in the range of my signal generator. I use the very common UA741 in this design, because I have a through-hole one. In a real design, you'd probably use a more modern one that can work on lower voltages, and can drive its output to the rails. And is faster (see jc2048 ' comment).
This is an inverting design. The output drives low when the input is high.
The circuit
It's virtually the same as the AOE design. But R1 is 20K instead of 10K, OpAmp voltage 10 V.

images: the actual circuit that I set up on a breadboard.
Results
Test with an input that is noisy, and migrates to both upper and lower levels multiple times:

image source: the design successfully cleans up a noisy test signal from my waveform generator
The yellow trace is the input. I have chosen a signal that is noisy on both low and high level. I've set it so that it has glitches on both sides of the hysteresis range. The magenta trace is the output. It's a nice "digital" signal, with fast edges and little noise. Because I used the imperfect UA741, signal does not reach ground or VCC. The Blue trace is the set point. You can clearly see that the output level influences the comparison point.
Operation: this is an OpAmp with positive feedback. R3 feeds the output back to the + input. That "escalates" the OpAmp. When the input crosses the set point, it immediately goes to the rail voltage (or as close as it can get to it).
R3 also has another effect: It influences the set point, because it is either connected to the positive or ground rail. When output is low, R3 will pull the set point down a little. When output is high, it will pull it up somewhat. That's what generates the hysteresis. Set point and hysteresis width are function of the 3 resistors values (and by how close the OpAmps can drive to the rails).

