


|
For the Sound and Vibration Measurement Hat for Raspberry Pi road test, I'm reviewing Measurement Computing's IEPE Measurement DAQ HAT for Raspberry Pi. In this post, I'm setting up Eclipse on my development computer. Then I test cross-compilation and remote debugging
I'm using the Finite Scan sample C example . If all works fine (and it does) I should be able to compile, deploy and debug DAQ code on the Pi, from Eclipse running on my Windows pc. |

Configure Eclipse
For ToolChain configuration and debugger install, check previous post TSS Programming in C, with cross-compile and remote debug in Eclipse
Follow these sections:
- Cross Compile toolchain
- Install and configure GDBSERVER on the Pi, without the sudo wrapper.
Download DAQHATS libraries and include files
The toolchain that's installed in the previous step, makes all typical Linux dependencies available on the development pc.
It doesn't have the library and includes for daqhats development. We'll download them and place them on the pc.
Libraries
Navigate to /usr/local/lib. This is the location where your daqhats libraries are generated when you follow the software install instructions.
Copy all libdaqhats.so* files in that directory to the local lib folder you created on your PC.
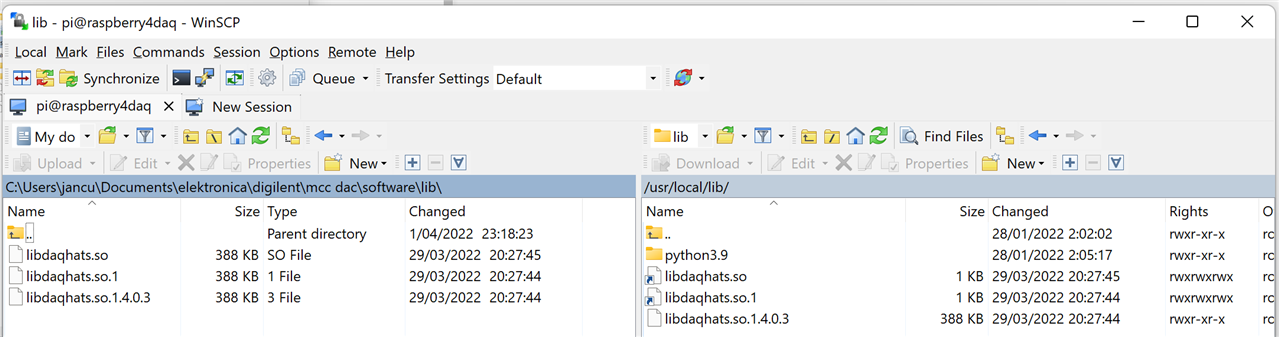
the .so.1* entries are hyperlinks on the Pi. When you copy them over, you'll get 3 identical files with content.
Smart people can save disk space by only copying the .so.1.0.4 file and make Windows links similar to the Linux ones.
Or (not a fan) copy the .so.1.0.4 file and remove the .1.0.4 part of the extension.
Header Files
Because the daqhats examples use relative paths in the include definitions, it's easier to copy the header files into a comparable structure on your pc.
...
Make a base folder for the includes. Create a daqhats folder inside it, then a mountpount (any name is fine actually) folder inside that one.
Copy /home/pi/daqhats/examples/c/daqhats_utils.h to the base folder you just created on the pc.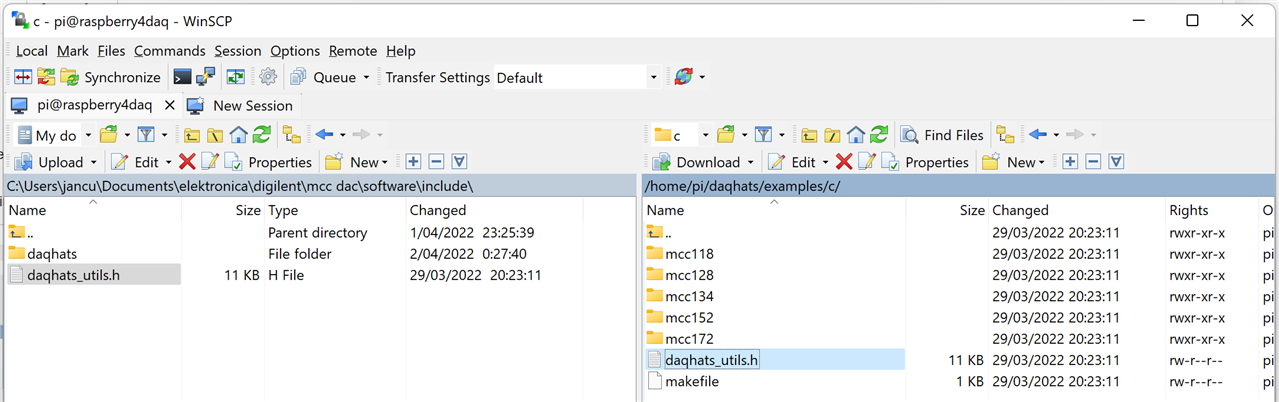
Copy all header files form /usr/local/include/daqhats into the daqhats subfolder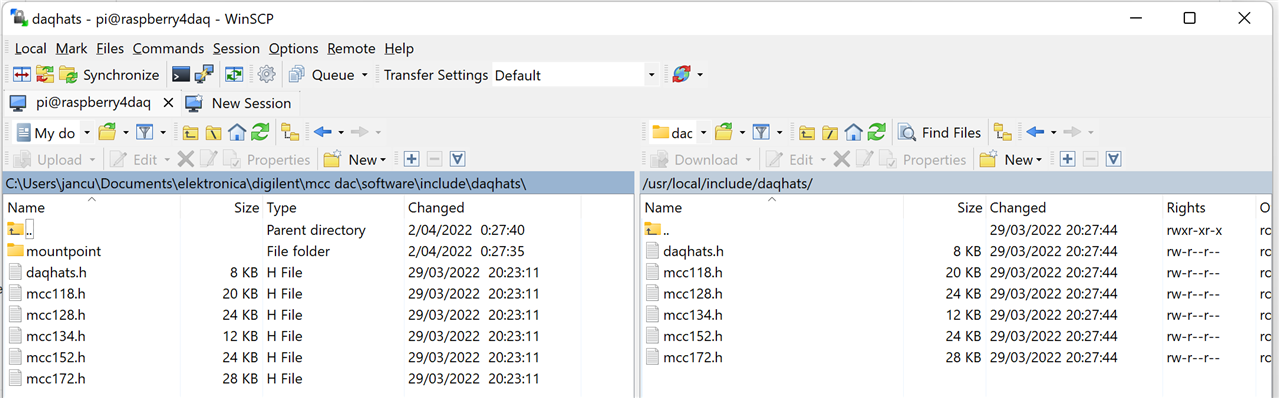
Nothing needs to be copied in the mountpoint folder.
That's it. All dependencies are now downloaded. You can start building software.
Create an Eclipse project for DAQHATS
Follow my original post again, section Create an Eclipse project:
- New Project
- Configure Make
Then the DAQHATS specific actions:
Configure includes
Right click on the project, select Properties. DAQHATS uses CPP extensions, so we maintain the G++ settings
Navigate to C/C++ Build -> Settings -> Tools Settings -> Cross G++ Compiler -> Includes
Add the mountpoint and base directories.
You can use the File system... button to browse and select the folder. Eclipse will automatically turn that into a valid path for Make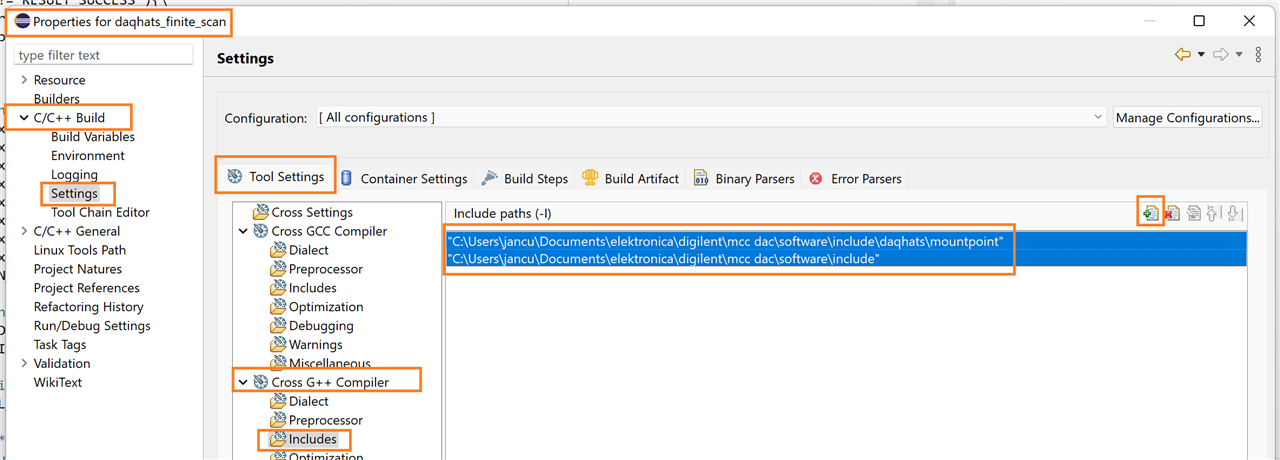
Configure Library
In the same dialog, navigate to Cross GCC Linker -> Libraries.
Add the path to the location where you copied the daqhats library files.
You can use the File system... button again.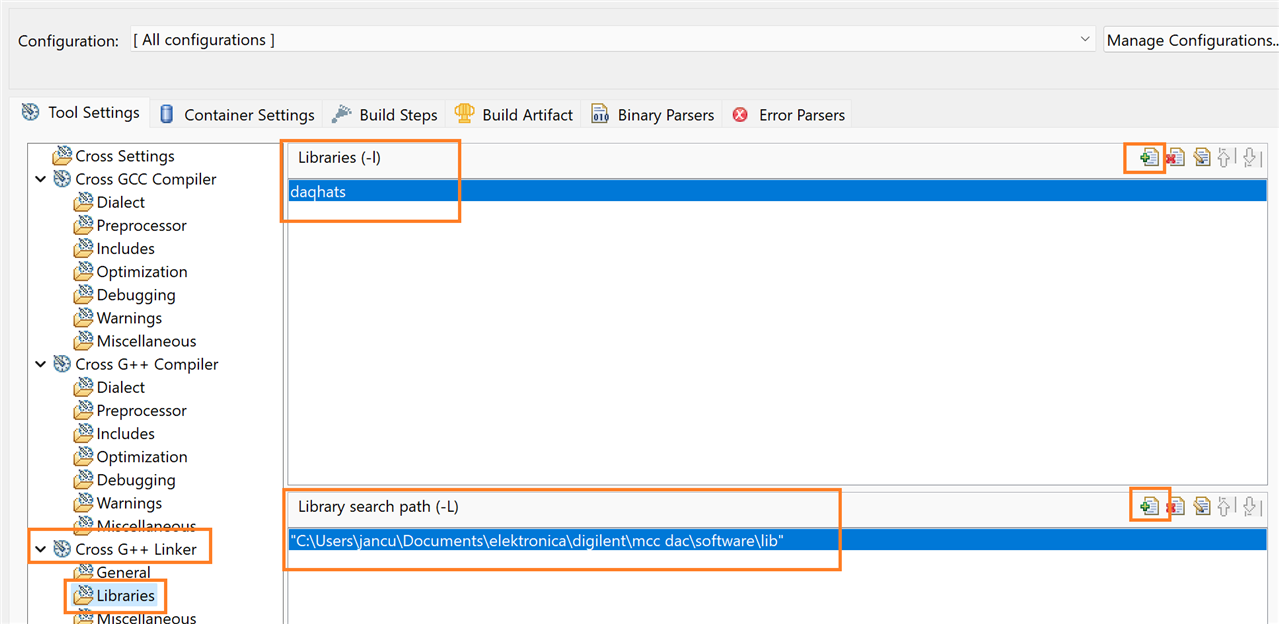
Enter daqhats as library name.
Done. Now your project is ready for development.
Add one of the C example sources. I used finite_scan.c.
Build the Linux Executable
Build it according to the following section in my original post:
- Build the Linux Executable
Remote Debug the Executable on the Pi
Again follow the section in the original instructions:
- Remote Debug the Executable on the Pi
except: daqhats code doesn't need to be run as sudo. Skip changing the Debugger -> Gdbserver Settings.
I have started to alter the example. Because I know that I have an IEPE sensor, and it's connected to channel 0, I put that in the code.
I also started replacing printf with cout <<.
/*****************************************************************************
MCC 172 Functions Demonstrated:
mcc172_iepe_config_write
mcc172_a_in_clock_config_read
mcc172_a_in_clock_config_write
mcc172_a_in_sensitivity_write
mcc172_a_in_scan_start
mcc172_a_in_scan_read
Purpose:
Perform a finite acquisition on 1 or more channels.
Description:
Acquires blocks of analog input data for a user-specified group
of channels. The RMS voltage for each channel is
displayed for each block of data received from the device. The
acquisition is stopped when the specified number of samples is
acquired for each channel.
*****************************************************************************/
#include <iostream>
#include <math.h>
#include "../../daqhats_utils.h"
using namespace std;
double calc_rms(double* data, uint8_t channel, uint8_t num_channels,
uint32_t num_samples_per_channel)
{
double value;
uint32_t i;
uint32_t index;
value = 0.0;
for (i = 0; i < num_samples_per_channel; i++)
{
index = (i * num_channels) + channel;
value += (data[index] * data[index]) / num_samples_per_channel;
}
return sqrt(value);
}
int main() {
int result = RESULT_SUCCESS;
uint8_t address = 0;
char channel_string[512];
char options_str[512];
char display_header[512];
int i;
// Set the channel mask which is used by the library function
// mcc172_a_in_scan_start to specify the channels to acquire.
// The functions below, will parse the channel mask into a
// character string for display purposes.
// uint8_t channel_mask = {CHAN0 | CHAN1};
uint8_t channel_mask = {CHAN0};
convert_chan_mask_to_string(channel_mask, channel_string);
uint8_t num_channels = 0U;
int max_channel_array_length = mcc172_info()->NUM_AI_CHANNELS;
{
int channel_array[max_channel_array_length];
num_channels = convert_chan_mask_to_array(channel_mask,
channel_array);
double sensitivity = 1000.0; // 1000 mV / unit default
uint32_t samples_per_channel = 10240;
uint32_t buffer_size = samples_per_channel * num_channels;
double read_buf[buffer_size];
int total_samples_read = 0;
int32_t read_request_size = -1; // read all available samples
double timeout = 5.0;
double scan_rate = 10240.0;
double actual_scan_rate = 0.0;
uint32_t options = OPTS_DEFAULT;
uint16_t read_status = 0;
uint32_t samples_read_per_channel = 0;
uint8_t synced;
uint8_t clock_source;
uint8_t iepe_enable;
// Select an MCC172 HAT device to use.
if (select_hat_device(HAT_ID_MCC_172, &address))
{
// Error getting device.
return -1;
}
cout << endl << "Selected MCC 172 device at address " << address << endl;
// Open a connection to the device.
result = mcc172_open(address);
STOP_ON_ERROR(result);
iepe_enable = 1;
for (i = 0; i < num_channels; i++)
{
result = mcc172_iepe_config_write(address, channel_array[i],
iepe_enable);
STOP_ON_ERROR(result);
result = mcc172_a_in_sensitivity_write(address, channel_array[i],
sensitivity);
STOP_ON_ERROR(result);
}
// Set the ADC clock to the desired rate.
result = mcc172_a_in_clock_config_write(address, SOURCE_LOCAL, scan_rate);
STOP_ON_ERROR(result);
// Wait for the ADCs to synchronize.
do
{
result = mcc172_a_in_clock_config_read(address, &clock_source,
&actual_scan_rate, &synced);
STOP_ON_ERROR(result);
usleep(5000);
} while (synced == 0);
convert_options_to_string(options, options_str);
cout << endl << "MCC 172 finite scan example" << endl;
cout << " Functions demonstrated:" << endl;
cout << " mcc172_iepe_config_write" << endl;
cout << " mcc172_a_in_clock_config_read" << endl;
cout << " mcc172_a_in_clock_config_write" << endl;
cout << " mcc172_a_in_sensitivity_write" << endl;
cout << " mcc172_a_in_scan_start" << endl;
cout << " mcc172_a_in_scan_read" << endl;
cout << " IEPE power: " << (iepe_enable ? "on" : "off") << endl;
cout << " Channels: " << channel_string << endl;
cout << " Sensitivity: " << sensitivity << endl;
cout << " Samples per channel: " << samples_per_channel << endl;
cout << " Requested scan rate: " << scan_rate << endl;
cout << " Actual scan rate: " << actual_scan_rate << endl;
cout << " Options: " << options_str << endl;
// Configure and start the scan.
result = mcc172_a_in_scan_start(address, channel_mask, samples_per_channel,
options);
STOP_ON_ERROR(result);
cout << "Starting scan ..." << endl << endl;
// Create the header containing the column names.
strcpy(display_header, "Samples Read Scan Count ");
for (i = 0; i < num_channels; i++)
{
sprintf(channel_string, "Ch %d RMS ", channel_array[i]);
strcat(display_header, channel_string);
}
strcat(display_header, "\n");
cout << display_header;
// Continuously update the display value until enter key is pressed
// or the number of samples requested has been read.
do
{
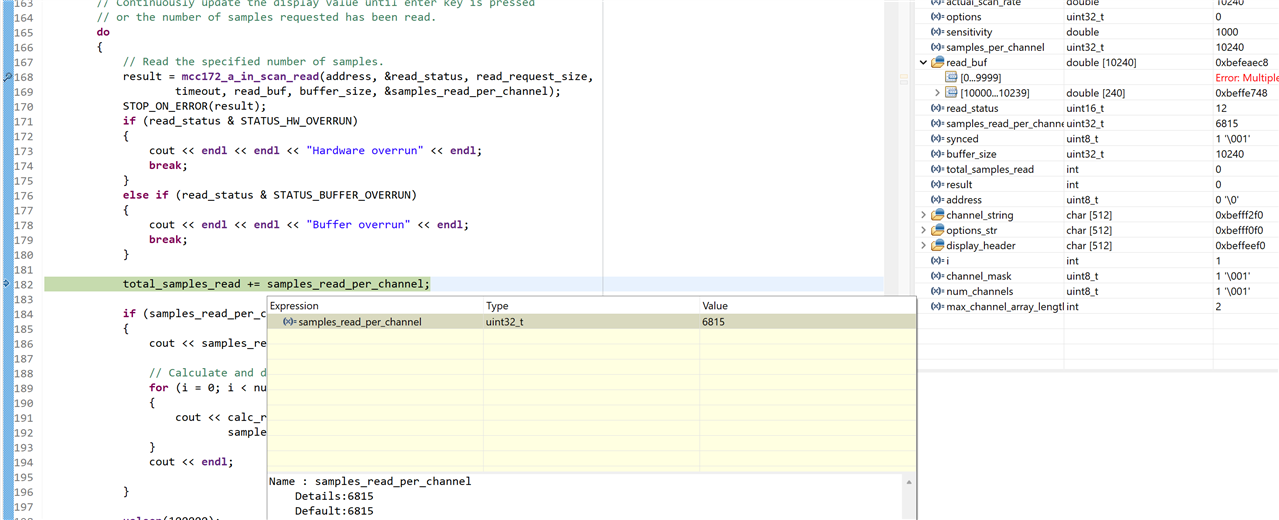
// Read the specified number of samples.
result = mcc172_a_in_scan_read(address, &read_status, read_request_size,
timeout, read_buf, buffer_size, &samples_read_per_channel);
STOP_ON_ERROR(result);
if (read_status & STATUS_HW_OVERRUN)
{
cout << endl << endl << "Hardware overrun" << endl;
break;
}
else if (read_status & STATUS_BUFFER_OVERRUN)
{
cout << endl << endl << "Buffer overrun" << endl;
break;
}
total_samples_read += samples_read_per_channel;
if (samples_read_per_channel > 0)
{
cout << samples_read_per_channel << " " << total_samples_read << " ";
// Calculate and display RMS voltage of the input data
for (i = 0; i < num_channels; i++)
{
cout << calc_rms(read_buf, i, num_channels,
samples_read_per_channel) << endl;
}
cout << endl;
}
usleep(100000);
}
// while ((result == RESULT_SUCCESS) &&
// ((read_status & STATUS_RUNNING) == STATUS_RUNNING) &&
// !enter_press());
while(false); // todo: one time. No waiting for enter key.
cout << endl;
stop:
print_error(mcc172_a_in_scan_stop(address));
print_error(mcc172_a_in_scan_cleanup(address));
// Turn off IEPE supply
for (i = 0; i < num_channels; i++)
{
result = mcc172_iepe_config_write(address, channel_array[i], 0);
STOP_ON_ERROR(result);
}
}
print_error(mcc172_close(address));
return 0;
}
Enjoy!
