|
In this 5th post in this Program the Device series I develop a Virtual Instrument Read, Write and Close block.
I'm designing LabVIEW Virtual Instrument functional blocks that allow you to control and query the instrument without reading the programming guides. |
Functional Blocks approach
The goal of these blocks, is that you can use them in your test setup easily. You don't have to read the manuals to understand the commands and register addresses.
To set the instrument or read values, you:
- set what channel you want to talk to
- select the function from a drop-down list
- in case of reading, that's it. You'll get the value.
- when you want to set a function, the drop-down list helps with the valid input values.

With the Get Parameters and Set Parameters block, you can build a decent automation flow.
Even though some of the functions, such as sweep and modulation, aren't listed in the drop-downs, they can be set with a combination of these blocks.
Once I'm more familiar with that part of my instrument, I may add specific functions for those.
In the previous post you could see that I reused the Error block in other blocks.
In this level, I'm reusing the Read and Write blocks. You will not find any UCI dll calls in these, because they are encapsulated in the layer below.
Get Parameters block
Read any of the instrument settings that can be controlled by software.

2 inputs:
- channel (0, 1)
- function (frequency, waveform, amplitude, ...)
1 output:
- the requested value
Usage example: get the current output frequency

Set Parameters block
Control any of the instrument settings.

3 inputs:
- channel (0, 1)
- function (frequency, waveform, amplitude, ...)
- value to set. Check the drop-down list for the acceptable inputs.
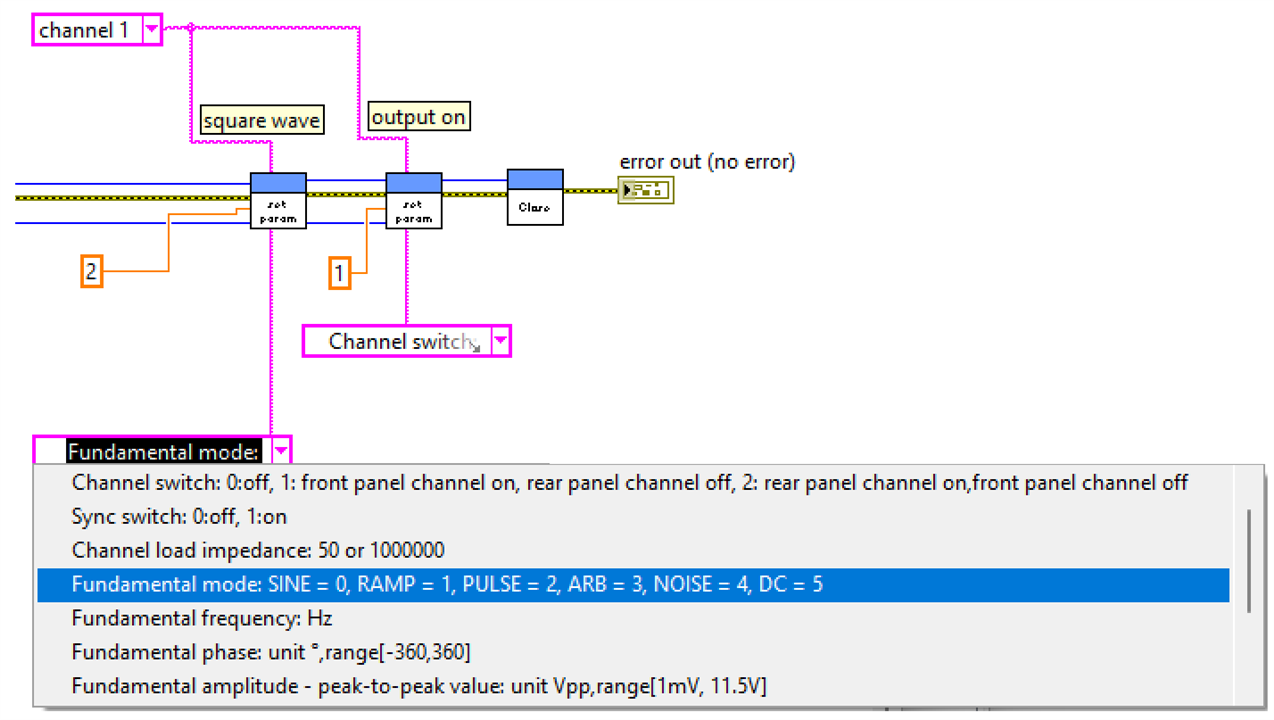
Usage example: set the output waveform and activate that output:

The last object to review is a utility block that converts the raw output bytes of a read operation into a number:
Output To Double block
Takes the 8 bytes that are returned by a Read operation, and convert them into a double.

The Get Parameter block uses this one to transform the output in what you need.
I made it a separate block because it can also be used in combination with the low level Read block.
There's a number of manipulations to do with the output to get it as a valid double: deal with the endianness, and cast into the final format.
This block handles that. I should have documented it in the low level post, but ran out of time :).
Example Flows
Virtual Instrument drivers in LabVIEW often come with examples. I've done the same:

There's one for the functional blocks, and another for the low level approach.
Functional block example
- initialise instrument
- set output frequency
- get output Vpp
- get output frequency
- set output waveform to square
- switch output on
- close instrument
Control panel:

Block diagram:

Low Level block example
- initialise instrument
- set output frequency
- get output frequency
- close instrument
Control panel:

Block diagram:

I've attached the project. It's in LabVIEW Community Edition. The attached library can not to be used for commercial activities and other uses that are excluded by its license.
The design that I described here comes without license. Feel free to use as you like.
Drivers on the accompanying CD need to be installed.
You will also need the UCI dll. You can find that in the install directory when you install the software on the instrument's CD. It's also part of the SDK distribution (see post #1).
I don't have an additional PC where I can test this. I expect that when you first run this example, LabVIEW will prompt for the DLL. Comment here if that's not true.
Happy Testing!
Related blog:

