|
The 2nd post in this Program the Device series talks about initial LabVIEW integration. An unstructured test to see if I can set up a meaningful conversation with the instrument.
In this post I'll open a session with the instrument, set the frequency, read the current frequency back and close the session. The interaction is via UNI-T's UCI api and dll. In a next post, I'll break this flow up in the traditional LabVIEW Virual Instrument blocks (Init, Close, basic Read and Write, and some advanced blocks to set and get favourite values, e.g. Set Freq, Get Freq, Set Waveform, ...) |
Integration with UNI-T UCI API and DLL
The programmer's guide for the instrument is for the UCI api. This is available as a dll in the SDK kit I used in the previous post.
In LabVIEW, you can call dll functions. In this example, I use these:
- uci_Open()
- uci_WriteSimple()
- uci_ReadX()
- uci_Close()
LabVIEW has a wizard to inspect a dll and create building blocks for you. For that, you need the dll and the accompanying .h file.
These files are part of the UNI-T SDK, but the wizard failed when I tried it. It runs forever without returning.
Luckily, there's a 2nd option: define the function declarations manually. You place a Call Library Function block on the LabVIEW canvas, and configure it as needed.
In this blog, I will show one block as example. In a later blog, where I structure the flow in functional components, I'll review all used functions.
Example: uci_open()
Start by reading the Programming Help, and have the ucidef.h file ready. Both available in the SDK.
The function has this signature:

image: UCI Help Document snippet showing the function signature
The custom types are defined in ucidef.h - you can see the base types there.
I'm posting the relevant ones here:
#define u_tchar char#define u_status u_int32#define u_size u_uint32#define u_session u_uint32#define u_string u_tchar*
This is what uci_Open looks like in LabVIEW's definitionuint32_t uci_Open(CStr _addr, uint32_t *_session, uint32_t _timeOut);
You define that by configuring the Call Library Function block. First you select the dll and function. Also configure call settings.

image: set the main function attributes
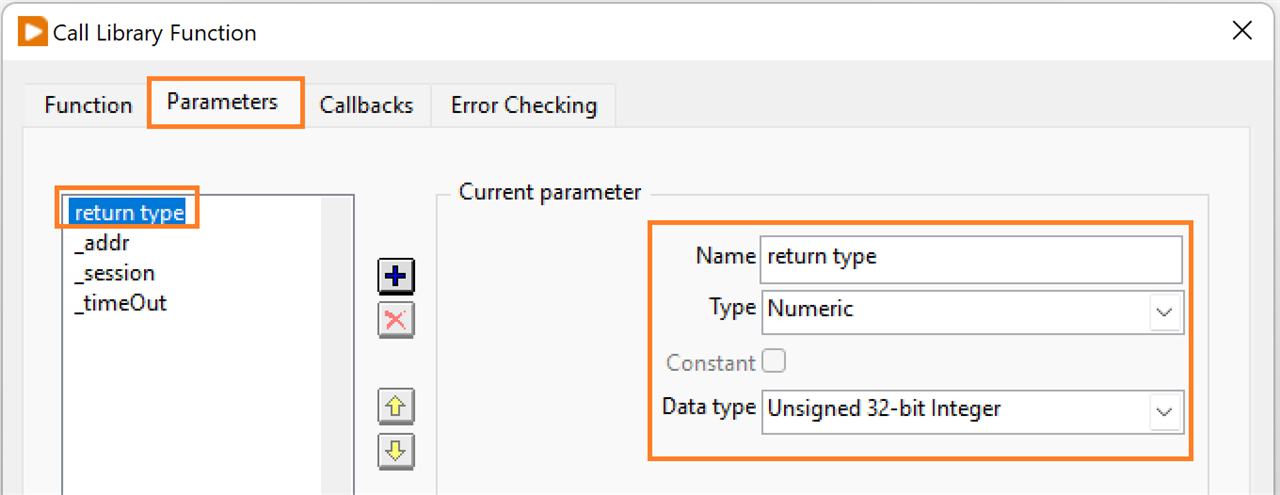
Then you configure the return value and each parameter. Translate the UCI types to LabVIEW's base types.

image: define return value signature

image: 1st parameter
The session parameter is an output, changed by the dll. That means you have to pass by reference.

image: 2nd parameter. Passed by value because it's an output parameter

image: last parameter
Full LabVIEW Flow (part a)
You can see the full process in the header of this post and the next. There are four activities
Open the device session
API function: uci_Open()

image: activate instrument session
If you are a LabVIEWer and followed along in this blog series, everything should look familiar.
The _address string is the one we used in the UCI DEMO program. The yellow block is the Call Library Function block reviewed in the previous section.
Timeout is set to 1s. It is also passed on to the downstream flow.
The other two lines passed on are the function outputs: return value and the _session handler we get from the dll.
In a next post, when I create a driver library, this will all be replaced by one single block that can be dropped in your LabVIEW designs.
Set Instrument Frequency
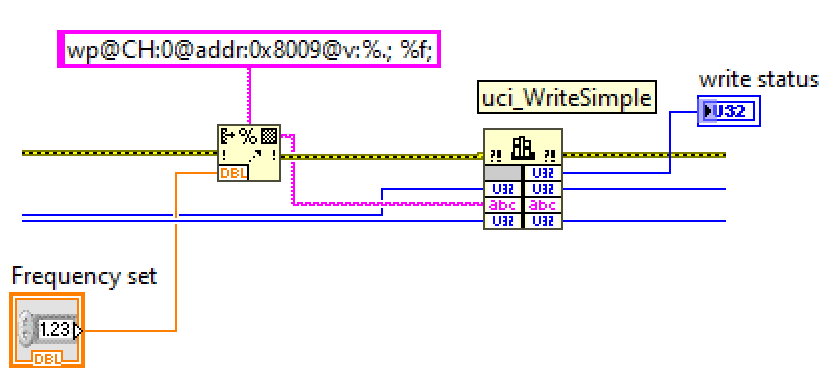
API function: uci_WriteSimple()

image: change the instrument frequency
The left half is a string formatter. It takes the frequency that you set on the control panel, and creates the correct string for the uci api.
If you enter 3000.5 Hz, the string will be wp@CH:0@addr:0x8009@v:3000.5;.
This string is passed to the Call Library Function block on the right side, that's configured for dll function uci_WriteSimple(). This block also gets the _session and _timeout values from the previous upstream flow.
The status is shown. _session and _timeout are passed along downstream.
In the next part, I review the Read and Close functionality. I'll also try to film the flow in action, together with the instrument.
Related blog:


