


|
With the shopping cart I won in a project14 month, I ordered a handheld oscilloscope. In this post: software impressions.
If you have an Owon HDS200 series instrument, you can follow along. It's the same. |

Overview
The MP720783 supports SCPI control in all 3 modes. What's impressive, is that you can use all 3 modes at the same time. You can control scope, DMM and function generator. They are all active, react to commands. This unit can be a test automation station for your design. While you are controlling it with SCPI, you can also have one of the 3 modes active on the display and keypad. A scenario can be:
- drive the input signal of a little OpAmp design with the function generator.
- check the current consumption or a key voltage with the DMM and retrieve the data
- retrieve the output waveform, or one of the 7 supported measurement functions
- have the oscilloscope screen visible all the time during that process, for monitoring or pleasure
Interface with LabVIEW
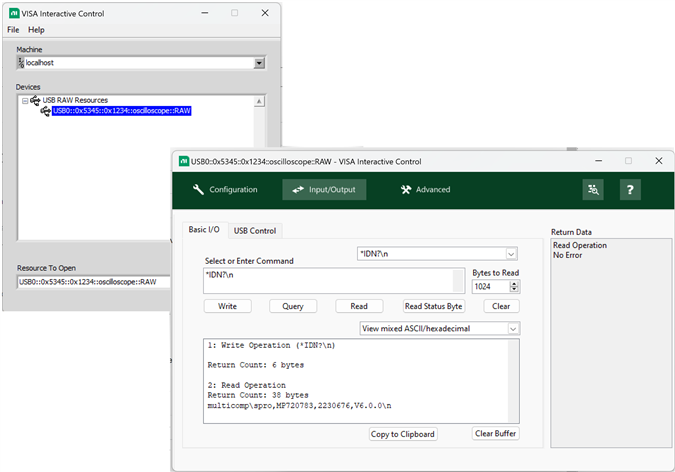
You can connect to the instrument as a USB RAW device. You use this URI in the VISA Open block to connect: USB0::0x5345::0x1234::oscilloscope::RAW.
I have generated a NI-Visa USB driver for the instrument, using the NI-VISA Driver Wizard. But I think that's not actually needed. If someone else can test with the default driver that comes with the instrument, that would be great. The advantage of using the self-generated NI-VISA driver is that the instrument pops up as a recognised instrument in all LabVIEW utilities and flow control objects. The Owon PC GUI will not recognise the instrument anymore, but that's a small (and easy to revert) loss.
Here are two easy ways to start working with the instrument. You can interact with the VISA Interactive Control utility:
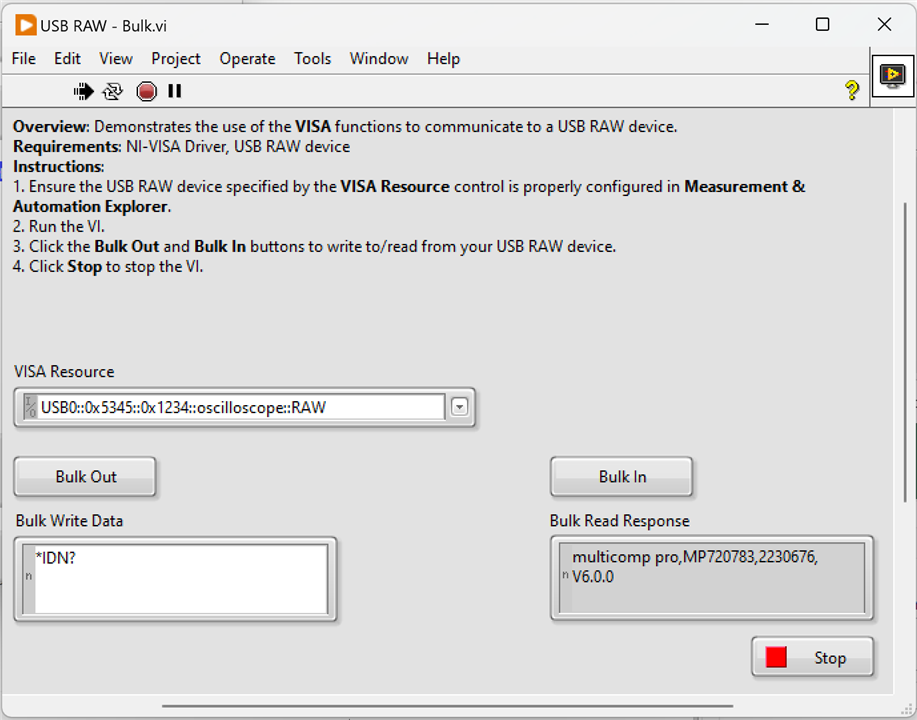
A first real step to creating a control flow, is to load the USB RAW - Bulk example that comes with LabVIEW. This is a flow that will showcase how you interact with the instrument.
Supported commands
The Owon (they are the OEM) SCPI guide is your best and most comprehensive guide for the available commands. For each of the modes, you get a rich set of commands to do the actions you 'd do with the buttons, and to read the info you can retrieve via the display.
A little set of examples, to show the look-and-feel:
:HORizontal:SCALe 200us:CH1:PROBe 10X:MEASurement:CH1:PERiod?:DATa:WAVe:SCReen:HEAD?:DATa:WAVe:SCReen:CH1?
:FUNCtion SINE:FUNCtion:FREQuency 10000:FUNCtion:AMPLitude 1.5:CHANnel ON
:DMM:CONFigure:VOLTage DC:DMM:RANGE mV:DMM:MEAS?
This intro contains the little scenarios that I tried out. I think it's promising, but we'll see if this is good when it's used in a first real test setup.
