element14 Community
element14 Community
    Register Log In
  • Site
  • Search
  • Log In Register
  • About Us
  • Community Hub
    Community Hub
    • What's New on element14
    • Feedback and Support
    • Benefits of Membership
    • Personal Blogs
    • Members Area
    • Achievement Levels
  • Learn
    Learn
    • Ask an Expert
    • eBooks
    • element14 presents
    • Learning Center
    • Tech Spotlight
    • STEM Academy
    • Webinars, Training and Events
    • Learning Groups
  • Technologies
    Technologies
    • 3D Printing
    • FPGA
    • Industrial Automation
    • Internet of Things
    • Power & Energy
    • Sensors
    • Technology Groups
  • Challenges & Projects
    Challenges & Projects
    • Design Challenges
    • element14 presents Projects
    • Project14
    • Arduino Projects
    • Raspberry Pi Projects
    • Project Groups
  • Products
    Products
    • Arduino
    • Avnet Boards Community
    • Dev Tools
    • Manufacturers
    • Multicomp Pro
    • Product Groups
    • Raspberry Pi
    • RoadTests & Reviews
  • Store
    Store
    • Visit Your Store
    • Choose another store...
      • Europe
      •  Austria (German)
      •  Belgium (Dutch, French)
      •  Bulgaria (Bulgarian)
      •  Czech Republic (Czech)
      •  Denmark (Danish)
      •  Estonia (Estonian)
      •  Finland (Finnish)
      •  France (French)
      •  Germany (German)
      •  Hungary (Hungarian)
      •  Ireland
      •  Israel
      •  Italy (Italian)
      •  Latvia (Latvian)
      •  
      •  Lithuania (Lithuanian)
      •  Netherlands (Dutch)
      •  Norway (Norwegian)
      •  Poland (Polish)
      •  Portugal (Portuguese)
      •  Romania (Romanian)
      •  Russia (Russian)
      •  Slovakia (Slovak)
      •  Slovenia (Slovenian)
      •  Spain (Spanish)
      •  Sweden (Swedish)
      •  Switzerland(German, French)
      •  Turkey (Turkish)
      •  United Kingdom
      • Asia Pacific
      •  Australia
      •  China
      •  Hong Kong
      •  India
      •  Korea (Korean)
      •  Malaysia
      •  New Zealand
      •  Philippines
      •  Singapore
      •  Taiwan
      •  Thailand (Thai)
      • Americas
      •  Brazil (Portuguese)
      •  Canada
      •  Mexico (Spanish)
      •  United States
      Can't find the country/region you're looking for? Visit our export site or find a local distributor.
  • Translate
  • Profile
  • Settings
Test & Tools
  • Technologies
  • More
Test & Tools
Forum How to take Good Pictures of Electronics
  • Blog
  • Forum
  • Documents
  • Files
  • Members
  • Mentions
  • Sub-Groups
  • Tags
  • More
  • Cancel
  • New
Join Test & Tools to participate - click to join for free!
Actions
  • Share
  • More
  • Cancel
Forum Thread Details
  • Replies 26 replies
  • Subscribers 359 subscribers
  • Views 4628 views
  • Users 0 members are here
  • photo_techniques
  • photos
  • picture
Related

How to take Good Pictures of Electronics

jw0752
jw0752 over 9 years ago

Recently I posted a couple of pictures that fell short of being the quality that I was looking for. mcb1 was kind enough to send me some excellent tips on camera settings. I thought it might be helpful to everyone if we all share some of the tips and techniques that we use to get good quality pictures of our projects and builds. This will hopefully get the conversation going and we can add to it as ideas and techniques begin to flow back and forth.


Here is my first Tip:


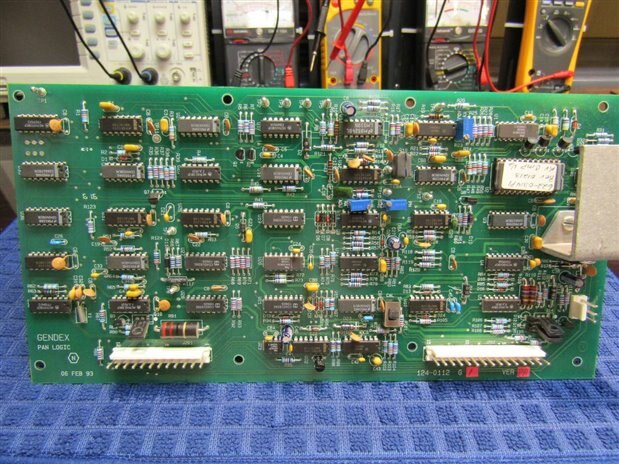
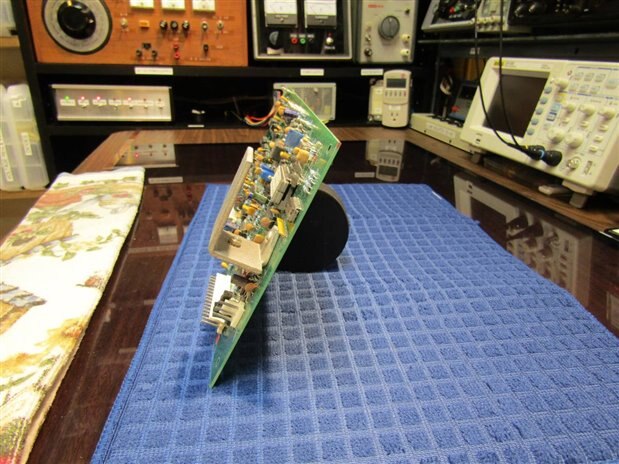
When I try to take a picture of a circuit board that is layed out flat on my bench I have difficulty with shadows frm my body and camera. I also experience difficulty eliminating flare on the circuit board from the over head lights. By propping the circuit board at an angle to the lighting it is much easier to avoid the shadows and the flare. In these pictures I am using a hockey puck to prop the board up.


image


image

These pictures were shot at f3.5  1/30th of a second exposure.


John

  • Sign in to reply
  • Cancel

Top Replies

  • balearicdynamics
    balearicdynamics over 9 years ago +3
    Hi John! Good idea to open this discussion. Really. To avoid shades and get the best field depth also a lens ring light (neon or cold LED ring) is a good choice to reach a good illumination, reduce the…
  • D_Hersey
    D_Hersey over 9 years ago +2
    Sometimes there is a lot of high-albedo stuff on a circuit board You might experiment with a polarizing filter, linear or circular
  • D_Hersey
    D_Hersey over 9 years ago +2
    I use a copy-stand. I illuminate with white LEDs and UV LEDs, but I could use tungsten.
  • D_Hersey
    D_Hersey over 9 years ago in reply to jw0752

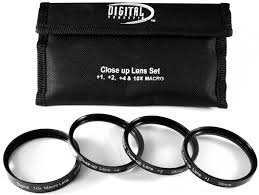
    Alternatively, close-up rings:

    image

    • Cancel
    • Vote Up +1 Vote Down
    • Sign in to reply
    • Cancel
  • mcb1
    mcb1 over 9 years ago

    John and others.

    There is no magic bullet for bright spots due to lighting.

    A polarising filter might help only if the light is single direction to start with.

    When I worked at the Photography studio the copy setup used two light sources at 45 deg with polarising filters and a filter on the lens to eliminate the reflections, which is a little bit OTT for home use.


    Subject placement

    For most of my images I use natural light coming in from a window behind and mostly above the subject.

    The window is on the south side (light is from the north in our end of the world) and it is often later in the day, so it is much less intense and is not direct.

    I place a white card or white surface to bounce light back onto the subject.

    One of my reflectors is a A4 paper that has been laminated and it works well since it can be bent.


    This lighting works better than the studio lights as there are no bright spots and you can easily see the results.

    You can easily check the light by clenching your fist and pointing your knuckles at the light source. The shadow on your palm will give an indication of where the light is coming from and how bad the shadow will be.


    Colour

    The light colour (Flash, Tungsten, LED, Florescent v natural) can be corrected in the camera and often the colour needs tweaking slightly to enhance the image, so you can use whatever you have as long as you understand the correction required.

    My Metz flashes tend to be blue, and both the internal flash and studio flash are white, so know your equipment and the effects is more important than using xyz.


    Depth of Field

    I shoot at the lowest aperture (highest F stop) the lens has which usually dictates a shutter speed of 1-2secs.

    Rather than the close-up rings I use an extension tube between the lens and body, which gives the magnification while keeping the lens away from the subject.

    There is software that will allow stacking of images to improve the dof, but you need to take multiple images at different focus points.

    At these speeds and dof it is important to use a cable/remote shutter release. If you can't then use the self timer and cover the eyepiece to prevent stray light from entering and fogging the photo.


    RAW v JPG

    All my photography is done in raw format which means a 24mB raw image.

    Raw format allows some manipulation before it gets converted to a jpg, but the most important part of the manipulation is to sharpen the image which brings the three individual sensors into line.

    Many of the cameras do a reasonable job of taking what they see and converting it, but it is a compromise and once it is a jpg anything you do is subtracting from the image.


    Because of the small size of 35mm format, images need to fill the frame (something you don't need to worry about with a 6x6 camera) so get as close as you can.


    Post manipulation

    There are lots of things that can be done after the image is taken.

    I've removed scratches or annoying bits, however if the detail is not there, you can't easily recreate it using software.

    From experience it is quicker to do it in-camera rather than post image, so download the image and check it on your computer while the subject is still setup and go back and reshoot if you're not happy.


    Hopefully these insights help someone.


    Mark

    • Cancel
    • Vote Up +2 Vote Down
    • Sign in to reply
    • Cancel
  • jw0752
    jw0752 over 9 years ago in reply to mcb1

    Thanks Mark,

    Thank you for all the good information. It will be helpful to me as I try to improve my pictures.

    John

    • Cancel
    • Vote Up 0 Vote Down
    • Sign in to reply
    • Cancel
  • D_Hersey
    D_Hersey over 9 years ago

    Not too hard to experiment with polarizing the light source:

    https://www.sciplus.com/p/COLOR-PADDLE_40277

    http://www.amazon.com/Polarizing-Film-Sheet-Gadget-Electronics/dp/B004X3XFHU


    Another thing to try is frosted acetate over the light source

    • Cancel
    • Vote Up 0 Vote Down
    • Sign in to reply
    • Cancel
  • mcb1
    mcb1 over 9 years ago in reply to D_Hersey

    Another thing to try is frosted acetate over the light source

    You're right that it helps diffuse the light, but bouncing the light off the roof (assume it is light colour) will increase the distance and reduce the contrast between the light and shadow areas.

    Anything more than 2 stops tends to be like black and white, so if possible aim for 1 stop (1/2 the light).


    Mark

    • Cancel
    • Vote Up 0 Vote Down
    • Sign in to reply
    • Cancel
  • jw0752
    jw0752 over 9 years ago in reply to D_Hersey

    Hi Don,

    When I used to try to teach the grandkids a little about physics I had some of the polarizing sheets for experiments. I will have to dig for them is storage now but it might be fun to run a few experiments.

    John

    • Cancel
    • Vote Up 0 Vote Down
    • Sign in to reply
    • Cancel
  • D_Hersey
    D_Hersey over 9 years ago in reply to jw0752

    Decades ago we had a little setup comprised of two sheets of polarizing film in a bunk-bed like arrangement

    We would stretch Saran Wrap between the sheets which would color in accordance with the stress, fun

    My friend Dave would not stop playing with it unless someone interrupted him

    He had a diagnosis of autism, but it was really slight

    Read later that that was a standard test for autism 

    • Cancel
    • Vote Up 0 Vote Down
    • Sign in to reply
    • Cancel
  • D_Hersey
    D_Hersey over 9 years ago

    Post processing with a program like GIMP can really help with things like contrast

    Modern cameras have lotsa dynamic range making effects possible and good-looking

    • Cancel
    • Vote Up 0 Vote Down
    • Sign in to reply
    • Cancel
  • D_Hersey
    D_Hersey over 9 years ago in reply to D_Hersey

    These are interesting:


    https://www.lytro.com/


    Lytro’s Magical DSLR-Like Camera Lets You Refocus Photos After You Take Them | WIRED

    • Cancel
    • Vote Up +1 Vote Down
    • Sign in to reply
    • Cancel
  • mcb1
    mcb1 over 9 years ago in reply to D_Hersey

    No you need some of these.

    Infinity Photo-Optical Company


    Very interesting history started by this Australian.

    Jim Frazier – An icon in Photography | Manning-Great Lakes Focus

    https://en.wikipedia.org/wiki/Frazier_lens


    Sadly the patent office screwed him over a technicality ...


    Mark

    • Cancel
    • Vote Up 0 Vote Down
    • Sign in to reply
    • Cancel
<>
element14 Community

element14 is the first online community specifically for engineers. Connect with your peers and get expert answers to your questions.

  • Members
  • Learn
  • Technologies
  • Challenges & Projects
  • Products
  • Store
  • About Us
  • Feedback & Support
  • FAQs
  • Terms of Use
  • Privacy Policy
  • Legal and Copyright Notices
  • Sitemap
  • Cookies

An Avnet Company © 2025 Premier Farnell Limited. All Rights Reserved.

Premier Farnell Ltd, registered in England and Wales (no 00876412), registered office: Farnell House, Forge Lane, Leeds LS12 2NE.

ICP 备案号 10220084.

Follow element14

  • X
  • Facebook
  • linkedin
  • YouTube