| Previous blogs | Description |
|---|---|
| #1 - Introduction, the plan and materials preparation | In this blog post we describe the project's main concept and some initial high-level design of it. |
| #2 - Materials and casing assembly | Our journey with selecting proper materials, cutting and assembling the drawer and its casing! |
| #3 - Modelling, cutting, planting! | The title says it all: this part describes some modelling we did before cutting some holes in the drawer and finally planted some vegetables! |
| Next blogs | Description |
|---|---|
| #5 - Piping and pumping - water and liquid fertiliser delivery system | Design and development of water supply system. |
| #6 - Mix of fixes | Final touches to water supply system and small redesigns/fixes. |
| #7 - Ride the lightning - Wiring diagram, pinout and components discussion | Diagram of the circuit, pinout for most components, wire choices and their connections |
| #8 - Pulling the strings | LED and Fan control circuit, overview of BJTs and MOSFETs with a handful of useful general information |
| Detailed description of 3D printed components, their presentation and some tips | |
| #10 - Software, architecture and the benefits of good preparation | Big explanation of the software and its architecture |
| #11 - Summary | Our final post before the end of the challenge! |
Intro
For our first grow we chose low plants that require less than 10 cm of space and 3 cm of soil to be planted. These were:
- Watercress, also our first harvest
- Radish, sprouts at this moment destined for full plants
- Lettuce, sprouts at this moment destined for full plants
As described in a previous blog, they were planted in 6 rows of plants with one row spacers marked by toothpicks. For the time being, they were watered using a nebuliser without any additions. This lead to a fast yield of watercress eaten by us on delicious sandwiches and a satisfying batch of sprouts of radish and lettuce.
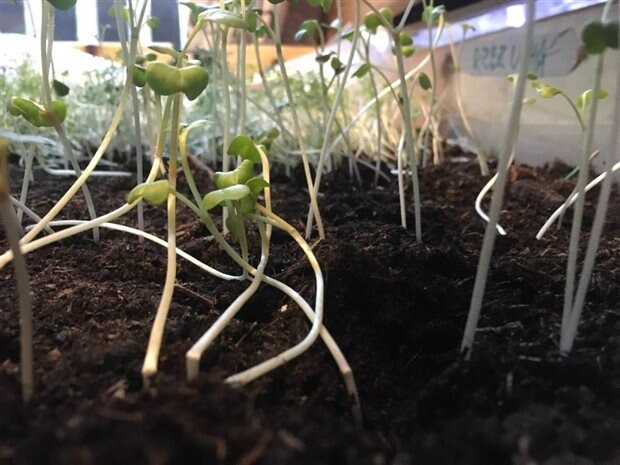
Picture 1&2: radish and lettuce sprouts looking good and healthy!
Watercress
It is a good choice for a plant for this small environment, as it is small, has little to no requirements other than moist substrate and light. Thus future grows of similar plants can be conducted using alternative substrate sources than soil as it is hard to clean the harvested plants. It grew as a dense pack of sprouts, that did not stand quite up right. It was worrying to see, as it suggests a problem either with nutrients or lighting inside the drawer.
Picture 3: Watercress just before harvest
It has a low calorie yield, but it contains high amounts of vitamin K, A and C. Such supply of valuable nutrients may contribute to diet diversification and vitamin supplementation. We yielded ~150 g.
Problems
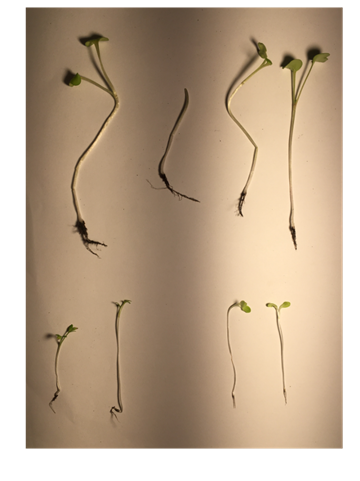
In all three rows we noticed long ‘leggy’ stems and small leaves of plants. It would not be a problem if we aimed at culturing microgreens, however to grow larger plants, we need to address the problem. Particularly in the radish rows we noticed that stems tended to snap close to the ground and cause the plant to collapse to the ground.
Picture 4&5: Leggy and breaking stems of radish and lettuce sprouts
This long thin stems and small leaves can be caused by three different factors:
- Insufficient nutrients and moisture in the soil
- Too dense arrangement of plants in the substrate
- Insufficient lightning
Solutions
To make sure our plants would develop into full grown specimens, all three problems were addressed.
First of all, excessive and weak plants have been removed. The criteria for removal were:
- Density of plants in the region - It was decided that two sprouts have to be at least 1 cm apart, as well as all clusters of sprouts had to be dispersed.
- Condition of its stem - if it was just bent, the plant was left in place, however a broken stem disqualified the plant. Iit would impair its ability to branch out and rapidly ripen
- Size and condition of the leaves - if they were two small, significantly discoloured or damaged the plant was removed
Such selection should follow the sprouting process in order to remove excessive competition for nutrients and light inside the box.
Second, the soil was provided with additional microelements and microbiota. As it is an artificial environment, microbes have to be introduced from living fertilisers - in our case it was biohummus. 5 measures of the liquid substance was added for the whole of the soil, followed by water to penetrate deeper into the soil. It will be used as a primary fertiliser, it is natural, cheap, and most importantly odorless. Producing a nasty stench disqualifies anything for use in urban setting, especially under the bed. Additional fertilisers used:
- Ammonium nitrate to recultivate soil after watercress harvest
- Magnesium sulphate to prevent yellowish discolouration of sprouts
Picture 6: Fertilisers and means of water delivery used
At last, lighting will be expanded using additional LED tape with the same specifications as the one used right now.
Summary
This blog describes initial growth, first harvest and problems that arose in the artificial environment of the Envidrawer. It is essential not to forget that this project is mainly biological in its nature - we are all in all trying to grow edible plants!
- Introduction presenting initial growth
- Our first harvest and its value
- Problems that arose inside the microenvironment
- Solutions applied
All in all, we are preparing the next plant to be germinated and seeded onto empty space left by the watercress, developing a water supply system and control software. More updates coming soon 
Michał & Jakub & Szymon
| Previous post | Next post |
|---|---|
| #4 - Plants, harvests, and fertilisers | #5 - Piping and pumping - water and liquid fertiliser delivery system |


Top Comments