


| Previous blogs | Description |
|---|---|
| #1 - Introduction, the plan and materials preparation | In this blog post we describe the project's main concept and some initial high-level design of it. |
| #2 - Materials and casing assembly | Our journey with selecting proper materials, cutting and assembling the drawer and its casing! |
| #3 - Modelling, cutting, planting! | The title says it all: this part describes some modelling we did before cutting some holes in the drawer and finally planted some vegetables! |
| #4 - Plants, harvests, and fertilisers | First harvest, problems with plants and used fertilisers. All that went off-script for our plants in the artificial environment. |
| Next blogs | Description |
|---|---|
| #6 - Mix of fixes | Final touches to water supply system and small redesigns/fixes. |
| #7 - Ride the lightning - Wiring diagram, pinout and components discussion | Diagram of the circuit, pinout for most components, wire choices and their connections |
| #8 - Pulling the strings | LED and Fan control circuit, overview of BJTs and MOSFETs with a handful of useful general information |
| Detailed description of 3D printed components, their presentation and some tips | |
| #10 - Software, architecture and the benefits of good preparation | Big explanation of the software and its architecture |
| #11 - Summary | Our final post before the end of the challenge! |
Intro
Our water supply system was based upon simple plant watering mechanism adapted for enclosed space design. It is fitted with additional features that can be regulated, most importantly the 5V aquarium pump which enables us to automate the process. Water will have to be refilled manually, but we plan on having a large container holding enough for several watering cycles. Each bout of water can be fitted with any water soluble/liquid fertiliser.
This post consists of:
- Tubing
- Water container and pump
- Gross structure
- Water calculations
Tubing
The main tube is 16 mm in diameter and 140 cm in length. This comes to around 1.2 liters in volume. There are 18 drippers in total attached in pairs every 13.3 cm, that give off 2 liters of water per hour each. A short (10 cm) piece of 3mm tubing is attached to each dripper and ran horizontally in the ground.

Picture 1: Piece of the main tube with its terminal seal and 4 last branching out 3mm tubes at the end
Each one of these tubes was pierced 20 times with a thick needle and the end was sealed using hot glue.

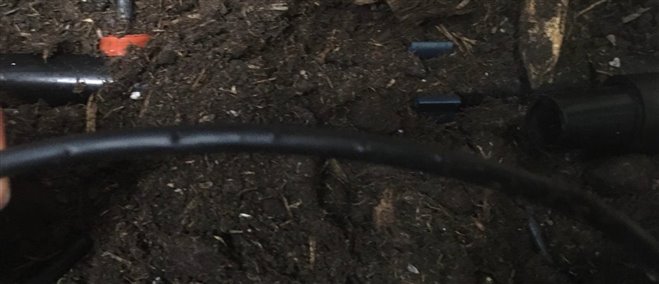
Picture 2&3: Seal at the end of the 3mm black tubes and wide holes in the tube
This allows us for slow and even distribution of water across the Envidrawer.
Water container and pump
The water container is printed to a dimension of 20x20x10 cm. It can hold 4 liters, enough to fill up the tubes required 1.2 liters and for additional 2.8 liters - enough for at least 2 watering cycles. The drippers are all placed on the bottom half of the main pipe, making sure there is as little as possible water left after watering the plants. Any stale liquid would soon start to smell foul and with potentially added fertilisers grow bacterial colonies.
The container is being designed and printed at the moment. It is supposed to fit inside the tight space of Envidrawer and accommodate electronics thus it cannot be installed right away. Inside, a 5V submersible water pump will be installed. We will need to isolate the pump cable from the water container - it will be left out of the submersed part and encased separately to prevent accidental water leaks and spillage.
Water pump and tubing attachment is designed using original parts of the water supply system as well as custom seals and 3D printed components.


Picture 4&5: Model of water connection and described elements of the system including the hole puncher for dripper montage
Gross structure
The main tube is attached to the bottom of the Envidrawer by printed and screwed on clamps. The tube is sealed at the end, and it will almost empty after watering the plants. The water container is placed at the end of the drawer, where the tube will be lead at an angle to be supplied by the water pump.
Water calculations
1.2 liters of water is needed to fill the pipe, however, less than that is required to start the watering process as drippers are on the lower half. To fill the pipe, we need to calculate how much water escapes the pipe per minute and how much our pump is capable of supplying. It can give off 80 liters per hour (1.3 liters per minute). It is important to maintain the tube's water levels at 70% to ensure all drippers provide water at equal flow rates. We can match the filling of the tube by the pump with the rate of emptying (0.6 l per minute - 18 2l/h drippers => 36 l/h - 0.6 l/min) by cranking down the current on the pump and slowing down the water flow.
To provide 1.2 liters of water we need to fill our pipe once or keep it filled for 2 minutes. To approximate this value we should first fill it up to half of its volume and keep the pump running for an additional volume. Of course, all of this will be tested out as we near the completion of our project.
Summary
Overall, the setup is ready to be filled with water and soak our 30 liters of soil for the next plant growth. The setup is simple enough, but any problems will come out during testing and programming so we will need to address them accordingly. We aim at finishing the main design before 31.12 and then, only software will hold us back 
Michał & Jakub & Szymon
| Previous post | Next post |
|---|---|
| #4 - Plants, harvests, and fertilisers | #6 - Mix of fixes |
Top Comments