


Blog List:
1.Uncover the Cores: Introduction
3. Uncover the Cores: System Concept & Workflow
4. Uncover the Cores: Getting started with PSoC 62S4 Pioneer Kit
5. Uncover the Cores: Final Project
Introduction:
In this blog, I will detail the process of getting started with this kit. I will show how to configure it, setup the ModusToolbox 3.0 and start debugging and uploading the codes.
Pin Configuration:
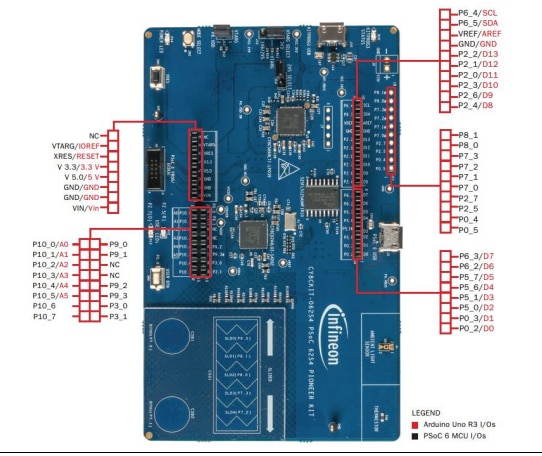
Port Configuration:

We will connect the USB to port 2 and not to 21 while making the project for the purpose of debugging. Once that is done, we can also use the port 21 to power it.
Setting up:
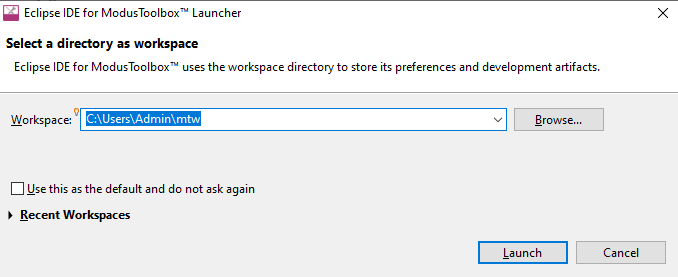
The ModusToolbox can be downloaded from here. The download includes all the files including the Eclipse IDE.
After that open the tool and select your workspace:
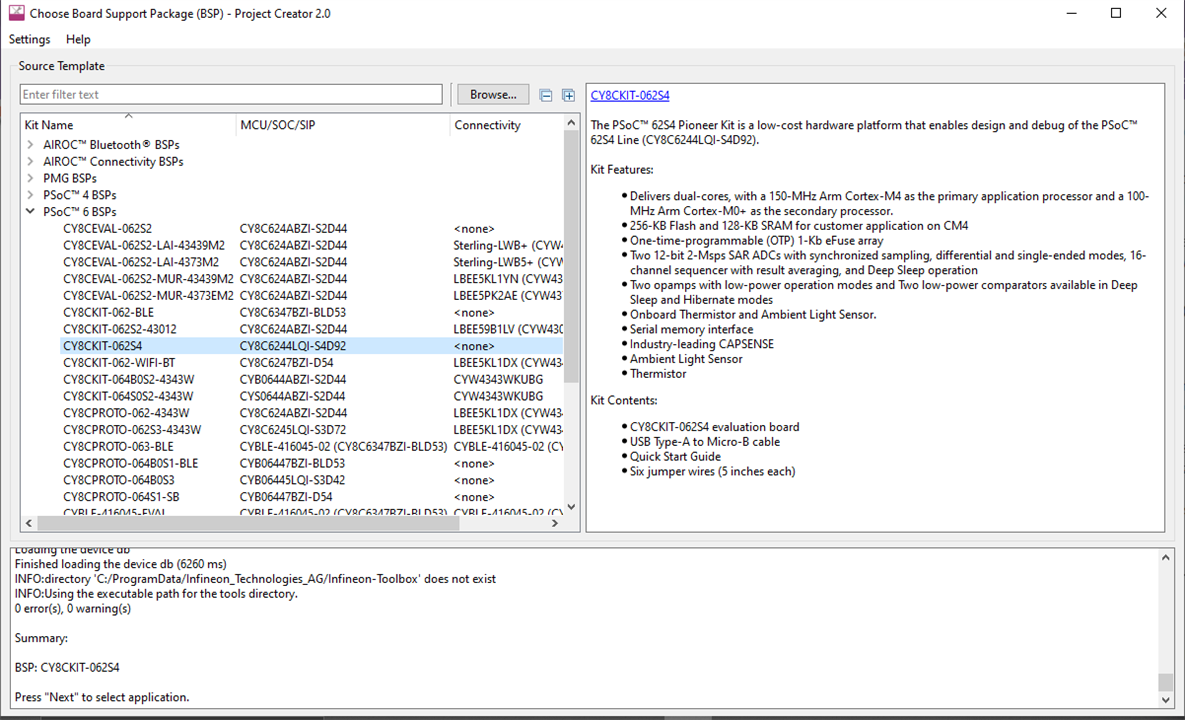
An option to choose the BSP for project creator opens up.
Then, we can select an example project to get started.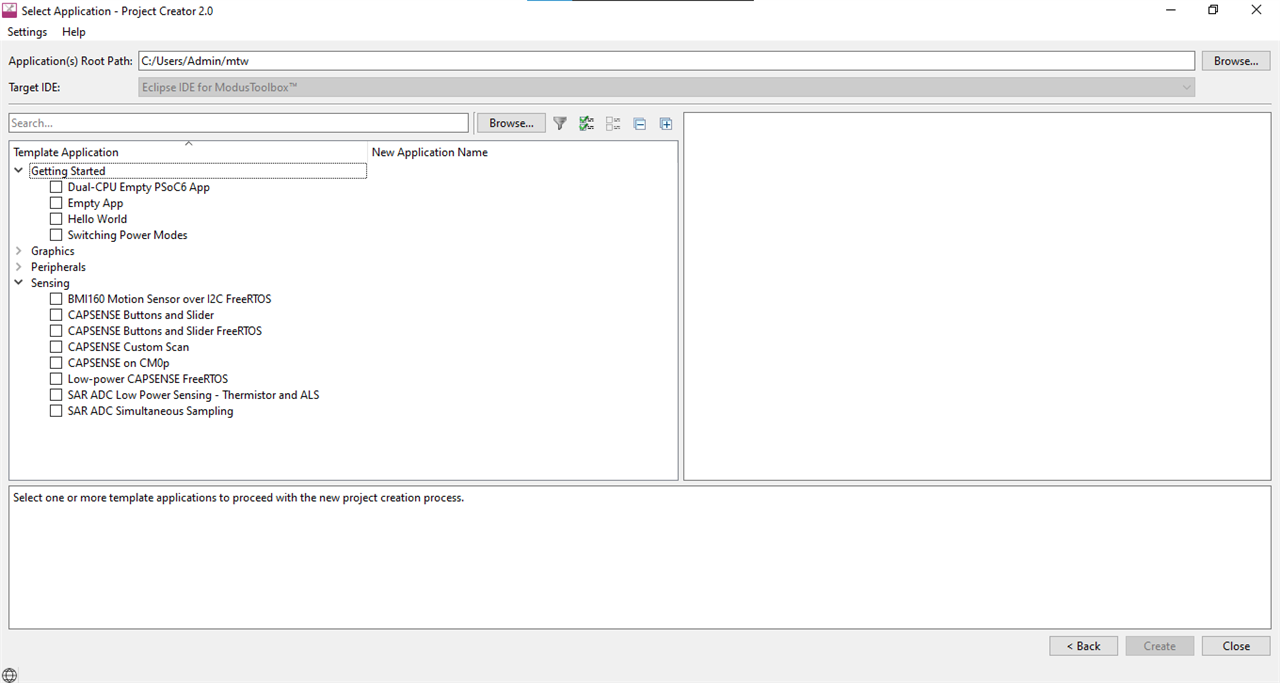
I went with "Hello World" to get started. All the files will be fetched and created for your workspace.
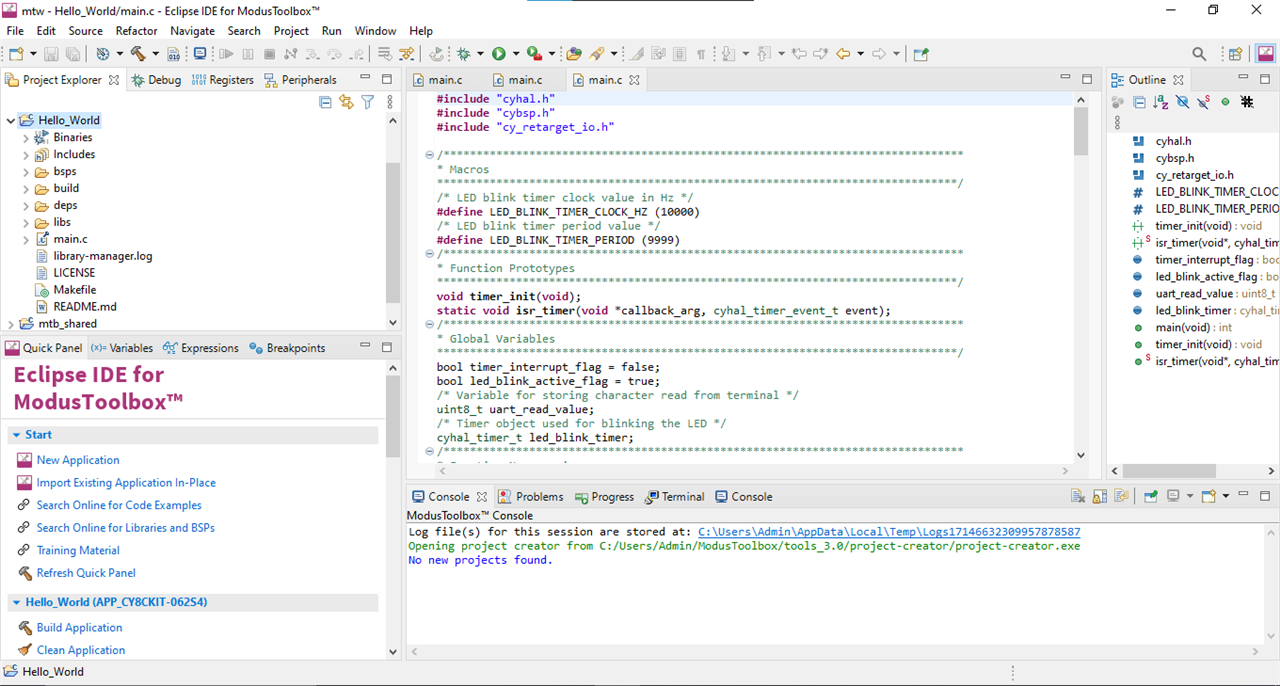
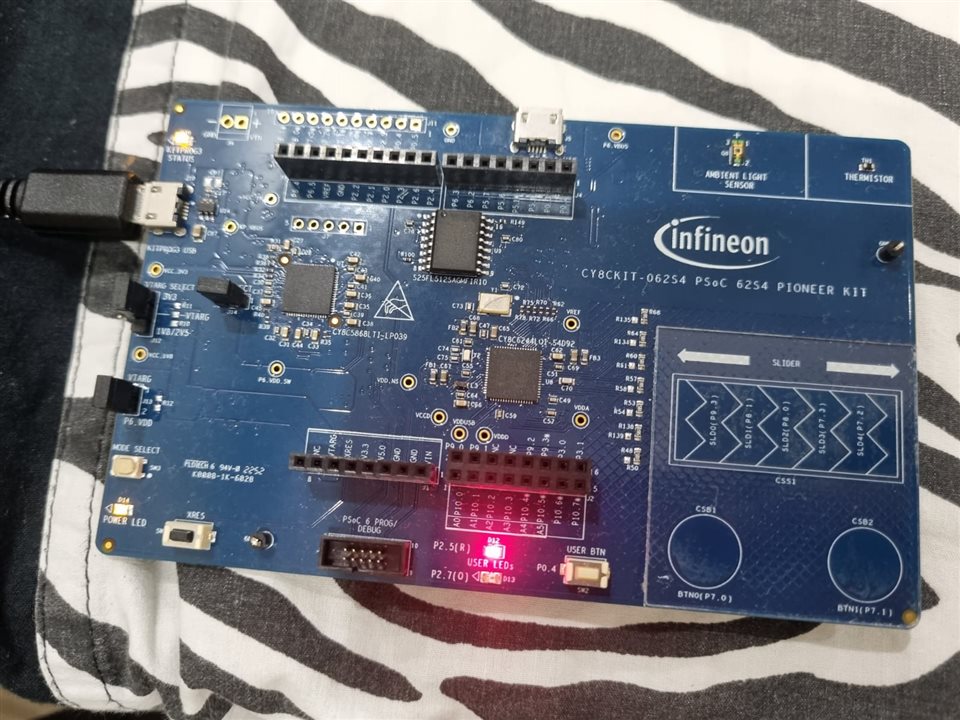
Connecting it to the ModusToolbox 3.0:
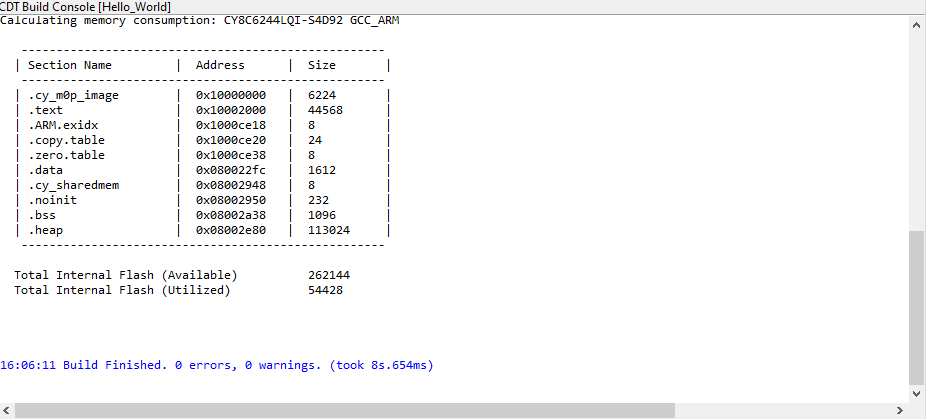
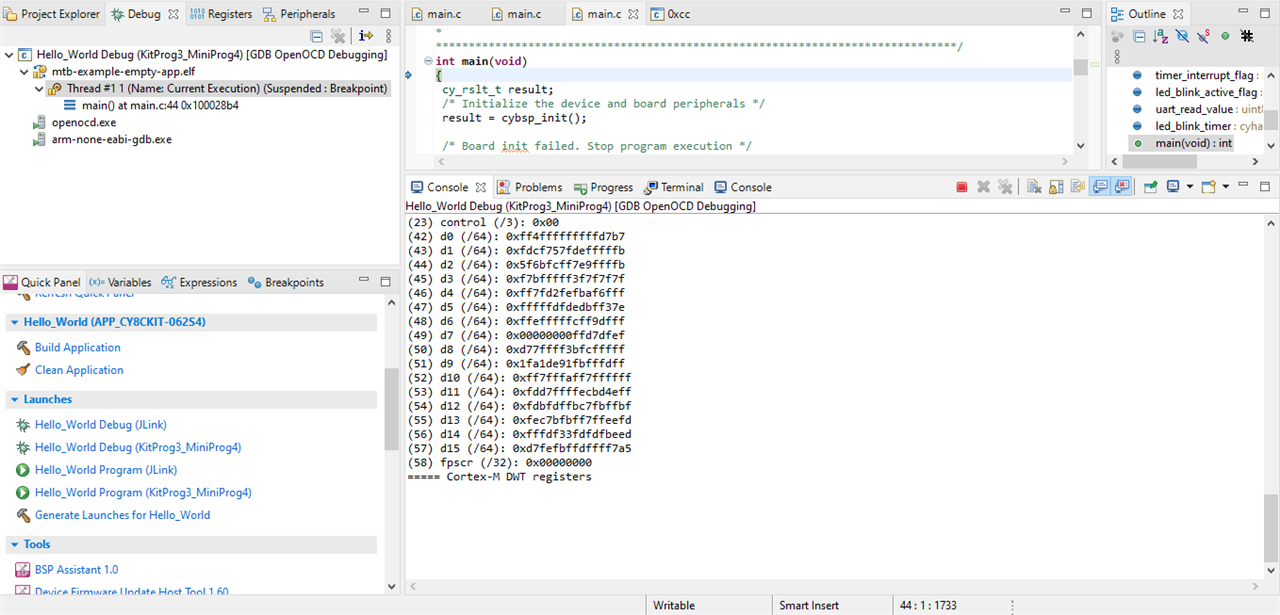
Now, we can connect the PSoC 62S4 board to the PC and start working with it. Firstly, we can build the application. This takes a bit of time to get done.
After that select  from the launches option.
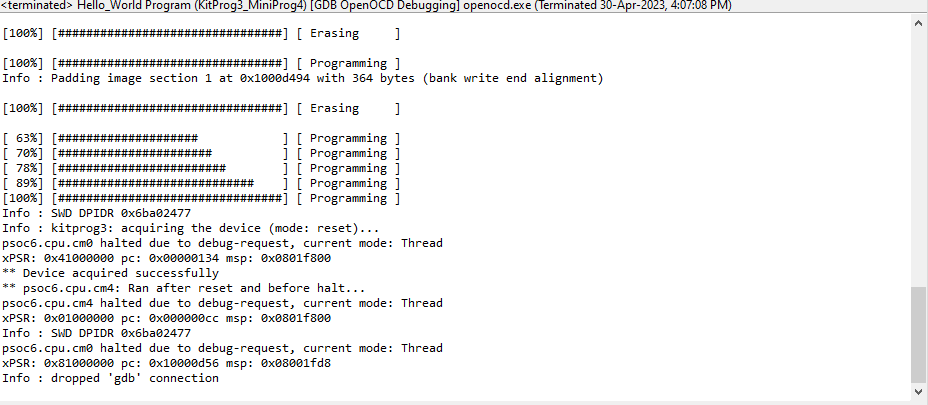
Select  to debug
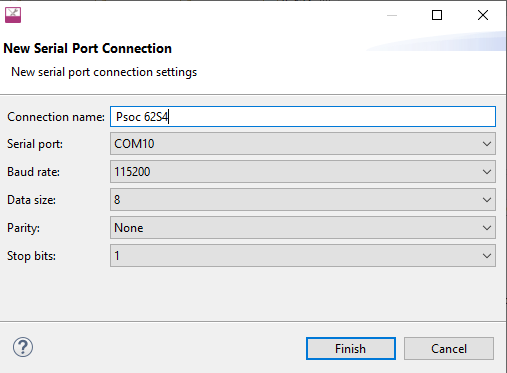
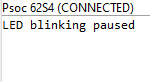
Using the Serial Connection:


Code:
#include "cyhal.h"
#include "cybsp.h"
#include "cy_retarget_io.h"

/*******************************************************************************
* Macros
*******************************************************************************/
/* LED blink timer clock value in Hz */
#define LED_BLINK_TIMER_CLOCK_HZ (10000)
/* LED blink timer period value */
#define LED_BLINK_TIMER_PERIOD (9999)
/*******************************************************************************
* Function Prototypes
*******************************************************************************/
void timer_init(void);
static void isr_timer(void *callback_arg, cyhal_timer_event_t event);
/*******************************************************************************
* Global Variables
*******************************************************************************/
bool timer_interrupt_flag = false;
bool led_blink_active_flag = true;
/* Variable for storing character read from terminal */
uint8_t uart_read_value;
/* Timer object used for blinking the LED */
cyhal_timer_t led_blink_timer;
/*******************************************************************************
* Function Name: main
********************************************************************************
* Summary:
* This is the main function for CM4 core. It sets up a timer to trigger a
* periodic interrupt. The main while loop checks for the status of a flag set
* by the interrupt and toggles an LED at 1Hz to create an LED blinky. The
* while loop also checks whether the 'Enter' key was pressed and
* stops/restarts LED blinking.
*
* Parameters:
* none
*
* Return:
* int
*
*******************************************************************************/
int main(void)
{
 cy_rslt_t result;
 /* Initialize the device and board peripherals */
 result = cybsp_init();

 /* Board init failed. Stop program execution */
 if (result != CY_RSLT_SUCCESS)
 {
 CY_ASSERT(0);
 }
 /* Enable global interrupts */
 __enable_irq();
 /* Initialize retarget-io to use the debug UART port */
 result = cy_retarget_io_init(CYBSP_DEBUG_UART_TX, CYBSP_DEBUG_UART_RX,
 CY_RETARGET_IO_BAUDRATE);
 /* retarget-io init failed. Stop program execution */
 if (result != CY_RSLT_SUCCESS)
 {
 CY_ASSERT(0);
 }
 /* Initialize the User LED */
 result = cyhal_gpio_init(CYBSP_USER_LED, CYHAL_GPIO_DIR_OUTPUT,
 CYHAL_GPIO_DRIVE_STRONG, CYBSP_LED_STATE_OFF);
 /* GPIO init failed. Stop program execution */
 if (result != CY_RSLT_SUCCESS)
 {
 CY_ASSERT(0);
 }
 /* \x1b[2J\x1b[;H - ANSI ESC sequence for clear screen */
 printf("\x1b[2J\x1b[;H");
 printf("****************** "
 "PSoC 6 MCU: Hello World! Example "
 "****************** \r\n\n");
 printf("Hello World!!!\r\n\n");

 printf("For more PSoC 6 MCU projects, "
 "visit our code examples repositories:\r\n\n");
 printf("https://github.com/Infineon/"
 "Code-Examples-for-ModusToolbox-Software\r\n\n");/* Initialize timer to toggle the LED */
 timer_init();
 printf("Press 'Enter' key to pause or "
 "resume blinking the user LED \r\n\r\n");
 for (;;)
 {
 /* Check if 'Enter' key was pressed */
 if (cyhal_uart_getc(&cy_retarget_io_uart_obj, &uart_read_value, 1)
 == CY_RSLT_SUCCESS)
 {
 if (uart_read_value == '\r')
 {
 /* Pause LED blinking by stopping the timer */
 if (led_blink_active_flag)
 {
 cyhal_timer_stop(&led_blink_timer);
 printf("LED blinking paused \r\n");
 }
 else /* Resume LED blinking by starting the timer */
 {
 cyhal_timer_start(&led_blink_timer);
 printf("LED blinking resumed\r\n");
 }
 /* Move cursor to previous line */
 printf("\x1b[1F");
 led_blink_active_flag ^= 1;
 }
 }
 /* Check if timer elapsed (interrupt fired) and toggle the LED */
 if (timer_interrupt_flag)
 {
 /* Clear the flag */
 timer_interrupt_flag = false;
 /* Invert the USER LED state */
 cyhal_gpio_toggle(CYBSP_USER_LED);
 }
 }
}
/*******************************************************************************
* Function Name: timer_init
********************************************************************************
* Summary:
* This function creates and configures a Timer object. The timer ticks* continuously and produces a periodic interrupt on every terminal count
* event. The period is defined by the 'period' and 'compare_value' of the
* timer configuration structure 'led_blink_timer_cfg'. Without any changes,
* this application is designed to produce an interrupt every 1 second.
*
* Parameters:
* none
*
*******************************************************************************/
void timer_init(void)
{
 cy_rslt_t result;
 const cyhal_timer_cfg_t led_blink_timer_cfg =
 {
 .compare_value = 0, /* Timer compare value, not used */
 .period = LED_BLINK_TIMER_PERIOD, /* Defines the timer period */
 .direction = CYHAL_TIMER_DIR_UP, /* Timer counts up */
 .is_compare = false, /* Don't use compare mode */
 .is_continuous = true, /* Run timer indefinitely */
 .value = 0 /* Initial value of counter */
 };
 /* Initialize the timer object. Does not use input pin ('pin' is NC) and
 * does not use a pre-configured clock source ('clk' is NULL). */
 result = cyhal_timer_init(&led_blink_timer, NC, NULL);
 /* timer init failed. Stop program execution */
 if (result != CY_RSLT_SUCCESS)
 {
 CY_ASSERT(0);
 }
 /* Configure timer period and operation mode such as count direction,
 duration */
 cyhal_timer_configure(&led_blink_timer, &led_blink_timer_cfg);
 /* Set the frequency of timer's clock source */
 cyhal_timer_set_frequency(&led_blink_timer, LED_BLINK_TIMER_CLOCK_HZ);
 /* Assign the ISR to execute on timer interrupt */
 cyhal_timer_register_callback(&led_blink_timer, isr_timer, NULL);
 /* Set the event on which timer interrupt occurs and enable it */
 cyhal_timer_enable_event(&led_blink_timer, CYHAL_TIMER_IRQ_TERMINAL_COUNT,
 7, true);
 /* Start the timer with the configured settings */
 cyhal_timer_start(&led_blink_timer);
}

/*******************************************************************************
 * Function Name: isr_timer
********************************************************************************
* Summary:
* This is the interrupt handler function for the timer interrupt.
*
* Parameters:
* callback_arg Arguments passed to the interrupt callback
* event Timer/counter interrupt triggers
*
*******************************************************************************/
static void isr_timer(void *callback_arg, cyhal_timer_event_t event)
{
 (void) callback_arg;
 (void) event;
 /* Set the interrupt flag and process it from the main while(1) loop */
 timer_interrupt_flag = true;
}
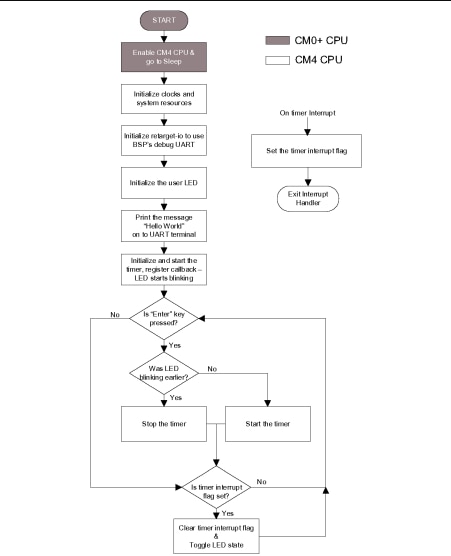
Flowchart:
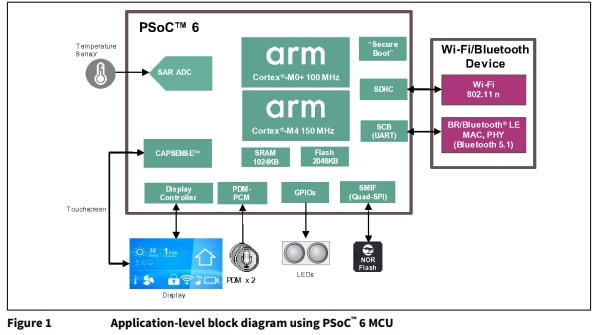
Now, in the next blog I will setup CAPSENSE, Thermistor and the Ambient Light Sensor. Additionally, I will integrate them with the 2 core architecture as explained in the previous blogs.