Introduction
About 2.2 Billion people globally don’t have the capability to see. Due to blindness or shortsight, they cannot perceive their environment and navigate like normal humans which results in reduced mobility. In my country, I see most of cases short sight people use a stick or cane to move from one place to another. Sometimes they take help from others to navigate. I believe computer vision and generative AI can give them a huge opportunity in the field of navigation. But they are not able to solve them by themselves. We have the responsibility to utilize the technology and make their life better. From that thinking, I took the project. But it is not an easy task. A rich dataset is very important with high-performance hardware. A very fast response is important for smooth navigation. The goal of this project was to develop a POC.
In this project, my motive was to solve the problem by developing an FPGA-based real-time embedded vision system capable of accurately identifying the objects surrounding the visually impaired and explaining the environment to him using text-to-speech. A blind person can hear the converted speech using his earphone. I intended to use Xilinx’s DPU (Deep Learning Processor Unit) IP and Python language to implement accelerated machine learning in FPGA fabric. As this project is part of the Eye On Intelligence Challenge I was bound to use Arty Z7 board in my project. One of the main parts of the project was object detection and I tried to implement DPU IP using Python to accelerate object detection. Unfortunately, I failed to successfully do that. One of the main reasons is official support was stopped. After several failed steps, I decided to implement the object detection part in the processing unit.
How the System Works
Let's explain my implementation in brief. Every complex digital system is a combination of hardware and software. The main hardware of the my system is Arty Z7, a Zynq-7000 SoC-based AMD FPGA board. All the processing is happening inside the board. A web camera is connected to capture the image of the front object. A custom YOLOv3 model is developed to detect the objects in the captured images.
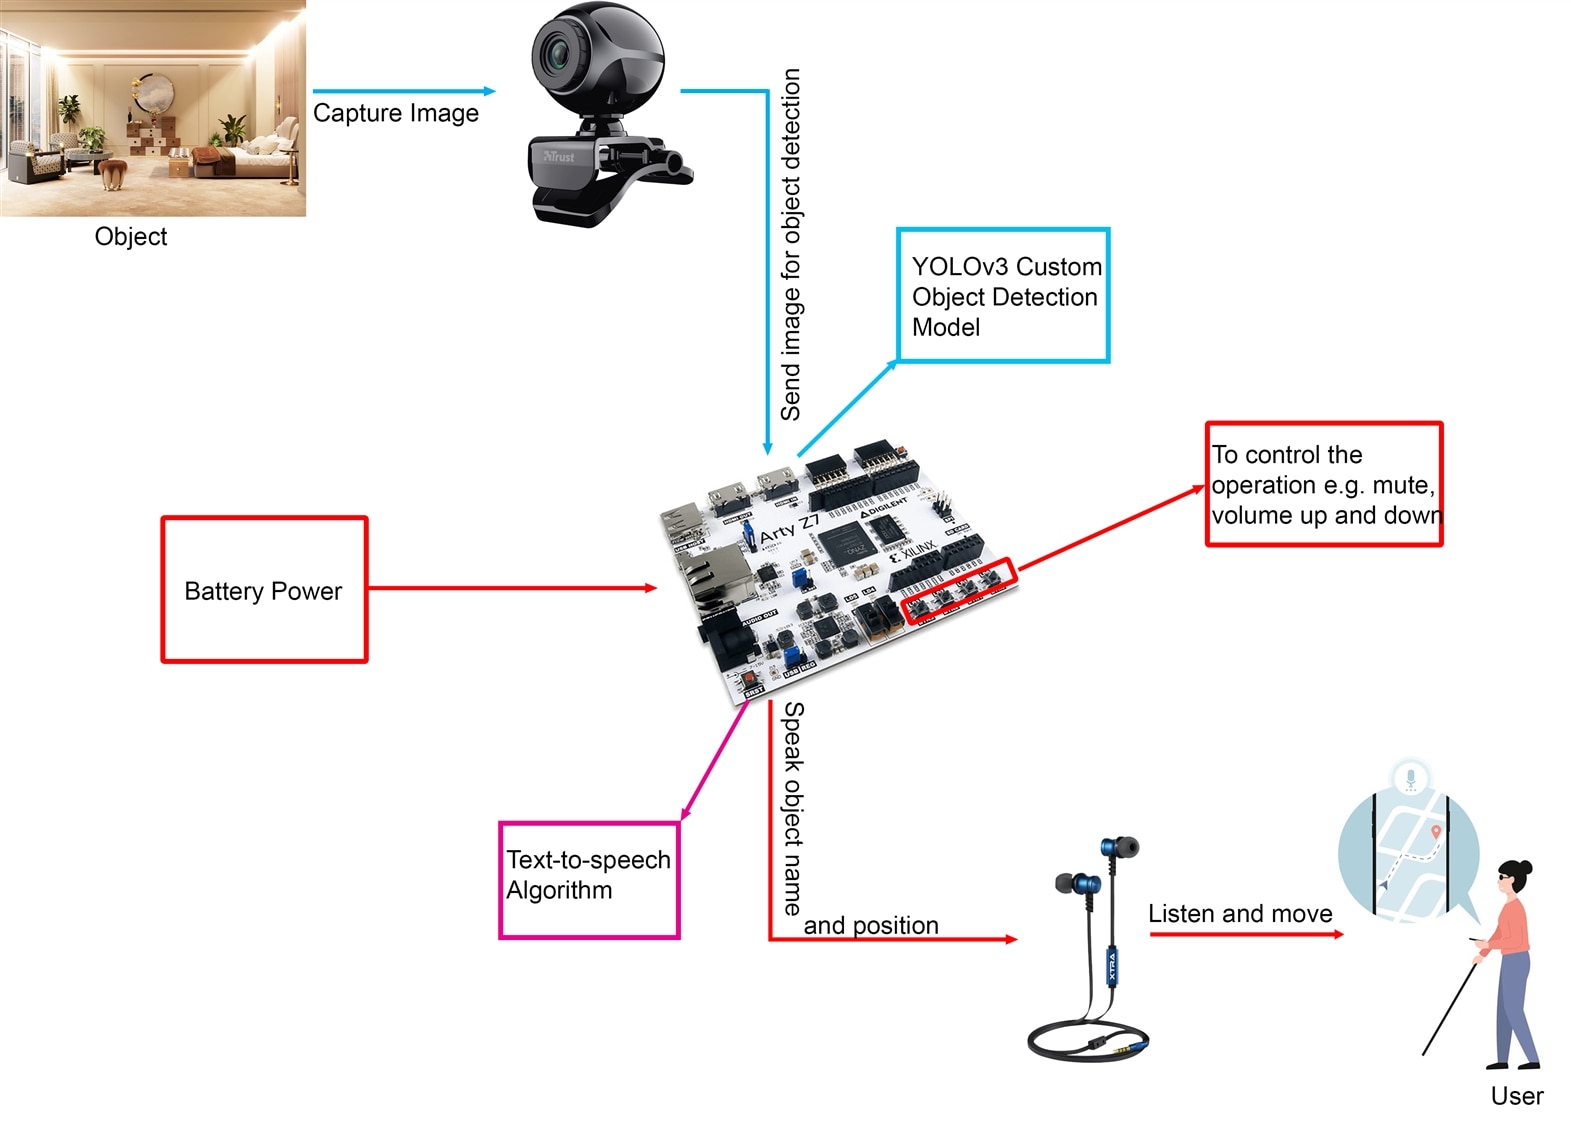
After the successful detection of the object information is converted to voice using a text-to-speech algorithm. It is then played to the headphones. The user listens to the voice and moves towards the goal accordingly. Four built-in buttons of the Arty Z7 board are used to control the operation such as controlling the audio volume. The above image illustrates the system.
Towards the Goal
Many steps are involved in a complex project like this Third Eye Project. When we start a project we may think to solve it in one way and the practical difficulties may lead us to follow another way. For example, in the beginning, I decided to implement DPU Overlay to accelerate image processing tasks. But when I tried to use the DPU Overlay in Arty Z7 board, I discovered that the official support of PYNQ DPU Overlay for the Zynq-7000 board is deprecated. So, I decided to use Petalinux and DNNDK for running the YOLOv3 object detection model on the Arty Z7 board. I spent many hours running the Yolo model in Zynq-7000 SoC but I was out of luck. So, I decided to use OpenCV and Python to run custom YOLO object detection model in the processing system part of the SoC with sacrificing the performance.
The following steps were involved throughout my work.
Step 1: Installing PYNQ to the Arty Z7 board
The Arty Z7 board came without any OS or software platform installed. But if we want to run Python we need to install the PYNQ Platform to the board. PYNQ (Python+Zynq), is an Open Source FPGA development platform from AMD® that makes it easier to use embedded machine learning applications using Zynq SoC. Using the Python language and libraries, we can exploit the benefits of programmable logic and microprocessors to build more capable and exciting electronic systems.
I downloaded the PYNQ image from the official link: http://www.pynq.io/boards.html for the PYNQ-Z1 board. This board is fully compatible with the Arty Z7 board. The downloaded file size was 1.7GB. I used a 32GB class 10 SD card to burn the PYNQ image using balenaEtcher.
I made the necessary jumpers configurations to the Arty Z7 board and inserted the SD card. To get network and internet connection I connected the Arty Z7 board to my router through an ethernet cable. Finally, I powered up the board and got everything working as expected.
I explain the process in detail in my first blog with some related images. You can check my first blog from here ( Blog #1: Third Eye for Blind - Overview).
Step 2: Controlling GPIO using Python
As I already mentioned, I used 4 buttons to control the operation of the system. Such as a user may want to increase or decrease the audio volume or even he may want to mute the audio. In that case, he/she can press the buttons to control the audio. He may like to adjust the distance to how far he wants to get to announce the object or wants to know the battery level. All these operations can be controlled using the button switches built into the board.
So, in the second step, I used Python and the base overlay to control the GPIO buttons and LEDs. At the same time, it was the first check that the board was responding with Python. I also utilized Matplotlib to draw some graphs and I was happy to see that everything was working perfectly. By that far I did not face any difficulties.
I explain my experiences and success regarding Buttons and LED control in my second blog. I added several images and videos to make everything clear to my readers. You can check my second blog from here ( Blog #2: Third Eye for Blind - Deep Dive into ZYNQ & PYNQ).
Step 3: Creating Custom Overlay
In my second blog, I used the official base overlay to play with buttons and LEDs. The overlay is very rich and user-friendly but of course, one overlay can not or should not satisfy all our requirements. So, you may need to modify a built-in overlay or create your own overlay to meet your demand efficiently. Xilinx has an excellent official PYNQ Overlay Tutorial where we can get the necessary guidelines on how to create a custom overlay. I took help from this guide to make my own overlay.
I started making a simple overlay related to doing some basic arithmetic operations on two integers data. I intended to finally modify the PYNQ DPU overlay for accelerating vision-related task with adding the GPIO controlling functionality. So, I started my journey with an easy step. Making that custom PYNQ Overlay was not tough for me. But I would say creating a custom PYNQ Overlay is not so easy. Several tools like Vitis HLS and Vivado are involved in the work.
For creating the calculator Overlay I wrote some C++ code in Vitis HLS and run C synthesis to export it as a Vivado IP.
void calculate(int a, int b, int& sum, int& sub, int& mul, int& div) {
#pragma HLS INTERFACE ap_ctrl_none port=return
#pragma HLS INTERFACE s_axilite port=a
#pragma HLS INTERFACE s_axilite port=b
#pragma HLS INTERFACE s_axilite port=sum
#pragma HLS INTERFACE s_axilite port=sub
#pragma HLS INTERFACE s_axilite port=mul
#pragma HLS INTERFACE s_axilite port=div

    sum = a + b;
	sub = a - b;
	mul = a * b;
	div = a / b;
}
The C code was not complex and the same was true for exporting RTL.
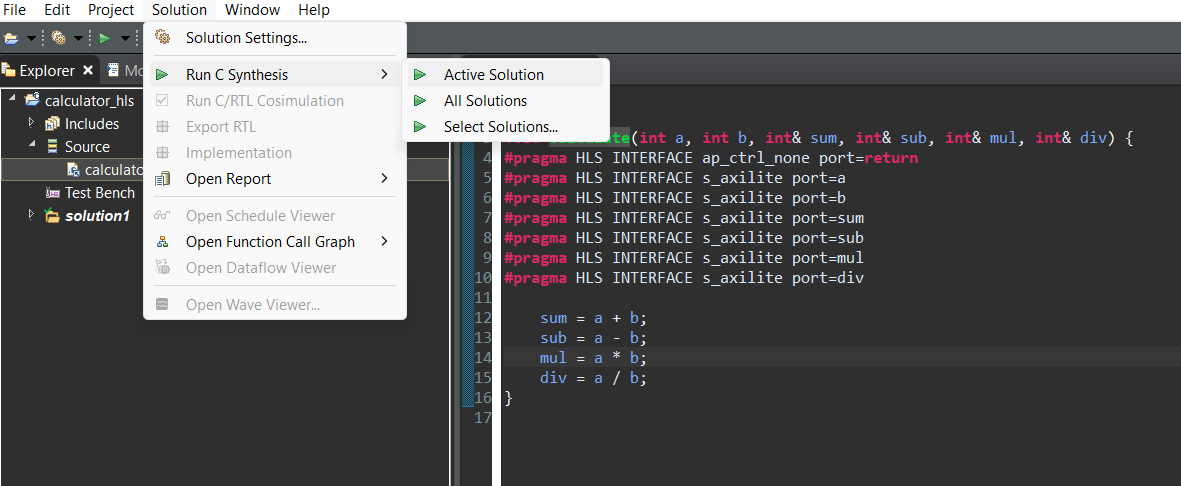
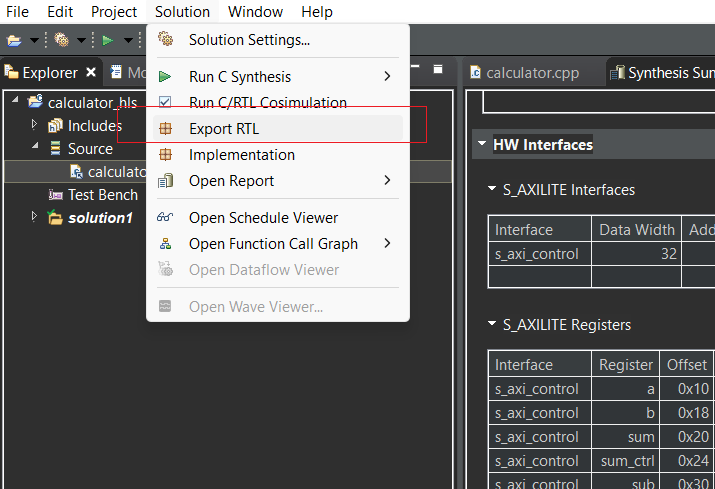
After exporting RTL I created the Overlay using Vivado. I imported the calculator IP as a block design in Vivado.
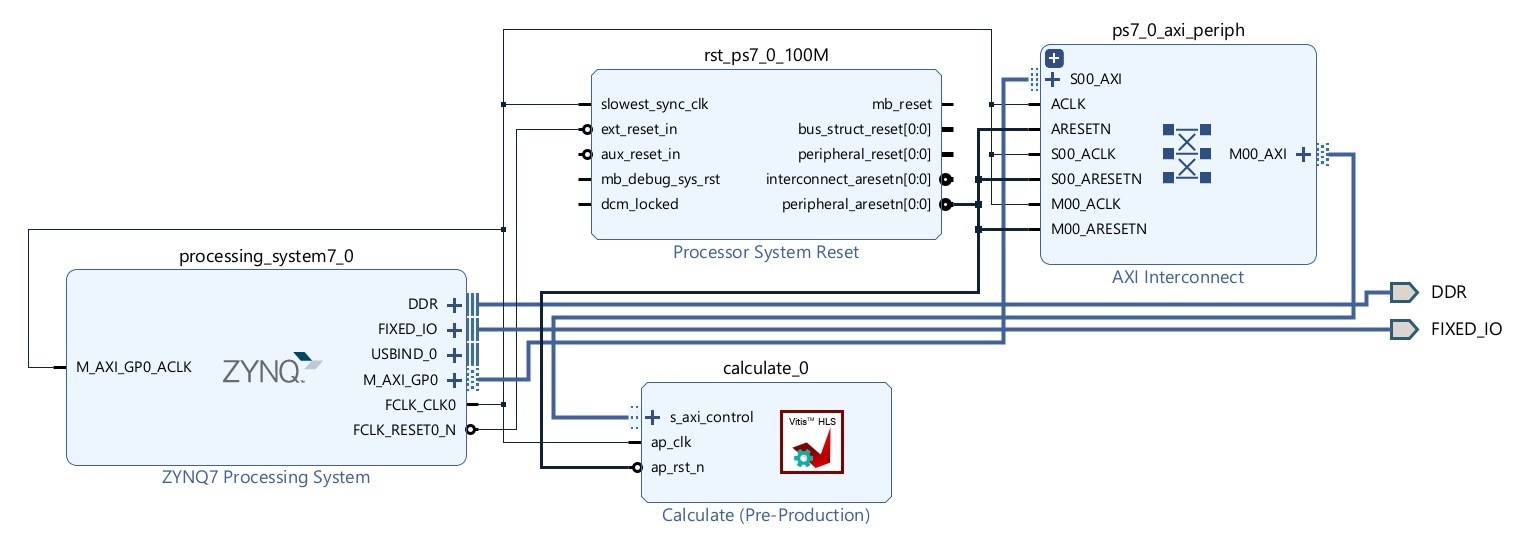
This custom IP block was added with other necessary IP blocks like the ZYNQ Processing System IP block and AXI Interconnect IP block. After the necessary connection and validation, the Bitstream was finally generated. The bitstream was transferred to the Arty Z7 board. Then I created a Python Notebook and wrote some code to test the Overlay using Python. I was successful in doing the necessary operations and the result was perfect!
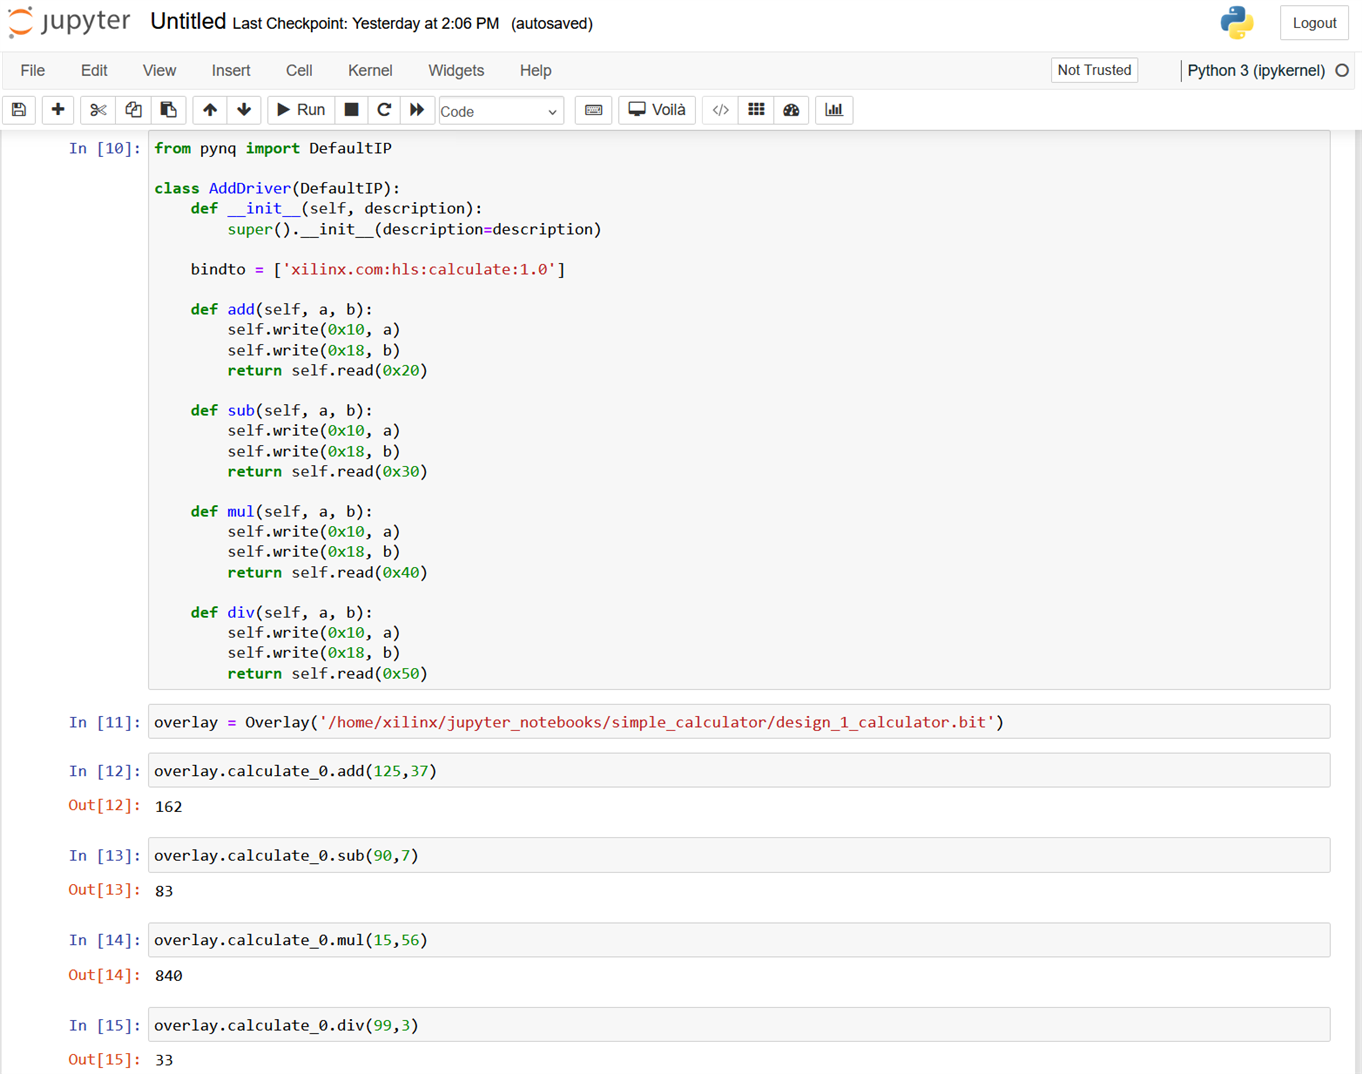
I wrote my full journey on creating the custom overlay in my third blog ( Blog #3: Third Eye for Blind - How to Make and Modify a PYNQ Overlay). You can get a clear understanding of the topic from my blog. I illustrated my work with lots of images and I also added a video on it.
Step 4: Journey towards DPU Overlay
That was the start of my hard time.
I have some practical experience working with the AMD Kria Robotics Starter Kit. I used Xilinx Deep Learning Processor Unit (DPU) Overlay for making one of my computer vision projects using that board. From that time I became a big fan of the DPU IP. DPU IP is a configurable computation engine dedicated to convolutional neural networks. It includes highly optimized instructions and supports most convolutional neural networks like VGG, ResNet, GoogleNet, YOLO, SSD, MobileNet, FPN, and others. I used the DPU Overlay and YOLOv3 to detect objects in real time. and I was surprised by the performance of the KR260 board with the DPU Overlay. So, I wanted to use the DPU Overlay to Zynq-7000 SoC.
I was able to successfully install the PYNQ DPU on my Arty Z7 board but when trying to install the example Notebook for DPU-PYNQ I got the following error:

The error was related to vart module. I tried to install 'vart' as I got the No module found error. After some research, I realized that the official PYNQ DPU is not available for Zynq-7000 SoC and there is possibly a performance-related issue.
I was looking for an alternative for running YOLOv3 on the Arty Z7 board. After doing some research I came to know about DNNDK by Xilinx to accelerate the development and implementation of Deep Neural Networks (DNN's) on Xilinx FPGA devices. This development kit was specially designed to take advantage of the power of parallel processing and reconfigurable flexibility of the FPGA's to accelerate machine learning tasks and DNN inference.
I found an excellent tutorial series that utilizes DPU IP for YOLO object detection model. I found the architecture below:
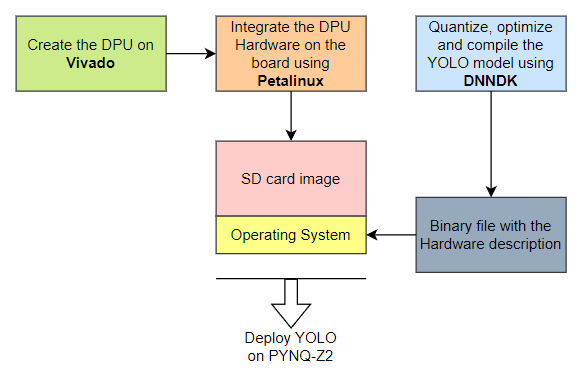
As per the diagram, we first need to develop the DPU on Vivado according to the architecture that suites the limitations of the board. After the development, we will have a collection of files relative to the project, including the binary file describing the DPU. Then we will integrate the DPU Hardware on a SD card image followed by the Operating System specs on Petalinux. Lastly, we will quantize, optimize and compile the YOLO model using DNNDK. Finally, we will have to do a little bit of programming to establish a connection between the DPU and the rest of the functions executed on the PS.
I followed the full tutorial series here (https://andre-araujo.gitbook.io/yolo-on-pynq-z2/dpu-implementation). For creating the DPU I installed Vivado 2020.1 in parallel to the latest version of Vivado and made the DPU IP.
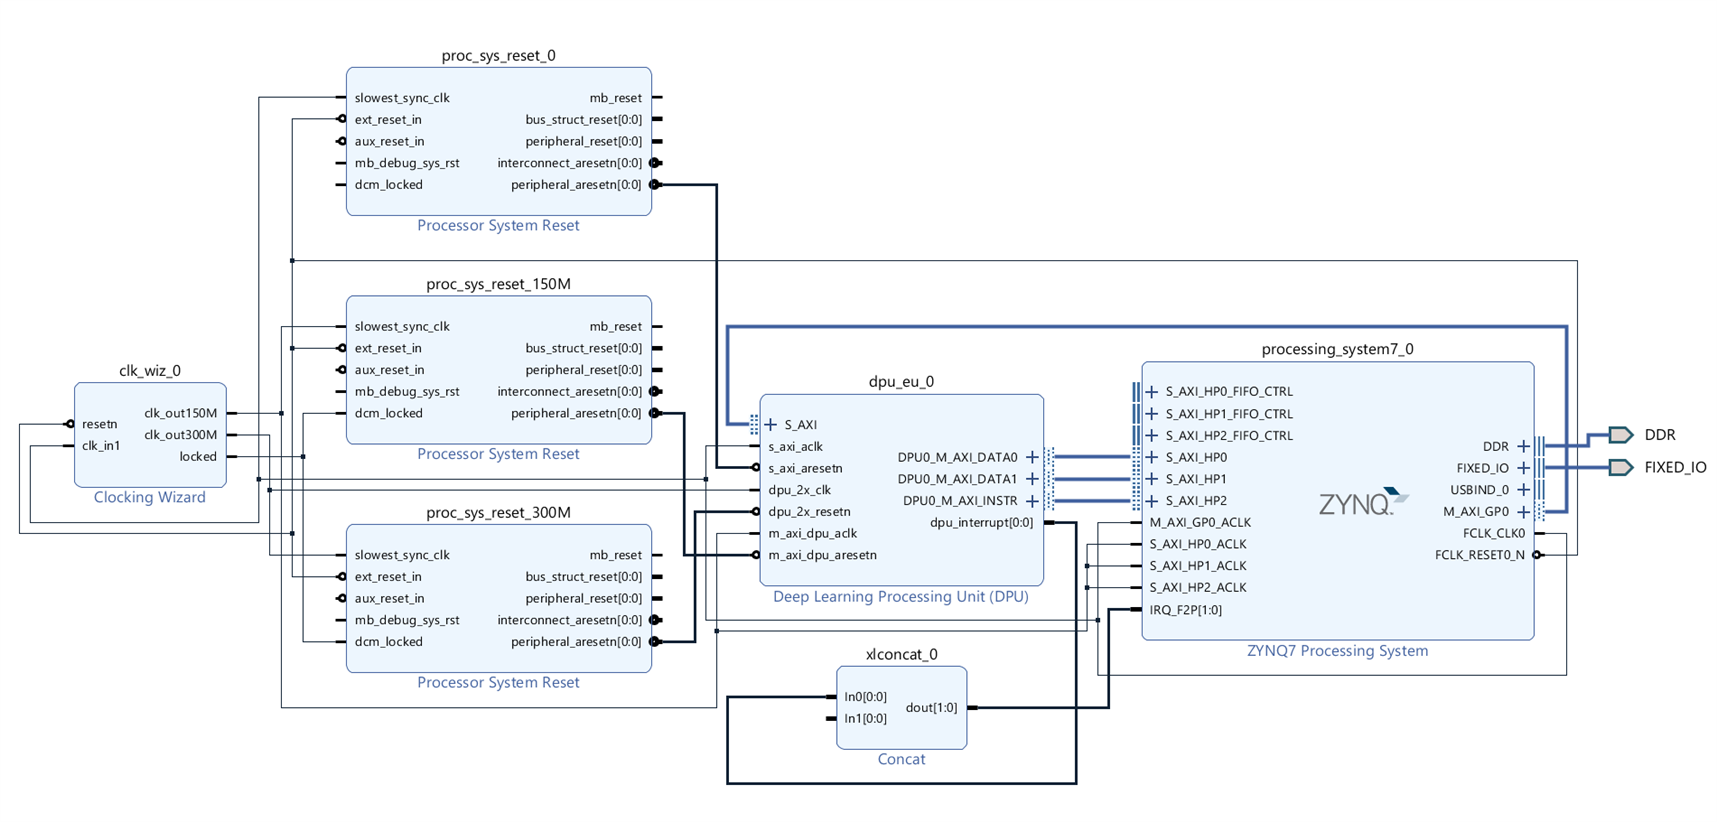
After generating the DPU bitstream in Vivado, the next step was to implement the designed DPU on an SD card image. To do so I had to use Petalinux. Petalinux allows us to create an SD card image with the Linux Operating System including required libraries, and it also holds the DPU hardware information to be sent to the Zynq-7020 chip.
So, I installed Petalinux on my Ubuntu Machine and created a successful Petalinux project for the Arty Z7 board. The Petalinux project ran successfully on my Arty Z7 board with all the peripherals support. It was successfully connected to the Internet.
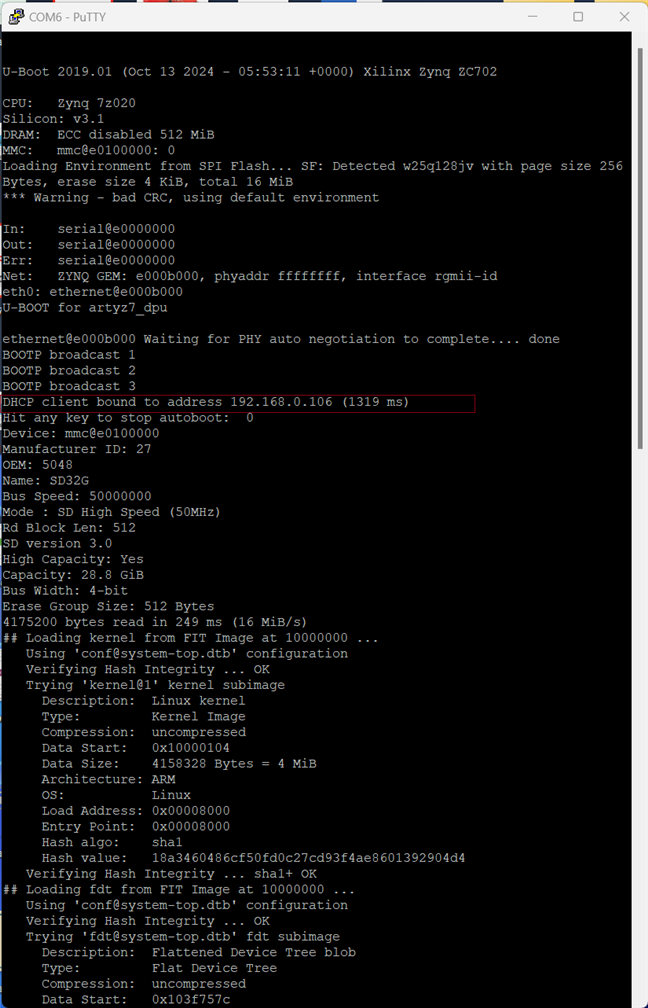
However, I was unsuccessful in the final step. When I tried to run the code after completing all the requirements my board got hanged every time. I tried with different codes and different models but the results were almost the same. After doing lots of experiments and spending several sleepless nights, I realized it could be very tough and time-consuming for me to solve the issue and get a successful output using my limited knowledge.
I explained and illustrated my elaborate journey regarding DPU implementation and Petalinux in my fourth blog. You can read the blog from here ( Blog #4: Third Eye for Blind - Object Detection using ZYNQ DPU and YOLOv3).
So, I decided to move in more common way. I decided to run YOLOv3 object detection model using Python and OpenCV without using the DPU.
Step 5: Object detection using YOLOv3, OpenCV and Python
In that stage, I tested a pre-trained YOLOv3 object detection model on the Arty Z7 board. I tested the model for both the downloaded image and the web camera image. I used the web camera that came with the challenger kit. That was the first time I used the camera with the kit and I was very happy with the image quality of the web camera. I was able to successfully detect the dogs from a downloaded image and the person while the web camera was facing me.
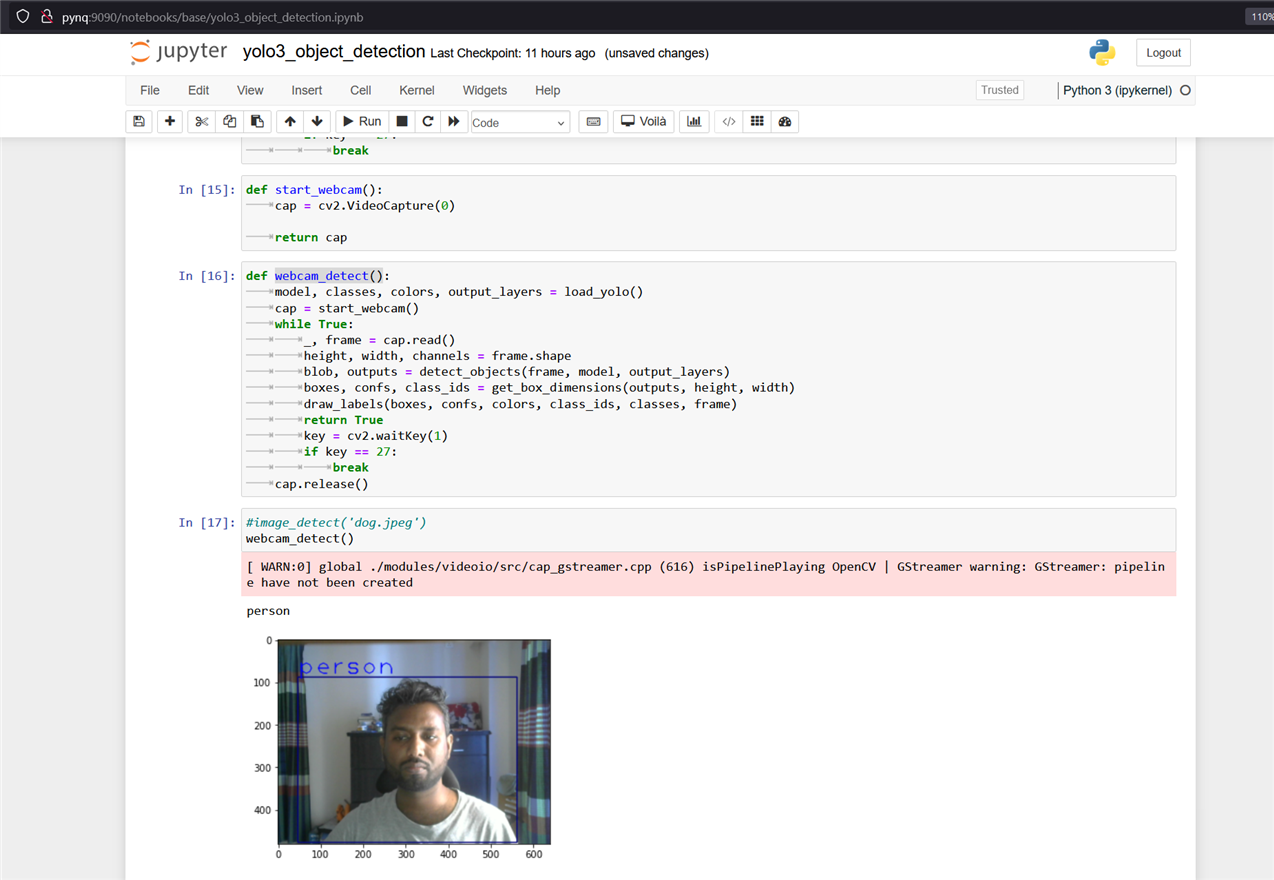
I used the Python OpenCV library, numpy, and Matplotlib for object detection and showing the result. I did not face any serious issues while writing and running the code. The object was also detected by the program but it was taking more time than expected. Detail for this step was illustrated in my fifth blog ( Blog #5: Third Eye for Blind - Training and Optimizing YOLOv3 Model for Object Detection) with the output and the result.
Step 6: Creating Custom YOLOv3 object detection model
A custom object detection model may be advantageous for better performance and rapid response. From that point, I focus my attention on making a custom YOLOv3 object detection model. For creating a custom model a rich dataset is very important. However, creating a good and useful dataset involves lots of time and effort. As it is a concept project it doesn't require such a professional response. So, I collected 50 images of each type to make a sample dataset for training and testing the model. Due to time limitations, I used the dataset for the indoor samples only like chairs, beds, basins, ovens, and refrigerators.
After collecting the images I annotate the photos in YOLO format using Lableimg. Then I used Google Colab and Python Notebook to train a model using my custom dataset. I explain the process in detail in my Blog 5. You can check the blog here ( Blog #5: Third Eye for Blind - Training and Optimizing YOLOv3 Model for Object Detection).
Step 7: Testing the Audio Output
One of the important tasks of the project is to convert detected text to audio, and then play that audio file. PYNQ base overlay is capable of recording and playing audio files in a speaker. The PYNQ image came with a sample notebook with audio recording and playing example. For checking the example notebook I connected a mini audio speaker with a built-in amplifier through the 3.5mm audio port of the Arty Z7 board as shown in the following figure.
I was able to play the sample audio file from the example notebook and the audio was very clear. Then I uploaded a wave file named BabyElephent.wav and played the file successfully. Below is the Python code.
from pynq.overlays.base import BaseOverlay
base = BaseOverlay("base.bit")
pAudio = base.audio

pAudio.load("BabyElephent.wav")
pAudio.play()
The reason for trying wave files is we can easily convert any text to a wave file using the Python library. The text to .mp3 conversion is more common but I was unable to play the mp3 file using the base overlay and Python. So, audio testing is successful.
Step 8: Installing Text-to-Speech Library
For converting the detecting object into audio speech we need a library that can convert any text to wav audio format. After trying multiple libraries finally, I was able to install pyttsx3 Python module that is capable to convert any text to wav audio file. I used the following command from the JupyterLab terminal:
pip install pyttsx3
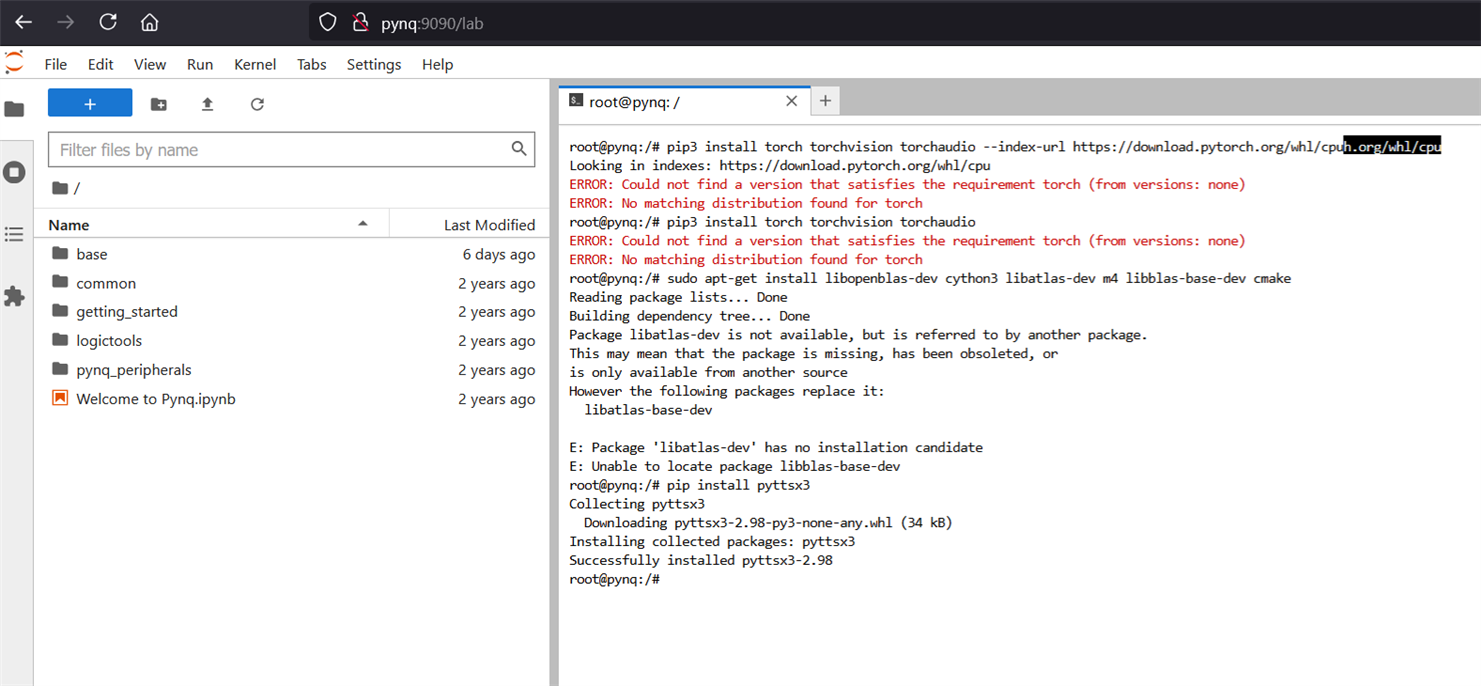
Then I wrote the following test code in my notebook and got an error shown in the screenshot below.
import pyttsx3
import wave

# Initialize the pyttsx3 engine
engine = pyttsx3.init()

# Set properties for the speech output (optional)
engine.setProperty('rate', 150)  # Speed of speech
engine.setProperty('volume', 1.0)  # Volume (0.0 to 1.0)

# Set the output file name
output_file = 'output.wav'

# Convert text to speech
text = "Hello, this is an example of text-to-speech conversion."
engine.save_to_file(text, output_file)

# Run the speech synthesis
engine.runAndWait()
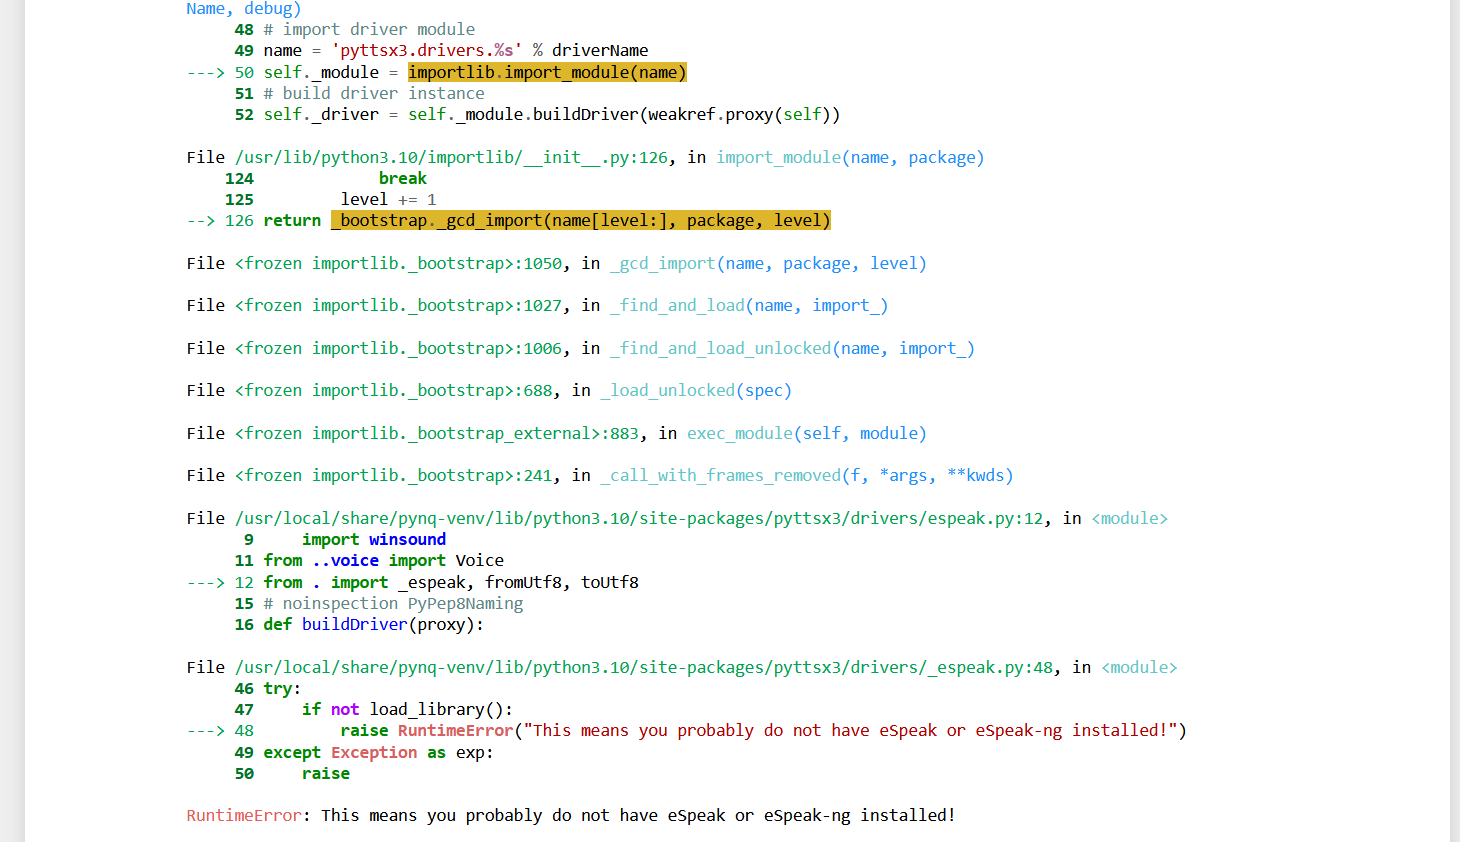
I solved the problem by installing eSpeak-ng module using the following command:
sudo apt-get install espeak-ng
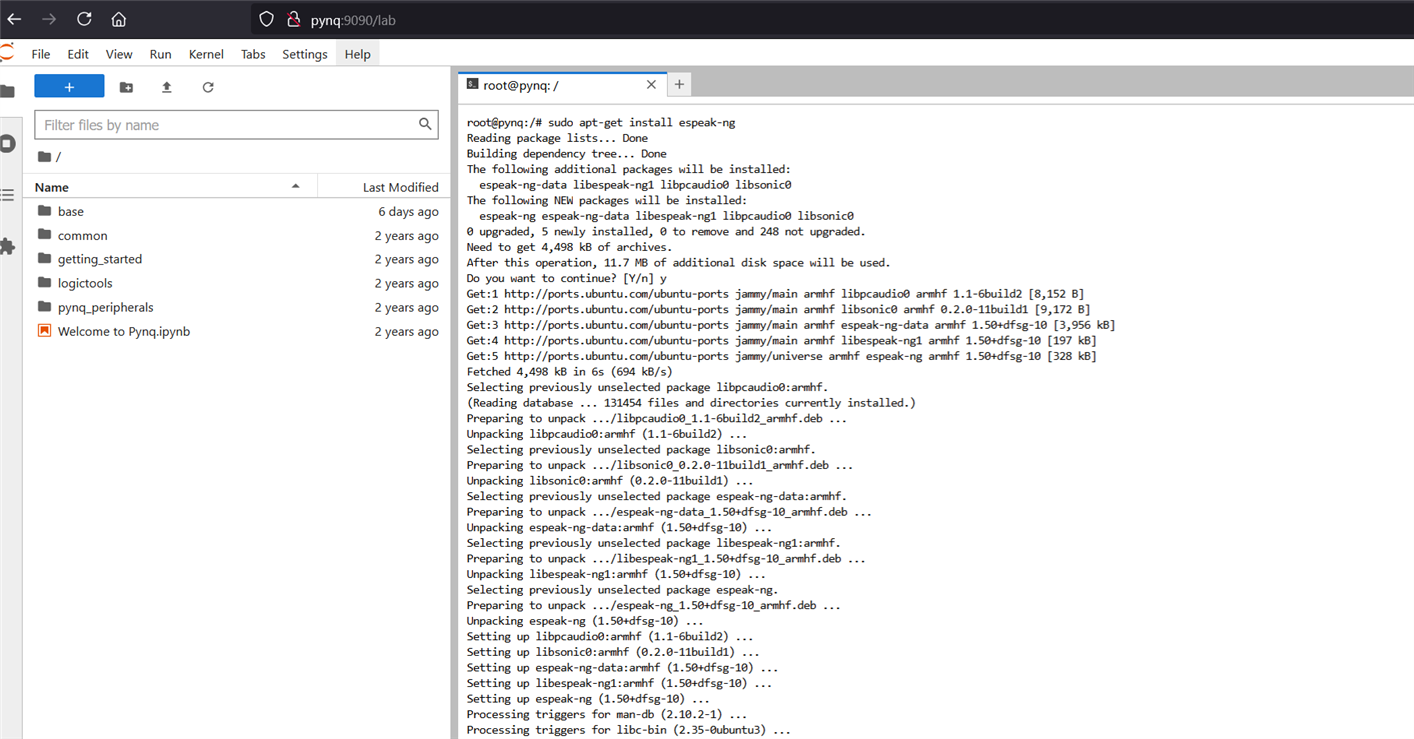
It solved the previous error but a new error appeared. The ffmpeg was not found.
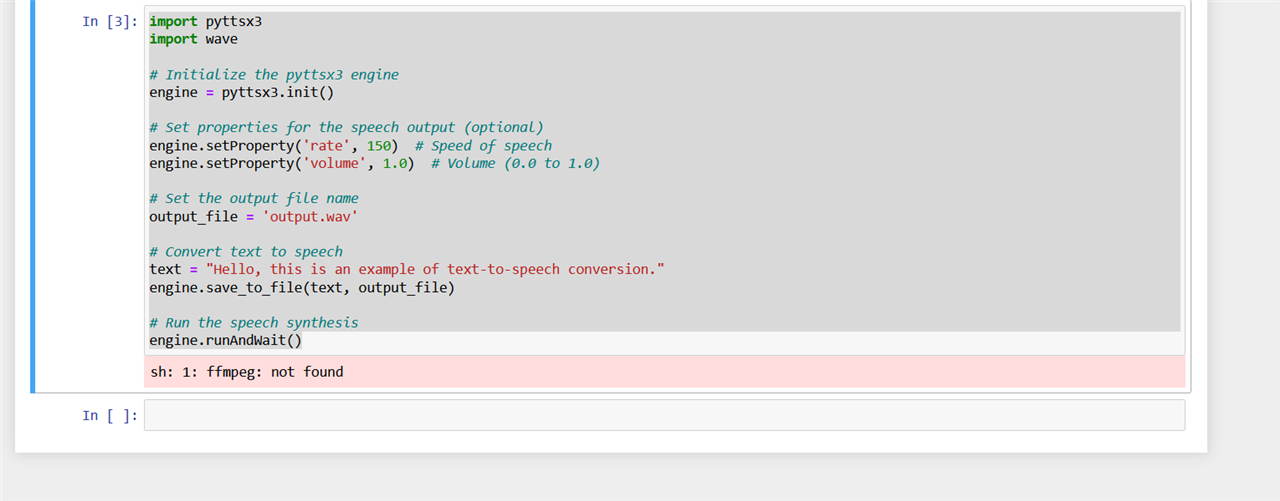
I installed ffmpeg using the following command:
sudo apt install ffmpeg
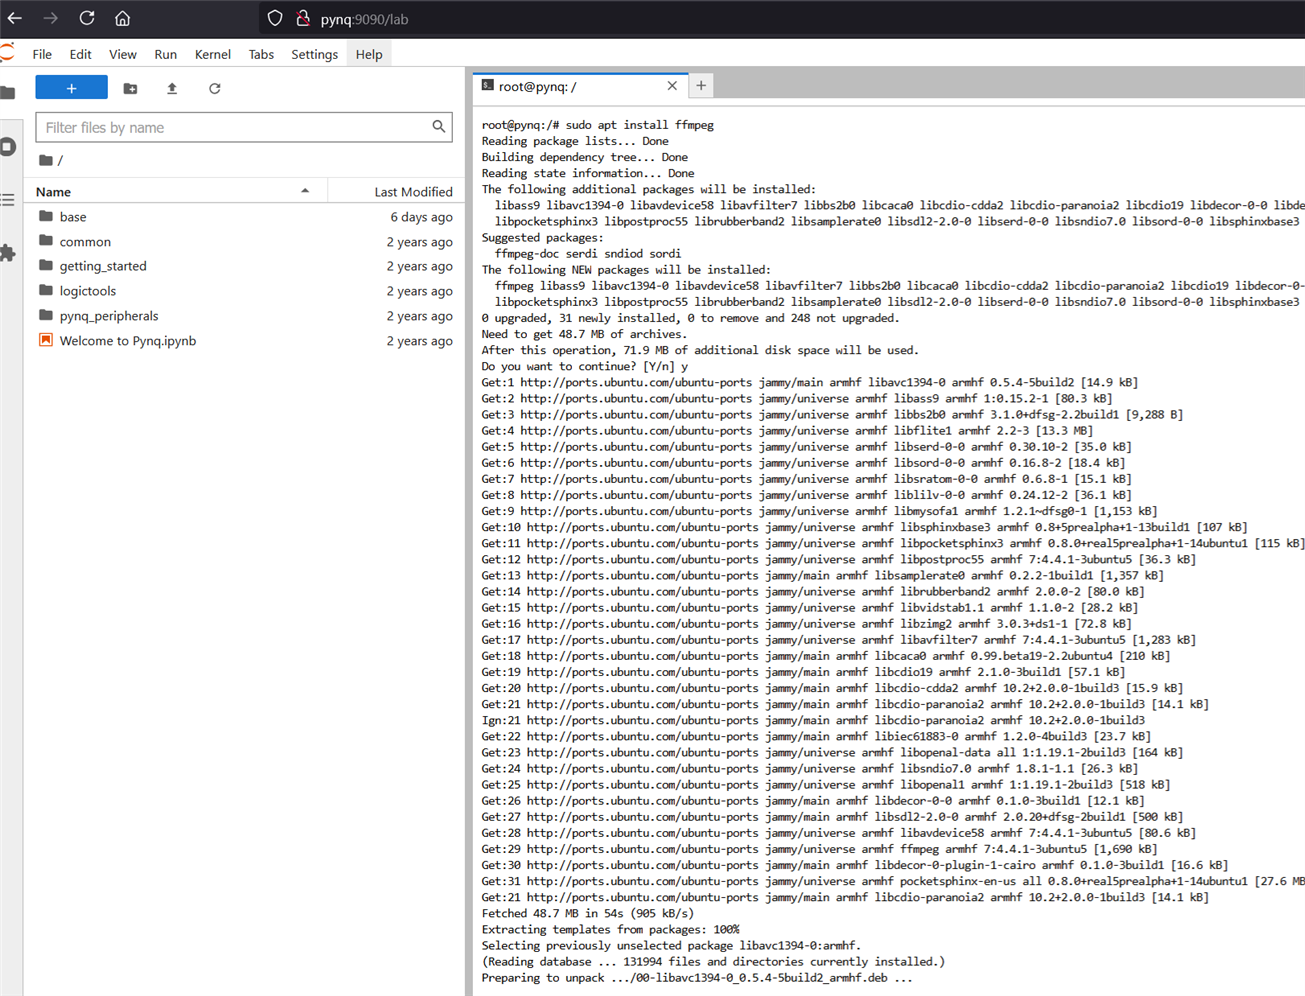
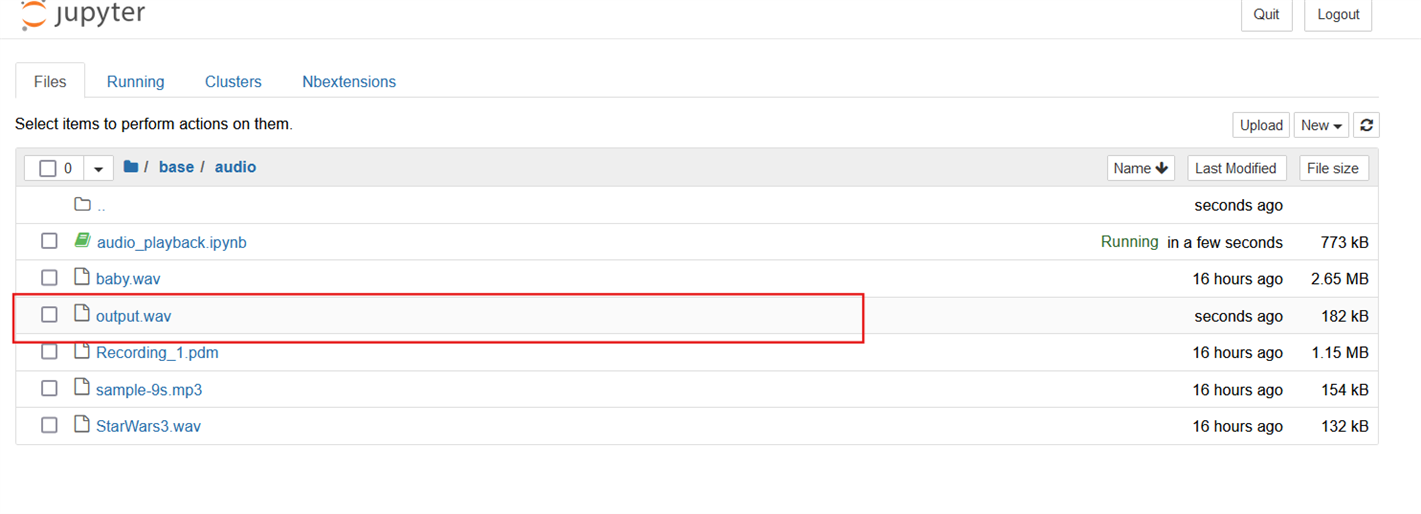
The problem was solved and the wav file was successfully generated from the text file:
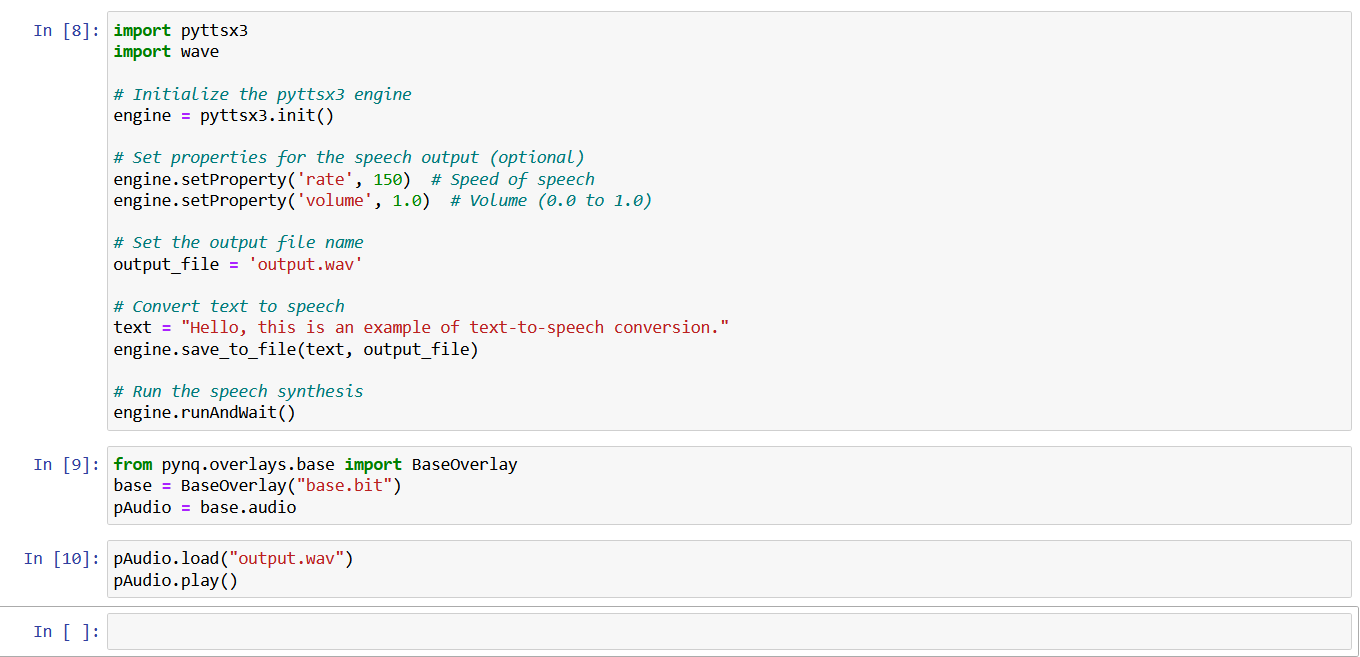
The following screenshot shows the test code:
Step 9: Compiling all the stuff together (The Final Step)
By the previous step, I had completed all the tasks of my project successfully. Now the only remaining task is to compile all the code together. I uploaded the full code to my GitHub. Following was the final hardware setup for my project.
Conclusion
It was really a big challenge to finish the project but finally, I did it. It would be more interesting If I could use the DPU to accelerate the vision part. But I will say It was the start of my big project. I want to make it more rich, effective, and user-friendly.
I have learned a lot from my work, especially about the FPGA and Zynq 7000 series SoC. I faced several difficulties while making my project and I learned from every difficulty.
Thank to all.
My Blog Series for this Project
- Blog #1: Third Eye for Blind - Overview
- Blog #2: Third Eye for Blind - Deep Dive into ZYNQ & PYNQ
- Blog #3: Third Eye for Blind - How to Make and Modify a PYNQ Overlay
- Blog #4: Third Eye for Blind - Object Detection using ZYNQ DPU and YOLOv3
- Blog #5: Third Eye for Blind - Training and Optimizing YOLOv3 Model for Object Detection


-

rsc
-
Cancel
-
Vote Up
0
Vote Down
-
-
Sign in to reply
-
More
-
Cancel
Comment-

rsc
-
Cancel
-
Vote Up
0
Vote Down
-
-
Sign in to reply
-
More
-
Cancel
Children