![]() BLOG#1 - My Idea - Case Enclosure Reliability Monitor
BLOG#1 - My Idea - Case Enclosure Reliability Monitor
A project utilizing 2 Arduino MKR WAN 1300 & 2 Enclosure Cases supplied by Hammond Manufacturing
This is my introduction blog post for this Design Challenge: Just Encase
My Idea
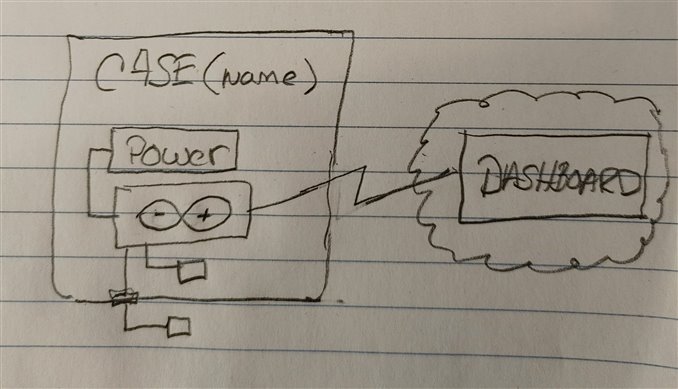
- Utilizing the Supplied components, i envision a monitoring dashboard that would report on the compliance of the supplied Case ratings over time.
- Data will be monitored from the inside and outside environments of the case.
- Data will be analyzed by the an Arduino IoT Cloud Dashboard setup to to report of the enclosure compliance ratings.
- The suppled 2 Arduino MKR WAN 1300 MCU will be placed inside of the case and used to collect the data and send it to the Dashboard for analysis.
- The supplied Sensors will be used to sense the environments inside and outside of the case.
- The data will be communicated over the Wide Area Network.
- The Dashboards exist in the cloud to be able to run from anywhere.
- A napkin diagram of my idea
- SO lets get to it, shall we.
My Goals for this Design Challenge
My main goal for this challenge will be to be able to implement my design idea, but in order to accomplish this task, I plan to also attain the following goals
Getting to understand enclosures.
- Enclosures have a rating used to specify the extent of protection an electrical enclosure has against environmental conditions.
- The Ingress Protection. IP rating, is used to rate the enclosures protection against solids and water on the contents of the enclosure.
- The IP Rating has 2 digits
- 1st signifies, protection from solid objects or materials.
- 2nd signifies, protection from water
- The 1554UGY enclosure
- is a Plastic Enclosure, Watertight, has a rating of IP66
- Ingress Protection: IP66 is as follows
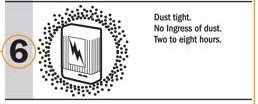
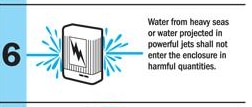
- It's limits are: cannot be submerged in water
- It will not allow dust in
- it is watertight and rain will not penetrate.
- The 1554H2GYCL enclosure
- Plastic Enclosure, Watertight, Polycarbonate, has a rating of IP68
- Ingress Protection Rating: IP68 is as follows.
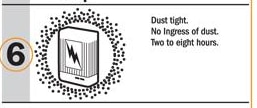

- It has the highest IP rating for water and can be completely submerged in water
- It has the same dust rating as the other enclosure and will not let dust particles in
- It is constructed of Polycarbonate with a Gasketed lid with two piece “tongue & groove” construction
- an Idea of mine is to use a dust particle Sensor to monitor the dust levels in both enclosures. a Water sensor could be used to detect moisture in the enclosures.
Getting to understanding the MKR WAN 1300 MCU.
- There pin configuration, usage, capabilities, setup, running tutorials.
- Getting status information from the MKR on temp, power etc.
- Use of the IDE and IoT cloud environments
- Arduino IoT Cloud,
- Dashboard will be implemented on the cloud
- A fellow challenger feiticeir0 , has a blog that does a great job at [Pool Water Monitoring] #3: Getting started with Arduino IoT Cloud
- Arduino Desktop IDE and/or Arduino WEB IDE
- Use new version of the IDE, Version 2
- Arduino IoT Cloud,
- Understanding Power to the MKR
- Understanding Sensor Hookup and Programming
Learning and Experimenting with LoRa
- Getting started
- Tutorials
- Do I need any extra components to the MKR WAN 1300 in order for it to work?
- Yes, you need an Dipole Pentaband Waterproof Antenna — Arduino Online Shop
- MKR to MKR via LoRaWAN
- MKR to IoT Cloud Via LoraRAN
Learning about the supplied Sensors
- Seeed Studio Grove Starter Kit
- How to get started
- How to connect to the Arduino?
- How to program it.
- Adafruit 642 Digital Temperature Sensor
- How to connect to Arduino
- How to program it
- Adafruit 412 Servo Motor
- How to connect to the Arduino
- how to program it
The Challenge Kit
- The challenge kit arrived Via UPS on Friday December 17, 2021
- The Challenge Kit Described
- The challenge kit included everything promised , Including 4 pairs of Cable Glands for the 2 enclosures.
- The kit contents and part numbers that follow
- Two Hammond Manufacturing Case enclosures.
- 1554 H2GYCL
- 1554 UGY
- Eight Hammond Manufacturing Cable Glands -- Two of each of the following part number
- 1427 NCGPG9G
- 1427 CG16
- 1427 NCGPG7G
- 1427 NCGPG11G
- Two Arduino MKR WAN 1300 development boards
- Sensors
- Seeed Studio Grove Starter Kit - Model # 68Y0155
- Adafruit 642 Digital Temperature Sensor - Newark Part #: 98Y0225
- Adafruit 412 Servo Motor - Newark Part #: 85W1681-
- Some additional parts purchased needed to implement my Idea
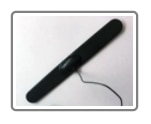
- 2 LoRa antennas Dipole Pentaband Waterproof Antenna from the Arduino shop
- A single solution to connect your smart devices to the Cloud. The antenna supports the GSM 850 / 900 / 1800 / 1900 MHz and UMTS bands. Designed for small devices, this antenna will work when used as wireless terminal, gateway, or access point. It is a ground plane independent design, housed in a robust waterproof plastic cover. It can be used outdoors in any kind of telemetry project, as well as for discreet in-vehicle installations. It comes with a high grade adhesive tape that allows the antenna to be attached to any surface. Please note, the antenna is not meant to be mounted on large metallic surfaces, since it would affect the antenna’s coverage. It works great on other materials such as glass, plastic, wood, or cardboard.
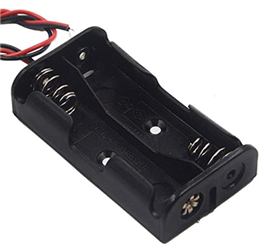
- A set of 3, 2 v AA battery holders from amazon
- https://www.amazon.com/dp/B07TB4HDYH?psc=1&ref=ppx_yo2_dt_b_product_details
- Specification:
- Type of AA Battery Holder: 2 aa battery holder, 2x 1.5V aa battery holder with wires
- Voltage Output of One Double A Battery Holder: 3V, 2 x 1.5v aa batteries = 3v aa battery holder
- Leads of 2 Cell AA Battery Holder: all the 2 aa battery holder with leads, they are tinned wire end
- Wires Length of 2 AA Battery Holder with Wires: 5.9"/15cm
- Wires Color of Battery Holders:
- red and black, the red cable contact the positive side of the aa battery holder pack, and the black cable contact the negative side of the 2 aa battery holder pack.
- red and black, the red cable contact the positive side of the aa battery holder pack, and the black cable contact the negative side of the 2 aa battery holder pack.
The Project Plan Blogs
Topics to be covered in each blog are listed in the following section. Section headings are links to the associated BLOG
Blog#2 Design (Case Enclosure Reliability Monitor)
- This blog will include the Design of my Idea.
- The idea is to conduct a number of test to determine if the Ingress Properties Ratings of each enclosure is met.
Blog#3 Implementation (Case Enclosure Reliability Monitor)
- This blog will include the implementation of the Basic Design described in the previous blog in this Series.
- This Basic Design will be used as the framework implement test that will be described in in the next 2 blogs in this Series.
Blog#4 Testing Part 1 (Case Enclosure Reliability Monitor)
- TEST 1 - Measure the Temperature outside of the Hammond Enclosure1554UGY
- The Blog includes following sections
- Description
- Wiring Diagram
- Software design
- Libraries
- Dashboard GUI Design
- Running the Test
- Outside the Enclosure
- Inside the Enclosure
- Running test by putting the case into different environments.
Blog#5 Testing - Part 2 (Case Enclosure Reliability Monitor)
- This is my 2nd Test, using the Hammond Enclosure 155H2CYCL
- TEST# 2 - Measure the Environment within the Waterproof Enclosure 1554H2GYCL
- The Blog includes following sections
- Description
- Wiring Diagram
- Software design
- Libraries
- Dashboard GUI Design
- Running the Test
- Placing the Design inside the 1554H2GYCL
- Running test by putting the case into different environments.
Blog#6 Conclusion (Case Enclosure Reliability Monitor)
- Conclusions
- I give some conclusions as to what I have gained from this Design Challenge
- I answer some questions
- Did everything work as designed?
- What were the biggest hurdles you had to overcome?
- Future Enchantments
- I list some possible enhancements that can be added to make the system more useful.

Top Comments
-

skruglewicz
-
Cancel
-
Vote Up
0
Vote Down
-
-
Sign in to reply
-
More
-
Cancel
Comment-

skruglewicz
-
Cancel
-
Vote Up
0
Vote Down
-
-
Sign in to reply
-
More
-
Cancel
Children