


Table of Contents
Introduction
A color sensor is a type of transducer that converts one form of energy into another form. Digilent PMOD color module is used for the project, which is paired with a circuit through an analog to digital converter. Then a MiniZed single board computer can process the digital version of color for many different applications, such as Internet of Things (IoT) applications. A simple WiFi webserver will display the color codes from PMOD color module with color detected as the webserver background.
Project Structure
- Color sensor webserver top level structure
There are two systems in the project: IoT webserver and IoT Web browser as below.

Figure 1: MiniZed PMOD Color Sensor Webserver Concept Diagram
IoT webserver system includes:
a. AMD/Xilin Zynq FPGA and Mutrata BCM 4343W WiFi module on MiniZed platform,
b. PMOD color sensor and a PMOD switch module: color sensor and LED PWM dimming control.
IoT web browser system includes:
a. A WiFi router
b. An Ethernet connected Windows 10 PC.
2. TCS34725 Color Sensor
The core part of Digilent PMOD color sensor is TCS34725, which is a light-to-digital converter. There are a 3X4 photodiode array, four ADCs, some data registers, a state machine and an I2C interface on TCS34725. The 3X4 photodiode array is composed of red-filtered, green-filtered, blue-filtered, and clear(unfiltered) photodiodes. In addition, the photodiodes are coated with an IR-blocking filter. The four integrated ADCs simultaneously convert the amplified photodiode currents to a 16-bit digital value. Upon completion of a conversion cycle, the results are transferred to the data registers, which are double-buffered to ensure the integrity of the data. All of the internal timing, as well as the low-power wait state, is controlled by the state machine.
2-wire I2C communication with up to 400kHz is the interface between MiniZed and PMOD color sensor.
The principle of detecting color from a subject is based on reflectance property of a colored surface, as illustrated in Figure 2.

Figure 2: Basic Principle of Color Sensor
When applying a light source on a subject, the surface will reflect a specific spectrum while absorbing all the other spectra. The success of a color sensor by reflection depends on the detector, the illumination of the light and the subject. The detailed information about the sensor structure and theory can be found from Ref[2].
3. FPGA Hardware Design of MiniZed PMOD Color Sensor Webserver
Avnet Path to Programmable 3 provides a great framework for this project. I already provided some introductory blogs on the training and flows. Please check the links at the bottom of the report. The overview of the FPGA design diagram is presented at Figure 3.
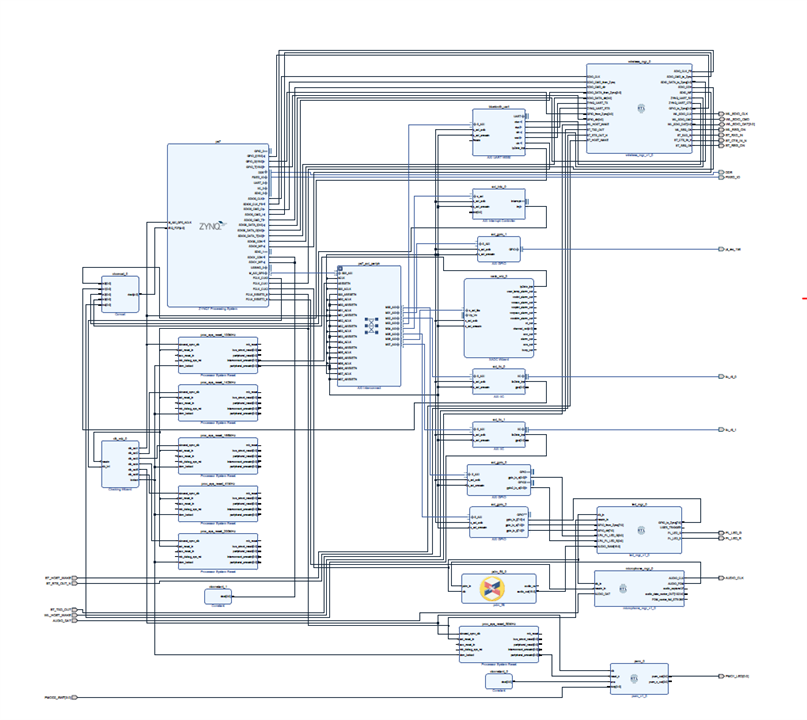
Figure 3: MiniZed PMOD Color Sensor Webserver FPGA Diagram
AXI_IIC_1 is the interface between Zynq FPGA and PMOD color module on PMOD1. I add a PWM VDHL module into Zynq FPGA for LED dimming control. The reference design of PWM VHDL is from DigiKey TechForum(Ref[3]). Digilent PMOD_SWT will be attached to PMOD2 for LED dimming control. Digilent PMOD color module has one dimmable LED for light source. There are 4 switchers on the PMOD_SWT module, so 4-bit resolution is configured for PWM duty cycle control.
The theory of PWM dimming control is well documented at Ref[3]. 50MHz clock is applied as the system clock of PWM VHDL module. 1Khz is configured frequency of PWM signal. The bit resolution defines the resolution of the pulse width. For 4-bit resolution PWM duty cycle control design here, the pulse width has resolution at 16. The finest possible pulse width adjustment is the period (i.e. 1/ pwm_freq) divided by 16. The parameter phases sets the number of outputs and their relation to one another. The number of PWM outputs means phases, and these outputs are 360°/phases out-of-phase with one another.
Figure 4 presents the VHDL module implemented at Vivado 2021 GUI diagram. Figure 5 shows how to configure the parameters for PWM VHDL module.

Figure 4: PWM VHDL Module for Dimmable LED
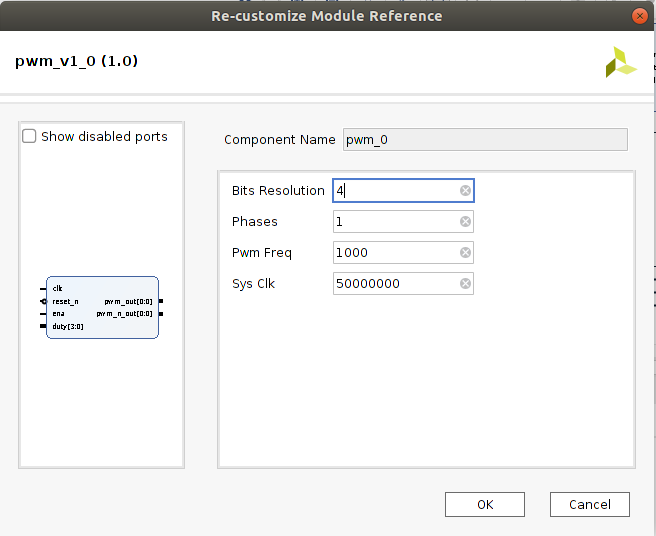
Figure 5: PWM VHDL Module Configuration
Final report for MiniZed FPGA hardware report:
| {gallery}MiniZed_FPGA_HW_report |
|---|
|
|
|
REPLACE THIS TEXT WITH YOUR IMAGE
|
|
MiniZed_HW_Timing |
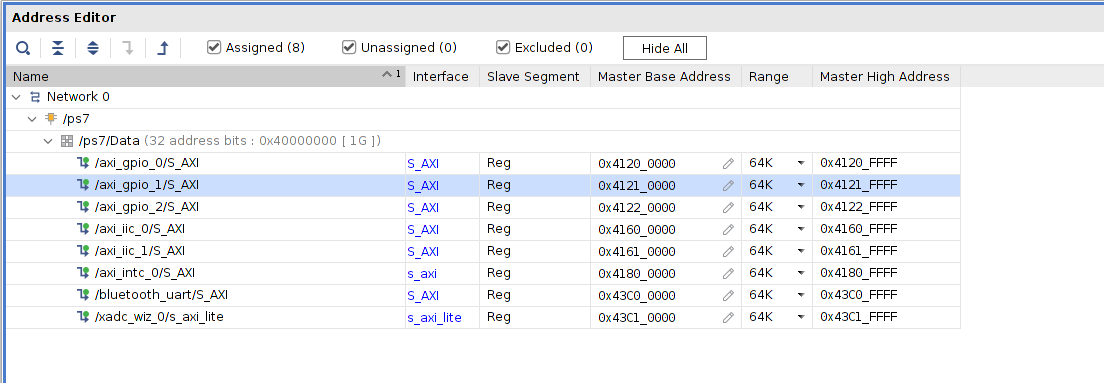 MiniZed_HW_Mem_map
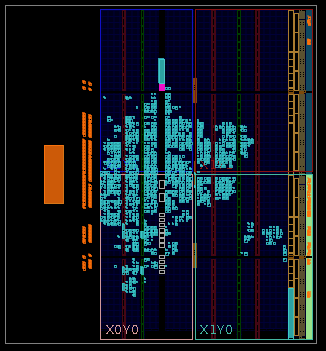 MiniZed_Webser_FPGA_resource_report
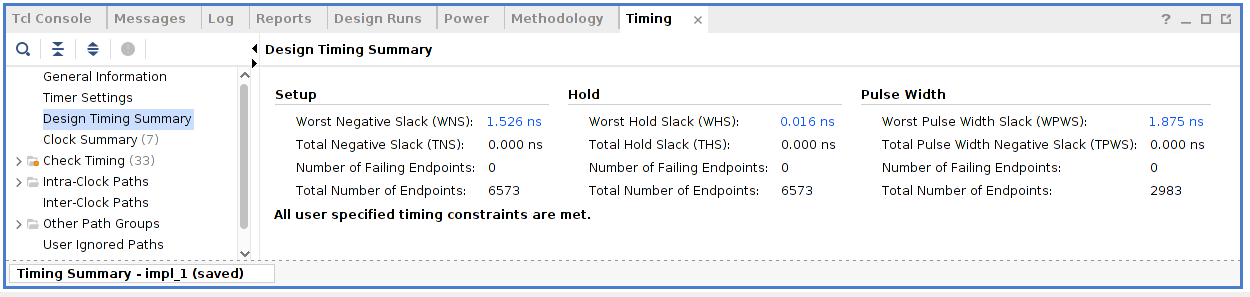
4. PMOD Color Sensor Linux APIs on MiniZed
Embedded Linux on Zynq FPGA is a very big task in the project, which is one of the top goals I joined this design challenge. After reviewing my design objectives and the constraints of each modules on MiniZed platform, I decided to carry over the Petalinux flow from Avnet MiniZed Training Courses 2021.1 into the project because the WiFi module for IoT applications has to be implemented under Linux OS. I did not plan to use PYNQ framework on MiniZed this time. So an updated Petalinux flow from Avnet framework needs is required.
I started to implement Digilent PMOD color module from Vitis 2021.1 standalone application on MiniZed platform. Then I ported Vitis 2021.1 standalone application into Petalinux color sensor driver, which worked well. After I reviewed webserver training materials from Avnet MiniZed training Courses 2021.1, I realized that I did need either PYNQ or Python for both PMOD color sensor API and webserver design. However Avnet webserver design framework did not fit in my project very well, so I finally decided to design a webserver from a scratch for this project. It is my first time to develop a webserver/website for any projects.
4.1 Digilent PMOD color sensor standalone API on MiniZed
Digilent provided a framework for many PMOD modules developed by them. A quick prototype bench testing under Vitis 2021.1 standalone API is very straightforward on MiniZed platform.
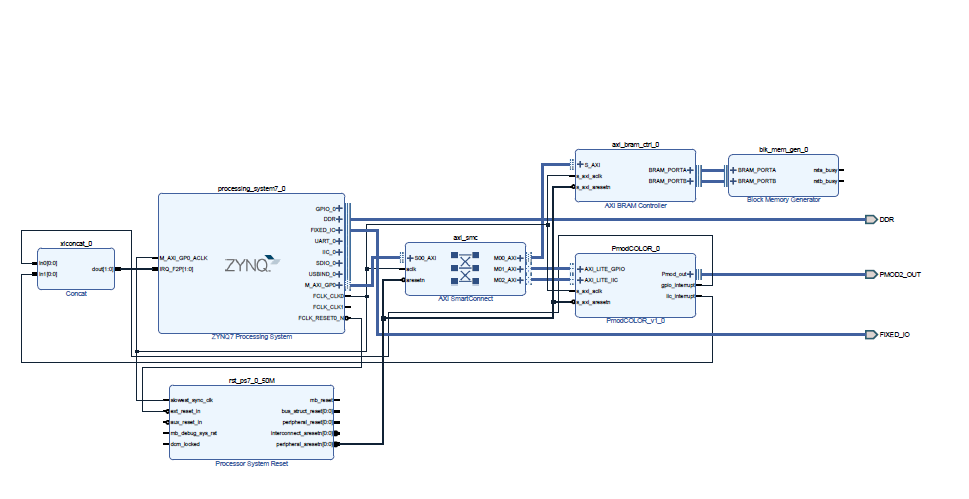
Figure 6 : Digilent PMOD Color Module Standalone FPGA Diagram
MiniZed prototype bench testing is ploted at Figure 7.

Figure 7: Digilent PMOD Color Module Standalone API Running on MiniZed
Notes for Digilent PMOD library: it is not a good path to integrate them into Xilinx Petalinux flow due to device tree development and driver compatibilities between Vitis standalone API and Xilinx Linux library.
4.2 Digilent PMOD color sensor: Petalinux API
AMD/Xilinx does provide a lot of Linux drivers on Zynq FPGA platform. I did migrate Digilent PMOD color module standalone driver into Zynq Linux OS after taking the training class of Integrating Sensors on MiniZed with PetaLinux. Here is the snapshot of PMOD_color Linux API running on MiniZed Petalinux 2021.1.
Source codes of this part will be commited into my github repo. The Petalinux did let my PMOD color API run on MiniZed as Figure 8.

Figure 8: Digilent PMOD Color Module Petalinux API Running on MiniZed
4.3 Using Python3 to develop Digilent PMOD color sensor API
Xilinx/AMD Petalinux 2021.1 provides a framework for Python3 application development. I configure the kernel with I2C SMBUS for Python3 development as Figure 9.
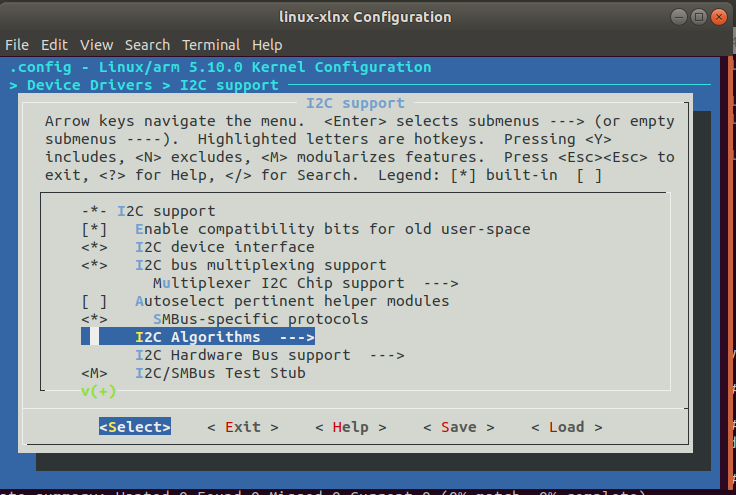
Figure 9: Configure SMBUS for I2C at Petalinux Kernel
Ref[4] is a good reference to for Python 3 drivers of TCS34725, which targeted on Raspberry Pi platform. I am able to use TCS34725 Python driver from Ref[4] for MiniZed Petalinux tool chain with a little bit tinkering work.
from flask import Flask, render_template, request
from TCS34725 import TCS34725
import http.server
import socketserver
import logging
import cgi
import sys
import re
import subprocess
import time, struct
# Flask constructor
app = Flask(__name__)

sys.path.insert(1, '/usr/local/bin/gpio')
from gpio_common import gpio_map

PsButtonPortnumber  = gpio_map['PS_BUTTON'].gpio
PS_RedPortnumber    = gpio_map['PS_R'].gpio
PS_GreenPortnumber  = gpio_map['PS_G'].gpio
PL_RedPortnumber    = gpio_map['PL_R'].gpio
PL_GreenPortnumber  = gpio_map['PL_G'].gpio
EnableMicPortnumber = gpio_map['PL_MIC1'].gpio


Light=TCS34725(0X29, debug=False)
if(Light.TCS34725_init() == 1):
    print("TCS34725 initialization error!!")
else:
   print("TCS34725 initialization success!!")

try:
    Light=TCS34725(0X29, debug=False)
    if(Light.TCS34725_init() == 1):
        print("TCS34725 initialization error!!")
    else:
        print("TCS34725 initialization success!!")
    time.sleep(2)
    while True:
        print ("\nProgram start")
        ID=Light.Read_ID()
        print("Read_ID: %x "%ID),
        Light.Get_RGBData()
        print ("\nProgram get rgb data")
        print("R: %d "%Light.R),
        print("G: %d "%Light.G),
        print("B: %d "%Light.B),
        Light.GetRGB888()
        print("RGB888R: %d "%Light.RGB888_R),
        print("RGB888G: %d "%Light.RGB888_G),
        print("RGB888B: %d "%Light.RGB888_B),
        print("RGB888C: %#x "%Light.C),
        #flyingbean
        #test_data=Light.RGB888_R,

        #print(type(test_data)),
        #print("test_data: ",test_data[0]),
        #print("test_data rounding: ",round(test_data[0])),
        #test_data_hex= int((test_data[0])) ,
        #print(type(test_data_hex)),
        #print("test_data rounding: %x",(test_data_hex[0])<<1),

        #flyingbean
        reg_RGB888_R= Light.RGB888_R,
        Hex_RGB888_R= int(reg_RGB888_R[0]),
        reg_RGB888_G= Light.RGB888_G,
        Hex_RGB888_G= int(reg_RGB888_G[0]),
        reg_RGB888_B= Light.RGB888_B,
        Hex_RGB888_B= int(reg_RGB888_B[0]),
        print("Hex_RGB888_R : %#x"%Hex_RGB888_R),
        print("Hex_RGB888_G : %#x"%Hex_RGB888_G),
        print("Hex_RGB888_B : %#x"%Hex_RGB888_B),

       # Light.GetRGB565()
        #print("RGB565: %#x "%Light.RG565),
        #print("RGB565 R: %d "%Light.RG565_R),
        #print("RGB565 G: %d "%Light.RG565_G),
        #print("RGB565 B: %d "%Light.RG565_B),
       #print("RGB888: %#x "%Light.RGB888),
        print("LUX: %d "%Light.Get_Lux()),
        print("CT: %dK "%Light.Get_ColorTemp()),
        print("INT: %d "%Light.GetLux_Interrupt(0xff00, 0x00ff)),
        time.sleep(1);

except:
    #GPIO.cleanup()
    print ("\nProgram end")
    exit()
TCS34725 Python driver source code:
#!/usr/bin/python

import time
import math
import smbus
#import pygame
#import RPi.GPIO as GPIO


#GPIO

LED     = 18
INT_PORT= 17

TCS34725_R_Coef     = 0.136
TCS34725_G_Coef     = 1.000
TCS34725_B_Coef     = -0.444
TCS34725_GA         = 1.0
TCS34725_DF         = 310.0
TCS34725_CT_Coef    = 3810.0
TCS34725_CT_Offset  =1391.0

class TCS34725:
    Gain_t = 0
    IntegrationTime_t = 0

    TCS34725_CMD_BIT        = 0x80
    TCS34725_CMD_Read_Byte  = 0x00
    TCS34725_CMD_Read_Word  = 0x20
    TCS34725_CMD_Clear_INT  = 0x66

    TCS34725_ENABLE         = 0x00
    TCS34725_ENABLE_AIEN    = 0x10    # RGBC Interrupt Enable
    TCS34725_ENABLE_WEN     = 0x08     # Wait enable - Writing 1 activates the wait timer
    TCS34725_ENABLE_AEN     = 0x02     # RGBC Enable - Writing 1 actives the ADC, 0 disables it
    TCS34725_ENABLE_PON     = 0x01    # Power on - Writing 1 activates the internal oscillator, 0 disables it
    TCS34725_ATIME          = 0x01    # Integration time
    TCS34725_WTIME          = 0x03    # Wait time (if TCS34725_ENABLE_WEN is asserted)
    TCS34725_WTIME_2_4MS    = 0xFF    # WLONG0 = 2.4ms   WLONG1 = 0.029s
    TCS34725_WTIME_204MS    = 0xAB    # WLONG0 = 204ms   WLONG1 = 2.45s
    TCS34725_WTIME_614MS    = 0x00    # WLONG0 = 614ms   WLONG1 = 7.4s
    TCS34725_AILTL          = 0x04    # Clear channel lower interrupt threshold
    TCS34725_AILTH          = 0x05
    TCS34725_AIHTL          = 0x06    # Clear channel upper interrupt threshold
    TCS34725_AIHTH          = 0x07
    TCS34725_PERS           = 0x0C    # Persistence register - basic SW filtering mechanism for interrupts
    TCS34725_PERS_NONE      = 0b0000  # Every RGBC cycle generates an interrupt
    TCS34725_PERS_1_CYCLE   = 0b0001  # 1 clean channel value outside threshold range generates an interrupt
    TCS34725_PERS_2_CYCLE   = 0b0010  # 2 clean channel values outside threshold range generates an interrupt
    TCS34725_PERS_3_CYCLE   = 0b0011  # 3 clean channel values outside threshold range generates an interrupt
    TCS34725_PERS_5_CYCLE   = 0b0100  # 5 clean channel values outside threshold range generates an interrupt
    TCS34725_PERS_10_CYCLE  = 0b0101  # 10 clean channel values outside threshold range generates an interrupt
    TCS34725_PERS_15_CYCLE  = 0b0110  # 15 clean channel values outside threshold range generates an interrupt
    TCS34725_PERS_20_CYCLE  = 0b0111  # 20 clean channel values outside threshold range generates an interrupt
    TCS34725_PERS_25_CYCLE  = 0b1000  # 25 clean channel values outside threshold range generates an interrupt
    TCS34725_PERS_30_CYCLE  = 0b1001  # 30 clean channel values outside threshold range generates an interrupt
    TCS34725_PERS_35_CYCLE  = 0b1010  # 35 clean channel values outside threshold range generates an interrupt
    TCS34725_PERS_40_CYCLE  = 0b1011  # 40 clean channel values outside threshold range generates an interrupt
    TCS34725_PERS_45_CYCLE  = 0b1100  # 45 clean channel values outside threshold range generates an interrupt
    TCS34725_PERS_50_CYCLE  = 0b1101  # 50 clean channel values outside threshold range generates an interrupt
    TCS34725_PERS_55_CYCLE  = 0b1110  # 55 clean channel values outside threshold range generates an interrupt
    TCS34725_PERS_60_CYCLE  = 0b1111  # 60 clean channel values outside threshold range generates an interrupt
    TCS34725_CONFIG         = 0x0D
    TCS34725_CONFIG_WLONG   = 0x02    # Choose between short and long (12x) wait times via TCS34725_WTIME
    TCS34725_CONTROL        = 0x0F    # Set the gain level for the sensor
    TCS34725_ID             = 0x12    # 0x44 = TCS34721/TCS34725, 0x4D = TCS34723/TCS34727
    TCS34725_STATUS         = 0x13
    TCS34725_STATUS_AINT    = 0x10    # RGBC Clean channel interrupt
    TCS34725_STATUS_AVALID  = 0x01    # Indicates that the RGBC channels have completed an integration cycle
    TCS34725_CDATAL         = 0x14    # Clear channel data
    TCS34725_CDATAH         = 0x15
    TCS34725_RDATAL         = 0x16    # Red channel data
    TCS34725_RDATAH         = 0x17
    TCS34725_GDATAL         = 0x18    # Green channel data
    TCS34725_GDATAH         = 0x19
    TCS34725_BDATAL         = 0x1A    # Blue channel data
    TCS34725_BDATAH         = 0x1B

    #Integration Time
    TCS34725_INTEGRATIONTIME_2_4MS  = 0xFF   #<  2.4ms - 1 cycle    - Max Count: 1024
    TCS34725_INTEGRATIONTIME_24MS   = 0xF6   #<  24ms  - 10 cycles  - Max Count: 10240
    TCS34725_INTEGRATIONTIME_50MS   = 0xEB   #<  50ms  - 20 cycles  - Max Count: 20480
    TCS34725_INTEGRATIONTIME_101MS  = 0xD5   #<  101ms - 42 cycles  - Max Count: 43008
    TCS34725_INTEGRATIONTIME_154MS  = 0xC0   #<  154ms - 64 cycles  - Max Count: 65535
    TCS34725_INTEGRATIONTIME_700MS  = 0x00   #<  700ms - 256 cycles - Max Count: 65535

    #Gain
    TCS34725_GAIN_1X                = 0x00   #<  No gain  */
    TCS34725_GAIN_4X                = 0x01   #<  4x gain  */
    TCS34725_GAIN_16X               = 0x02   #<  16x gain */
    TCS34725_GAIN_60X               = 0x03   #<  60x gain */

    R = 0
    G = 0
    B = 0
    C = 0

    RGB888_R = 0
    RGB888_G = 0
    RGB888_B = 0
    RGB888 = 0

    RGB565 = 0

    def __init__(self, address=0x29, debug=False):
        self.i2c = smbus.SMBus(2)
        self.address = address
        self.debug = debug
        #Set GPIO mode
        #GPIO.setwarnings(False)
        #GPIO.setmode(GPIO.BCM)
        #GPIO.setup(LED, GPIO.OUT)
        #self.pwm = GPIO.PWM(18, 1000)
        #self.pwm.start(100)
        #GPIO.setup(INT_PORT, GPIO.IN, pull_up_down=GPIO.PUD_UP)
        if (self.debug):
          print("Reseting TSL2581")

    def Write_Byte(self, reg, value):
        "Writes an 8-bit value to the specified register/address"
        reg = reg | self.TCS34725_CMD_BIT;#Register addressing highest bit is set to 1
        self.i2c.write_byte_data(self.address, reg, value)
        if (self.debug):
          print("I2C: Write 0x%02X to register 0x%02X" % (value, reg))

    def Write_Word(self, reg, value):
        "Writes an 8-bit value to the specified register/address"
        reg = reg | self.TCS34725_CMD_BIT;
        self.i2c.write_word_data(self.address, reg, value)
        if (self.debug):
          print("I2C: Write 0x%02X to register 0x%02X" % (value, reg))

    def Read_Byte(self, reg):
        "Read an unsigned byte from the I2C device"
        reg = reg | self.TCS34725_CMD_BIT;
        result = self.i2c.read_byte_data(self.address, reg)
        if (self.debug):
          print("I2C: Device 0x%02X returned 0x%02X from reg 0x%02X" % (self.address, result & 0xFF, reg))
        return result

    def Read_Word(self, reg):
        "Read an unsigned byte from the I2C device"
        reg = reg | self.TCS34725_CMD_BIT;
        result = self.i2c.read_word_data(self.address, reg)
        if (self.debug):
          print("I2C: Device 0x%02X returned 0x%02X from reg 0x%02X" % (self.address, result & 0xFF, reg))
        return result

    def Set_Gain(self, gain):
        self.Write_Byte(self.TCS34725_CONTROL, gain);
        self.Gain_t = gain;

    def Set_Integration_Time(self, time):
        # Update the timing register
        self.Write_Byte(self.TCS34725_ATIME, time)
        self.IntegrationTime_t = time;

    def Enable(self):
        self.Write_Byte(self.TCS34725_ENABLE, self.TCS34725_ENABLE_PON)
        time.sleep(0.01)
        self.Write_Byte(self.TCS34725_ENABLE, self.TCS34725_ENABLE_PON | self.TCS34725_ENABLE_AEN)
        time.sleep(0.01)

    def Disable(self):
        #Turn the device off to save power
        reg = Read_Byte(self.TCS34725_ENABLE);
        self.Write_Byte(self.TCS34725_ENABLE, reg & ~(TCS34725_ENABLE_PON | TCS34725_ENABLE_AEN));

    def Interrupt_Enable(self):
        reg = self.Read_Byte(self.TCS34725_ENABLE)
        self.Write_Byte(self.TCS34725_ENABLE, reg | self.TCS34725_ENABLE_AIEN)

    def Interrupt_Disable(self):
        reg = self.Read_Byte(self.TCS34725_ENABLE)
        self.Write_Byte(self.TCS34725_ENABLE, reg & (~self.TCS34725_ENABLE_AIEN))

    def Set_Interrupt_Persistence_Reg(self, PER):
        if(PER < 0x10):
            self.Write_Byte(self.TCS34725_PERS, PER)
        else :
            self.Write_Byte(self.TCS34725_PERS, self.TCS34725_PERS_60_CYCLE)

    def Set_Interrupt_Threshold(self, Threshold_H,  Threshold_L):
        self.Write_Byte(self.TCS34725_AILTL, Threshold_L & 0xff)
        self.Write_Byte(self.TCS34725_AILTH, Threshold_L >> 8)
        self.Write_Byte(self.TCS34725_AIHTL, Threshold_H & 0xff)
        self.Write_Byte(self.TCS34725_AIHTH, Threshold_H >> 8)

    def Clear_Interrupt_Flag(self):
        self.Write_Byte(self.TCS34725_CMD_Clear_INT, 0x00);

    def TCS34725_init(self):
        ID = self.Read_Byte(self.TCS34725_ID)
        if(ID != 0x44 and ID != 0x4D):
            return 1
        self.Set_Integration_Time(self.TCS34725_INTEGRATIONTIME_154MS)
        self.Set_Gain(self.TCS34725_GAIN_60X)
        self.IntegrationTime_t = self.TCS34725_INTEGRATIONTIME_154MS
        self.Gain_t = self.TCS34725_GAIN_60X
        self.Enable()
        self.Interrupt_Enable()
        self.SetLight(40)
        return 0


    def GetLux_Interrupt(self, Threshold_H, Threshold_L):
        self.Set_Interrupt_Threshold(Threshold_H, Threshold_L);
     #   if(GPIO.input(INT_PORT) == GPIO.LOW):
      #      self.Clear_Interrupt_Flag();
      #      self.Set_Interrupt_Persistence_Reg(self.TCS34725_PERS_2_CYCLE);
      #      return 1;

        return 0;

    def Read_ID(self):
        return self.Read_Byte(self.TCS34725_ID)

    def Get_RGBData(self):
        self.C = self.Read_Word(self.TCS34725_CDATAL | self.TCS34725_CMD_Read_Word)
        self.R = self.Read_Word(self.TCS34725_RDATAL | self.TCS34725_CMD_Read_Word)
        self.G = self.Read_Word(self.TCS34725_GDATAL | self.TCS34725_CMD_Read_Word)
        self.B = self.Read_Word(self.TCS34725_BDATAL | self.TCS34725_CMD_Read_Word)
        time.sleep(0.1)
        if(self.IntegrationTime_t == self.TCS34725_INTEGRATIONTIME_2_4MS):
            time.sleep(0.01)
        elif(self.IntegrationTime_t == self.TCS34725_INTEGRATIONTIME_24MS):
            time.sleep(0.04)
        elif(self.IntegrationTime_t == self.TCS34725_INTEGRATIONTIME_50MS):
            time.sleep(0.05)
        elif(self.IntegrationTime_t == self.TCS34725_INTEGRATIONTIME_101MS):
            time.sleep(0.1)
        elif(self.IntegrationTime_t == self.TCS34725_INTEGRATIONTIME_154MS):
            time.sleep(0.2)
        elif(self.IntegrationTime_t == self.TCS34725_INTEGRATIONTIME_700MS):
            time.sleep(0.7)

    #Convert read data to RGB888 format
    def GetRGB888(self):
        i = 1
        if(self.R >= self.G and self.R >= self.B):
            i = self.R / 255 + 1

        elif( self.G >= self.R and self.G >= self.B):
            i =  self.G / 255 + 1

        elif(  self.B >=  self.G and self.B >= self.R):
            i =  self.B / 255 + 1

        if(i!=0):
            self.RGB888_R = self.R / i
            self.RGB888_G = self.G / i
            self.RGB888_B = self.B / i

        if(self.RGB888_R > 30):
            self.RGB888_R = self.RGB888_R - 30
        if(self.RGB888_G > 30):
            self.RGB888_G = self.RGB888_G - 30
        if(self.RGB888_B > 30):
            self.RGB888_B = self.RGB888_B - 30

        self.RGB888_R = self.RGB888_R * 255 / 225
        self.RGB888_G = self.RGB888_G * 255 / 225
        self.RGB888_B = self.RGB888_B * 255 / 225
        #flyingbean: will fix it later
        #print("RGB888R: %d "%self.RGB888_R),
        #print("RGB888G: %d "%self.RGB888_G),
        #print("RGB888B: %d "%self.RGB888_B),
        #self.RGB888 = (self.RGB888_R<<16) | (self.RGB888_G<<8) |(self.RGB888_B)

    def GetRGB565(self):
        i = 1
        RGB565_R = 0
        RGB565_G = 0
        RGB565_B = 0

        if(self.R >= self.G and self.R >= self.B):
            i = self.R / 255 + 1
        elif( self.G >= self.R and self.G >= self.B):
            i =  self.G / 255 + 1
        elif(  self.B >=  self.G and self.B >= self.R):
            i =  self.B / 255 + 1

        if(i!=0):
            RGB565_R = self.R / i
            RGB565_G = self.G / i
            RGB565_B = self.B / i

        if(RGB565_R > 30):
            RGB565_R = RGB565_R - 30
        if(RGB565_G > 30):
            RGB565_G = RGB565_G - 30
        if(RGB565_B > 30):
            RGB565_B = RGB565_B - 30

        RGB565_R = RGB565_R * 255 / 225
        RGB565_G = RGB565_G * 255 / 225
        RGB565_B = RGB565_B * 255 / 225
        self.RGB565_R = RGB565_R
        self.RGB565_G = RGB565_G
        self.RGB565_B = RGB565_B
         #flyingbean: will fix it later
        #print("RGB565 R: %d "%self.RGB565_R)
        #print("RGB565 G: %d "%self.RGB565_G)
        #print("RGB565 B: %d "%self.RGB565_B)
        #flyingbean: will fix it later
        #self.RG565 = (((RGB565_R>>3) << 11) | ((RGB565_G>>2) << 5) | (RGB565_B>>3 ))&0xffff

    def Get_Lux(self):
        atime_ms = ((256 - self.IntegrationTime_t) * 2.4);
        if(self.R + self.G + self.B > self.C):
            ir =  (self.R + self.G + self.B - self.C) / 2
        else:
            ir = 0
        r_comp = self.R - ir;
        g_comp = self.G - ir;
        b_comp = self.B - ir;
        Gain_temp = 1
        if(self.Gain_t == self.TCS34725_GAIN_1X):
            Gain_temp = 1
        elif(self.Gain_t == self.TCS34725_GAIN_4X):
            Gain_temp = 4
        elif(self.Gain_t == self.TCS34725_GAIN_16X):
            Gain_temp = 16
        elif(self.Gain_t == self.TCS34725_GAIN_60X):
            Gain_temp = 60

        cpl = (atime_ms * Gain_temp) / (TCS34725_GA * TCS34725_DF);
        lux = (TCS34725_R_Coef * (float)(r_comp) + TCS34725_G_Coef * \
            (float)(g_comp) +  TCS34725_B_Coef * (float)(b_comp)) / cpl;
        return lux;

    def Get_ColorTemp(self):
        ir=1.0
        if(self.R + self.G + self.B > self.C):
            ir =  (self.R + self.G + self.B - self.C - 1) / 2
        else:
            ir = 0
        r_comp = self.R - ir;
        b_comp = self.B - ir;
        cct=TCS34725_CT_Coef * (float)(b_comp) / (float)(r_comp) + TCS34725_CT_Offset;
        return cct;

    def SetLight(self, value):
  #      self.pwm.start(value)
        return 0;
Here is the snapshot of PMOD color sensor up into running on MiniZed under Petalinux 2021.1 build.
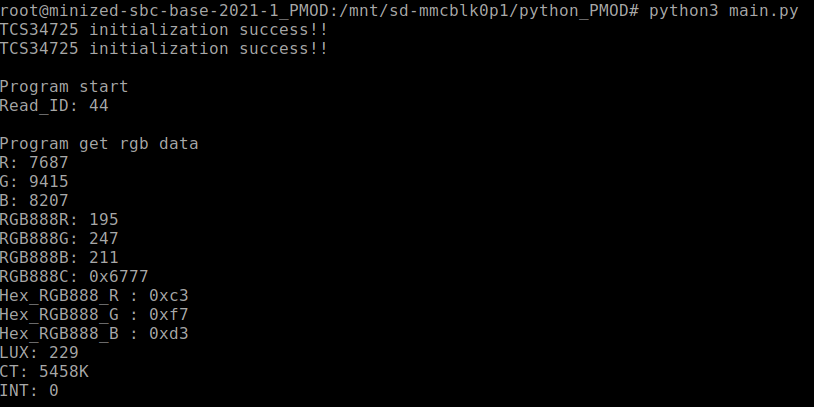
Figure 10: PMOD Color Sensor Python API Running On MiniZed
5. MiniZed PMOD Color Sensor Webserver
Flask is a lightweight Python web framework, which is a useful tool for MiniZed platform. Another useful web development tool is Request framework.
For Flask/Request and other Python3 related packages, I configured rootfs package as below:

Figure 11: Petalinux RootFS Configuration for Webserver/Flask
How to configure Flask/Request? Ref[5] provides a good demonstration on MiniZed.
Here is the video record on MiniZed UART terminal for Petalinux and webserver API there.
The MiniZed WiFi FTP server is presented in Figure 12. You might find the webserver file system on MiniZed at the right side of the figure.
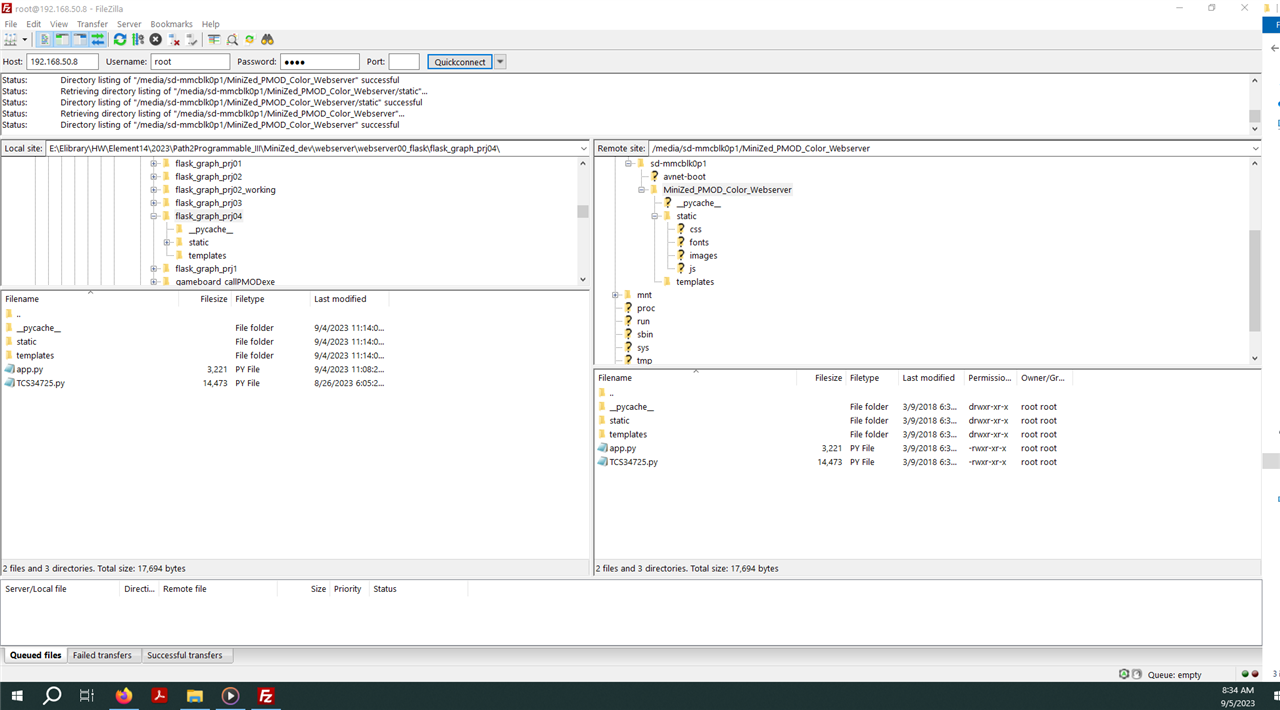
Figure 12: FileZilla FTP for MiniZed WiFi
Figure 13 presents the snapshot of homepage of the webserver. All the decimal/hex numbers(except Element14) are updated in the real time if I click the button on the same page, which is named as Get New Color. Color illumination and temperature are also measured and plot on the home page too. Color temperature number is much bigger than rest measured sensor data, so I decide to remove it from the bar chart to make the homepage look nicer.
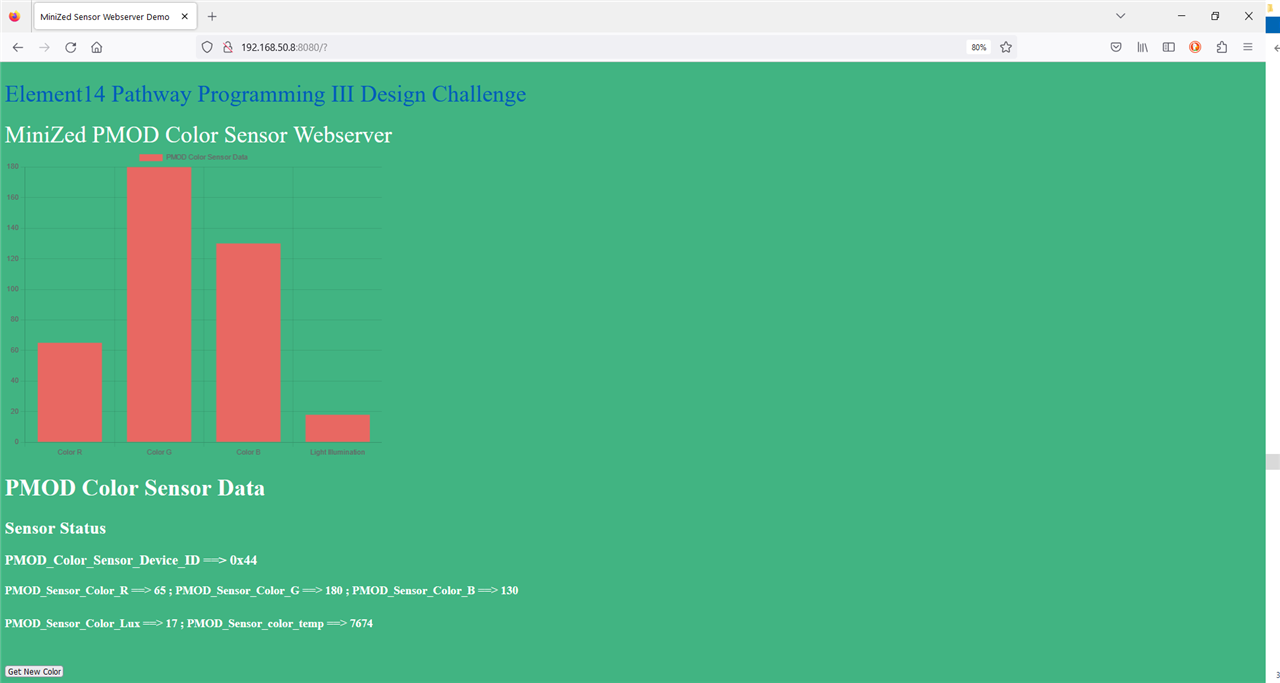
Figure 13: Homepage of MiniZed Webserver
MiniZed Color Sensor Webserver Demo
After more than a month learning, I cannot remember how many iterations I have done to bring all the building blocks together and finally I am able to present you a working Petalinux project on MiniZed with my homegrown webserver.
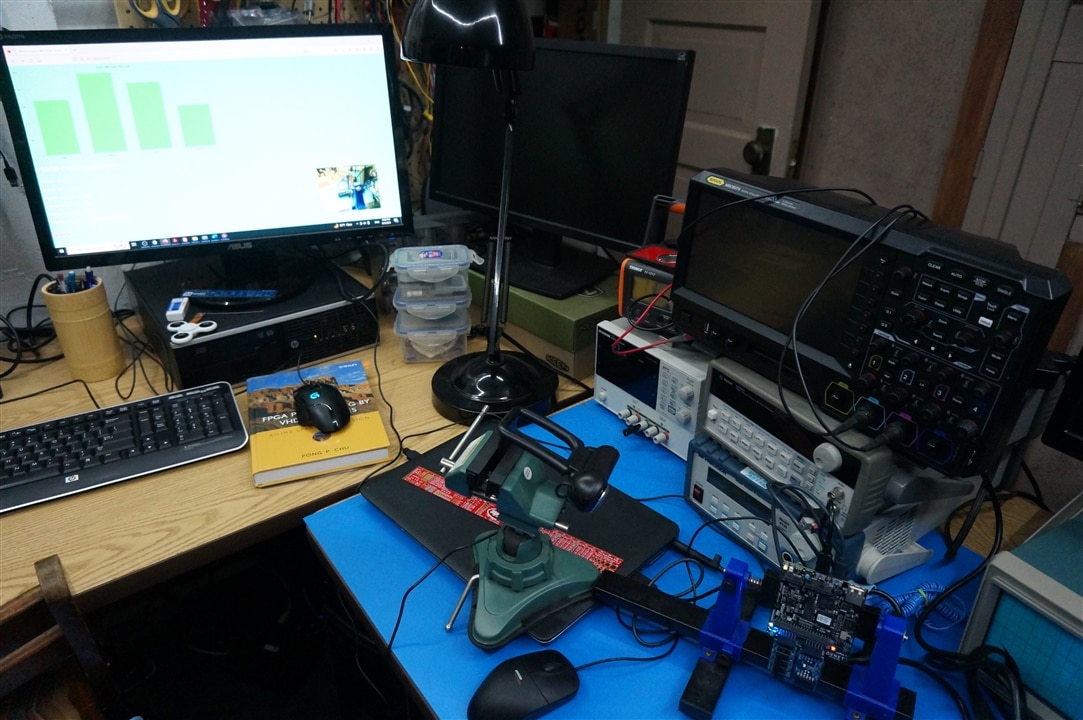
Figure 14: Bench Testing Setup
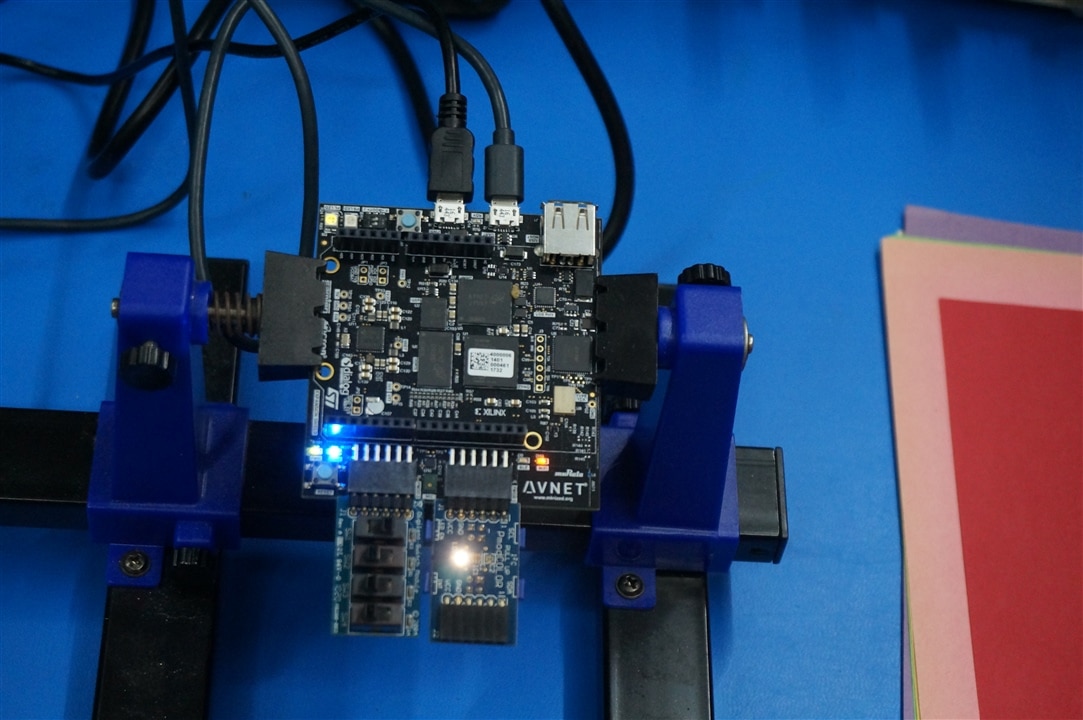
Figure 15: MiniZed PMOD Color Sensor/SWT
MiniZed color sensor webserver with LED dimming control is up into running. The detected color from PMOD sensor will be reproduced as the background color on the webserver. The webcam is able to present the color paper on the same screen of the webserver, so the reader can tell the project is working as expected or not.
Conclusions
MiniZed is a powerful platform for sensor/IoT applications. The color sensor IoT platform I developed is able to detect color from random color-paper which were left from my previous Cricut projects. The accuracy of the sensor detection is approximately good enough for a demo project. I do need to add calibration features into the project. However, there are several factors that need to be invested before I can implement the calibration algorithm into the Python API. The first factor is the background light. As you can tell, the color detected and presented on the webpage can be different if the background light is changed on the same color paper. The second factor is the reference color for the calibration. I found that the black/white colors are quite difficult to be defined as the reference color. I need to plan extra work to update the project to be more robust for color detection in the future.
Last also not least, the source codes for the project can be found at my Github:
https://github.com/flyingbean/MiniZed.git
Previous blogs for the training program:
Blog#05: Build MiniZed TTC HW Lab 9 from Scratch
Blog #04: Build a simple User API for Petalinux and Need Support for GPIO UIO API under Petalinux
Blog #03: Build Petalinux for Lab 7 and Boot Petalinux via JTAG
Blog #02: Learning AXI BRAM Controller
Blog #01: Planning MiniZed Avnet TTC Path
References
[1] Avnet MiniZed TTC Training Vitis 2021.1
[2] Design and Characterization of Automated Color Sensor System, by Maher Assaad, Israel Yohannes, Amine Bermak, Dominique Ginhac, Fabrice, Meriaudeau, International Journal on Smart Sensing and Intelligent Systems, 2014
[3] PWM Generator (VHDL), https://forum.digikey.com/t/pwm-generator-vhdl/12652
[4] TCS34725 Color Sensor - Waveshare Wiki
[5] Custom Webserver on the MiniZed by Whitney Knitter, Custom Webserver on the MiniZed - Hackster.io
Top Comments