element14 Community
element14 Community
    Register Log In
  • Site
  • Search
  • Log In Register
  • Community Hub
    Community Hub
    • What's New on element14
    • Feedback and Support
    • Benefits of Membership
    • Personal Blogs
    • Members Area
    • Achievement Levels
  • Learn
    Learn
    • Ask an Expert
    • eBooks
    • element14 presents
    • Learning Center
    • Tech Spotlight
    • STEM Academy
    • Webinars, Training and Events
    • Learning Groups
  • Technologies
    Technologies
    • 3D Printing
    • FPGA
    • Industrial Automation
    • Internet of Things
    • Power & Energy
    • Sensors
    • Technology Groups
  • Challenges & Projects
    Challenges & Projects
    • Design Challenges
    • element14 presents Projects
    • Project14
    • Arduino Projects
    • Raspberry Pi Projects
    • Project Groups
  • Products
    Products
    • Arduino
    • Avnet & Tria Boards Community
    • Dev Tools
    • Manufacturers
    • Multicomp Pro
    • Product Groups
    • Raspberry Pi
    • RoadTests & Reviews
  • About Us
  • Store
    Store
    • Visit Your Store
    • Choose another store...
      • Europe
      •  Austria (German)
      •  Belgium (Dutch, French)
      •  Bulgaria (Bulgarian)
      •  Czech Republic (Czech)
      •  Denmark (Danish)
      •  Estonia (Estonian)
      •  Finland (Finnish)
      •  France (French)
      •  Germany (German)
      •  Hungary (Hungarian)
      •  Ireland
      •  Israel
      •  Italy (Italian)
      •  Latvia (Latvian)
      •  
      •  Lithuania (Lithuanian)
      •  Netherlands (Dutch)
      •  Norway (Norwegian)
      •  Poland (Polish)
      •  Portugal (Portuguese)
      •  Romania (Romanian)
      •  Russia (Russian)
      •  Slovakia (Slovak)
      •  Slovenia (Slovenian)
      •  Spain (Spanish)
      •  Sweden (Swedish)
      •  Switzerland(German, French)
      •  Turkey (Turkish)
      •  United Kingdom
      • Asia Pacific
      •  Australia
      •  China
      •  Hong Kong
      •  India
      •  Korea (Korean)
      •  Malaysia
      •  New Zealand
      •  Philippines
      •  Singapore
      •  Taiwan
      •  Thailand (Thai)
      • Americas
      •  Brazil (Portuguese)
      •  Canada
      •  Mexico (Spanish)
      •  United States
      Can't find the country/region you're looking for? Visit our export site or find a local distributor.
  • Translate
  • Profile
  • Settings
Pi Chef Design Challenge
  • Challenges & Projects
  • Design Challenges
  • Pi Chef Design Challenge
  • More
  • Cancel
Pi Chef Design Challenge
Blog Bake Mate - Pi Chef Blog #12 - Stretch goal 1: A visual indicator using Sense HAT's RGB LED Matrix - Part 2
  • Blog
  • Forum
  • Documents
  • Polls
  • Files
  • Events
  • Mentions
  • Sub-Groups
  • Tags
  • More
  • Cancel
  • New
  • Share
  • More
  • Cancel
Group Actions
  • Group RSS
  • More
  • Cancel
Engagement
  • Author Author: avnrdf
  • Date Created: 17 Mar 2018 2:13 PM Date Created
  • Views 1297 views
  • Likes 7 likes
  • Comments 5 comments
  • pi_chef
  • bakemate
  • pi chef - bake mate
  • pi chef design challenge
  • pi chef
  • pi-chef
Related
Recommended

Bake Mate - Pi Chef Blog #12 - Stretch goal 1: A visual indicator using Sense HAT's RGB LED Matrix - Part 2

avnrdf
avnrdf
17 Mar 2018

Bake Mate - Pi Chef Blog #12 - Stretch goal 1: A visual indicator using Sense HAT's RGB LED Matrix - Part 2

image


Picking up from Bake Mate - Pi Chef Blog #11 - Stretch goal 1: A visual indicator using Sense HAT's RGB LED Matrix - Part 1, I wrote some code to convert a percentage (which is passed when the function is called) into the pattern that I've already described.


Senselib:


To keep things organised, I added all Sense HAT related code to a dedicated file - senselib.py.


import sense_hat

from time import sleep


disp = sense_hat.LedMatrix()

dpad = sense_hat.DPad()

disp.clear()


#color definitions: RGB values

RED = (63,1,1)

GREEN = (30,63,6)

WHITE = (12,12,12)

BLANK = (0,0,0)

DONE_COMP = (0,15,25)

DONE = (63,0,0)

PALE_RED = (5,0,0)

PALE_DON = (0,1,2)

TURQ =(0,1,2)

EORAN = (30,7,2)


#called the first time the file is imported

disp.fb_flush()


def drawPercent(Percent):

        p = int(Percent*64/100)

        print ("adjustted to "+str(p))


        disp.clear()


        if (Percent>=97):

                for row in range (7,-1,-1):

                        for col in range (0,8,1):

                                current = ((7-row)*8+col)

                                #print("curr is "+str(current) + ";row is " + str(row) + " & col is" + str(col))

                                #disp.set_pixel_fb((row),(col),DONE)

                                 disp.set_pixel_fb((row),(col),GREEN)

        else:

                for row in range (7,-1,-1):

                        for col in range (0,8,1):

                                current = ((7-row)*8+col)

                                #print("curr is "+str(current) + ";row is " + str(row) + " & col is" + str(col))

                                #disp.set_pixel_fb((row),(col),DONE)

                                if (current < p):

                                        disp.set_pixel_fb((row),(col),PALE_RED)

                                        #print (" set " + str(current) + " i.e. " + str(row) + "," + str(col))

                                else:

                                        disp.set_pixel_fb((row),(col),PALE_DON)


        disp.fb_flush()

        return


  • The first few lines deal with imports. The sense_hat library is the custom driver I described in the previous blog post. It handles low level tasks like sending data to the ATtiny over I2C using the smbus library. It also provides a framebuffer that can be written to using set_pixel_fb(). To write the buffer to the ATtiny88, use fb_flush().
  • The next few lines define different color combinations - which are R,G,B values from 0 to 65 (instead of the standard 0 to 255)
  • drawPercent() is the function that will be imported and invoked from the main Bake Mate python program.
  • The parameter passed is the percent value (out of 100%), which needs to be scaled relative to 64 (because it's a 8x8 matrix). This is done using p = int(Percent*64/100). For example, 50% should light 50% of the 64 LEDs, which is 32.
  • disp.clear() is used to clear the contents of the display - it writes a RGB value of 0,0,0 to all the pixels.


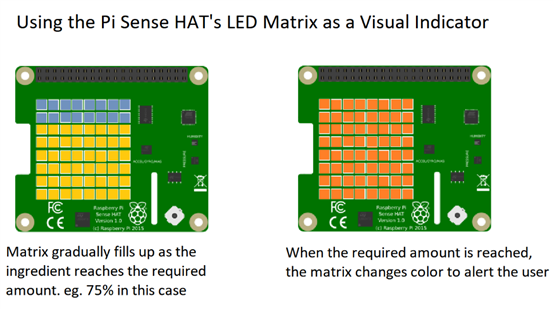
Now, the way I wanted it to work was to slowly fill up the grid with a certain color that correlates to the percent of the quantity added (if 50% of the required amount has been added, fill 50% of the pixels).

When the amount reaches close to the required amount (set at 97% here), the whole grid changes color to alert the user. That is what the outermost 'if-else block does.


  • If the value of percent is greater than 97%, it sets the value of the entire RGB matrix to GREEN
  • If the value of percent is less than 97%, it fills up the grid proportional to the percent - the 'else' block.


Pixel math:


I used nested for loops to iterate through all the pixels in the matrix. As the variable names suggest, the outer one is for the rows, and the inner one for columns.


for row in range (7,-1,-1):


This is used to generate values: starting at 7 (the first parameter), ending at -1 (the second parameter - it actually stops at 0 since -1 is not included) and -1 (the third parameter) is the amount the value is decremented by. The outer loop therefore runs from 7 to 0 (7,6,5,4,3,2,1,0) - which is used as the row reference.

Why backwards? It's because the way addresses of the RGB LEDs on the Sense HAT have been defined. The first one (0,0) is the one on the upper-leftmost & (7,7) is the lower-rightmost.

I want the grid to fill from left to right starting at the bottom, which means that the order of reference of the rows needs to be reversed - which is done by running the 'row' loop backwards.


current = ((7-row)*8+col)


This is used to generate a pseudo value of the current pixel. The numbering starts from the bottom and moves left to right - in the same order that the grid needs to be filled.

I'm using this to compare the value of p (scaled percent relative to 64) so that the color of the LED can be decided.


Here's how it works:


The loop starts at pseudo value 0 (which is the lower left most pixel). Let's say that the percent of the ingredient added is 75%, which means that 75% of the grid needs to be filled, or 48 pixels. The color for 'filled' pixels is PALE_RED, and unfilled pixels is PALE_DON. The loops start at the lower left most pixel (pseudo value 0 - row 7, column 0) and increase (they move right along the bottom row). This covers pseudo values 0 to 7  (from the formula of current). The value of p (the scaled percent relative to 64) is 48, so the 'if' condition sets all these pixels to PALE_RED (since they're filled because pseudo value is less than 48). The loops now move to row 6 and move left to right from column 0 to 7 and set all the values to PALE_RED.

This continues till the value of the pseudo value of a certain pixel exceeds the value of p (scaled percentage), and the remaining pixels get set to PALE_DON


This video illustrates how it works. I wrote two consecutive loops that call the drawPercent() function with the value of the loop counter. The first one counts from 0 to 100 (therefore it fills the grid from 0 to 100% in steps of 1%), after which the second loop runs, which counts from 100 to 0 in steps of 1 (causing the grid to 'un-fill'). Whenever the value of percent passed to drawPercent() is more than 97, it turns the entire matrix green.


You don't have permission to edit metadata of this video.
Edit media
x
image
Upload Preview
image


Demo time:


I used my 'Pi' recipe to run a quick demo. This is the step which asks for screwdrivers:

Watch how the LEDS turn RED according to the weight added - which is directly proportional to the percent that's been added. Towards, the end, the LED matrix flashes green when the value added is above 97% of the required value.

(The video is dark because I needed to turn down the exposure to ensure that the LEDs are visible. The 'pan' of the weighing scale in the upper left corner.)


You don't have permission to edit metadata of this video.
Edit media
x
image
Upload Preview
image


This could be modified to work with a WS2812 strip instead of a square LED matrix.

Even the method of indication could change - start with a color like blue and gradually change to red as the value increases. Towards the end, turn the matrix green and flash it at a frequency that is determined by the percent.


Suggestions are welcome!

  • Sign in to reply

Top Comments

  • DAB
    DAB over 7 years ago +2
    Nice simple user interface. Have you considered having the display go red should the user put too much of something in? DAB
  • avnrdf
    avnrdf over 7 years ago in reply to DAB +2
    Yes, as I told genebren : " I'm working on the over-weight: anything more than 105% (or any other percent) will make the display flash yellow. Though, it'll need to work well enough that the user doesn…
  • e14phil
    e14phil over 7 years ago +2
    Avner! I love these stretch goals!
  • e14phil
    e14phil over 7 years ago

    Avner! I love these stretch goals!

    • Cancel
    • Vote Up +2 Vote Down
    • Sign in to reply
    • More
    • Cancel
  • avnrdf
    avnrdf over 7 years ago in reply to DAB

    Yes, as I told genebren:


    "

    I'm working on the over-weight: anything more than 105% (or any other percent) will make the display flash yellow. Though, it'll need to work well enough that the user doesn't exceed 100% in the first place - removing ingredients from the mixing bowl isn't convenient at all.


    Instead of waiting till 97% to make the display flash green, I'm think of automatically switching the display to a 'detailed' mode at 92%. After this, it will change to a different set of colors and continue filling till 100, except now the full RGB matrix will cover 10% (instead of the original 100) - giving the user more detail than before.

    • Cancel
    • Vote Up +2 Vote Down
    • Sign in to reply
    • More
    • Cancel
  • DAB
    DAB over 7 years ago

    Nice simple user interface.


    Have you considered having the display go red should the user put too much of something in?


    DAB

    • Cancel
    • Vote Up +2 Vote Down
    • Sign in to reply
    • More
    • Cancel
  • avnrdf
    avnrdf over 7 years ago in reply to genebren

    I'm working on the over-weight: anything more than 105% (or any other percent) will make the display flash yellow. Though, it'll need to work well enough that the user doesn't exceed 100% in the first place - removing ingredients from the mixing bowl isn't convenient at all.


    Instead of waiting till 97% to make the display flash green, I'm think of automatically switching the display to a 'detailed' mode at 92%. After this, it will change to a different set of colors and continue filling till 100, except now the full RGB matrix will cover 10% (instead of the original 100) - giving the user more detail than before.


    There are so many different ways of doing this, and I'm open to suggestions! image

    • Cancel
    • Vote Up +1 Vote Down
    • Sign in to reply
    • More
    • Cancel
  • genebren
    genebren over 7 years ago

    Very nice display usage.  Giving the user feedback will make the weighing process more intuitive.  I think that the color changes are an added bonus.  I did not notice if you showed what would happen on an over-weight condition, do you show how much over you are in a similar way?


    Good luck on the rest of your development.

    Gene

    • Cancel
    • Vote Up +1 Vote Down
    • Sign in to reply
    • More
    • Cancel
element14 Community

element14 is the first online community specifically for engineers. Connect with your peers and get expert answers to your questions.

  • Members
  • Learn
  • Technologies
  • Challenges & Projects
  • Products
  • Store
  • About Us
  • Feedback & Support
  • FAQs
  • Terms of Use
  • Privacy Policy
  • Legal and Copyright Notices
  • Sitemap
  • Cookies

An Avnet Company © 2025 Premier Farnell Limited. All Rights Reserved.

Premier Farnell Ltd, registered in England and Wales (no 00876412), registered office: Farnell House, Forge Lane, Leeds LS12 2NE.

ICP 备案号 10220084.

Follow element14

  • X
  • Facebook
  • linkedin
  • YouTube