


The goal - A way, super-awesome, extra special, super-duper range hood like the world has never seen before!
Blog post #1 has links to all sections of the build: Smart Range Hood - Pi Chef Challenge Blog post #1
Trying to decide on sensor selection which will give actionable data based on current conditions...
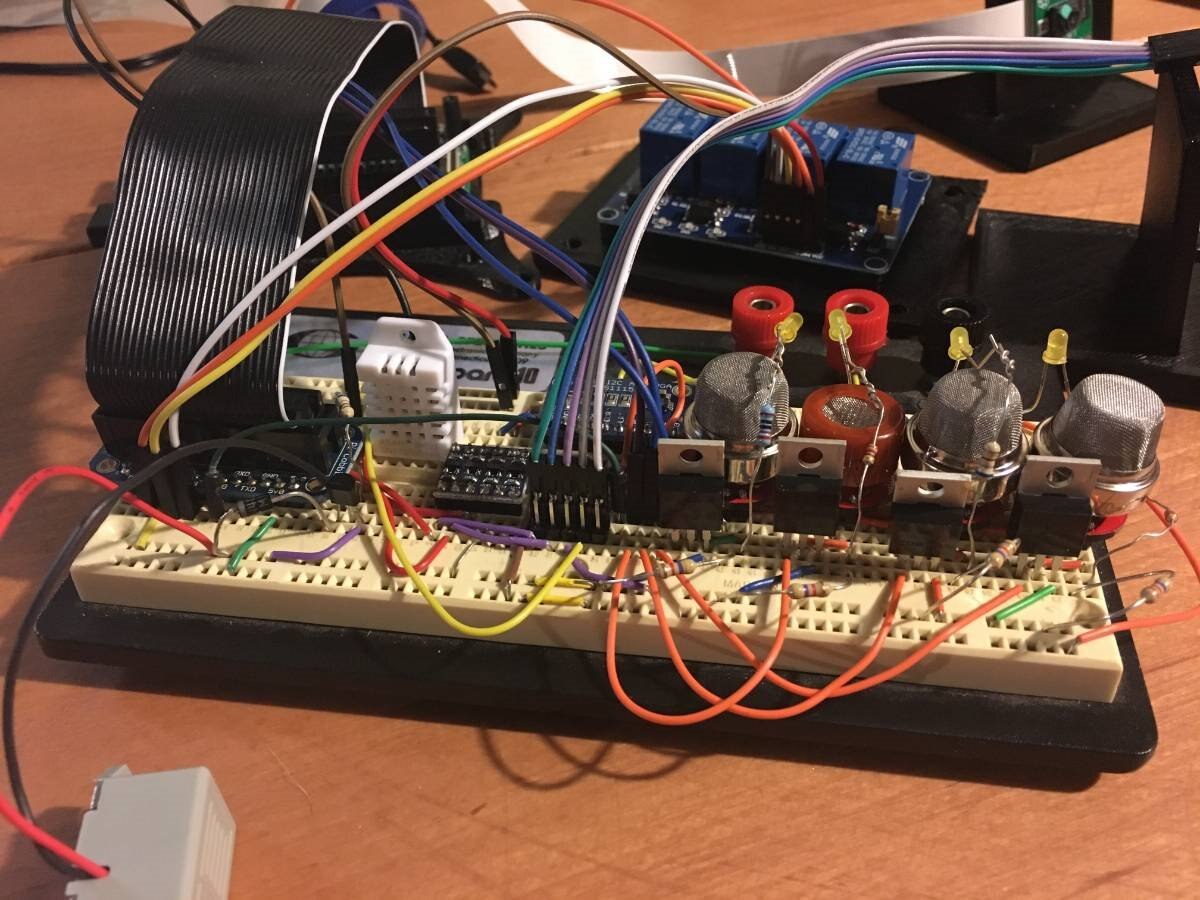
It was decided early on to use the "MQ" sensors for gas detection along with a DHT22 for Temperature and Humidity. In this post, I give details on the selection and implementation of the MQ sensors. I did previously help our exchange student Carlo build a special sensor to detect when our first child had a dirty diaper. He found that methane and hydrogen are the two most prevalent gasses in solid waste.
I spent some time looking at dougw Doug Wong's posts on a previous challenge for the Safe and Sound. He lists out the different MQ sensors and what they are sensitive to - See his post here:
Safe and Sound - Hazardous Factor - Air Quality - blog 4
I ended up choosing the following:
MQ4 - Methane Gas
MQ6 - LPG Gas
MQ7 - Carbon Monoxide Gas
MQ8 - Hydrogen Gas
I considered MQ9 flammable gas sensor but according to Doug's chart, there is a lot of overlap with the CO sensor. I have natural gas at my house (and importantly on the stove) so the MQ4 Methane (aka natural gas) sensor seems like the ideal choice. Methane has a specific gravity of ~0.56 compared to regular air which is 1.00. This means that it is much lighter than air and will rise. This makes the range hood an ideal location for the sensor since any methane leaks will be carried up into the hood.
The LPG sensor was chosen since LP is also a flammable gas, and If this was a commercial product then being able to sense LPG would be a necessity; or the hood would have to be ordered with an option to sense that gas.
CO is a byproduct of combustion so if a fire burns the oxygen from the air, asphyxiation can occur. There is not a risk of combustion from this gas, but significant health risks are still present since it displaces oxygen. The NFPA and others have a list linked below with a sliding scale of 'safe' limits which also indicate common symptoms of overexposure. Hydrogen is a highly flammable gas. This is used in many places ranging from fuel cells in cars to the large booster for the space shuttle (although in liquid form). It also turns out that humans produce this gas as part of the digestion process...
| MQ | Gas | Specific Gravity | Sensitivity | Safe levels | Explosion | Link |
|---|---|---|---|---|---|---|
| MQ4 | Methane | 0.56 or 0.6-0.7 | 200-10,000 ppm | 1,000 ppm/8hr | 50,000 ppm | |
| MQ6 | LPG | 0.495 | 200-10,000 ppm | 1,000 ppm | 2,100 ppm | |
| MQ7 | CO | 0.9967 | 20-2,000 ppm | <100 ppm/2 hr* | n/a | |
| MQ8 | Hydrogen | 0.0696 | 100-10,000 ppm | > than LEL** | 4,100 ppm |
*The NFPA and other came up with a chart showing a 'sliding scale' of what safe levels would be, and of course it depends on total exposure time
**LEL - Lower Explosion Level. Hydrogen is a simple asphyxiation and does not pose toxicity risks below its explosion level
Some data was taken from this page to get the specific gravity - https://www.engineeringtoolbox.com/specific-gravities-gases-d_334.html
There is some good information on this website about natural gas - Basic Natural Gas Safety | O&G Exploration & Production | Energen .
Methane safe levels link Methane Safety
LPG safe levels link https://www.cdc.gov/niosh/idlh/68476857.html
CO safe levels link https://www.detectcarbonmonoxide.com/co-health-risks/
Hydrogen safe levels link https://www.nap.edu/read/12032/chapter/9#152
Incidentally, a CO2 sensor would NOT work in the range hood since it has a specific gravity of 1.5; meaning it is much heavier than air. CO2 would collect near the floor.
I chose the hydrogen and CO sensors since they are also dangerous gases and they could easily be detected by this setup.
Power consumption
The sensor itself uses a negligible amount of current to run the voltage divider. However, each sensor include a heater circuit. The idea is to run the heater circuit every so often to burn off anything which has accumulated on the sensing element. According to the datasheet, the heaters consume about 1 watt of power. At 5 volts, this is 200 mA. If all four sensors' heaters were run at the same time, this would require 800mA, which is a considerable amount, even given the 2.5 amp power supply from Newark. To get around this, I am using N-Channel mosfets to switch the ground side of the heater circuit; and cycle through each heater one at a time. This will spread out the power consumption from being one large spike to one longer plateau.
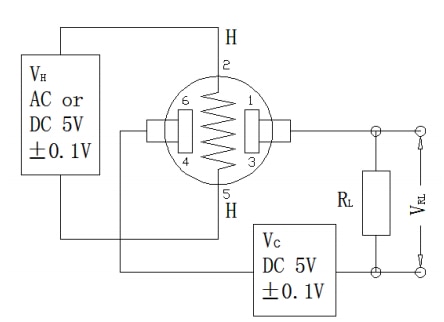
Reading the sensor - circuit diagram
In order to get the data from the sensor, there are a few things that must happen. First of all, the sensor(s) is analog. It is designed to run at 5 V DC. It functions like a variable resistor; with lower resistance when the target gas is present; and higher resistance when the gas is not present. This means a higher voltage V(rl) with higher gas concentrations. The exact value of the load resistor can help 'tune' the sensitivity of the sensor within its sensing range. The datasheet specs out a 4.7k load resistor and they provide a graph showing the ppm versus voltage across the sensing range.
Schematic as shown in the datasheet:
For my use, I will be supply 5VDC to the sensor's heater circuit and switch the ground side with an N-Channel mosfet (IRLB8721PbF). That will look more like what I have pictured here:
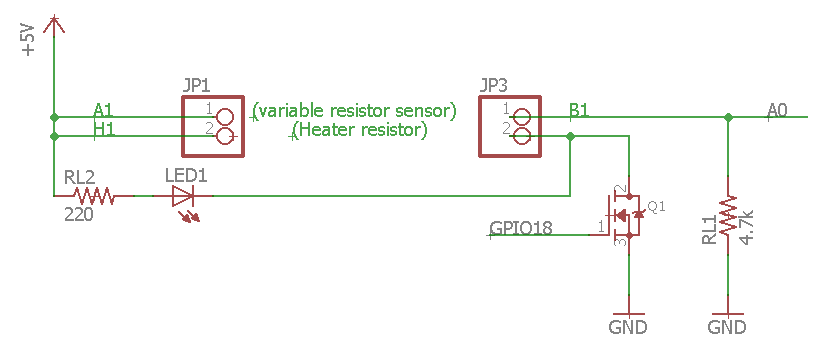
The heater will run when I activate GPIO18 to complete the ground circuit. This will also let LED1 turn on to show that the heater is currently running. A0 will feed into that analog to digital sensor detailed below. RL1 4.7k is the load resistor. This is required to create the voltage divider circuit.
To read the sensor, things will become a bit more complicated. The Raspberry Pi does not come with any analog input pins. I will have to use an external sensing method to get the values. I chose the ADS1115 16-bit ADC. This is a 4-channel analog to digital converter and it works on the I2C bus. It works on both 3.3v and 5v. Since the datasheet specs out using 5V for the MQ sensors, I will run the ADC at 5 V. To get this data into the Raspberry Pi, I will be accessing the ADC over the I2C bus via a level shifter. Then I can run a 5V rail for the MQ sensors as per the datasheet, and I can still access the values from the Raspberry Pi. This also can convert with 16 bits of precision - this means values from 0 to 65,535. An Arduino for comparison has a 10-bit ADC with only 1024 unique levels.
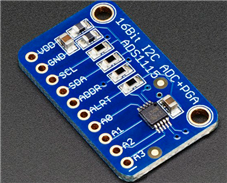
This is the ADC I got on Adafruit for ~$15. I could have sourced the chip stand-alone for much cheaper but this breakout board option seemed like the correct approach since it comes with the decoupling capacitors, biasing resistors, and a handy .1" pitch connection point. This will allow me to basically drop this in and be up and running.
Converting analog values into PPM
Gas concentration versus voltage, with 4.7k load resistor; MQ4 (using the circuit diagram above). This chart is from the datasheet of the MQ4 sensor.
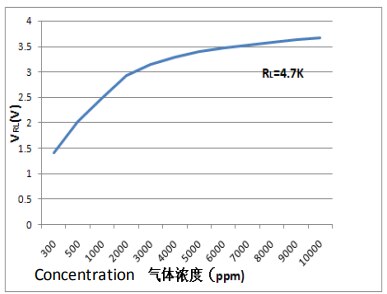
The other sensors work in a similar manner, but are sensitive to other gasses. The scale is logarithmic so a formula will be used to do the conversion. The ADC is 16-bit as mentioned above, so there should be good granularity across the range of values. Details of this will be in a future post.
Additional Components:
There were a few other additional components that I decided to add. The MQ sensors come with a special round 6-pin connector. This is not breadboard friendly, and at this stage I'm not creating any custom boards for them. Luckily, I found when purchasing the sensors a convenient "breakout" board that brings the pins down from 6 to four and makes them more friendly. These only cost $1.00 so I picked up four of them. I also required the logic level shifter which was mentioned above, but worth mentioning again. This allows bi-directional communication over the I2C bus
Coming soon!!!
My next post will detail the breadboard hookup of all the components and initial readings from the various sensors.
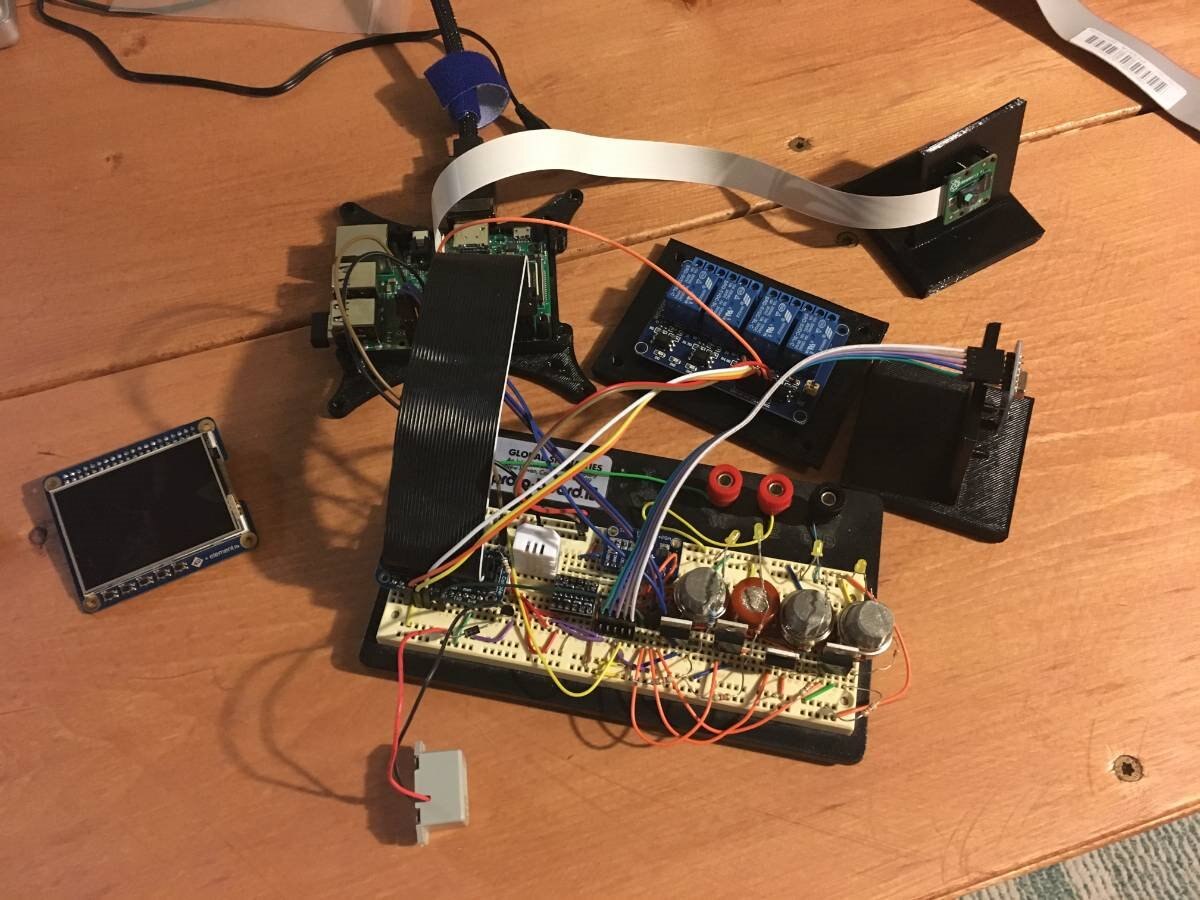
Here is a preview (Grid Eye, Pi Camera, Relays, MQ sensors, and some other goodies can be seen) -
Top Comments