Table of Contents
- Introduction
- Getting Started
- Edge Impulse
- Improving Edge Impulse Model
- Testing The Machine Learning Model With OpenMV
- Adding The Water Sprayer System
- Testing The Water Sprayer System
- IoT Environmental Monitoring System | Part1
- IoT Environmental Monitoring System | Part2
- Summary
**********************************************************************************************************************
In the second part of my project I am going to use the Arduino MKR WAN 1310 board to develop an IoT Environmental Monitoring System Based on LoRa and without using a Gateway. I was inspired by my project: (Missing Blog Post) which was finalis in an ecological contest last year.
Differences between the MKR WAN 1300 and the 1310
- Better and More Efficient Processor: The MKR WAN 1310, brings in a series of improvements when compared to its predecessor, the MKR WAN 1300. While still based on the Microchip® SAMD21 low power processor, the Murata CMWX1ZZABZ LoRa® module, and the MKR family’s characteristic crypto chip (the ECC508), the MKR WAN 1310 includes a new battery charger, a 2MByte SPI Flash, and improved control of the board’s power consumption.
- Improved Battery Power: The latest modifications have considerably improved the battery life on the MKR WAN 1310. When properly configured, the power consumption is now as low as 104uA! It is also possible to use the USB port to supply power (5V) to the board.
- On-board Storage: Data logging and other OTA (Over The Air) functions are now possible since the inclusion of the on board 2MByte Flash. This new feature will let you transfer configuration files from the infrastructure onto the board, create your own scripting commands, or simply store data locally to send it whenever the connectivity is best. Whilst the MKR WAN 1310’s crypto chip adds further security by storing credentials & certificates in the embedded secure element.
So the MKR WAN 1310 is essentially an updated replacement of the 1300 and you should consider the 1300 to be an outdated product. I believe the fundamental reason for the replacement is that the hardware design of the 1300 resulted in an unnecessarily high power consumption.
LoRa Sender
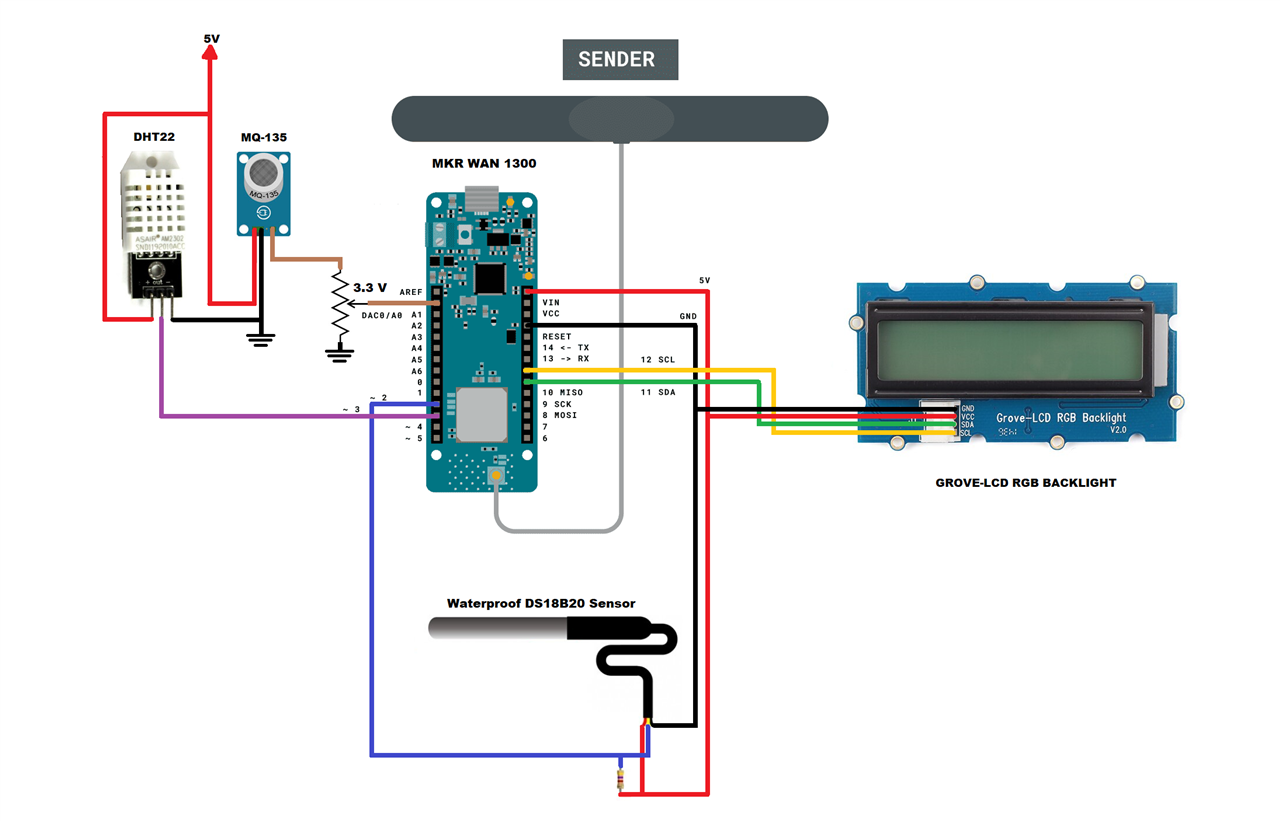
How does it work?
- The purpose of using the DS18B20 sensor with probe is that my idea is to monitor the temperature of the soil or the water of the bee apiary;
- From the DHT22 sensor I obtained humidity readings with value ranges between 0 to 100%. I omit the temperature readings as the DS18B20 temperature sensor has a better measurement range (-55°C to +125°C); and
- Also I have used the MQ-135 sensor to detect and measure carbon dioxide (CO2) particles in parts per million (ppm). Sensitive material of gas sensor is SnO2, which with lower conductivity in clean air. When target pollution gas exists, the sensor’s conductivity gets higher along with the gas concentration rising.
// AUTHOR: GUILLERMO PEREZ GUILLEN

#include <SPI.h> // LoRa->
#include <LoRa.h>
#include <OneWire.h> // DS18B20->
#include <DallasTemperature.h>
#include <Wire.h> // LCD->
#include "rgb_lcd.h"
rgb_lcd lcd;
const int colorR = 173;
const int colorG = 255;
const int colorB = 47;

#include "DHT.h" // DHT22 ->
#define DHTPIN 3    // Pin where the sensor is connected
#define DHTTYPE DHT22   // DHT22 sensor
DHT dht(DHTPIN, DHTTYPE);

// DS18B20-> Data wire is plugged into port 2 on the Arduino
#define ONE_WIRE_BUS 2
OneWire oneWire(ONE_WIRE_BUS);
DallasTemperature sensors(&oneWire);

#define anInput     A0 // MQ135-> analog feed from MQ135
int counter = 0;

void setup() {
  // set up the LCD's number of columns and rows:
  lcd.begin(16, 2);
  lcd.setRGB(colorR, colorG, colorB);
  lcd.print("ECOLOGY!");
  pinMode(anInput,INPUT); // MQ135
  lcd.setCursor(0, 1); // LCD
  lcd.print("LoRa Sender");
  if (!LoRa.begin(915E6)) {
  lcd.setCursor(0, 1); // LCD
  lcd.print("Starting LoRa failed!");
    while (1);
  }
  sensors.begin();   //temperature sensor starts
  dht.begin();
}

void loop() {
  int co2now[10]; //int array for co2 readings
  int co2raw = 0; //int for raw value of co2
  int co2ppm = 0; //int for calculated ppm
  int zzz = 0; //int for averaging
  for (int x = 0;x<10;x++) // MQ135-> samplpe co2 10x over 2 seconds
  {
    co2now[x]=analogRead(A0);
    delay(200);
  }
  for (int x = 0;x<10;x++) // add samples together
  {
    zzz=zzz + co2now[x];
  }
  co2raw = zzz/10; // divide samples by 10
  co2ppm = co2raw;
  int h = dht.readHumidity(); //We read the Humidity
  sensors.requestTemperatures();   //The command to read the temperature is sent
  int temp = sensors.getTempCByIndex(0); //The temperature is obtained in ยบC
  // send packet
  LoRa.beginPacket();
  LoRa.print(temp);
  LoRa.print(",");
  LoRa.print(h);
  LoRa.print(",");
  LoRa.print(co2ppm);
  LoRa.endPacket();
  lcd.clear();
  lcd.setCursor(0, 0); // LCD
  lcd.print("P=");
  lcd.setCursor(3, 0); // LCD
  lcd.print(counter);
  lcd.setCursor(8, 0); // LCD
  lcd.print("T=");
  lcd.setCursor(11, 0); // LCD
  lcd.print(temp);
  lcd.setCursor(14, 0); // LCD
  lcd.print("C");
  lcd.setCursor(0, 1); // LCD
  lcd.print("H=");
  lcd.setCursor(3, 1); // LCD
  lcd.print(h);
  lcd.setCursor(6, 1); // LCD
  lcd.print("%");
  lcd.setCursor(8, 1); // LCD
  lcd.print("CO2=");
  lcd.setCursor(13, 1); // LCD
  lcd.print(co2ppm);
  counter++;
  delay(13000);
}
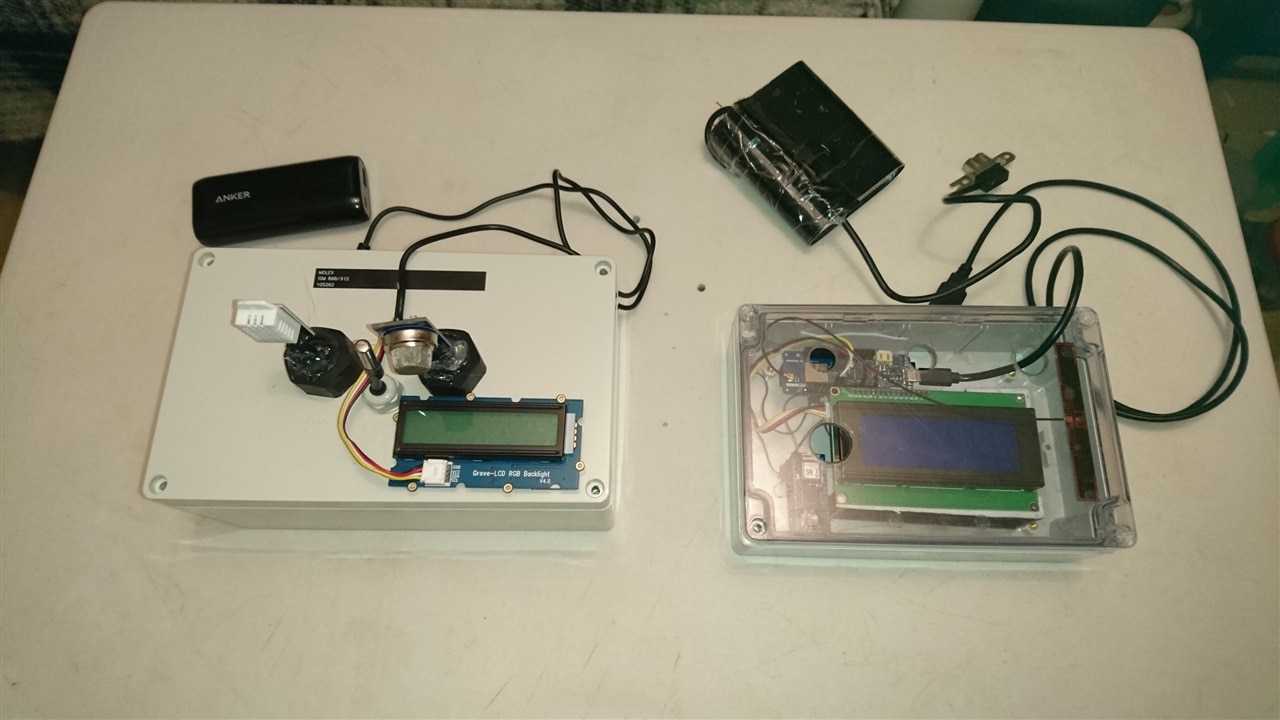
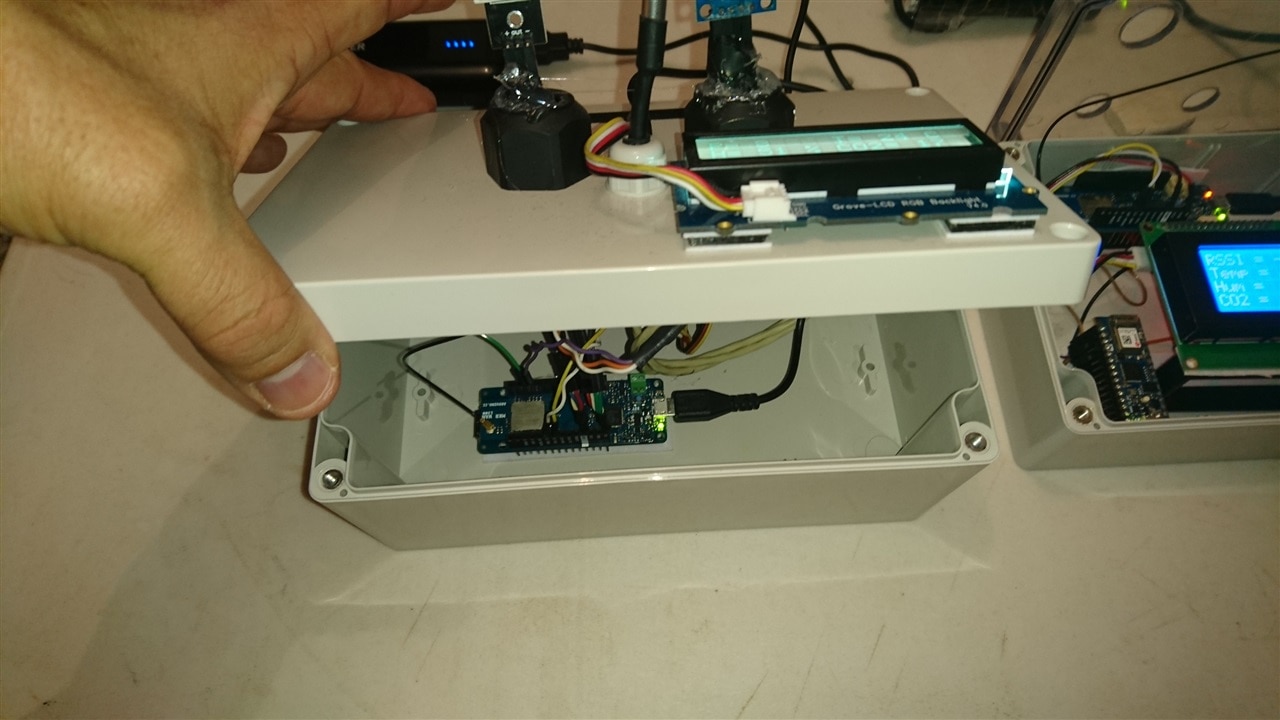
Below I show you the assembled transmitter module.
LoRa Receiver
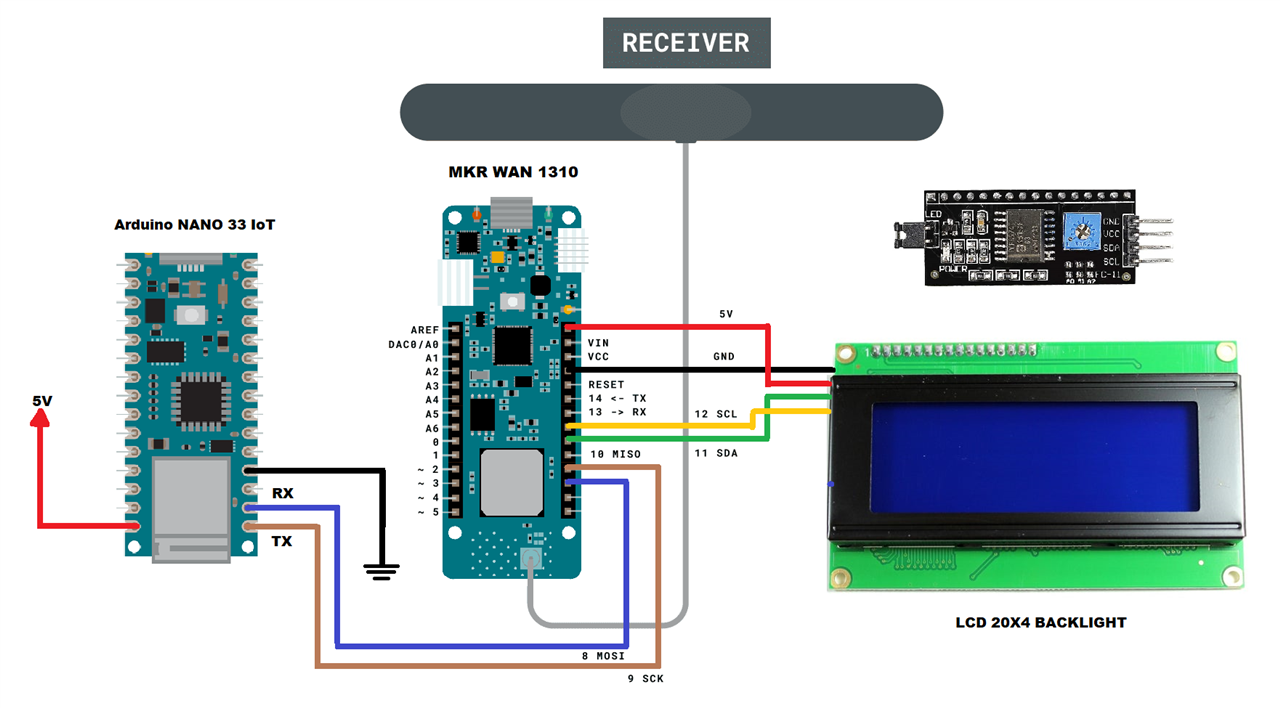
How does it work?
- First you have to receive the data in a character string;
- I separated the data from the three sensors by means of a comma;
- The data is printed on the 16 x 4 LCD screen;
- The data is transmitted through the SERCOM 1 serial port to the Arduino Nano 33 IoT board;
- The Arduino Nano 33 IoT board sends the data to the ThingSpeak IoT service provider;
- Finally, these data can be consulted through the PC or through an IoT application;
Below I show you the code for the MKR WAN 1310 board.
// AUTHOR: GUILLERMO PEREZ GUILLEN

#include <SPI.h>
#include <LoRa.h>
#include <Arduino.h>   // SERCOM1
#include "wiring_private.h" // SERCOM1

// SERCOM1: Rx->D9 & Tx->D8
Uart Serial3 (&sercom1, 9, 8, SERCOM_RX_PAD_1, UART_TX_PAD_0);
void SERCOM1_Handler()
{
  Serial3.IrqHandler();
}

#include <Wire.h> // Library for I2C communication
#include <LiquidCrystal_I2C.h> // Library for LCD
LiquidCrystal_I2C lcd = LiquidCrystal_I2C(0x27, 20, 4); // Change to (0x27,16,2) for 16x2 LCD.

char cadena[30]; //We create an array that will store the characters that we will write in the PC console. We assign a limit of characters, in this case 30
byte posicion=0;  //Variable to change the position of the characters in the array
int valor;  //Integer Variable

void setup() {
  lcd.init();  // Initiate the LCD:
  lcd.backlight();
  pinMode(LED_BUILTIN, OUTPUT);
  Serial.begin(9600);
  Serial3.begin(9600); // SERCOM1
  // Assign pins 8 & 9 SERCOM1 functionality
  pinPeripheral(8, PIO_SERCOM);
  pinPeripheral(9, PIO_SERCOM);
  Serial.println("LoRa Receiver")
  if (!LoRa.begin(915E6)) {
    Serial.println("Starting LoRa failed!");
    while (1);
  }
}

void loop() {
  int packetSize = LoRa.parsePacket();
  if (packetSize) {
    memset(cadena, 0,sizeof(cadena));//memset deletes the contents of the array "cadena" from position 0 to the end sizeof
    // received a packet
    Serial.print("Received packet... ");
    // read packet
    while (LoRa.available()) {
      char dedos= (char)LoRa.read();
      Serial.print(dedos);
      Serial3.print(dedos);
      cadena[posicion]=dedos;//Read a character from the string "cadena" from "posicion", then read the next character with "posicion++"
      posicion++;
    }
    posicion=0;
    int signal_rx = LoRa.packetRssi();
    // print RSSI of packet
    Serial.print(" with RSSI ");
    Serial.println(signal_rx);
    int parte1 = getValue(cadena,',',0).toInt();
    int parte2 = getValue(cadena,',',1).toInt();
    int parte3 = getValue(cadena,',',2).toInt();
    Serial.println(parte1);
    delay(100);
    Serial.println(parte2);
    delay(100);
    Serial.println(parte3);
    delay(100);
    lcd.clear();
    lcd.setCursor(0, 0);
    lcd.print("RSSI =");
    lcd.setCursor(7, 0);
    lcd.print(signal_rx);
    lcd.setCursor(11, 0);
    lcd.print("dBm");
    lcd.setCursor(0, 1);
    lcd.print("Temp =");
    lcd.setCursor(8, 1);
    lcd.print(parte1);
    lcd.setCursor(11, 1);
    lcd.print("C");
    lcd.setCursor(0, 2);
    lcd.print("Hum =");
    lcd.setCursor(8, 2);
    lcd.print(parte2);
    lcd.setCursor(11, 2);
    lcd.print("%");
    lcd.setCursor(0, 3);
    lcd.print("CO2 =");
    lcd.setCursor(8, 3);
    lcd.print(parte3);
    lcd.setCursor(11, 3);
    lcd.print("PPM");
    digitalWrite(LED_BUILTIN, HIGH);
    delay(2000);
    digitalWrite(LED_BUILTIN, LOW);
    delay(12000);
  }
}

String getValue(String data, char separator, int index)
{
  int found = 0;
  int strIndex[] = {0, -1};
  int maxIndex = data.length()-1;
  for(int i=0; i<=maxIndex && found<=index; i++){
    if(data.charAt(i)==separator || i==maxIndex){
        found++;
        strIndex[0] = strIndex[1]+1;
        strIndex[1] = (i == maxIndex) ? i+1 : i;
    }
  }
  return found>index ? data.substring(strIndex[0], strIndex[1]) : "";
}
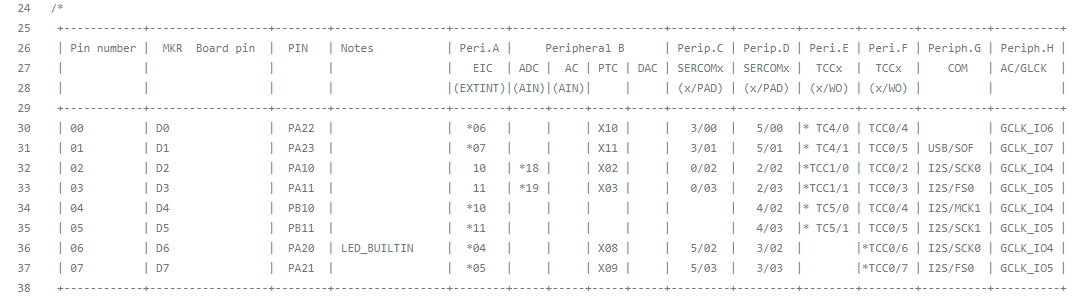
Note: I have verified the SERCOM ports of the MKR WAN 1310 board, and they are compatible with the MKR WAN 1300 board: https://github.com/arduino/ArduinoCore-samd/blob/5dced38e81e6001a4b6e237e3462bc8db962127a/variants/mkrwifi1010/variant.cpp
Finally, below I show you the code for the Arduino NANO 33 IoT board.
// AUTHOR: GUILLERMO PEREZ GUILLEN

#include <WiFiNINA.h> // THINGSPEAK->
#include "secrets.h"
#include "ThingSpeak.h"

char ssid[] = SECRET_SSID;    //  your network SSID (name)
char pass[] = SECRET_PASS;   // your network password
int keyIndex = 0;            // your network key Index number (needed only for WEP)
WiFiClient  client;
unsigned long myChannelNumber = SECRET_CH_ID;
const char * myWriteAPIKey = SECRET_WRITE_APIKEY;

char cadena[30]; //We create an array that will store the characters that we will write in the PC console. We assign a limit of characters, in this case 30
byte posicion=0;  //Variable to change the position of the characters in the array
int valor;  //Integer Variable

void setup()
{
  Serial.begin(9600);
  Serial1.begin(9600);
  // THINGSPEAK-> check for the WiFi module:
  if (WiFi.status() == WL_NO_MODULE) {
    Serial.println("Communication with WiFi module failed!");
    // don't continue
    while (true);
  }
  String fv = WiFi.firmwareVersion();
  if (fv != "1.0.0") {
    Serial.println("Please upgrade the firmware");
  }
  ThingSpeak.begin(client);  //Initialize ThingSpeak
}

void loop()
{
  // THINGSPEAK-> Connect or reconnect to WiFi
  if(WiFi.status() != WL_CONNECTED){
    Serial.print("Attempting to connect to SSID: ");
    Serial.println(SECRET_SSID);
    while(WiFi.status() != WL_CONNECTED){
      WiFi.begin(ssid, pass); // Connect to WPA/WPA2 network. Change this line if using open or WEP network
      Serial.print(".");
      delay(5000);
    }
    Serial.println("\nConnected.");
  }
  if(Serial1.available()) //Is there data inside the buffer?
  {
    memset(cadena, 0,sizeof(cadena));//memset deletes the contents of the array "cadena" from position 0 to the end sizeof

    while(Serial1.available()>0) //As long as there is data in the buffer execute the function
    {
      delay(5);
      cadena[posicion]=Serial1.read();//Read a character from the string "cadena" from "posicion", then read the next character with "posicion++"
      posicion++;
    }
    posicion=0;
    // Write to ThingSpeak. There are up to 8 fields in a channel, allowing you to store up to 8 different
    // pieces of information in a channel.  Here, we write to field 1.
    int parte1 = getValue(cadena,',',0).toInt();
    int parte2 = getValue(cadena,',',1).toInt();
    int parte3 = getValue(cadena,',',2).toInt();
    Serial.println(parte1);
    delay(100);
    Serial.println(parte2);
    delay(100);
    Serial.println(parte3);
    delay(100);
    // set the fields with the values
    ThingSpeak.setField(1, parte1);
    ThingSpeak.setField(2, parte2);
    ThingSpeak.setField(3, parte3);
  // write to the ThingSpeak channel
  int x = ThingSpeak.writeFields(myChannelNumber, myWriteAPIKey);
  if(x == 200){
    Serial.println("Channel update successful.");
  }
  else{
    Serial.println("Problem updating channel. HTTP error code " + String(x));
  }
    delay(15000);
  }
}

String getValue(String data, char separator, int index)
{
  int found = 0;
  int strIndex[] = {0, -1};
  int maxIndex = data.length()-1;
  for(int i=0; i<=maxIndex && found<=index; i++){
    if(data.charAt(i)==separator || i==maxIndex){
        found++;
        strIndex[0] = strIndex[1]+1;
        strIndex[1] = (i == maxIndex) ? i+1 : i;
    }
  }
  return found>index ? data.substring(strIndex[0], strIndex[1]) : "";
}
Below I show you the assembled receiver module.
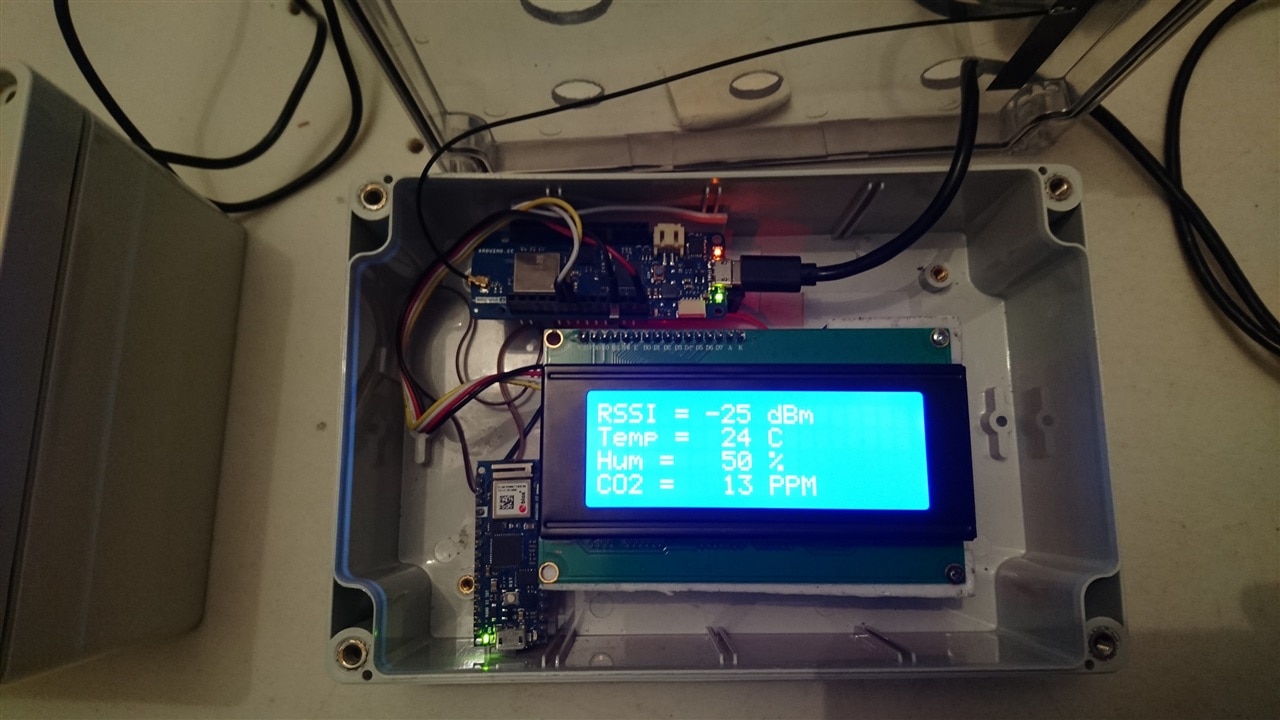
Now the two modules are ready for a test.