


Blog List:
Garbage Collector #1 Introduction
Garbage Collector #2 Clamp testing
Garbage Collector #3 Seeking help from Infineon's Technical Supports
Garbage Collector #4 Some basic interactions with the shields
Garbage Collector #5 Base testing
Garbage Collector #6 Wireless Controller
Garbage Collector #7 Clamp and Base
Garbage Collector #8 Clamp Improvement
Garbage Collector #9 Doubling the maximum current
Garbage Collector #10 Summary
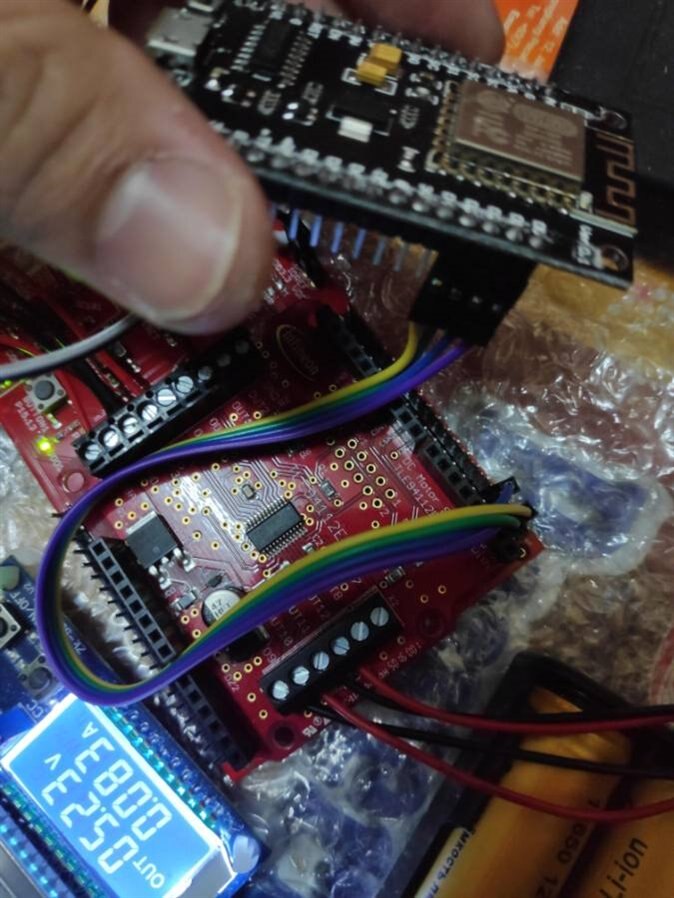
Previously, I have successfully built and tested the base of the Garbage Collector using a temporarily wired controller. In this blog post, I will share about the wireless controller that I have added to have an easier way to control the Garbage Collector.
I have chosen to use NodeMCU to connect to the Wifi and at the same time communicate to the XMC4700 Relax Kit through GPIO.
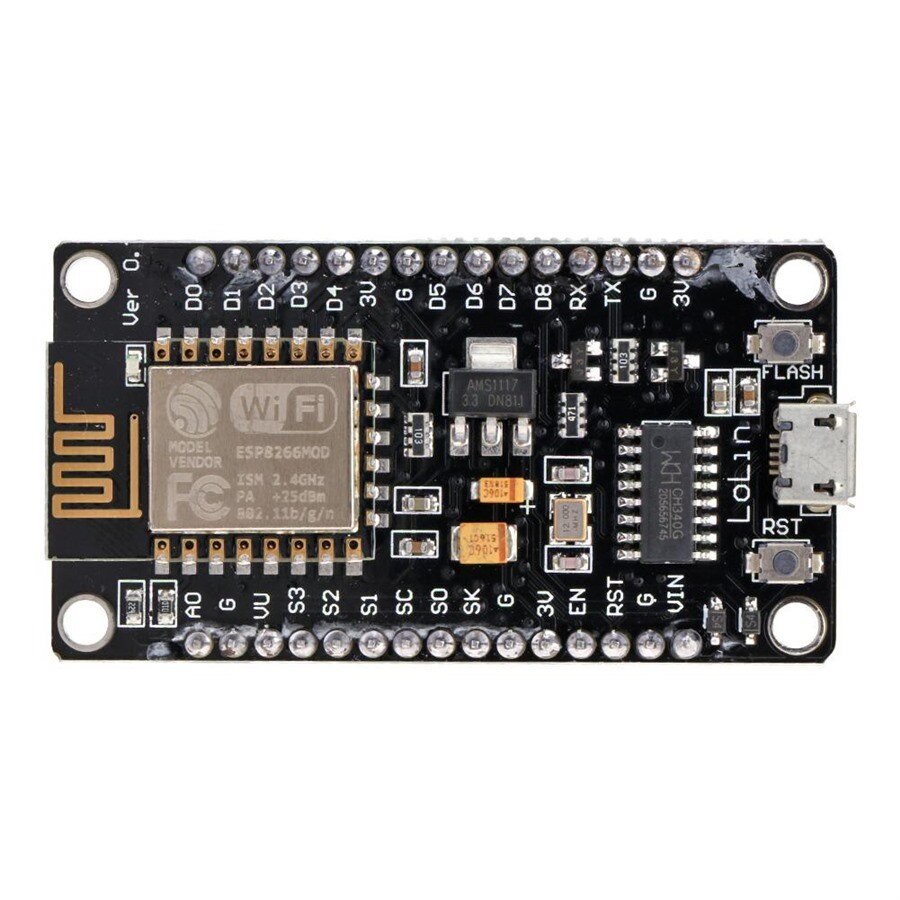
By referring to the tutorial on Youtube https://www.youtube.com/watch?v=aw_3X-vp7aI&list=WL&index=48&t=0s&ab_channel=RoboShala , I was able to create an app to control the NodeMCU wirelessly, and eventually, the NodeMCU will communicate with XMC4700 using its GPIO.
Below is the Arduino code for the NodeMCU:
#include <ESP8266WiFi.h>


String  i;
WiFiServer server(80);


  int FORWARD = 16;
  int REVERSE  = 5;
  int LEFT  = 4;
  int RIGHT = 0;
  int UP  = 14;
  int DOWN  = 12;
  int OPEN  = 13;
  int CLOSE = 15;


void setup()
{
  i = "";


  Serial.begin(9600);


  pinMode(FORWARD, OUTPUT); // GPIO pin16=D0 of NodeMCU 12E or in place of '16' you can write'D0' directly || -->Connected to motordriver
  pinMode(REVERSE, OUTPUT);  // GPIO pin5=D1 of NodeMCU 12E or in place of '16' you can write 'D0' directly || -->Connected to motordriver
  pinMode(LEFT, OUTPUT);  // GPIO pin4=D2 of NodeMCU 12E or in place of '16' you can write 'D0' directly || -->Connected to motordriver
  pinMode(RIGHT, OUTPUT);  // GPIO pin0=D3 of NodeMCU 12E or in place of '16' you can write 'D0' directly || -->Connected to motordriver
  pinMode(UP, OUTPUT);
  pinMode(DOWN, OUTPUT);
  pinMode(OPEN, OUTPUT);
  pinMode(CLOSE, OUTPUT);
    WiFi.disconnect();
  delay(2000);
  Serial.println("Connecting to WIFI");
   WiFi.begin("Wan-TIME2.4Ghz","zickwan-4896");
  while ((!(WiFi.status() == WL_CONNECTED))){
    delay(300);
    Serial.print("..");


  }Serial.println("I am Connected");
  Serial.println("My Local IP is : ");
  Serial.print((WiFi.localIP()));
  server.begin();


}


void loop()
{


    WiFiClient client = server.available();
    if (!client) { return; }
    while(!client.available()){  delay(1); }
    i = (client.readStringUntil('\r'));
    i.remove(0, 5);
    i.remove(i.length()-9,9);

    if (i == "forward") {
      digitalWrite(FORWARD,HIGH);
      digitalWrite(REVERSE,LOW);
      digitalWrite(LEFT,LOW);
      digitalWrite(RIGHT,LOW);
      client.println("HTTP/1.1 200 OK");
      client.println("Content-Type: text/html");
      client.println("");
      client.println("<!DOCTYPE HTML>");
      client.println("<html>");
      client.println("forward");
      client.println("</html>");
      client.stop();


    }
    if (i == "reverse") {
      digitalWrite(FORWARD,LOW);
      digitalWrite(REVERSE,HIGH);
      digitalWrite(LEFT,LOW);
      digitalWrite(RIGHT,LOW);
      client.println("HTTP/1.1 200 OK");
      client.println("Content-Type: text/html");
      client.println("");
      client.println("<!DOCTYPE HTML>");
      client.println("<html>");
      client.println("reverse");
      client.println("</html>");
      client.stop();


    }
    if (i == "left") {
      digitalWrite(FORWARD,LOW);
      digitalWrite(REVERSE,LOW);
      digitalWrite(LEFT,HIGH);
      digitalWrite(RIGHT,LOW);
      client.println("HTTP/1.1 200 OK");
      client.println("Content-Type: text/html");
      client.println("");
      client.println("<!DOCTYPE HTML>");
      client.println("<html>");
      client.println("left");
      client.println("</html>");
      client.stop();


    }
    if (i == "right") {
      digitalWrite(FORWARD,LOW);
      digitalWrite(REVERSE,LOW);
      digitalWrite(LEFT,LOW);
      digitalWrite(RIGHT,HIGH);
      client.println("HTTP/1.1 200 OK");
      client.println("Content-Type: text/html");
      client.println("");
      client.println("<!DOCTYPE HTML>");
      client.println("<html>");
      client.println("right");
      client.println("</html>");
      client.stop();


    }
    if (i == "stop") {
      digitalWrite(FORWARD,LOW);
      digitalWrite(REVERSE,LOW);
      digitalWrite(LEFT,LOW);
      digitalWrite(RIGHT,LOW);
      client.println("HTTP/1.1 200 OK");
      client.println("Content-Type: text/html");
      client.println("");
      client.println("<!DOCTYPE HTML>");
      client.println("<html>");
      client.println("right");
      client.println("</html>");
      client.stop();


    }


    if (i == "up") {
      digitalWrite(UP,HIGH);
      digitalWrite(DOWN,LOW);
      client.println("HTTP/1.1 200 OK");
      client.println("Content-Type: text/html");
      client.println("");
      client.println("<!DOCTYPE HTML>");
      client.println("<html>");
      client.println("up");
      client.println("</html>");
      client.stop();


    }
    if (i == "down") {
      digitalWrite(UP,LOW);
      digitalWrite(DOWN,HIGH);
      client.println("HTTP/1.1 200 OK");
      client.println("Content-Type: text/html");
      client.println("");
      client.println("<!DOCTYPE HTML>");
      client.println("<html>");
      client.println("down");
      client.println("</html>");
      client.stop();


    }
    if (i == "open") {
      digitalWrite(OPEN,HIGH);
      digitalWrite(CLOSE,LOW);
      client.println("HTTP/1.1 200 OK");
      client.println("Content-Type: text/html");
      client.println("");
      client.println("<!DOCTYPE HTML>");
      client.println("<html>");
      client.println("open");
      client.println("</html>");
      client.stop();


    }
    if (i == "close") {
      digitalWrite(OPEN,LOW);
      digitalWrite(CLOSE,HIGH);
      client.println("HTTP/1.1 200 OK");
      client.println("Content-Type: text/html");
      client.println("");
      client.println("<!DOCTYPE HTML>");
      client.println("<html>");
      client.println("close");
      client.println("</html>");
      client.stop();


    }
    if (i == "hold") {
      digitalWrite(OPEN,LOW);
      digitalWrite(CLOSE,LOW);
      client.println("HTTP/1.1 200 OK");
      client.println("Content-Type: text/html");
      client.println("");
      client.println("<!DOCTYPE HTML>");
      client.println("<html>");
      client.println("close");
      client.println("</html>");
      client.stop();


    }


}
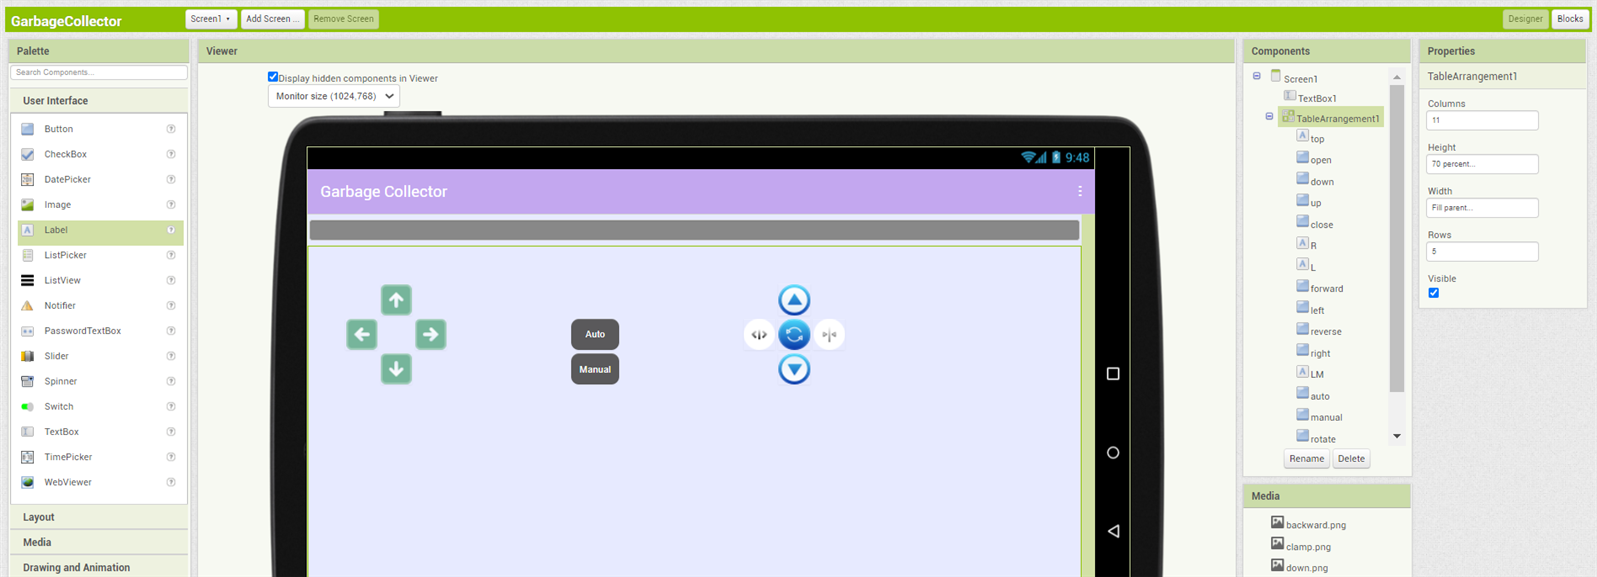
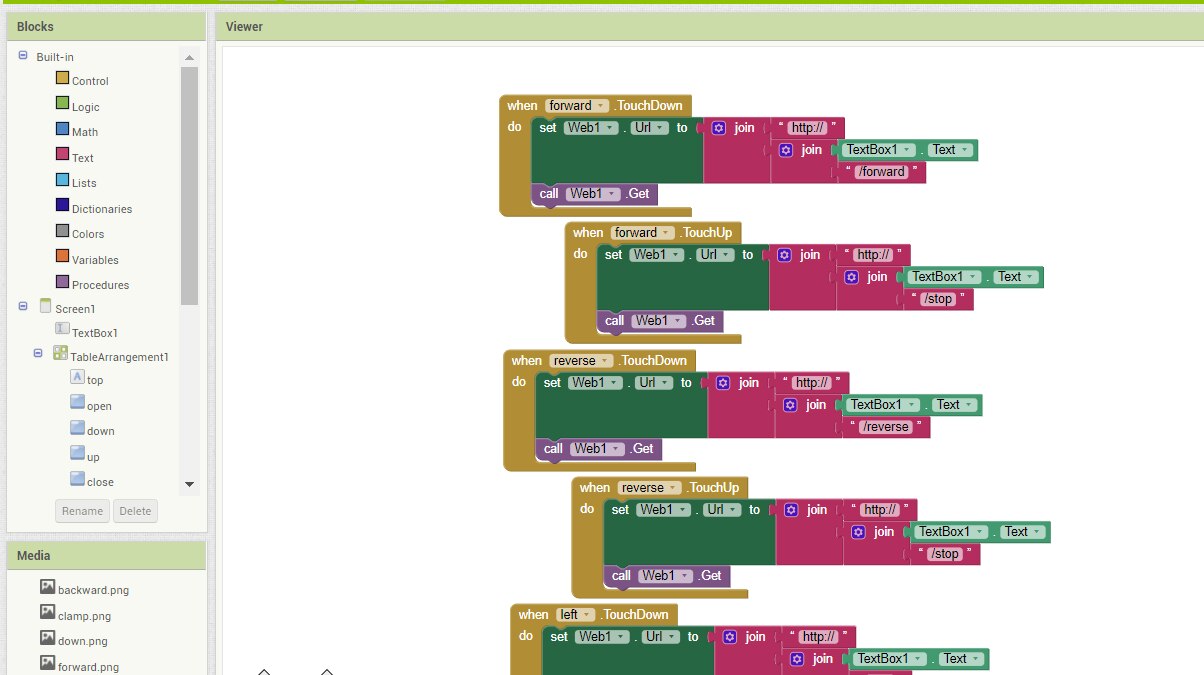
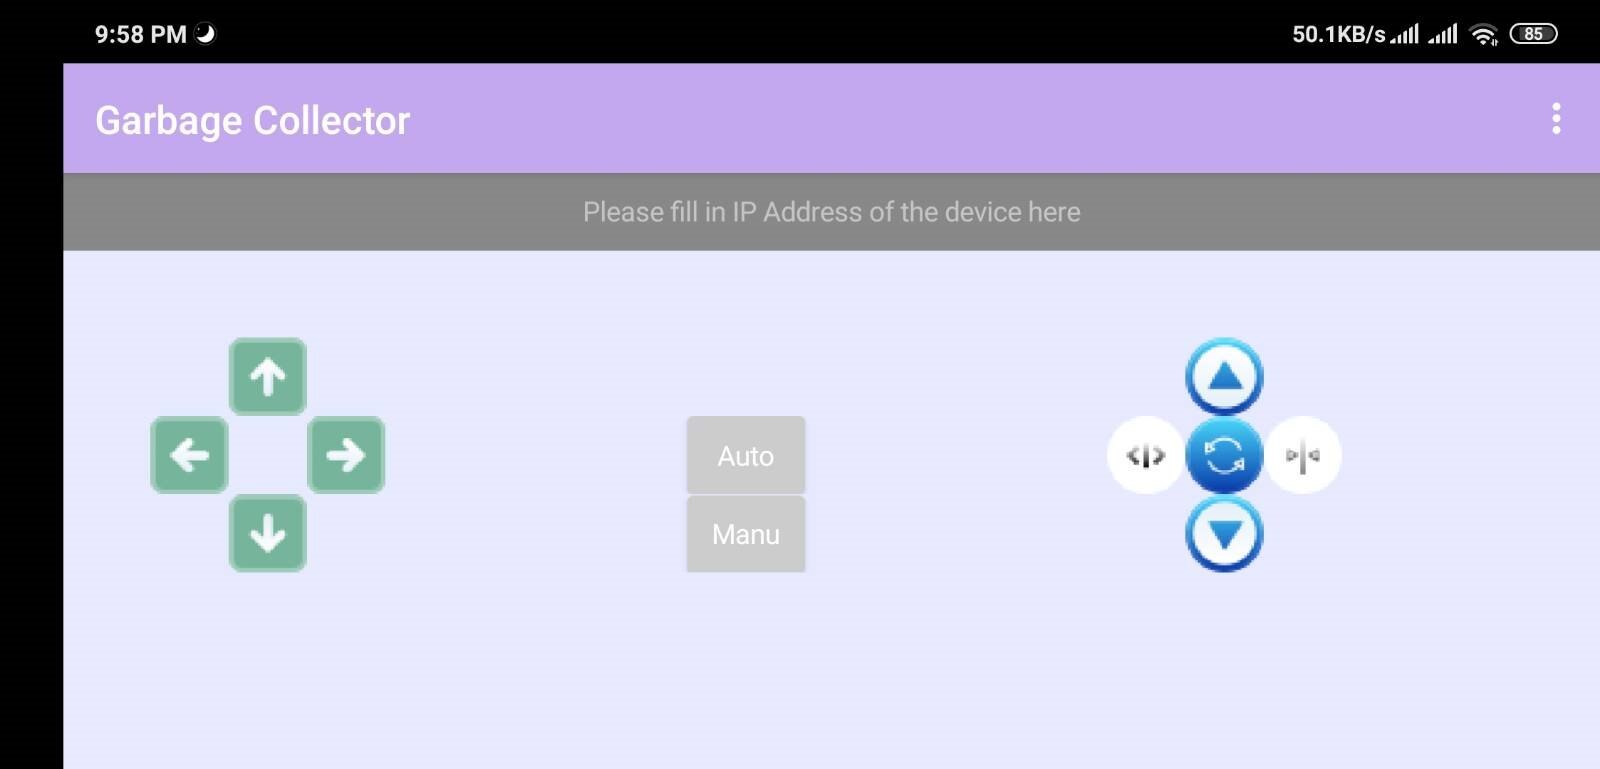
I have also created a mobile application using MIT App Inventor http://ai2.appinventor.mit.edu/ :
These are the files the project files and the application file of the mobile application:
GarbageCollector.aia: https://drive.google.com/file/d/1Y7JBFpfzyy_74JlLXz_viGhGEDukXx5q/view?usp=sharing (this is the project file to be imported into MIT App Inventor website in case you want to modify the mobile app)
GarbageCollector.apk: https://drive.google.com/file/d/1BGUqz-hG-M4dnJ9xAlqZMnON4MUva2a-/view?usp=sharing (this is the apk file to be installed to the mobile phone)
Controller.ino: https://drive.google.com/file/d/1csAxbVDEpEGvAw5EQfT8TB4ZNec8dwEG/view?usp=sharing (Arduino project file to be uploaded to NodeMCU
User Interface of the mobile application that I have created:
For the XMC4700 Relax Kit, the code that I'm using is the same code as in my previous blog post where the DAVE project can be cloned at the following GitHub link:
GitHub link https://github.com/wanfp97/freertos_motor
I have connected pins D0, D1, D2, and D3 (representing forward, backward, left, and right) to the respective interrupt pins that I have set in the DAVE project for XMC4700 Relax Kit (P0.4, P0.1, P0.6, and P0.5).
Below is the wireless controller testing video:
Design Flow: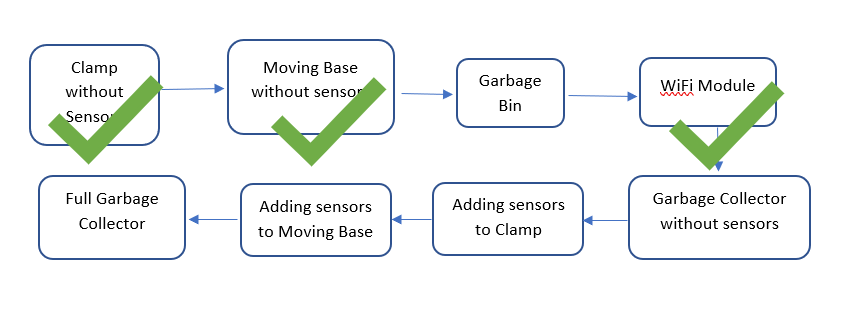
What's Next?
I'm going to attach the clamp, garbage bin, as well as batteries to the base of the Garbage Collector and test them all at once. See you next blog.