


A few easy steps to get an RTOS project running on the MSP432 LaunchPad
Part 1 sets up the project, explains how to configure a task and gets the Blinky running. |

What you need:
- MSP432 LaunchPad
- 1 micro-USB cable
- Code Composer Studio
- TI-RTOS for MSP43X
Starting a Project
I start by importing the TI-RTOS "Empty" example. It's a pretty decently configured start point.
With a few clicks you have a running project that you can test out right away. Your LaunchPad's LED1 will blink once per minute if you've done things right.
Follow these steps to import the project:
Start Code Composer Studio.
Menu View -> Resource Explorer
Navigate to TI-RTOS for MSP43x -> Development Tools -> MSP-EXP432x -> Driver Examples -> Empty Examples -> Empty Project

Click the Import to IDE button.
You now have a project named empty_MSP_EXP432P401R_TI.
Build it and execute via the debugger. Check if the red led at the left bottom corner of the LaunchPad is blinking.
Enjoy your first success. You have shown that you have an RTOS program that compiles and runs fine.
When you have looked at the led for a few hours, stop the debugger. The led will keep on blinking.
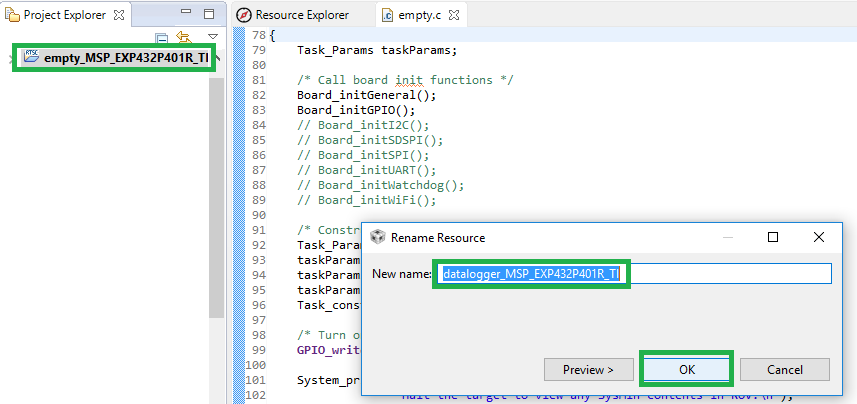
Rename the project and any file with "empty" in the name to something meaningful.
I'm using "datalogger" for this example.
The project name becomes "datalogger_MSP_EXP432P401R_TI". Right-click on the project root in the Project explorer and select Rename....
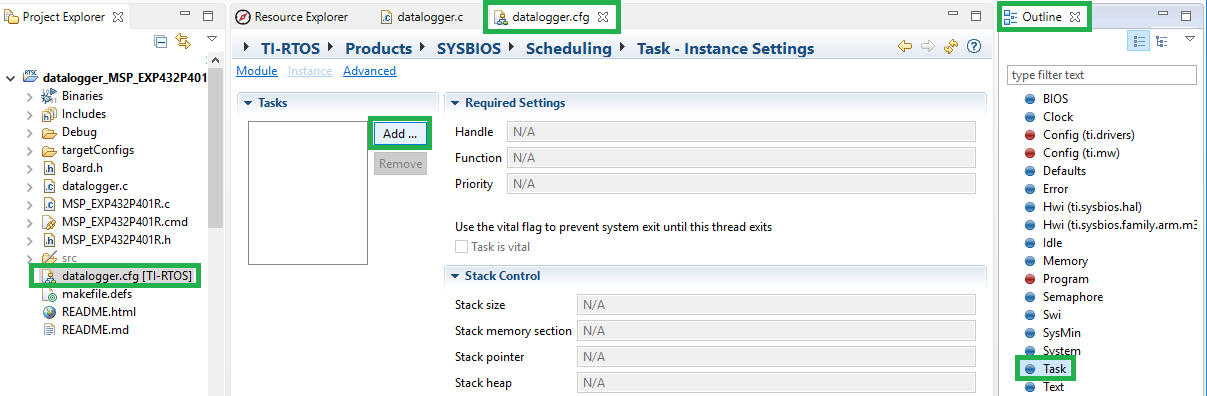
Then rename the following files by rightclicking on them selecting rename:
empty.c -> datalogger.c
empty.cfg -> datalogger.cfg
Build and run the project again. That will show that you have successfully completed the steps.
There's more to this example than meets the eye. You get the basic logging and instrumentation skeleton. And the controller is configured to go to low-energy mode when idle.

Configure the Blinky Task
The empty project registers the blinky task with code.
    /* Construct heartBeat Task  thread */
    Task_Params_init(&taskParams);
    taskParams.arg0 = 1000;
    taskParams.stackSize = TASKSTACKSIZE;
    taskParams.stack = &task0Stack;
    Task_construct(&task0Struct, (Task_FuncPtr)heartBeatFxn, &taskParams, NULL);
That's fine (you can also see the convention - used by many - to pass the scheduling time as arg0). You can use that method if you prefer.
In TI-RTOS, you can also set up the task with the configuration editor.
The result for your firmware is exactly the same, but you get some additional advantages:
- all tasks and their priorities, stack size and timings available in one place
- an editor to view and change task settings
- a cleaner main()
Let's start by removing the program code that sets up our Blink task from datalogger.c. Just write down the settings that are used to create the task
Did that for you  : Stacksize 512, Sleep time 1000
Remove the following lines:
#define TASKSTACKSIZE   512


Task_Struct task0Struct;
Char task0Stack[TASKSTACKSIZE];
and:
    Task_Params taskParams;
    // ...
    /* Construct heartBeat Task  thread */
    Task_Params_init(&taskParams);
    taskParams.arg0 = 1000;
    taskParams.stackSize = TASKSTACKSIZE;
    taskParams.stack = &task0Stack;
    Task_construct(&task0Struct, (Task_FuncPtr)heartBeatFxn, &taskParams, NULL);
and configure the scheduling again in the TI-RTOS configuration editor.
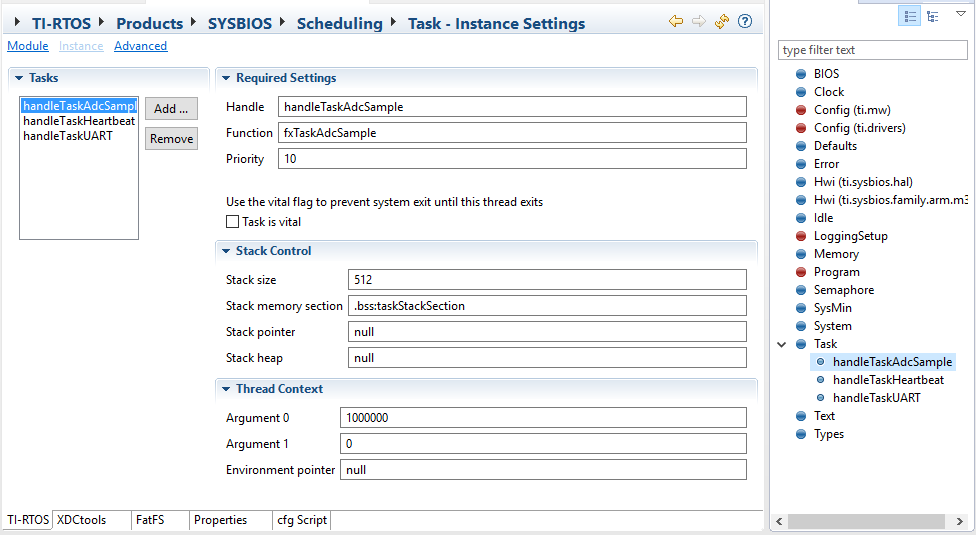
Double-click on datalogger.cfg. In the outline view on the right, select the Task node. Click Add....
A new form opens that lets you set the parameters:
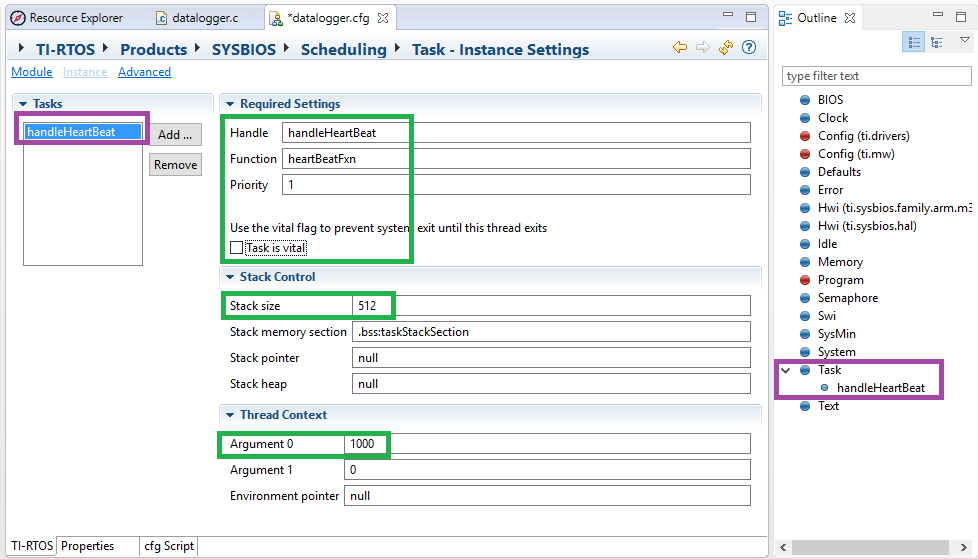
Enter a name for the task handle. In the Function field, use the exact name of the blinky task (heartBeatFxn).
Priority is 1 (very low). The LED will give us a quick view into the RTOS scheduler health.
If the scheduler can't cope with the load, the rhythm of the LED will become irregular.
That's a great help during the development cycle.
Set the Stack size and Argument0 value to those you've written down before.
Press the Save All button to apply the changes to both files we edited.
Build and execute again. The program behaves exactly the same as before.
That's what we wanted.
Next
In the next blog I'll add an a new task. I'll also ad the ADC driver and integrate sampling into the project.
For those playing along, here's the content of datalogger.c after the changes:
/*
 * Copyright (c) 2015, Texas Instruments Incorporated
 * All rights reserved.
 *
 * Redistribution and use in source and binary forms, with or without
 * modification, are permitted provided that the following conditions
 * are met:
 *
 * *  Redistributions of source code must retain the above copyright
 *    notice, this list of conditions and the following disclaimer.
 *
 * *  Redistributions in binary form must reproduce the above copyright
 *    notice, this list of conditions and the following disclaimer in the
 *    documentation and/or other materials provided with the distribution.
 *
 * *  Neither the name of Texas Instruments Incorporated nor the names of
 *    its contributors may be used to endorse or promote products derived
 *    from this software without specific prior written permission.
 *
 * THIS SOFTWARE IS PROVIDED BY THE COPYRIGHT HOLDERS AND CONTRIBUTORS "AS IS"
 * AND ANY EXPRESS OR IMPLIED WARRANTIES, INCLUDING, BUT NOT LIMITED TO,
 * THE IMPLIED WARRANTIES OF MERCHANTABILITY AND FITNESS FOR A PARTICULAR
 * PURPOSE ARE DISCLAIMED. IN NO EVENT SHALL THE COPYRIGHT OWNER OR
 * CONTRIBUTORS BE LIABLE FOR ANY DIRECT, INDIRECT, INCIDENTAL, SPECIAL,
 * EXEMPLARY, OR CONSEQUENTIAL DAMAGES (INCLUDING, BUT NOT LIMITED TO,
 * PROCUREMENT OF SUBSTITUTE GOODS OR SERVICES; LOSS OF USE, DATA, OR PROFITS;
 * OR BUSINESS INTERRUPTION) HOWEVER CAUSED AND ON ANY THEORY OF LIABILITY,
 * WHETHER IN CONTRACT, STRICT LIABILITY, OR TORT (INCLUDING NEGLIGENCE OR
 * OTHERWISE) ARISING IN ANY WAY OUT OF THE USE OF THIS SOFTWARE,
 * EVEN IF ADVISED OF THE POSSIBILITY OF SUCH DAMAGE.
 */

/*
 *  ======== empty.c ========
 */
/* XDCtools Header files */
#include <xdc/std.h>
#include <xdc/runtime/System.h>

/* BIOS Header files */
#include <ti/sysbios/BIOS.h>
#include <ti/sysbios/knl/Task.h>

/* TI-RTOS Header files */
#include <ti/drivers/GPIO.h>
// #include <ti/drivers/I2C.h>
// #include <ti/drivers/SDSPI.h>
// #include <ti/drivers/SPI.h>
// #include <ti/drivers/UART.h>
// #include <ti/drivers/Watchdog.h>
// #include <ti/drivers/WiFi.h>

/* Board Header file */
#include "Board.h"

/*
 *  ======== heartBeatFxn ========
 *  Toggle the Board_LED0. The Task_sleep is determined by arg0 which
 *  is configured for the heartBeat Task instance.
 */
Void heartBeatFxn(UArg arg0, UArg arg1)
{
    while (1) {
        Task_sleep((UInt)arg0);
        GPIO_toggle(Board_LED0);
    }
}

/*
 *  ======== main ========
 */
int main(void)
{
    /* Call board init functions */
    Board_initGeneral();
    Board_initGPIO();
    // Board_initI2C();
    // Board_initSDSPI();
    // Board_initSPI();
    // Board_initUART();
    // Board_initWatchdog();
    // Board_initWiFi();

    /* Turn on user LED */
    GPIO_write(Board_LED0, Board_LED_ON);

    System_printf("Starting the example\nSystem provider is set to SysMin. "
                  "Halt the target to view any SysMin contents in ROV.\n");
    /* SysMin will only print to the console when you call flush or exit */
    System_flush();

    /* Start BIOS */
    BIOS_start();

    return (0);
}
Good luck!
Little secret: works exactly the same for MSP430, TIVA / TM4C and the SimpleLink CC1310, CC2650, CC3200.
Top Comments