


As much as I was enjoying messing about with the mechanical part of the Furby there was still a big unknown for me that I wanted resolved. That was how to get the sound to make the Furby speak. I had considered an I2S audio module as that does seem the more elegant option. However, as I'd already decided to control my Furby using the breakout board that meant that I was working with 1.8v I/O so I2C could be problematic.
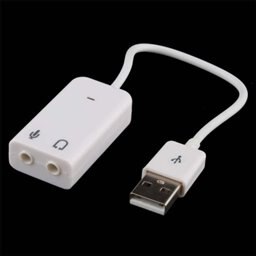
Instead, I went for the USB option with a cheap USB module from Ebay that mentioned it supported Linux. I'd bought this right at the beginning of the challenge as I'd heard that Ben Heck has gone for USB Audio in his last project. Apart from plugging it into a windows machine to make sure it actually worked I'd not done anything with it..
I spotted a few other challengers have already used USB sound so I had a quick read of their articles.
Upcycle It - Funeka - The Skull #5 : Ohh, it's music to my ears
Blog Entry #1: Recording and Calibrating the Tockman
Looks like aplay is a nice simple way to play the audio file and that can be called from nodejs either as a child process using execFile or via a npm package. These are both asynchronous so I can get on with other things such as making the mouth move whilst the sound is playing.
Setup
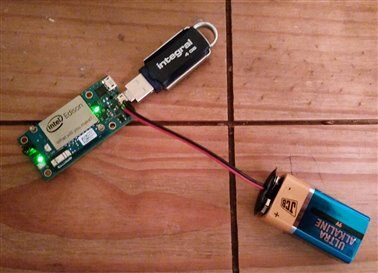
I booted up the Edison Arduino with the audio card wired in and ran :
lsusb
To see all the devices, instead I got an error.
unable to initialize libusb: -99
To check that the USB was present I ran
lspci | grep USB
And that returned
00:11.0 USB controller: Intel Corporation Device 119e (rev 01)
Googling the above error -99 I found that it was simply that I needed to swap SW1 from Device to Host.
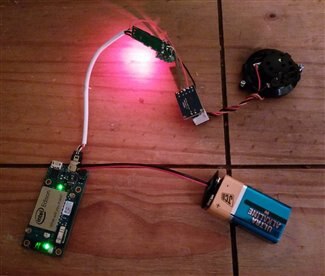
I repeated the command (and got a strange red light on the Audio card) and the following was returned:
root@Eddie:~# lsusb
Bus 002 Device 001: ID 1d6b:0003 Linux Foundation 3.0 root hub
Bus 001 Device 002: ID 0d8c:013c C-Media Electronics, Inc. CM108 Audio Controller
Bus 001 Device 001: ID 1d6b:0002 Linux Foundation 2.0 root hub
Next following the "Rock out with the Edison" article I checked that there was a PCM audio device available.
root@Eddie:~# cat /proc/asound/pcm
00-00: Loopback PCM : Loopback PCM : playback 8 : capture 8
00-01: Loopback PCM : Loopback PCM : playback 8 : capture 8
01-00: 14 :  : playback 1 : capture 1
01-01: ((null)) :  : playback 1 : capture 1
01-02: ((null)) :  : playback 1 : capture 1
02-00: USB Audio : USB Audio : playback 1 : capture 1
Next up was checking the playback and audio devices with PulseAudio sound server control
root@Eddie:~# pactl list | grep Name | grep usb
        Name: alsa_output.usb-C-Media_Electronics_Inc._USB_PnP_Sound_Device-00-Device.analog-stereo
        Name: alsa_output.usb-C-Media_Electronics_Inc._USB_PnP_Sound_Device-00-Device.analog-stereo.monitor
        Name: alsa_input.usb-C-Media_Electronics_Inc._USB_PnP_Sound_Device-00-Device.analog-mono
        Name: alsa_card.usb-C-Media_Electronics_Inc._USB_PnP_Sound_Device-00-Device
Test
I wanted to know if the sound would be loud enough so I plugged in some headphones. I was looking for a test sound to try so I did some googling and found these sounds Electronic Furby: Furby Sounds but I decided to go with http://sounds.stoutman.com/sounds/better.wav instead.
Aplay showed my card listed as card 2: Device
root@Eddie:~# aplay -l
**** List of PLAYBACK Hardware Devices ****
card 0: Loopback [Loopback], device 0: Loopback PCM [Loopback PCM]
  Subdevices: 8/8
  Subdevice #0: subdevice #0
  Subdevice #1: subdevice #1
  Subdevice #2: subdevice #2
  Subdevice #3: subdevice #3
  Subdevice #4: subdevice #4
  Subdevice #5: subdevice #5
  Subdevice #6: subdevice #6
  Subdevice #7: subdevice #7
card 0: Loopback [Loopback], device 1: Loopback PCM [Loopback PCM]
  Subdevices: 8/8
  Subdevice #0: subdevice #0
  Subdevice #1: subdevice #1
  Subdevice #2: subdevice #2
  Subdevice #3: subdevice #3
  Subdevice #4: subdevice #4
  Subdevice #5: subdevice #5
  Subdevice #6: subdevice #6
  Subdevice #7: subdevice #7
card 1: dummyaudio [dummy-audio], device 0: 14 []
  Subdevices: 1/1
  Subdevice #0: subdevice #0
card 2: Device [USB PnP Sound Device], device 0: USB Audio [USB Audio]
  Subdevices: 1/1
  Subdevice #0: subdevice #0
So I played the file using "Device" as that is the name of the USB audio.
aplay -D default:Device better.wav
It's possible to configure the ALSA subsystem so that the USB device is the default so I may do that in the future.
Turn it up to 11
The volume from the headphones was not very loud so amplification was necessary. Interestingly, the Furby does not have an audio amplifier although that may be tucked away in the COB#2. So I used a new PAM8302A 2.5W amplifier module.

I wired the amplifier supply to the power lines on the USB, IN- to GND, IN+ to one of the audio channels and /SD to +5v. And tested.

USB On the Go
The Edison mini has micro USB sockets and my sound card had a full sized USB. I could have included an adapter but instead I decided to put on a micro-USB connector with the suitable OTG wiring i.e. pins 4 and 5 shorted, so that it would correctly be detected by the Edison.
Here's the connections seen from the plug end.

It was at this point I realised I still had an issue powering the Mini-Breakout board. Because of the extra regulator on the J21 route it won't run from the 5v I was producing from my battery box. It would run fine from the USB (at 5v) but I now needed that for the sound card.
The Grove kit came to my rescue in that it had a PP3 to Jack connector. I cropped that off and connected on a 2 pin socket.
I plugged it all together and my audio did not work. I had a little adapter that turns big USB into mini so I used that with a memory stick to check that the port was working. It was, so I returned my audio card to the bench and resoldered the connections. I hooked it back up and this time it was properly detected. So I tested it one last time with the audio file, "I'm feeling better now, I really am".
Reference
Intel Edison Audio Setup Guide
Advanced Linux Sound Architecture
2.5W Class D Audio Amplifier - PAM8302
Maxim - Understanding USB On the Go
Understanding execfile spawn exec and fork in node
How-to-make-your-own-usb-otg-cable-for-an-android-smartphone
Previous Posts
Upcycle It Blogs tagged with upcycled_interactiveracecardriver
Top Comments