element14 Community
element14 Community
    Register Log In
  • Site
  • Search
  • Log In Register
  • Community Hub
    Community Hub
    • What's New on element14
    • Feedback and Support
    • Benefits of Membership
    • Personal Blogs
    • Members Area
    • Achievement Levels
  • Learn
    Learn
    • Ask an Expert
    • eBooks
    • element14 presents
    • Learning Center
    • Tech Spotlight
    • STEM Academy
    • Webinars, Training and Events
    • Learning Groups
  • Technologies
    Technologies
    • 3D Printing
    • FPGA
    • Industrial Automation
    • Internet of Things
    • Power & Energy
    • Sensors
    • Technology Groups
  • Challenges & Projects
    Challenges & Projects
    • Design Challenges
    • element14 presents Projects
    • Project14
    • Arduino Projects
    • Raspberry Pi Projects
    • Project Groups
  • Products
    Products
    • Arduino
    • Avnet Boards Community
    • Dev Tools
    • Manufacturers
    • Multicomp Pro
    • Product Groups
    • Raspberry Pi
    • RoadTests & Reviews
  • Store
    Store
    • Visit Your Store
    • Choose another store...
      • Europe
      •  Austria (German)
      •  Belgium (Dutch, French)
      •  Bulgaria (Bulgarian)
      •  Czech Republic (Czech)
      •  Denmark (Danish)
      •  Estonia (Estonian)
      •  Finland (Finnish)
      •  France (French)
      •  Germany (German)
      •  Hungary (Hungarian)
      •  Ireland
      •  Israel
      •  Italy (Italian)
      •  Latvia (Latvian)
      •  
      •  Lithuania (Lithuanian)
      •  Netherlands (Dutch)
      •  Norway (Norwegian)
      •  Poland (Polish)
      •  Portugal (Portuguese)
      •  Romania (Romanian)
      •  Russia (Russian)
      •  Slovakia (Slovak)
      •  Slovenia (Slovenian)
      •  Spain (Spanish)
      •  Sweden (Swedish)
      •  Switzerland(German, French)
      •  Turkey (Turkish)
      •  United Kingdom
      • Asia Pacific
      •  Australia
      •  China
      •  Hong Kong
      •  India
      •  Korea (Korean)
      •  Malaysia
      •  New Zealand
      •  Philippines
      •  Singapore
      •  Taiwan
      •  Thailand (Thai)
      • Americas
      •  Brazil (Portuguese)
      •  Canada
      •  Mexico (Spanish)
      •  United States
      Can't find the country/region you're looking for? Visit our export site or find a local distributor.
  • Translate
  • Profile
  • Settings
Hardware Hacking
  • Challenges & Projects
  • Project14
  • Hardware Hacking
  • More
  • Cancel
Hardware Hacking
Blog Radio Magic: I Need a Case! (part 3)
  • Blog
  • Forum
  • Documents
  • Events
  • Polls
  • Files
  • Members
  • Mentions
  • Sub-Groups
  • Tags
  • More
  • Cancel
  • New
Join Hardware Hacking to participate - click to join for free!
  • Share
  • More
  • Cancel
Group Actions
  • Group RSS
  • More
  • Cancel
Engagement
  • Author Author: balearicdynamics
  • Date Created: 10 Jul 2020 8:10 AM Date Created
  • Views 3019 views
  • Likes 8 likes
  • Comments 16 comments
  • fm radio
  • vintage
  • analog music
  • perspex
  • bush fm radio
  • laser cutter
  • vintage music
  • hardwarehackingch
  • digital control
  • synth
Related
Recommended

Radio Magic: I Need a Case! (part 3)

balearicdynamics
balearicdynamics
10 Jul 2020

  • Why a Case Now
    • Design
    • Assembling

Links to the previous parts

Part 1

Part 2

Part 3

Part 4

Why a Case Now

The idea of this Vintage-Modern-Upcycled-Modular device (wow! So long) is a set of modules connected together designed in a way easy to reproduce, as well as making partially. This first prototype is designed in the simplest way, using the popular Fritzing circuit design tool and PCB prototyping boards but aims to become something more stable with its own series of well-designed circuits with Altium and professionally-made PCB. For the same reason, I have designed – and solved the respective issues – several circuits modules connected together. The availability of multiple modules makes it easier to organize the spaces inside the box case; at this point in the project, it is essential the case design available to better organize the distribution of the spaces.

There are some assumptions I had to consider in the design:


  1. The main control panel should be easy to manage
  2. Wiring to the external component (the vintage radio in this case) should be simple and easy to connect
  3. The case size and geometry is conditioned by the analog control panel (including some old-school digital parts)


image

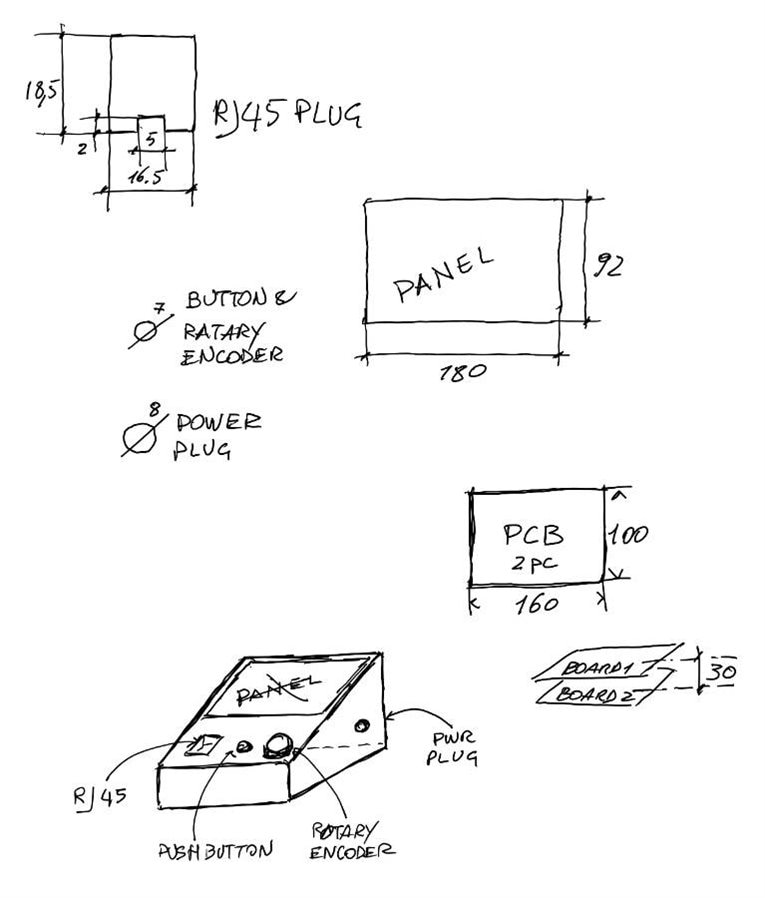
The above image is the first draft showing the initial idea of the case and some quotes; The form-factor remained almost the same – but, in my opinion, more pleasant now – while the main controls and connector have been moved in a more ergonomic position. I chose to make the case laser-cut using a 3 mm sheet of perspex from Kitronik, yellow color. The color shade of the acrylic laminate fits very well with the classic yellow color palette of the 60-70s' vintage design creating a good contrast with the blue baby color of the BUSH radio.

imageimage

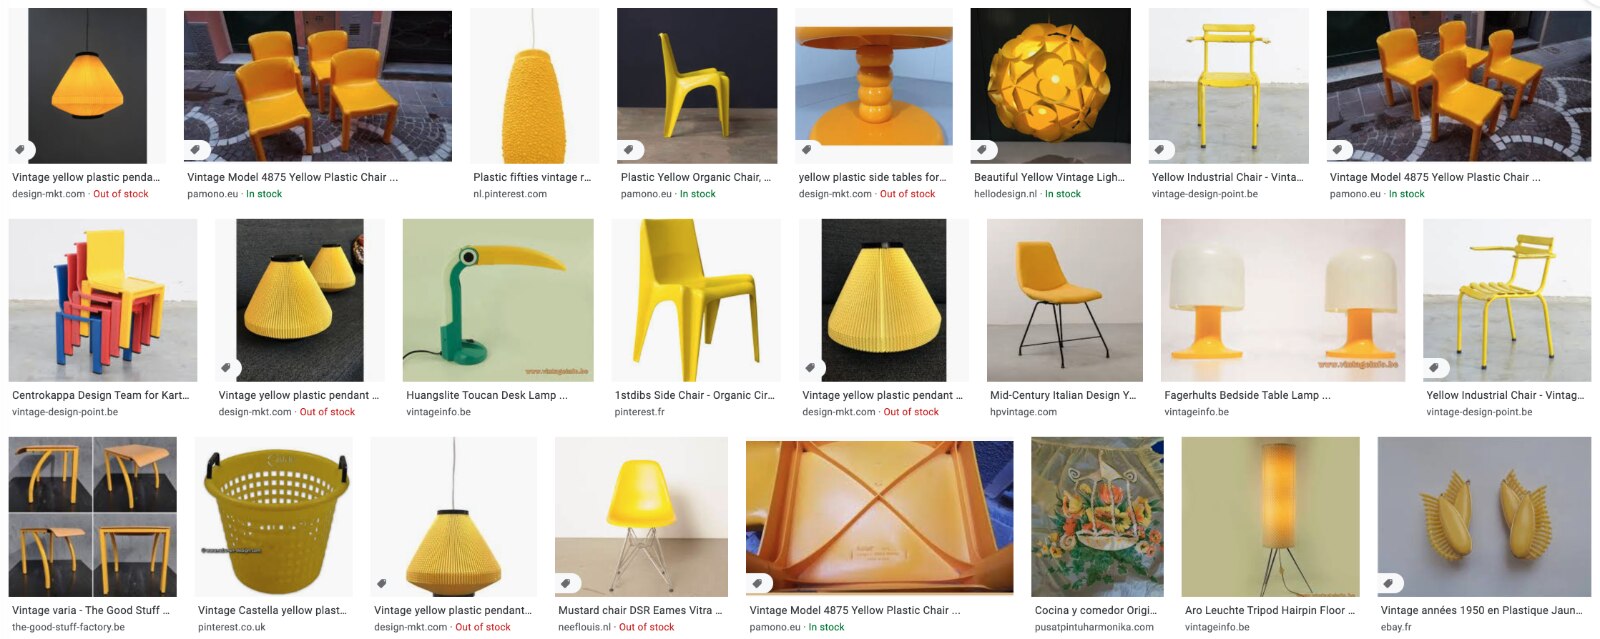
Above: the yellow color in a retro-palette (source: color-hex.com) and some examples of vintage designs in yellow


Design

To design the parts for laser-cutting boxes and cases, I frequently used the online tool https://en.makercase.com/#/  but this site has a big limit to create only regular polygons or square/rounded boxes. Investigating online for alternatives I found a very interesting alternative: boxes.py This site is an online tool supporting a wide variety of boxes, cases, rounded boxes, consoles, all parametric; not only but if you have special needs the site uses a Python library available on GitHub. The APIs of this library permit to manage a lot of buildings as well.


Below: the components created with boxes.py to build the synth console.

image

I should credit Ingegno Maker Space (and M.Cristina Ciocci) for the availability of their professional laser cutter.


Assembling

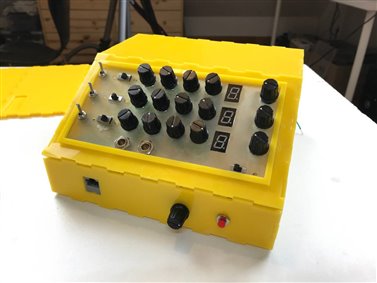
Just in case, I have also cut a copy of the console case with 3 mm plywood to make experiments if some adaption was needed. As shown in the image below, the result of the parts generated with boxes.py was excellent and no further changes were needed.

image

Using two thin frames glued inside and outside the square hole of the front side of the case I fixed the main control panel after I have pre-soldered all the wires that will be connected to the boards.

imageimage

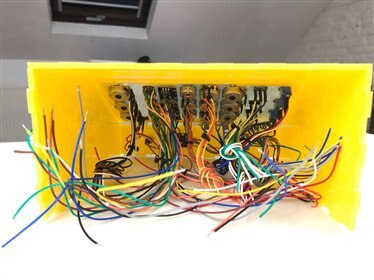
Above: inside and outside view of the case with the control panel assembled.


Everything is ready to assemble the circuits and connect the PCB modules inside. A question still has no answer: what is the RJ45 connector?

If you want to know the answer, stay in touch, the next part will follow soon!

  • Sign in to reply

Top Comments

  • dubbie
    dubbie over 4 years ago +4
    Enrico, That's a nice box. I quite like the wooden one. Dubbie
  • balearicdynamics
    balearicdynamics over 4 years ago in reply to dubbie +4
    Dubbie, I like it too but in the context of the upcycle, it is more appropriate the yellow plastic. Then, this is just a prototype. As wood is an alternative (with some kind of original paint), I hope…
  • shabaz
    shabaz over 4 years ago +3
    That looks so cool, and nice cabling too! RJ45's are underrated.. very useful low-cost connector!
  • balearicdynamics
    balearicdynamics over 4 years ago in reply to phoenixcomm

    phoenixcomm Thank you Cris, now I understand. For me, jack is different so it was unclear. I thought using something similar but I had no time to find them and buy a bunch. Using multiple boards sure this is the better solution.


    BTW, below is what I think as "Jack": https://en.wikipedia.org/wiki/Phone_connector_(audio)


    One of my big difficulties, especially when designing the schematics, is to find the right name of the components like the kind of connectors in English, so when I should be sure to find the right ones, at least for the first time I should go to the shop and buy directly to see them visually.


    Enrico

    • Cancel
    • Vote Up 0 Vote Down
    • Sign in to reply
    • More
    • Cancel
  • phoenixcomm
    phoenixcomm over 4 years ago in reply to balearicdynamics

    <balearicdynamicsimage


    just an edge connector the vector pcb was 22/44 or 22pins side for a total of 44 pins

    ~~Cris

    • Cancel
    • Vote Up +1 Vote Down
    • Sign in to reply
    • More
    • Cancel
  • balearicdynamics
    balearicdynamics over 4 years ago in reply to jw0752

    Old hands but fresh mind! We are maker, find a way to make the batch in a more helpful and faster way. I am sure you can.


    Enrico

    • Cancel
    • Vote Up +1 Vote Down
    • Sign in to reply
    • More
    • Cancel
  • jw0752
    jw0752 over 4 years ago in reply to balearicdynamics

    Hi Enrico,


    Neil Sherman at Tag-Connect in San Francisco is marketing them for me.


    https://www.tag-connect.com/product/non-slip-probe-tips


    Now the problem is manufacturing them with my old hands. Every time I make a batch I say it is my last batch.


    John

    • Cancel
    • Vote Up +2 Vote Down
    • Sign in to reply
    • More
    • Cancel
  • balearicdynamics
    balearicdynamics over 4 years ago in reply to jw0752

    Are really useful! Incredibly smart and useful. You should start selling them (I can help you how to do easy)


    Enrico

    • Cancel
    • Vote Up +2 Vote Down
    • Sign in to reply
    • More
    • Cancel
>
element14 Community

element14 is the first online community specifically for engineers. Connect with your peers and get expert answers to your questions.

  • Members
  • Learn
  • Technologies
  • Challenges & Projects
  • Products
  • Store
  • About Us
  • Feedback & Support
  • FAQs
  • Terms of Use
  • Privacy Policy
  • Legal and Copyright Notices
  • Sitemap
  • Cookies

An Avnet Company © 2025 Premier Farnell Limited. All Rights Reserved.

Premier Farnell Ltd, registered in England and Wales (no 00876412), registered office: Farnell House, Forge Lane, Leeds LS12 2NE.

ICP 备案号 10220084.

Follow element14

  • X
  • Facebook
  • linkedin
  • YouTube