element14 Community
element14 Community
    Register Log In
  • Site
  • Search
  • Log In Register
  • About Us
  • Community Hub
    Community Hub
    • What's New on element14
    • Feedback and Support
    • Benefits of Membership
    • Personal Blogs
    • Members Area
    • Achievement Levels
  • Learn
    Learn
    • Ask an Expert
    • eBooks
    • element14 presents
    • Learning Center
    • Tech Spotlight
    • STEM Academy
    • Webinars, Training and Events
    • Learning Groups
  • Technologies
    Technologies
    • 3D Printing
    • FPGA
    • Industrial Automation
    • Internet of Things
    • Power & Energy
    • Sensors
    • Technology Groups
  • Challenges & Projects
    Challenges & Projects
    • Design Challenges
    • element14 presents Projects
    • Project14
    • Arduino Projects
    • Raspberry Pi Projects
    • Project Groups
  • Products
    Products
    • Arduino
    • Avnet Boards Community
    • Dev Tools
    • Manufacturers
    • Multicomp Pro
    • Product Groups
    • Raspberry Pi
    • RoadTests & Reviews
  • Store
    Store
    • Visit Your Store
    • Choose another store...
      • Europe
      •  Austria (German)
      •  Belgium (Dutch, French)
      •  Bulgaria (Bulgarian)
      •  Czech Republic (Czech)
      •  Denmark (Danish)
      •  Estonia (Estonian)
      •  Finland (Finnish)
      •  France (French)
      •  Germany (German)
      •  Hungary (Hungarian)
      •  Ireland
      •  Israel
      •  Italy (Italian)
      •  Latvia (Latvian)
      •  
      •  Lithuania (Lithuanian)
      •  Netherlands (Dutch)
      •  Norway (Norwegian)
      •  Poland (Polish)
      •  Portugal (Portuguese)
      •  Romania (Romanian)
      •  Russia (Russian)
      •  Slovakia (Slovak)
      •  Slovenia (Slovenian)
      •  Spain (Spanish)
      •  Sweden (Swedish)
      •  Switzerland(German, French)
      •  Turkey (Turkish)
      •  United Kingdom
      • Asia Pacific
      •  Australia
      •  China
      •  Hong Kong
      •  India
      •  Korea (Korean)
      •  Malaysia
      •  New Zealand
      •  Philippines
      •  Singapore
      •  Taiwan
      •  Thailand (Thai)
      • Americas
      •  Brazil (Portuguese)
      •  Canada
      •  Mexico (Spanish)
      •  United States
      Can't find the country/region you're looking for? Visit our export site or find a local distributor.
  • Translate
  • Profile
  • Settings
Open Arduino
  • Challenges & Projects
  • Project14
  • Open Arduino
  • More
  • Cancel
Open Arduino
Blog Arduino in Test Instrumentation - Part 3b: LabVIEW Driver Switch Control Block
  • Blog
  • Forum
  • Documents
  • Events
  • Polls
  • Files
  • Members
  • Mentions
  • Sub-Groups
  • Tags
  • More
  • Cancel
  • New
Join Open Arduino to participate - click to join for free!
  • Share
  • More
  • Cancel
Group Actions
  • Group RSS
  • More
  • Cancel
Engagement
  • Author Author: Jan Cumps
  • Date Created: 12 Apr 2018 8:06 PM Date Created
  • Views 1792 views
  • Likes 4 likes
  • Comments 0 comments
  • diytestequipch
  • openarduinoch
  • labview
  • project 14
  • scpi
  • arduino_test_instrumentation
Related
Recommended

Arduino in Test Instrumentation - Part 3b: LabVIEW Driver Switch Control Block

Jan Cumps
Jan Cumps
12 Apr 2018
image

Open Arduino

Enter Your Project for a chance to win a grand prize for the most innovative use of Arduino or a $200 shopping cart! The Birthday Special: Arduino Projects for Arduino Day!

Back to The Project14 homepage image

Project14 Home
Monthly Themes
Monthly Theme Poll


Arduino in Test Instrumentation


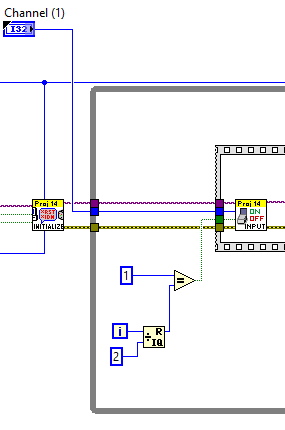
To celebrate Project 14's birthday, I'm going to make a programmable switch with an Arduino UNO.

This post describes the second block for the LabVIEW driver: Switch Control

image

In the previous post I reviewed the Initialization block. This post is about the key block of the library. We control relays via LabVIEW.


Switch Control

image

This is the key block in the library. it controls the relays.

You'll use this to turn the relays on and off.

image

Additional to the standard VISA and Error in/outs, this block accepts two parameters:

  • Channel (1|2): the relay that will be controlled by this block
  • Enable (true|false): switch the relay on or off

These parameters speak for themselves.

Let's look at the flow:


image


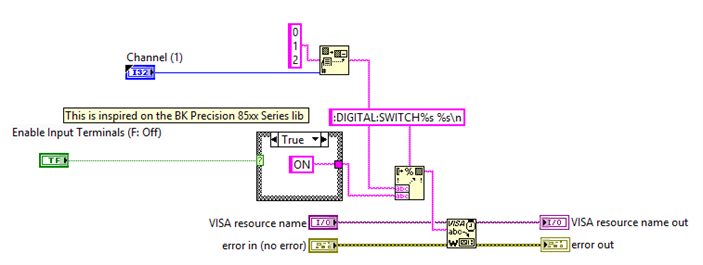
The flow takes the input parameters Channel and Enable. It then creates a SCPI command that's sent to the Arduino.

There's one case block in this flow, that defines the parameter for ON or OFF:

image

image

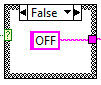
The result is a SCPI string like

:DIGITAL:SWITCH1: ON


Here's an example on how to use this block:


image


Related Blog
Arduino in Test Instrumentation - Intro: SCPI Programmable Switch
Arduino in Test Instrumentation - Part 1: SCPI Lib
Arduino in Test Instrumentation - Part 2: Firmware
Arduino in Test Instrumentation - Part 3a: LabVIEW Driver Intitialisation Block
Arduino in Test Instrumentation - Part 3b: LabVIEW Driver Switch Control Block
Arduino in Test Instrumentation - Part 3c: LabVIEW Driver Read Status Block
Arduino in Test Instrumentation - Outro: LabVIEW Example
  • Sign in to reply
element14 Community

element14 is the first online community specifically for engineers. Connect with your peers and get expert answers to your questions.

  • Members
  • Learn
  • Technologies
  • Challenges & Projects
  • Products
  • Store
  • About Us
  • Feedback & Support
  • FAQs
  • Terms of Use
  • Privacy Policy
  • Legal and Copyright Notices
  • Sitemap
  • Cookies

An Avnet Company © 2025 Premier Farnell Limited. All Rights Reserved.

Premier Farnell Ltd, registered in England and Wales (no 00876412), registered office: Farnell House, Forge Lane, Leeds LS12 2NE.

ICP 备案号 10220084.

Follow element14

  • X
  • Facebook
  • linkedin
  • YouTube