


We finished our device to monitor the opening of windows. Our device allows to monitor up to 4 windows simultaneously. From its 4-digit 7-segment display, it allows you to monitor the reference markers of each of the four windows. And periodically the status of the four windows is published in the Ubidots cloud, allowing remote monitoring from the Venttracker dashboard.
Cloud connected window opening monitor
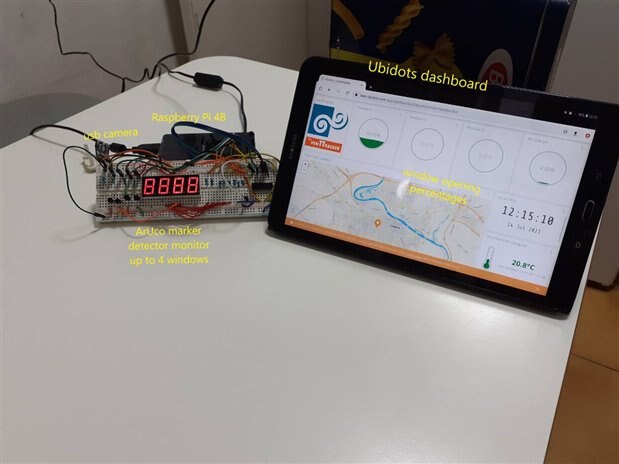
Four windows fully detected. Two closed (0% opening) and two open (30% and 4%)
How to build the 4x7 display, BOM and schematic: Window Opening Monitor with ArUco - Multi-window driver 4x7 segment display
Video demo
Connecting the device to the cloud
Ubidots
We'll be using Ubidots services with Ubidots free plan for STEM. This plan has some limits
- First 3 devices free
- Variables: Up to 10 variables per device.
- Data Ingestion: 4,000 dots per day across all of your devices.
- Data Extraction: 500,000 dots per day across all of your account
- Data Rate: 1 request per second, across all of your devices.
- Data Retention: 1 month.
We are using a 5 second refresh rate for the demos which exceeds the daily free dots cuota.
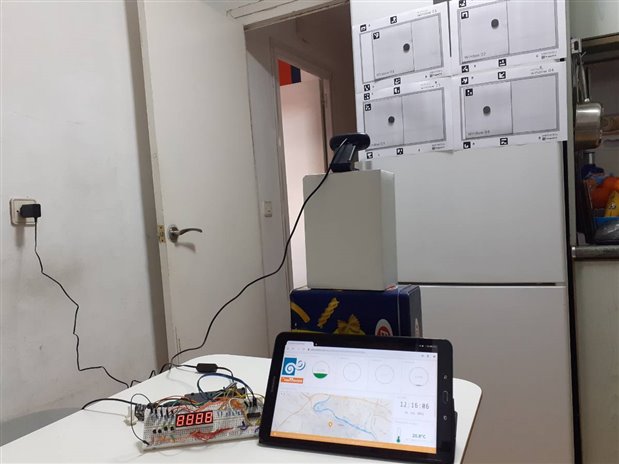
Creating our virtual paper windows for testing
Print and cut:

Window ArUco Markers IDs:
| Window | Top Left | Top Right | Bottom Right | Bottom Left | Window Tracker |
|---|---|---|---|---|---|
| WINDOW 1 | 1 | 2 | 3 | 4 | 0 |
| WINDOW 2 | 11 | 12 | 13 | 14 | 10 |
| WINDOW 3 | 21 | 22 | 23 | 24 | 20 |
| WINDOW 4 | 31 | 32 | 33 | 34 | 30 |
Using the paper window mock-ups to simulate 4 sliding windows
The different window parts are attached to the refrigerator door by magnets.
Raspberry Pi used for stop motion.
Python code
Class Diagram
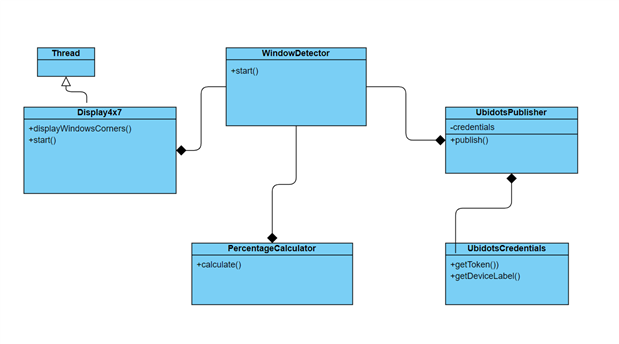
You can inject in the WindowDetectector your own custom Display, Cloud Publisher or Percentage calculator object as needed.
Github repository
https://github.com/javagoza/venttracker/tree/main/wom/python
Ubidots Publisher Python Class code
Python class for publishing the data to the cloud:
Usage:
cloudPublisher = UbidotsPublisher()
cloudPublisher.publish(35, 48, 0, 23)
or with your own credentials
cloudPublisher = UbidotsPublisher(myCredentials)
#!/usr/bin/env python
# -*- coding: utf-8 -*-
"""wom_ubidots_publisher.py: Sends location and Windows state to Ubidots Cloud
"""
__author__ = "Enrique Albertos"

# Venttracker WOM Windows Opening Monitor creation on Ubidots
import time
import requests
import json
import random

class UbidotsCredentials() :
    TOKEN = "BBFF-UjO2Hr5GCz8mx2WA9M1g0WAwUNU73N"  # Put your TOKEN here
    DEVICE_LABEL = "Venttracker_WOM01"  # Put your device label here

    def __init__(self, token = TOKEN, deviceLabel = DEVICE_LABEL):
        self.__token = token
        self.__deviceLabel = deviceLabel

    def getToken(self) :
        return self.__token

    def getDeviceLabel(self) :
        return self.__deviceLabel

class UbidotsPublisher() :

    __WINDOWS_NUMBER_LABEL = "windows_no"  # Number of windows detected
    __UBIDOTS_URL = "http://industrial.api.ubidots.com"
    __UBIDOTS_SERVICE_ADDRESS = "{}/api/v1.6/devices/{}"
    __GEOLOCATE_URL = 'https://extreme-ip-lookup.com/json/'
    __HTTP_400_BAD_REQUEST = 400
    __POSITION_LABEL = "position"  # Number of windows detected
    __WOM_SERIAL_LABEL = "serial_id"
    __W01_OPENING_PCT_LABEL = "w01_opening_pct"  # % opening window 1
    __W02_OPENING_PCT_LABEL = "w02_opening_pct" # % opening window 2
    __W03_OPENING_PCT_LABEL = "w03_opening_pct"  # % opening window 3
    __W04_OPENING_PCT_LABEL = "w04_opening_pct"  # % opening window 4
    __W05_OPENING_PCT_LABEL = "w05_opening_pct"  # % opening window 5
    __INFO_ATTEMPING_TO_SEND_DATA = "[INFO] Attemping to send data."
    __INFO_FINISHED = "[INFO] finished."
    __INFO_PAYLOAD = "[INFO] {}."
    __INFO_REQUEST_UPDATED = "[INFO] request made properly, your device is updated."
    __ERROR_FIVE_ATTEMPTS = "[ERROR] Could not send data after 5 attempts, please check your token credentials and internet connection."
    __REQUEST_ATTEMPTS = 5
    __WINDOWS_NUMBER = 4
    __WINDOWS_LABELS = [__W01_OPENING_PCT_LABEL, __W02_OPENING_PCT_LABEL, \
                      __W03_OPENING_PCT_LABEL, __W04_OPENING_PCT_LABEL]

    def __init__(self, credentials = UbidotsCredentials(), debug = False):
        self.__credentials = credentials
        self.__location = self.__geolocate()
        self.__serial = self.__get_serial()
        self.__debug = debug # True activate debug print


    # get latitude and longitude from IP
    def __geolocate(self) :
        url = UbidotsPublisher.__GEOLOCATE_URL
        r = requests.get(url)
        data = json.loads(r.content.decode())
        return {'lat' : data['lat'],'lng': data['lon']}

    # get raspberry pi seriial as unique identifier
    def __get_serial(self):
        # Extract serial from cpuinfo file
        cpuserial = "0000000000000000"
        try:
            f = open('/proc/cpuinfo','r')
            for line in f:
                if line[0:6]=='Serial':
                    cpuserial = line[10:26]
            f.close()
        except:
            cpuserial = "ERROR000000000"
        return cpuserial

    # build payload dictionary
    def __build_payload(self, windowData, location, serial):

        payload = {UbidotsPublisher.__POSITION_LABEL:
             {"value": "1",
              "context": {"lat": location['lat'],
                          "lng": location['lng'],
                          UbidotsPublisher.__WOM_SERIAL_LABEL : serial }},
              UbidotsPublisher.__WINDOWS_NUMBER_LABEL: UbidotsPublisher.__WINDOWS_NUMBER}

        for i in range(0, UbidotsPublisher.__WINDOWS_NUMBER):
            payload.update({self.__WINDOWS_LABELS[i]: windowData[i]})

        payload.update(
            {UbidotsPublisher.__POSITION_LABEL:
             {"value": "1",
              "context": {"lat": location['lat'],
                          "lng": location['lng'],
                          UbidotsPublisher.__WOM_SERIAL_LABEL : serial }}})

        if self.__debug:
            print(UbidotsPublisher.__INFO_PAYLOAD.format(payload))

        return payload

    # post request to Ubidots
    def __post_request(self, payload):
        # Creates the headers for the HTTP requests
        url = UbidotsPublisher.__UBIDOTS_URL
        url = UbidotsPublisher.__UBIDOTS_SERVICE_ADDRESS.format(url, self.__credentials.getDeviceLabel())
        headers = {"X-Auth-Token": self.__credentials.getToken(), "Content-Type": "application/json"}

        # Makes the HTTP requests
        status = UbidotsPublisher.__HTTP_400_BAD_REQUEST
        attempts = 0
        while status >= UbidotsPublisher.__HTTP_400_BAD_REQUEST and attempts <= UbidotsPublisher.__REQUEST_ATTEMPTS:
            req = requests.post(url=url, headers=headers, json=payload)
            status = req.status_code
            attempts += 1
            time.sleep(1)

        # Processes results
        if self.__debug :
            print(req.status_code, req.json())
        if status >= UbidotsPublisher.__HTTP_400_BAD_REQUEST:
            if self.__debug :
                print(UbidotsPublisher.__ERROR_FIVE_ATTEMPTS)
            return False

        if self.__debug :
            print(UbidotsPublisher.__INFO_REQUEST_UPDATED)
        return True

    def publish(self, windowData) :
        payload = self.__build_payload(windowData, self.__location, self.__serial)

        if self.__debug :
            print(UbidotsPublisher.__INFO_ATTEMPING_TO_SEND_DATA)
        self.__post_request(payload)
        if self.__debug :
            print(UbidotsPublisher.__INFO_FINISHED)
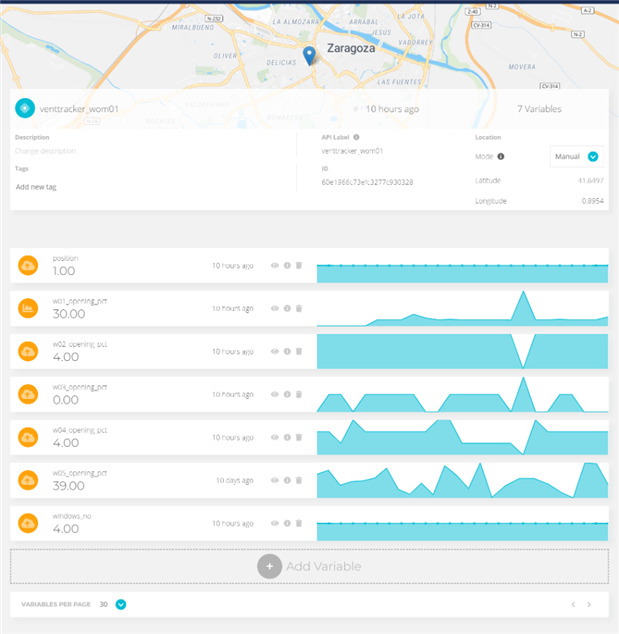
Payload with geolocation and windows state
{
'position': {
'value': '1',
'context': {
'lat': '40.41902',
'lng': '-2.92256',
'serial_id': '10000000055eba52'
}
},
'windows_no': 4,
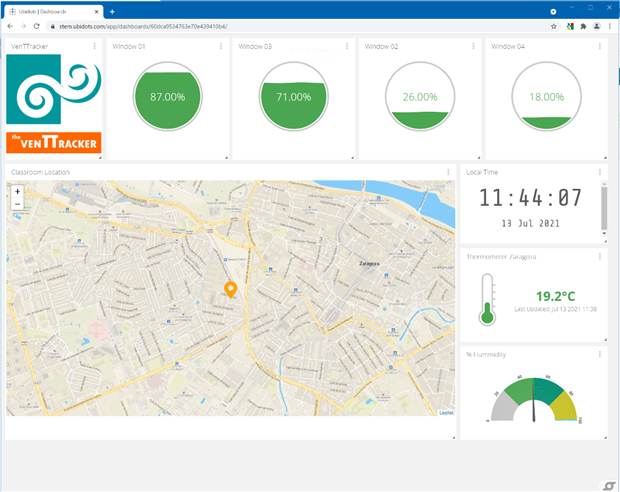
'w01_opening_pct': 87,
'w02_opening_pct': 26,
'w03_opening_pct': 71,
'w04_opening_pct': 18
}
Ubidots Response. Request made properly and device updated
200
 {
    'position': [{
            'status_code': 201
        }
    ],
    'w01_opening_pct': [{
            'status_code': 201
        }
    ],
    'w02_opening_pct': [{
            'status_code': 201
        }
    ],
    'w03_opening_pct': [{
            'status_code': 201
        }
    ],
    'w04_opening_pct': [{
            'status_code': 201
        }
    ],
    'windows_no': [{
            'status_code': 201
        }
    ]
}
Window Opening Percentage Calculator Class Python Code
This class computes the opening percentage of a window given the reference markers and ids and the window tracker marker.
Usage:
calculator = PercentageCalculator()
percentage = calculator.calculate( arrayOfMarkers) # top left, top right, bottom right, bottom left, window tracker
The percentage calculator takes the reference markers of the window in coordinates as gabbed from the original image, creates a transformation matrix to correct perspective and then calculates the position of the tracker marker in percentage.
#!/usr/bin/env python
# -*- coding: utf-8 -*-
"""wom_percentage_calculator.py:
    calculates the opening percentage after computing a perspective transformation
"""
__author__ = "Enrique Albertos"

import cv2
import numpy as np

class PercentageCalculator:

    def __orderPoints(self, pts):
        # initialzie a list of coordinates that will be ordered
        # such that the first entry in the list is the top-left,
        # the second entry is the top-right, the third is the
        # bottom-right, and the fourth is the bottom-left
        rect = np.zeros((4, 2), dtype = "float32")
        # the top-left point will have the smallest sum, whereas
        # the bottom-right point will have the largest sum
        s = pts.sum(axis = 1)
        rect[0] = pts[np.argmin(s)]
        rect[2] = pts[np.argmax(s)]
        # now, compute the difference between the points, the
        # top-right point will have the smallest difference,
        # whereas the bottom-left will have the largest difference
        diff = np.diff(pts, axis = 1)
        rect[1] = pts[np.argmin(diff)]
        rect[3] = pts[np.argmax(diff)]
        # return the ordered coordinates
        return rect

    def __getOpeningPercentage(self, trackerPoint, pts):
        try:
            # obtain a consistent order of the points and unpack them
            # individually
            rect = self.__orderPoints(pts)
            (tl, tr, br, bl) = rect
            # compute the width of the new image, which will be the
            # maximum distance between bottom-right and bottom-left
            # x-coordiates or the top-right and top-left x-coordinates
            widthA = np.sqrt(((br[0] - bl[0]) ** 2) + ((br[1] - bl[1]) ** 2))
            widthB = np.sqrt(((tr[0] - tl[0]) ** 2) + ((tr[1] - tl[1]) ** 2))
            maxWidth = max(int(widthA), int(widthB))
            if int(maxWidth) == 0 :
                return 0
            # compute the height of the new image, which will be the
            # maximum distance between the top-right and bottom-right
            # y-coordinates or the top-left and bottom-left y-coordinates
            heightA = np.sqrt(((tr[0] - br[0]) ** 2) + ((tr[1] - br[1]) ** 2))
            heightB = np.sqrt(((tl[0] - bl[0]) ** 2) + ((tl[1] - bl[1]) ** 2))
            maxHeight = max(int(heightA), int(heightB))
            # the set of destination points to obtain a "birds eye view",
            dst = np.array([[0, 0], [maxWidth - 1, 0],
                [maxWidth - 1, maxHeight - 1], [0, maxHeight - 1]], dtype = "float32")
            # compute the perspective transform matrix
            M = cv2.getPerspectiveTransform(rect, dst)
            # transform the tracker point
            trackerTransform = np.matmul(M, np.array([[trackerPoint[0]],[trackerPoint[1]], [1]]))
            return int((trackerTransform[0] / trackerTransform[2]) / maxWidth * 100)
        except :
            return 0


    def calculate(self, mcorners) :
        # calculates the opening percentage given an ordered list of corners and a tracker
        # top left, top right, bottom right, bottom left, window tracker
        return self.__getOpeningPercentage(
            mcorners[4][0], # tracker point
            np.array([
                mcorners[0][0], # ref. rec top left corner,
                mcorners[1][1], # ref. rec top right corner
                mcorners[2][2], # ref. rec bottom right corner
                mcorners[3][3]  # ref. rec bottom left corner
                ]))
Display4x7 Class Python Code
This class drives a 4x7 segment display using an SN74HC595 shift register clocked by spi clock and 4 digital lines to switch digits. Works in its own thread
See: Window Opening Monitor with ArUco - Multi-window driver 4x7 segment display
Usage:
display = Display4x7()
display.start()
display.displayWindowCorners([[True, True, True, True, True], [False, False, False, False, False], [False, False, False, False, False], [False, False, False, False, False]])
#!/usr/bin/env python
# -*- coding: utf-8 -*-
"""wom_display_4x7_spi.py: 4 digits x7  segment display
   drives a 4x7 segment display using an SN74HC595 shift register clocked by spi clock
   and 4 digital lines to switch digits. Works in its own thread
"""
__author__ = "Enrique Albertos"
__license__ = "GPL"

import RPi.GPIO as GPIO
import sys
import time
import threading
from threading import Thread
import spidev
import atexit

class Display4x7(threading.Thread):

    # PIN definitions GPIO.BCM
    # Connect to 74HC595 8-bit serial-in, parallel-out shift
    __bus  = 0  # MOSI GPIO 10 (PIN 21) - 74HC595 pin 14 DS
              # SCLK GPIO 11 - 74HC595 pin 11 SHCP
    __device = 0
    __spiSpeedDefault = 3900000
    __latchPinDefault = 25 # GPIO 8 (CEO) 74HC595 pin 12 STCP


    # HS42056 1K-32 digit selection
    __digit0PinDefault   = 14 # 7-Segment pin D4
    __digit1PinDefault   = 15 # 7-Segment pin D3
    __digit2PinDefault   = 18 # 7-Segment pin D2
    __digit3PinDefault   = 23 # 7-Segment pin D1

    MARKERS = ( 0x03,  # Top Left
                0x05,  # Top Right
                0x50,  # Bottom Right
                0x18,  # Bottom Left
                0x80,  # Center
                0x00   # blank
                )

    HEX_DIGITS = (0x5F, # = 0
                 0x44,  # = 1
                 0x9D,  # = 2
                 0xD5,  # = 3
                 0xC6,  # = 4
                 0xD3,  # = 5
                 0xDB,  # = 6
                 0x45,  # = 7
                 0xDF,  # = 8
                 0xC7,  # = 9
                 0xCF,  # = A
                 0xDA,  # = b
                 0x1B,  # = C
                 0xDC,  # = d
                 0x9B,  # = E
                 0x8B,  # = F
                 0x00   # blank
                 )

    def __init__(self, initialContent = (0,0,0,0), bus=0, device=0, digit0 = __digit0PinDefault, digit1 = __digit1PinDefault, digit2 = __digit2PinDefault, digit3 = __digit3PinDefault,  latchPin = __latchPinDefault, speedHz = __spiSpeedDefault):
        self.__displayContent = initialContent
        self.__latchPin = latchPin
        self.__digit3 = digit3
        self.__digit2 = digit2
        self.__digit1 = digit1
        self.__digit0 = digit0
        self.__shifRegisterPins = (latchPin)
        self.__controlDigitsPins = ( digit3, digit2, digit1, digit0 )
        self.__lock = threading.Lock()
        self.__bus = bus
        self.__device = device
        self.__speedHz = speedHz
        atexit.register(self.cleanup)
        self.__setup()
        threading.Thread.__init__(self)

    def __initPinsAsOutputs(self, pins) :
        for pin in pins:
            GPIO.setup(pin, GPIO.OUT, initial = GPIO.LOW)

    def __lowPins(self, pins) :
        for pin in pins:
            GPIO.output(pin, GPIO.LOW)

    def __setup(self):
        GPIO.setwarnings(False)
        GPIO.setmode(GPIO.BCM)
        # init display control digits pins
        self.__initPinsAsOutputs(self.__controlDigitsPins)
        # init serial *** register pins
        GPIO.setup(self.__latchPin, GPIO.OUT, initial = GPIO.LOW)

        self.__spiDisplay= spidev.SpiDev()
        self.__spiDisplay.open(self.__bus,self.__device)
        self.__spiDisplay.max_speed_hz = self.__speedHz
        self.__spiDisplay.mode = 0
        self.__spiDisplay.bits_per_word = 8
        self.__spiDisplay.no_cs = True

    def __shiftout(self, byte):
        GPIO.output(self.__latchPin, 1)
        time.sleep(0.00000005)
        GPIO.output(self.__latchPin, 0)
        self.__spiDisplay.xfer([byte])
        GPIO.output(self.__latchPin, 1)
        time.sleep(0.00000005)
        GPIO.output(self.__latchPin, 0)

    def run(self):
        # overrides thread run
        while True:
            i=0
            for pin in self.__controlDigitsPins:
                self.__lowPins(self.__controlDigitsPins)
                with self.__lock:
                    self.__shiftout(self.__displayContent[i])
                GPIO.output(pin, GPIO.HIGH)
                time.sleep(0.00000001)
                i=i+1

    def display(self, displayContent = (0,0,0,0)) :
        with self.__lock:
            self.__displayContent = displayContent

    def displayInt(self, number = 0) :
        self.display((self.HEX_DIGITS[(number // 1000)%10], self.HEX_DIGITS[(number // 100)%10],self.HEX_DIGITS[(number // 10)%10],self.HEX_DIGITS[number %10]))

    def displayWindowCorners(self, iterable) :
        content = [0,0,0,0]
        digit=0
        for element in iterable:
            for i in range(5) :
                if element[i]:
                    content[digit] |= Display4x7.MARKERS[i]
            digit = digit + 1
        self.display(content)

    def __enter__(self) :
        return self

    def __exit__(self, exc_type, exc_value, traceback) :
        self.cleanUp()


    def cleanup() :
        self.__dislay.closeSPI(self.spiDevice)
        GPIO.cleanup()
WindowDetector Class. Python Code
Window detector. Detects up to 4 windows marked with 5 ArUco markers each
Results are sent to a 4x7 Led Display and published to Ubidots Cloud
Usage:
windowDetector = WindowDetector()
windowDetector.start()
Video images are captured in its own thread.
Last viewed marker positons are buffered.
Condition of marker detected uses a low pass filter using a deque that stores the 40 last states and compute as an or over the last 40 values.
This prevents the positions of the markers from being lost when one of the markers is momentarily covered over.
#!/usr/bin/env python
# -*- coding: utf-8 -*-
"""wom_window_detector.py: Window detector. Detects up to 4 windows
   marked with 5 ArUco markers each
   Results are sent to a 4x7 Led Display
"""
__author__ = "Enrique Albertos"
__license__ = "GPL"

from imutils.video import VideoStream
import imutils
import time
import cv2
import numpy as np
from collections import deque
from _functools import reduce
from wom_display_4x7_spi  import Display4x7
import atexit

class WindowDetector() :
    __WINDOW1_MARKERS = ( 1,  2,  3,  4,  0)
    __WINDOW2_MARKERS = (11, 12, 13, 14, 10)
    __WINDOW3_MARKERS = (21, 22, 23, 24, 20)
    __WINDOW4_MARKERS = (31, 32, 33, 34, 30)
    __WINDOW_MARKERS = (__WINDOW1_MARKERS, __WINDOW2_MARKERS, __WINDOW3_MARKERS, __WINDOW4_MARKERS)
    __NO_MARKER_DETECTED = (False,False,False,False,False)
    __NO_WINDOW_DETECTED = (__NO_MARKER_DETECTED,__NO_MARKER_DETECTED,__NO_MARKER_DETECTED,__NO_MARKER_DETECTED)
    __BUFFER_LENGTH = 40
    __FRAME_RATE = 4
    __IMAGE_SIZE = 1200

    def __init__(self, display = Display4x7()):
        self.display = display
        atexit.register(self.cleanup)

    def __movingDetector (self, iterable):
        # iterates the buffer deque and ors the lists of booleans
        return (reduce(lambda x, y: np.bitwise_or(list(x),list(y)), iterable)).tolist()

    def __markersInWindow(self, windowMarkers, ids) :
        # creates a tuple of booleans correspondig to the detection of the window markers
        # top left corner, top right corner, bottom right corner, left right corner, moving part
        list = []
        for element in windowMarkers :
            list.append(element in ids)
        return tuple(list)

    def __markersIn(self, windowMarkers, ids) :
        # creates a tuple of tuples for the different markers found in window
        list = []
        for window in windowMarkers :
            list.append(self.__markersInWindow(window, ids))
        return tuple(list)

    def start(self):
        # starts the detector, grab images and display markers found
        detectorBuffer = deque((), maxlen= WindowDetector.__BUFFER_LENGTH)
        detectorBuffer.append(WindowDetector.__NO_WINDOW_DETECTED)

        self.display.start()
        arucoDict = cv2.aruco.Dictionary_get(cv2.aruco.DICT_4X4_50)
        arucoParams = cv2.aruco.DetectorParameters_create()

        vs = VideoStream(src=0, framerate=WindowDetector.__FRAME_RATE).start()
        # loop over the frames from the video stream
        while True:
            # grab the frame from the threaded video stream and resize it
            frame = vs.read()
            frame = imutils.resize(frame, width=WindowDetector.__IMAGE_SIZE)
            # detect ArUco markers in the input frame
            (mcorners, ids, rejected) = cv2.aruco.detectMarkers(frame, arucoDict, parameters=arucoParams)
            # verify *at least* one ArUco marker was detected
            if len(mcorners) > 0:
                flatid = ids.flatten();
                if len(detectorBuffer) >= WindowDetector.__BUFFER_LENGTH:
                   detectorBuffer.popleft()
                detectorBuffer.append( self.__markersIn(self.__WINDOW_MARKERS, flatid))
            else:
                detectorBuffer.append(self.__NO_WINDOW_DETECTED)
            self.display.displayWindowCorners(self.__movingDetector(detectorBuffer))

    def __enter__(self) :
        return self

    def __exit__(self, exc_type, exc_value, traceback) :
        self.cleanUp()


    def cleanup() :
        GPIO.cleanup()
        cv2.destroyAllWindows()
        vs.stop()
Conclusions
We have made a design that allows remote monitoring of non-automated windows in a simple and inexpensive way.
A single device can control multiple windows. Up to 4 additional cameras can be added, which would allow us to control 20 windows with a single device.
Some uses for the device:
- monitor building energy performance
- natural ventilation habits monitor and enforcement
Top Comments